remote start VOLVO S80 2007 User Guide
[x] Cancel search | Manufacturer: VOLVO, Model Year: 2007, Model line: S80, Model: VOLVO S80 2007Pages: 251, PDF Size: 5.7 MB
Page 81 of 251
Overhead courtesy lighting.
The lighting in the front part of the passenger compartment is controlled with the buttons
and in the roof
console.
Switch
has three positions for all passenger compartment lighting:
Off - right side depressed, automatic lighting off.
Neutral position.
On - left side depressed, passenger compartment lighting on.
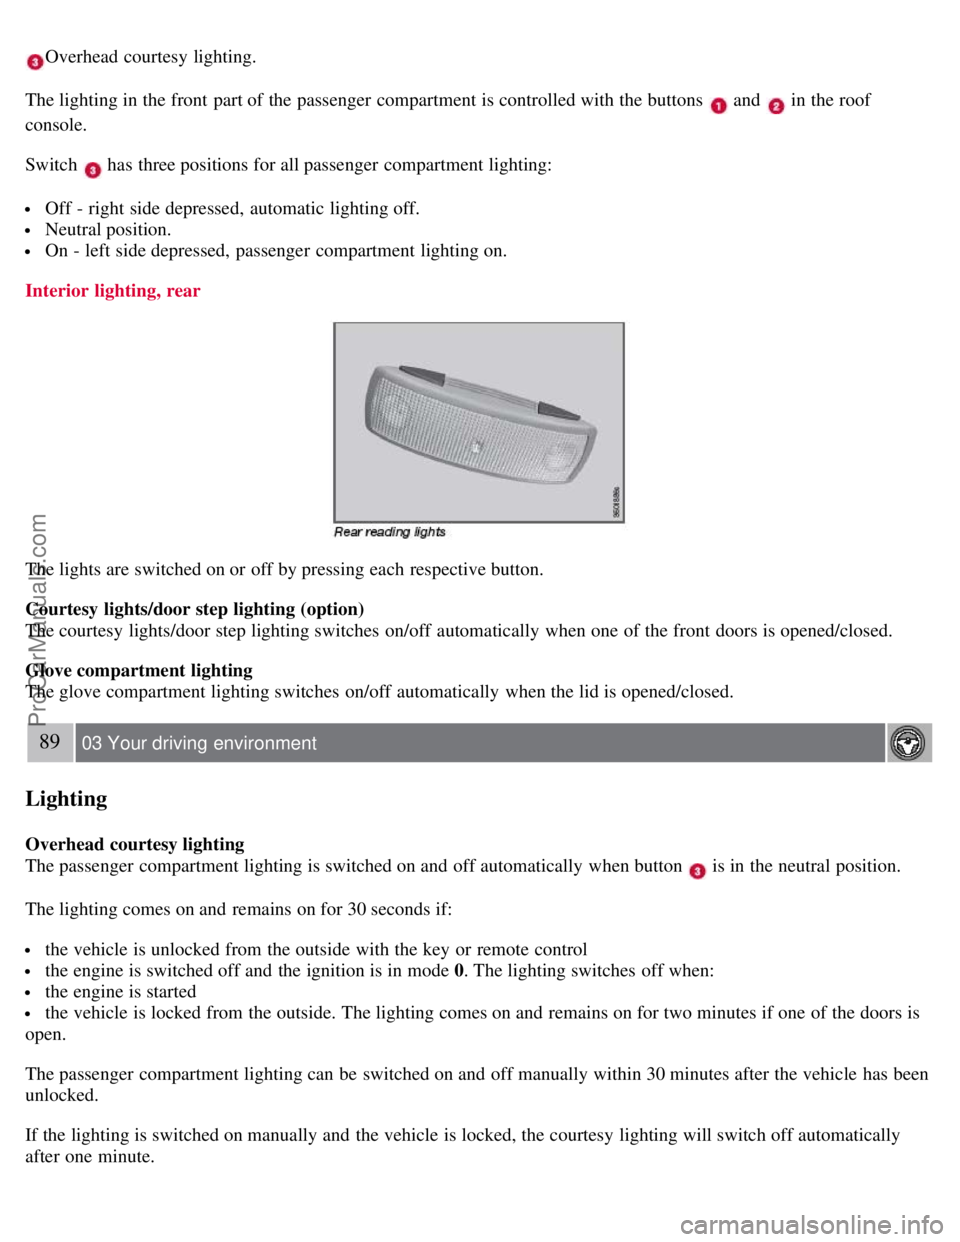
Interior lighting, rear
The lights are switched on or off by pressing each respective button.
Courtesy lights/door step lighting (option)
The courtesy lights/door step lighting switches on/off automatically when one of the front doors is opened/closed.
Glove compartment lighting
The glove compartment lighting switches on/off automatically when the lid is opened/closed.
89 03 Your driving environment
Lighting
Overhead courtesy lighting
The passenger compartment lighting is switched on and off automatically when button
is in the neutral position.
The lighting comes on and remains on for 30 seconds if:
the vehicle is unlocked from the outside with the key or remote control
the engine is switched off and the ignition is in mode 0. The lighting switches off when:
the engine is started
the vehicle is locked from the outside. The lighting comes on and remains on for two minutes if one of the doors is
open.
The passenger compartment lighting can be switched on and off manually within 30 minutes after the vehicle has been
unlocked.
If the lighting is switched on manually and the vehicle is locked, the courtesy lighting will switch off automatically
after one minute.
ProCarManuals.com
Page 88 of 251
Tilting the door mirror when parking (option)
The door mirror can be tilted down for the driver to view the side of the road when parking for example. Engage
reverse gear and press the L or R button. The door mirror resets when reverse gear is disengaged.
Automatic retraction when locking
When the vehicle is locked/unlocked with the remote key the door mirrors are automatically retracted/extended.
The function can be activated/deactivated under Car settings
Retract mirrors when locking. For a description of the
menu system, see page 115
.
Resetting to neutral
Mirrors that have been moved out of position by an external force must be electrically reset to the neutral position for
electric retracting/extending to work.
Retract the mirrors with the L and R buttons.
Fold them out again with the L and R buttons.
The mirrors are now reset in neutral position.
Home safe and approach lighting
The light on the door mirrors comes on when approach lighting or home safe lighting is selected, see page 89
.
95 03 Your driving environment
Mirrors
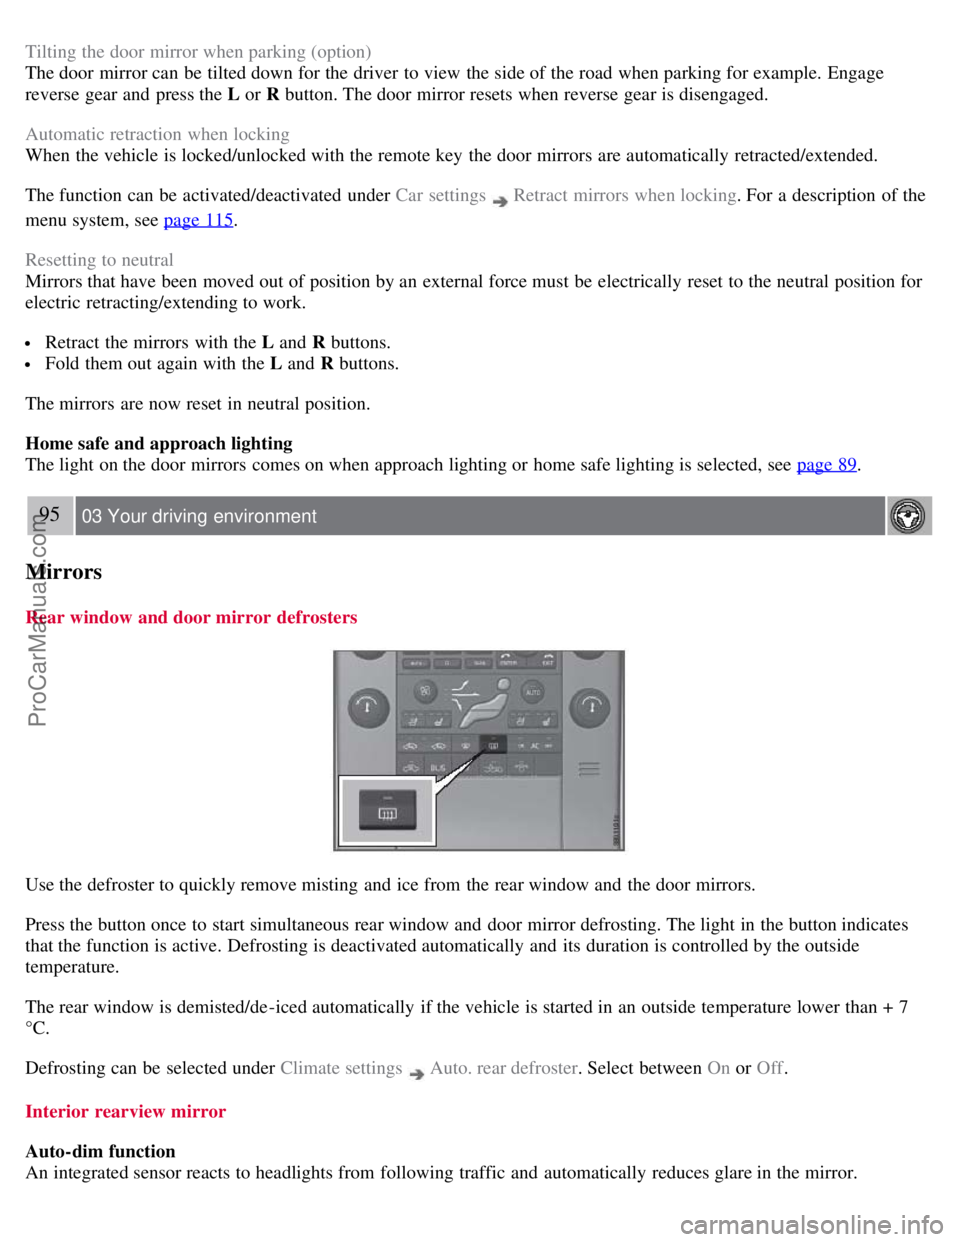
Rear window and door mirror defrosters
Use the defroster to quickly remove misting and ice from the rear window and the door mirrors.
Press the button once to start simultaneous rear window and door mirror defrosting. The light in the button indicates
that the function is active. Defrosting is deactivated automatically and its duration is controlled by the outside
temperature.
The rear window is demisted/de-iced automatically if the vehicle is started in an outside temperature lower than + 7
°C.
Defrosting can be selected under Climate settings
Auto. rear defroster . Select between On or Off.
Interior rearview mirror
Auto-dim function
An integrated sensor reacts to headlights from following traffic and automatically reduces glare in the mirror.
ProCarManuals.com
Page 95 of 251
Starting the engine
Starting the engine
1. Fasten the seat belt.
WARNING
Before starting the engine, check that the seat, steering wheel and mirrors are adjusted properly. Make sure the brake
pedal can be depressed completely. Adjust the seat if necessary.
1. Insert the remote key into the ignition slot. Press the key until it is drawn into the slot
1.
NOTE
The remote key should be inserted into the ignition slot with the key blade end of the remote pointing out. See the
illustration on page 75
.
2. Depress the brake pedal
2.
WARNING
An extra mat on the driver's floor can cause the accelerator and/or brake pedal to catch. Check that the movement of
these pedals is not impeded. Not more than one protective floor covering may be used at one time.
1On vehicles with the optional keyless drive, it is only necessary to have a remote control in the passenger's compartment.
2If the vehicle is moving, it is only necessary to press the start/stop button to start the vehicle.
3. Press and release the start/stop button. The autostart function will operate the starter motor until the engine starts.
The starter motor operates for a maximum of 10 seconds. If the engine has not started, repeat the procedure.
WARNING
Always remove the remote key from the ignition slot when leaving the vehicle, especially if there are children in
the vehicle.
Never remove the remote key from the ignition slot while driving or when the vehicle is being towed. The
steering lock could otherwise be activated, making it impossible to steer the vehicle. Never remove the remote key
with keyless drive function (option) from the vehicle while driving or during towing.
Always place the gear selector in Park and apply the parking brake before leaving the vehicle. Never leave the
vehicle unattended with the engine running.
Always open garage doors fully before starting the engine inside a garage to ensure adequate ventilation. The
exhaust gases contain carbon monoxide, which is invisible and odorless but very poisonous.
NOTE
The idling speed can be noticeably higher than normal during cold starts. This is to enable emission control system
can reach normal operating temperature as quickly as possible, which helps reduce exhaust emissions.
Keylock: Your vehicle is equipped with a keylock system. When the engine is switched off, the gear selector must
be in the Park position before the key can be removed
1 from the ignition slot.
ProCarManuals.com
Page 96 of 251
1Does not apply to vehicles with the optional keyless drive.
103 03 Your driving environment
Starting the engine
CAUTION
When starting in cold weather, the automatic transmission may shift up at slightly higher engine speeds than
normal until the automatic transmission fluid reaches normal operating temperature.
Do not race a cold engine immediately after starting. Oil flow may not reach some lubrication points fast enough
to prevent engine damage.
The engine should be idling when you move the gear selector. Never accelerate until after you feel the
transmission engage. Accelerating immediately after selecting a gear will cause harsh engagement and premature
transmission wear.
Selecting P or N when idling at a standstill for prolonged periods of time will help prevent overheating of the
automatic transmission fluid.
Keyless drive (option)
Follow steps 2-3 for starting the engine.
NOTE
For the vehicle to start, one of the vehicle's remote keys must be in the passenger compartment.
Steering wheel lock
The steering wheel lock is deactivated when the remote key is inserted into the ignition slot
1 and activated when the
remote key is removed from the ignition slot.
Always take the remote key or keyless drive remote when leaving the vehicle to help reduce the risk of theft.
1On vehicles with the optional keyless drive, the steering lock is deactivated when the start button is pressed for the first time (assuming that a
remote control is in the passenger's compartment). It is activated when the ignition is switched off and the driver's door is opened.
104 03 Your driving environment
Starting the engine
Jump starting
ProCarManuals.com
Page 98 of 251
105 03 Your driving environment
Transmission
Automatic transmission
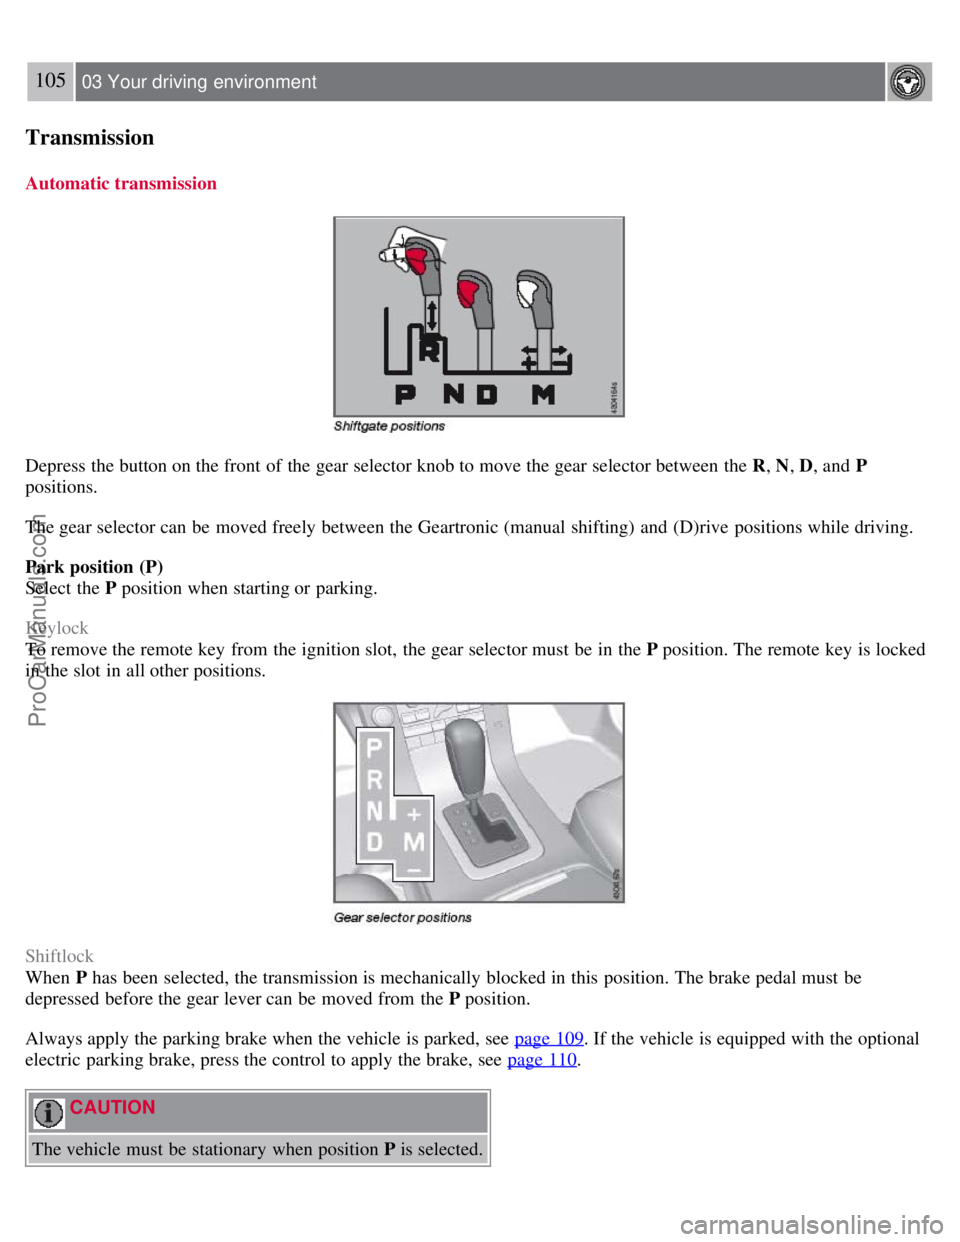
Depress the button on the front of the gear selector knob to move the gear selector between the R, N, D, and P
positions.
The gear selector can be moved freely between the Geartronic (manual shifting) and (D)rive positions while driving.
Park position (P)
Select the P position when starting or parking.
Keylock
To remove the remote key from the ignition slot, the gear selector must be in the P position. The remote key is locked
in the slot in all other positions.
Shiftlock
When P has been selected, the transmission is mechanically blocked in this position. The brake pedal must be
depressed before the gear lever can be moved from the P position.
Always apply the parking brake when the vehicle is parked, see page 109
. If the vehicle is equipped with the optional
electric parking brake, press the control to apply the brake, see page 110
.
CAUTION
The vehicle must be stationary when position P is selected.
ProCarManuals.com
Page 104 of 251
2. Press the control.
3. Release the brake pedal and ensure that the vehicle is at a standstill.
4. When the vehicle is parked, the gear selector must be in position P.
The
symbol in the instrument panel flashes while the parking bake is being applied, and glows steadily when
the parking brake has been fully applied.
NOTE
In an emergency the parking brake can be applied when the vehicle is moving by holding in the control. Braking
will be interrupted when the accelerator pedal is depressed or the control is released.
An audible signal will sound during this procedure if the vehicle is moving at speeds above 6 mph (10 km/h).
Parking on a hill
If the vehicle is pointing uphill, turn the front wheels so that they point away from the curb.
If the vehicle is pointing downhill, turn the front wheels so that they point toward the curb.
Releasing the electric parking brake
Manual release
1. Insert the remote key in the ignition slot.
2. Press firmly on the brake pedal.
3. Pull the parking brake control.
Vehicles with Keyless drive (option)
1. Press the START/STOP button.
2. Press firmly on the brake pedal.
3. Pull the parking brake control.
Automatic release
1. Start the engine.
111 03 Your driving environment
Parking brake
2. Fasten the seat belt.
NOTE
For safety reasons, the parking brake is only released automatically if the engine is running and the driver is
wearing a seat belt.
The electric parking brake will be released immediately when the accelerator pedal is pressed and the gear selector
ProCarManuals.com
Page 180 of 251
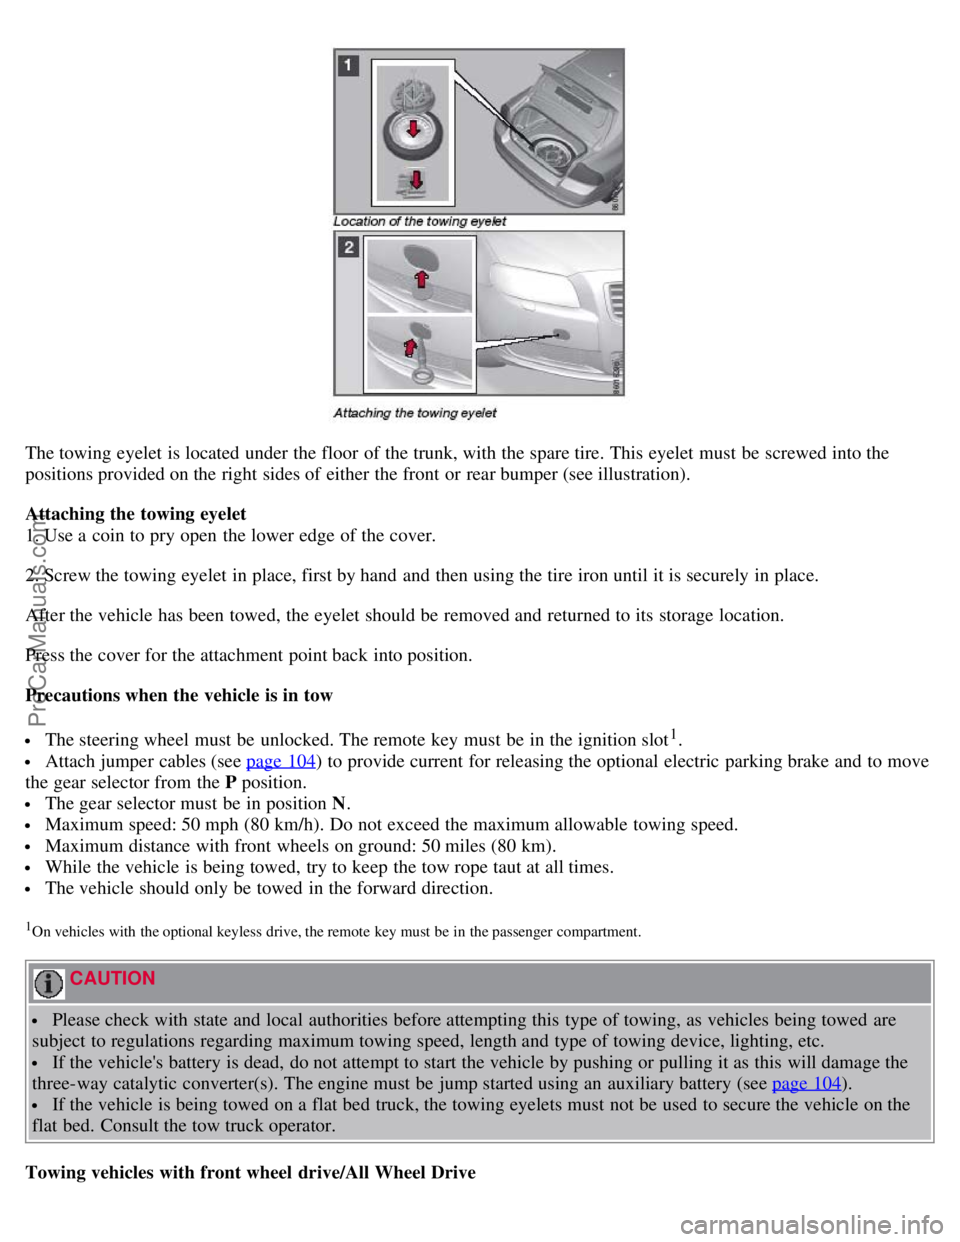
The towing eyelet is located under the floor of the trunk, with the spare tire. This eyelet must be screwed into the
positions provided on the right sides of either the front or rear bumper (see illustration).
Attaching the towing eyelet
1. Use a coin to pry open the lower edge of the cover.
2. Screw the towing eyelet in place, first by hand and then using the tire iron until it is securely in place.
After the vehicle has been towed, the eyelet should be removed and returned to its storage location.
Press the cover for the attachment point back into position.
Precautions when the vehicle is in tow
The steering wheel must be unlocked. The remote key must be in the ignition slot1.
Attach jumper cables (see page 104) to provide current for releasing the optional electric parking brake and to move
the gear selector from the P position.
The gear selector must be in position N .
Maximum speed: 50 mph (80 km/h). Do not exceed the maximum allowable towing speed.
Maximum distance with front wheels on ground: 50 miles (80 km).
While the vehicle is being towed, try to keep the tow rope taut at all times.
The vehicle should only be towed in the forward direction.
1On vehicles with the optional keyless drive, the remote key must be in the passenger compartment.
CAUTION
Please check with state and local authorities before attempting this type of towing, as vehicles being towed are
subject to regulations regarding maximum towing speed, length and type of towing device, lighting, etc.
If the vehicle's battery is dead, do not attempt to start the vehicle by pushing or pulling it as this will damage the
three-way catalytic converter(s). The engine must be jump started using an auxiliary battery (see page 104
).
If the vehicle is being towed on a flat bed truck, the towing eyelets must not be used to secure the vehicle on the
flat bed. Consult the tow truck operator.
Towing vehicles with front wheel drive/All Wheel Drive
ProCarManuals.com
Page 191 of 251
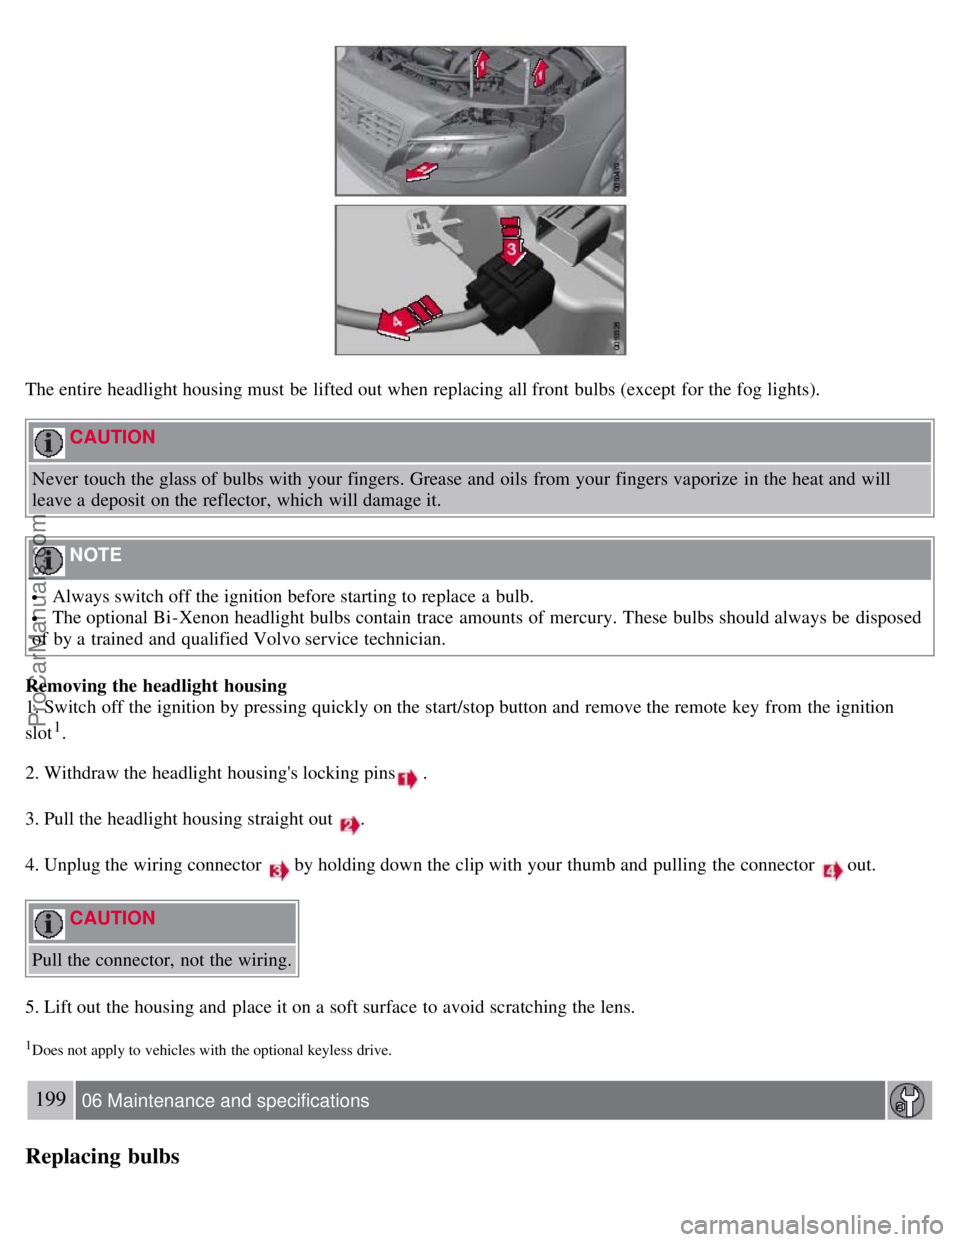
The entire headlight housing must be lifted out when replacing all front bulbs (except for the fog lights).
CAUTION
Never touch the glass of bulbs with your fingers. Grease and oils from your fingers vaporize in the heat and will
leave a deposit on the reflector, which will damage it.
NOTE
Always switch off the ignition before starting to replace a bulb.
The optional Bi -Xenon headlight bulbs contain trace amounts of mercury. These bulbs should always be disposed
of by a trained and qualified Volvo service technician.
Removing the headlight housing
1. Switch off the ignition by pressing quickly on the start/stop button and remove the remote key from the ignition
slot
1.
2. Withdraw the headlight housing's locking pins
.
3. Pull the headlight housing straight out
.
4. Unplug the wiring connector
by holding down the clip with your thumb and pulling the connector out.
CAUTION
Pull the connector, not the wiring.
5. Lift out the housing and place it on a soft surface to avoid scratching the lens.
1Does not apply to vehicles with the optional keyless drive.
199 06 Maintenance and specifications
Replacing bulbs
ProCarManuals.com
Page 192 of 251
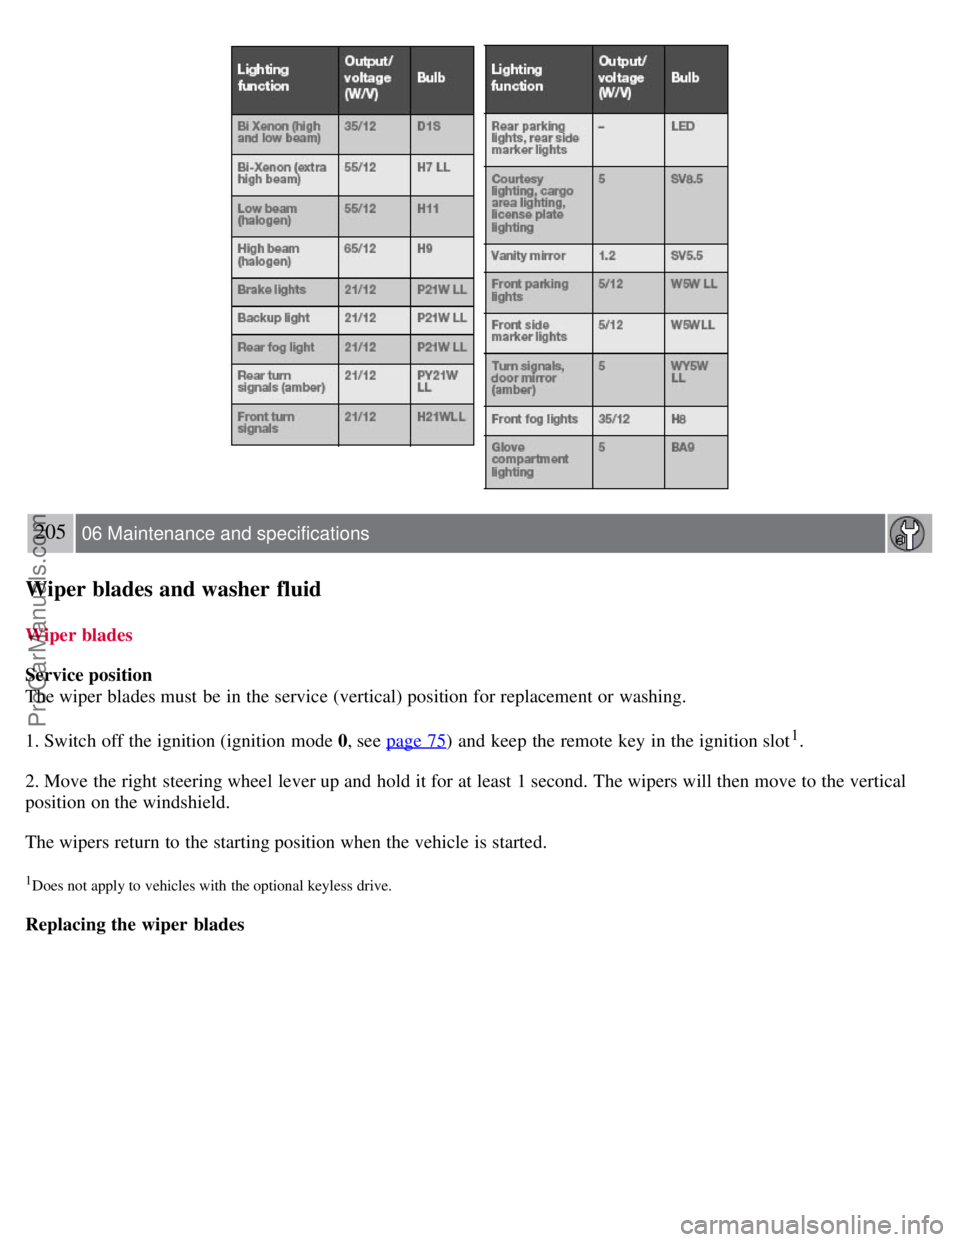
6. Replace the defective bulb(s), see page 204.
Reinserting the headlight housing
1. Plug in the connector until it clicks into place.
2. Reinstall the headlight housing and locking pins. Check that they are correctly inserted. The headlight housing must
be properly inserted and secured in place before the lighting is switched on or the remote key is inserted into the
ignition slot.
3. Check that the lights function properly.
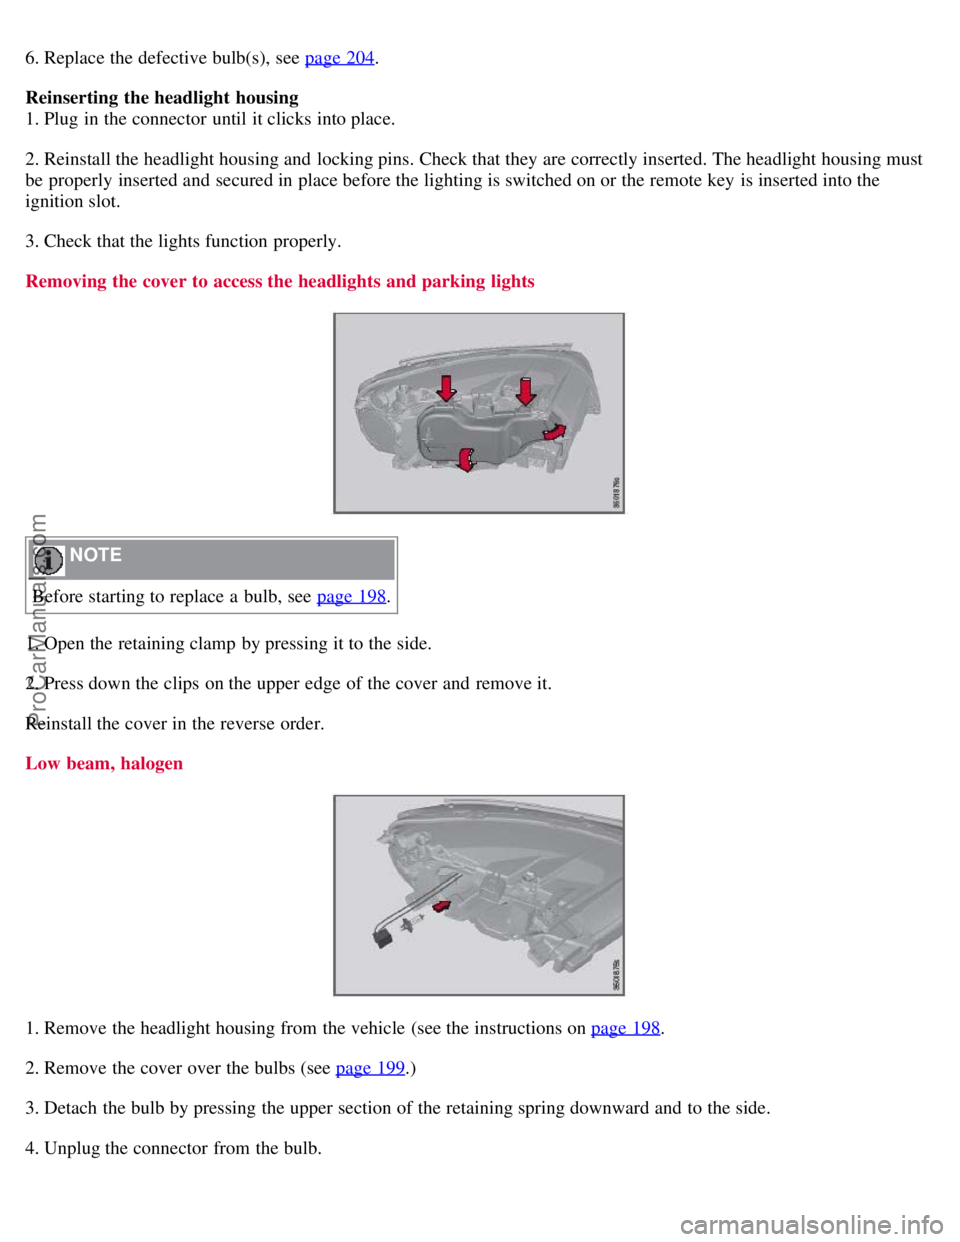
Removing the cover to access the headlights and parking lights
NOTE
Before starting to replace a bulb, see page 198
.
1. Open the retaining clamp by pressing it to the side.
2. Press down the clips on the upper edge of the cover and remove it.
Reinstall the cover in the reverse order.
Low beam, halogen
1. Remove the headlight housing from the vehicle (see the instructions on page 198.
2. Remove the cover over the bulbs (see page 199
.)
3. Detach the bulb by pressing the upper section of the retaining spring downward and to the side.
4. Unplug the connector from the bulb.
ProCarManuals.com
Page 199 of 251
205 06 Maintenance and specifications
Wiper blades and washer fluid
Wiper blades
Service position
The wiper blades must be in the service (vertical) position for replacement or washing.
1. Switch off the ignition (ignition mode 0, see page 75
) and keep the remote key in the ignition slot1.
2. Move the right steering wheel lever up and hold it for at least 1 second. The wipers will then move to the vertical
position on the windshield.
The wipers return to the starting position when the vehicle is started.
1Does not apply to vehicles with the optional keyless drive.
Replacing the wiper blades
ProCarManuals.com