VOLVO S80 2015 Owner´s Manual
Manufacturer: VOLVO, Model Year: 2015, Model line: S80, Model: VOLVO S80 2015Pages: 392, PDF Size: 10.66 MB
Page 341 of 392
09 Maintenance and specifications
Replacing bulbs09
}}
* Option/accessory, for more information, see Introduction.339
Trunk lighting
G021758
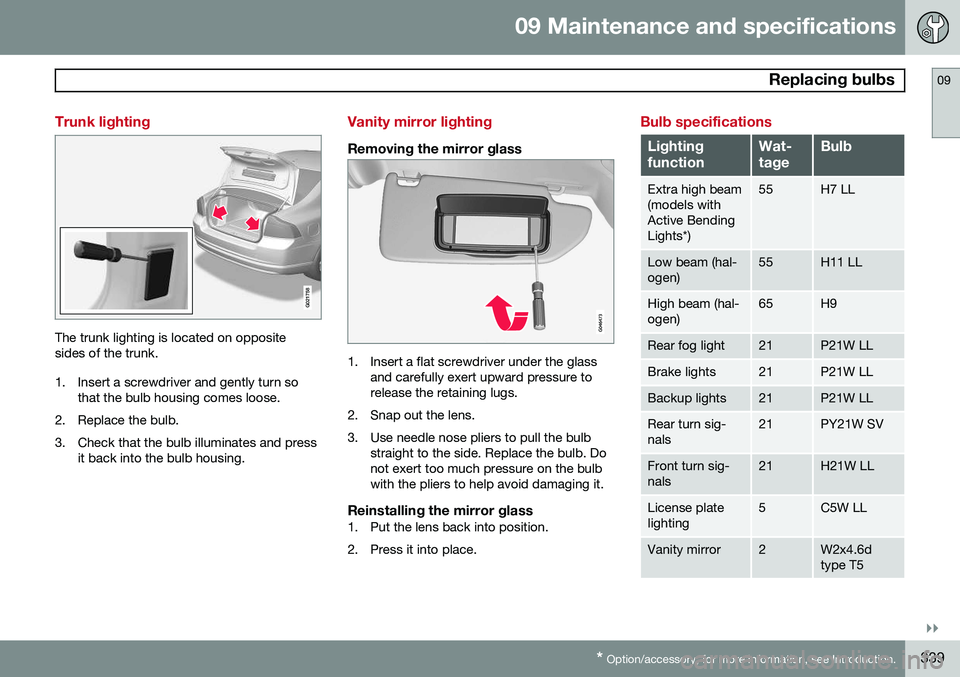
The trunk lighting is located on opposite sides of the trunk.
1. Insert a screwdriver and gently turn so
that the bulb housing comes loose.
2. Replace the bulb.
3. Check that the bulb illuminates and press it back into the bulb housing.
Vanity mirror lighting
Removing the mirror glass
1. Insert a flat screwdriver under the glassand carefully exert upward pressure to release the retaining lugs.
2. Snap out the lens.
3. Use needle nose pliers to pull the bulb straight to the side. Replace the bulb. Do not exert too much pressure on the bulbwith the pliers to help avoid damaging it.
Reinstalling the mirror glass1. Put the lens back into position.
2. Press it into place.
Bulb specifications
Lighting functionWat- tageBulb
Extra high beam (models withActive BendingLights*)55H7 LL
Low beam (hal- ogen)55H11 LL
High beam (hal- ogen)65H9
Rear fog light21P21W LL
Brake lights21P21W LL
Backup lights21P21W LL
Rear turn sig- nals21PY21W SV
Front turn sig- nals21H21W LL
License plate lighting5C5W LL
Vanity mirror2W2x4.6d type T5
Page 342 of 392
09 Maintenance and specifications
Replacing bulbs 09
340
Lighting functionWat- tageBulb
Front side marker lights5W5W LL
Glove compart- ment lighting5SV8.5 (length 43mm)
Trunk lighting5SV8.5 (length 38mm)
NOTE
Please consult a Volvo retailer’s Parts department for the most up-to-date bulbspecifications.
Page 343 of 392
09 Maintenance and specifications
Wiper blades and washer fluid09
}}
341
Wiper blades
Service position
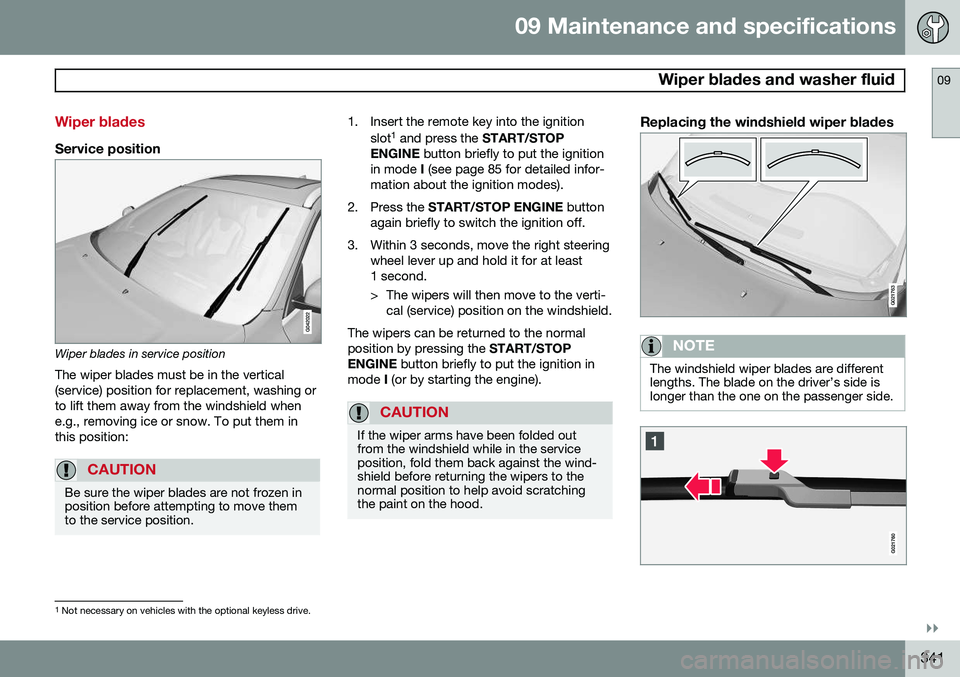
Wiper blades in service positionThe wiper blades must be in the vertical (service) position for replacement, washing orto lift them away from the windshield whene.g., removing ice or snow. To put them inthis position:
CAUTION
Be sure the wiper blades are not frozen in position before attempting to move themto the service position.
1. Insert the remote key into the ignition slot1
and press the START/STOP
ENGINE button briefly to put the ignition
in mode I (see page 85 for detailed infor-
mation about the ignition modes).
2. Press the START/STOP ENGINE button
again briefly to switch the ignition off.
3. Within 3 seconds, move the right steering wheel lever up and hold it for at least 1 second.
> The wipers will then move to the verti-cal (service) position on the windshield.
The wipers can be returned to the normal position by pressing the START/STOP
ENGINE button briefly to put the ignition in
mode I (or by starting the engine).
CAUTION
If the wiper arms have been folded out from the windshield while in the serviceposition, fold them back against the wind-shield before returning the wipers to thenormal position to help avoid scratchingthe paint on the hood.
Replacing the windshield wiper blades
G021763
NOTE
The windshield wiper blades are different lengths. The blade on the driver’s side islonger than the one on the passenger side.
1
Not necessary on vehicles with the optional keyless drive.
Page 344 of 392
09 Maintenance and specifications
Wiper blades and washer fluid 09
342
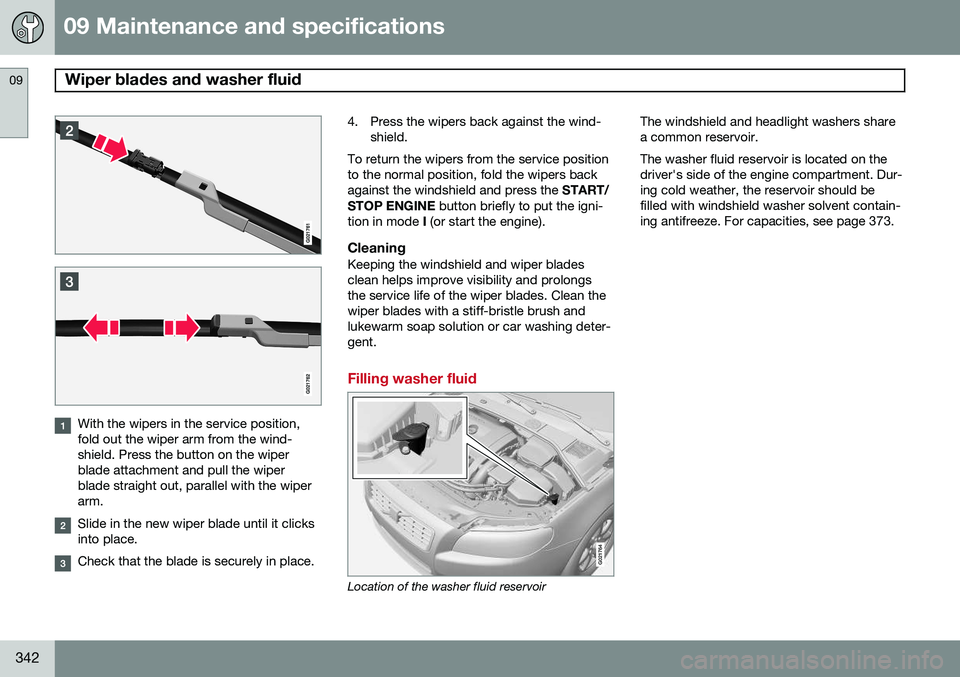
With the wipers in the service position, fold out the wiper arm from the wind-shield. Press the button on the wiperblade attachment and pull the wiperblade straight out, parallel with the wiperarm.
Slide in the new wiper blade until it clicks into place.
Check that the blade is securely in place.4. Press the wipers back against the wind-
shield.
To return the wipers from the service position to the normal position, fold the wipers backagainst the windshield and press the START/
STOP ENGINE button briefly to put the igni-
tion in mode I (or start the engine).
CleaningKeeping the windshield and wiper bladesclean helps improve visibility and prolongsthe service life of the wiper blades. Clean thewiper blades with a stiff-bristle brush andlukewarm soap solution or car washing deter-gent.
Filling washer fluid
G021764
Location of the washer fluid reservoir The windshield and headlight washers share a common reservoir. The washer fluid reservoir is located on the driver's side of the engine compartment. Dur-ing cold weather, the reservoir should befilled with windshield washer solvent contain-ing antifreeze. For capacities, see page 373.
Page 345 of 392
09 Maintenance and specifications
Battery09
}}
343
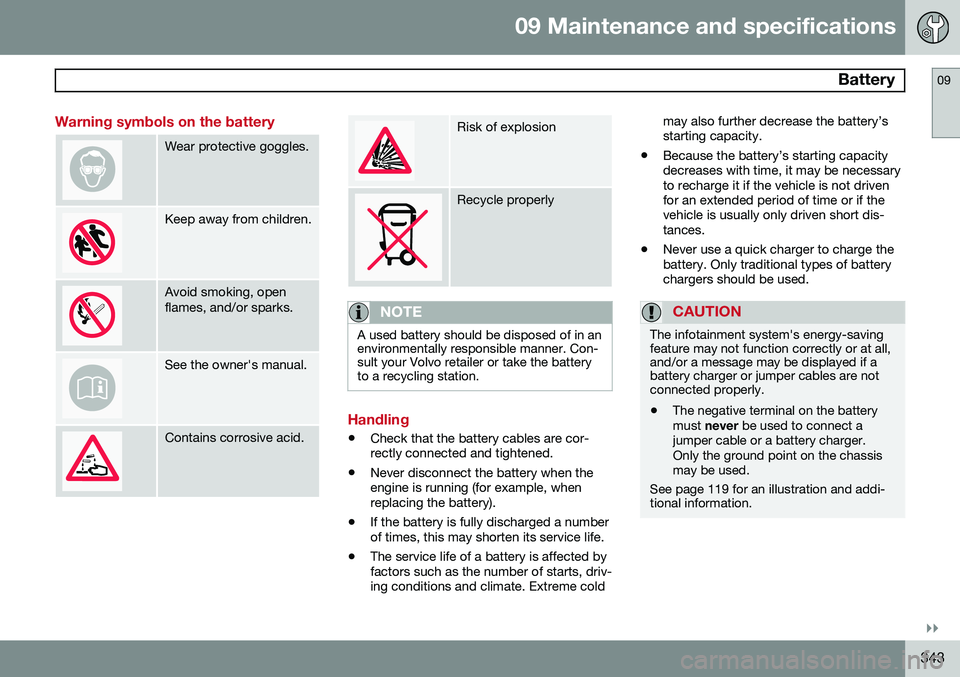
Warning symbols on the battery
Wear protective goggles.
Keep away from children.
Avoid smoking, open flames, and/or sparks.
See the owner's manual.
Contains corrosive acid.
Risk of explosion
Recycle properly
NOTE
A used battery should be disposed of in an environmentally responsible manner. Con-sult your Volvo retailer or take the batteryto a recycling station.
Handling
•Check that the battery cables are cor- rectly connected and tightened.
• Never disconnect the battery when theengine is running (for example, whenreplacing the battery).
• If the battery is fully discharged a numberof times, this may shorten its service life.
• The service life of a battery is affected byfactors such as the number of starts, driv-ing conditions and climate. Extreme cold may also further decrease the battery’sstarting capacity.
• Because the battery’s starting capacitydecreases with time, it may be necessaryto recharge it if the vehicle is not drivenfor an extended period of time or if thevehicle is usually only driven short dis-tances.
• Never use a quick charger to charge thebattery. Only traditional types of batterychargers should be used.
CAUTION
The infotainment system's energy-saving feature may not function correctly or at all,and/or a message may be displayed if abattery charger or jumper cables are notconnected properly.
• The negative terminal on the battery must
never be used to connect a
jumper cable or a battery charger.Only the ground point on the chassismay be used.
See page 119 for an illustration and addi- tional information.
Page 346 of 392
09 Maintenance and specifications
Battery 09
344
WARNING
•Never expose the battery to open flame or electric spark.
• Do not smoke near the battery.
• Battery fluid contains sulfuric acid. Donot allow battery fluid to contact eyes,skin, fabrics or painted surfaces. Ifcontact occurs, flush the affected areaimmediately with water. Obtain medi-cal help immediately if eyes are affec-ted.
NOTE
The life of the battery is shortened if it becomes discharged repeatedly.
Maintenance
•
Use a screw driver to open the caps or cover and a flashlight to inspect the level.
• If necessary, add distilled water. The levelshould never be above the indicator.
• The fluid level should be checked if thebattery has been recharged.
• After inspection, be sure the cap overeach battery cell or the cover is securelyin place.
• Check that the battery cables are cor-rectly connected and properly tightened. •
Never disconnect the battery when theengine is running, or when the key is inthe ignition. This could damage the vehi-cle's electrical system.
• The battery should be disconnected fromthe vehicle when a battery charger isused directly on the battery.
• To help keep the battery in good condi-tion, the vehicle should be driven for atleast 15 minutes a week or connected toa charger with an automatic chargingfunction.
• If the battery is fully discharged a numberof times, this may shorten its service life.Keeping the battery fully charged helpsprolong its service life.
• The service life of a battery is affected byfactors such as driving conditions and cli-mate. Extreme cold may also furtherdecrease the battery’s starting capacity.
• Because the battery’s starting capacitydecreases with time, it may be necessaryto recharge it if the vehicle is not drivenfor an extended period of time or if thevehicle is usually only driven short dis-tances.
CAUTION
•Always use distilled or deionized water (battery water).
• Never fill above the level mark in thecell.
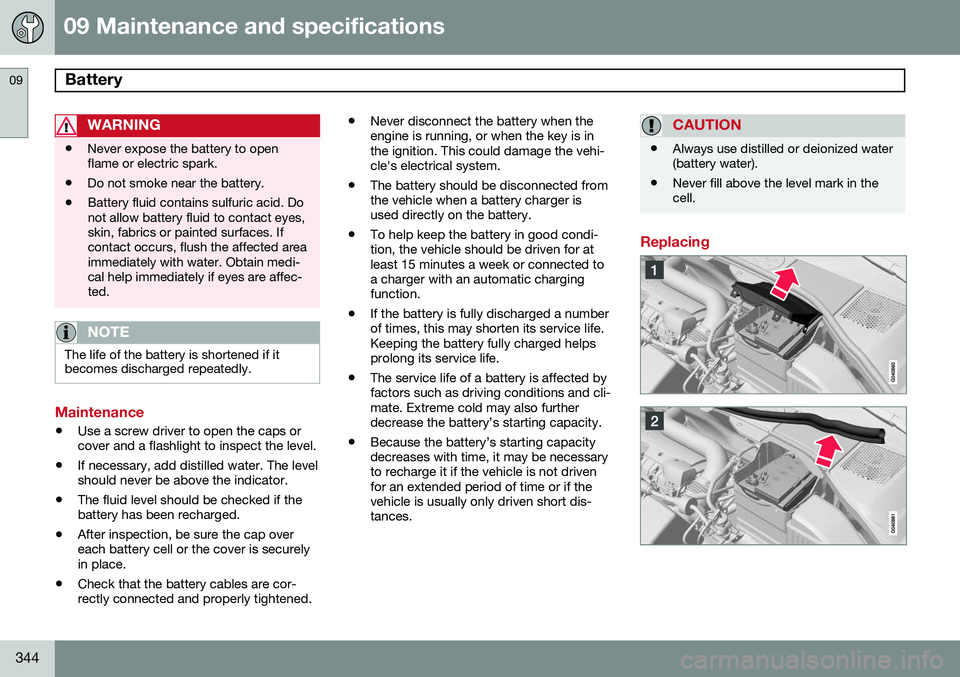
Replacing
Page 347 of 392
09 Maintenance and specifications
Battery09
}}
345
WARNING
Connect and disconnect the positive and negative cables in the correct sequence.
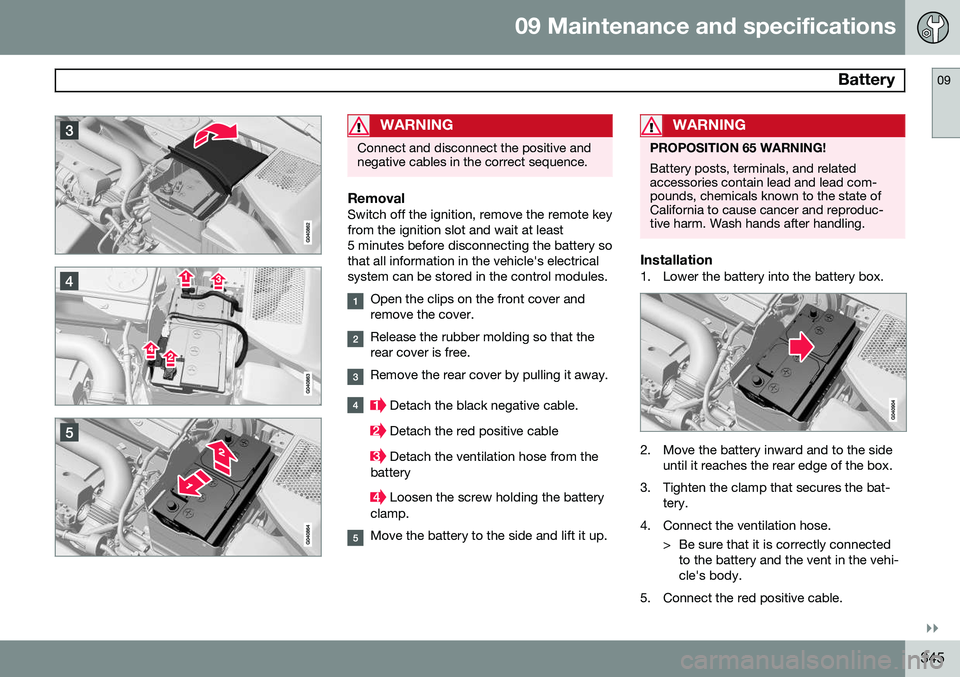
RemovalSwitch off the ignition, remove the remote key from the ignition slot and wait at least5 minutes before disconnecting the battery sothat all information in the vehicle's electricalsystem can be stored in the control modules.
Open the clips on the front cover and remove the cover.
Release the rubber molding so that the rear cover is free.
Remove the rear cover by pulling it away.
Detach the black negative cable.
Detach the red positive cable
Detach the ventilation hose from the
battery
Loosen the screw holding the battery
clamp.
Move the battery to the side and lift it up.
WARNING
PROPOSITION 65 WARNING! Battery posts, terminals, and related accessories contain lead and lead com-pounds, chemicals known to the state ofCalifornia to cause cancer and reproduc-tive harm. Wash hands after handling.
Installation1. Lower the battery into the battery box.
2. Move the battery inward and to the side until it reaches the rear edge of the box.
3. Tighten the clamp that secures the bat- tery.
4. Connect the ventilation hose. > Be sure that it is correctly connectedto the battery and the vent in the vehi- cle's body.
5. Connect the red positive cable.
Page 348 of 392
09 Maintenance and specifications
Battery 09
346
6. Connect the black negative cable.7. Press in the rear cover. (See Removal).
8. Reinstall the molding. (See Removal).
9. Reinstall the front cover and secure it with the clips. (See Removal).
Page 349 of 392
09 Maintenance and specifications
Fuses09
}}
347
Replacing fuses
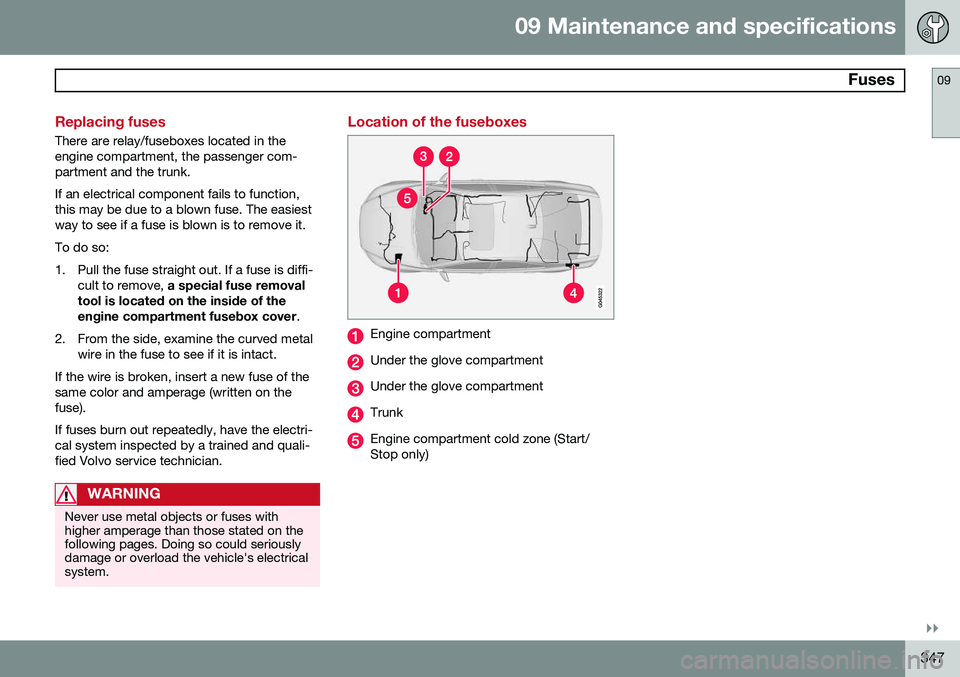
There are relay/fuseboxes located in the engine compartment, the passenger com-partment and the trunk. If an electrical component fails to function, this may be due to a blown fuse. The easiestway to see if a fuse is blown is to remove it. To do so:
1. Pull the fuse straight out. If a fuse is diffi-cult to remove, a special fuse removal
tool is located on the inside of the engine compartment fusebox cover .
2. From the side, examine the curved metal wire in the fuse to see if it is intact.
If the wire is broken, insert a new fuse of the same color and amperage (written on thefuse). If fuses burn out repeatedly, have the electri- cal system inspected by a trained and quali-fied Volvo service technician.
WARNING
Never use metal objects or fuses with higher amperage than those stated on thefollowing pages. Doing so could seriouslydamage or overload the vehicle's electricalsystem.
Location of the fuseboxes
Engine compartment
Under the glove compartment
Under the glove compartment
Trunk
Engine compartment cold zone (Start/ Stop only)
Page 350 of 392
09 Maintenance and specifications
Fuses 09
348
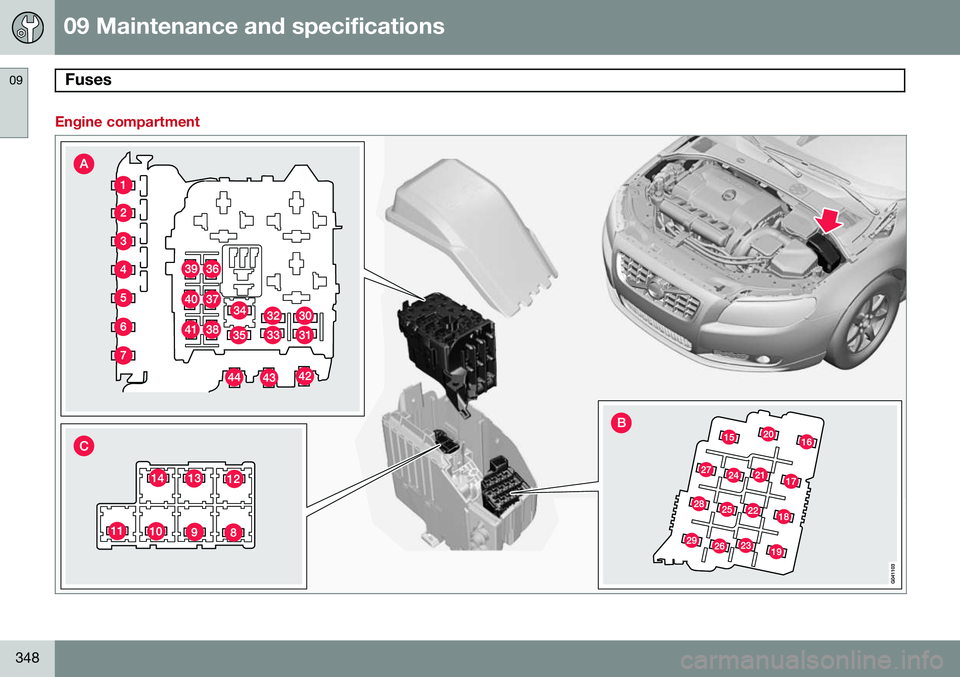
Engine compartment