child lock VOLVO S90 2017 Owner´s Manual
[x] Cancel search | Manufacturer: VOLVO, Model Year: 2017, Model line: S90, Model: VOLVO S90 2017Pages: 548, PDF Size: 11.42 MB
Page 91 of 548
SAFETY
}}
* Option/accessory.89
Raising the integrated booster cushion*
The integrated booster cushions in the rear seat's outboard positions must be correctlyraised before use.
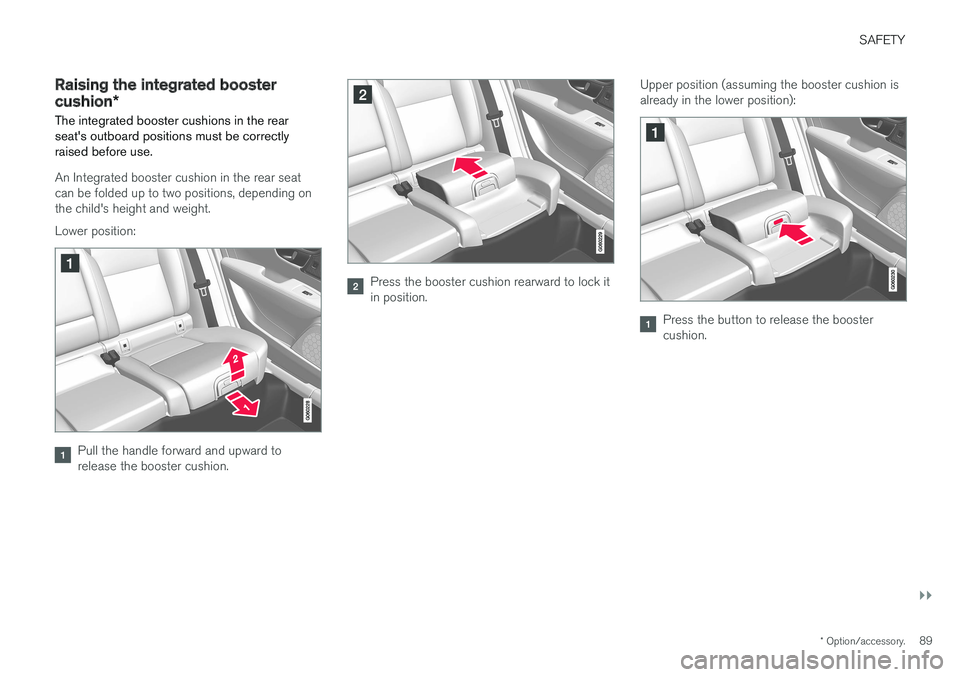
An Integrated booster cushion in the rear seat can be folded up to two positions, depending onthe child's height and weight. Lower position:
Pull the handle forward and upward to release the booster cushion.
Press the booster cushion rearward to lock it in position. Upper position (assuming the booster cushion isalready in the lower position):
Press the button to release the booster cushion.
Page 92 of 548
||
SAFETY
* Option/accessory.
90
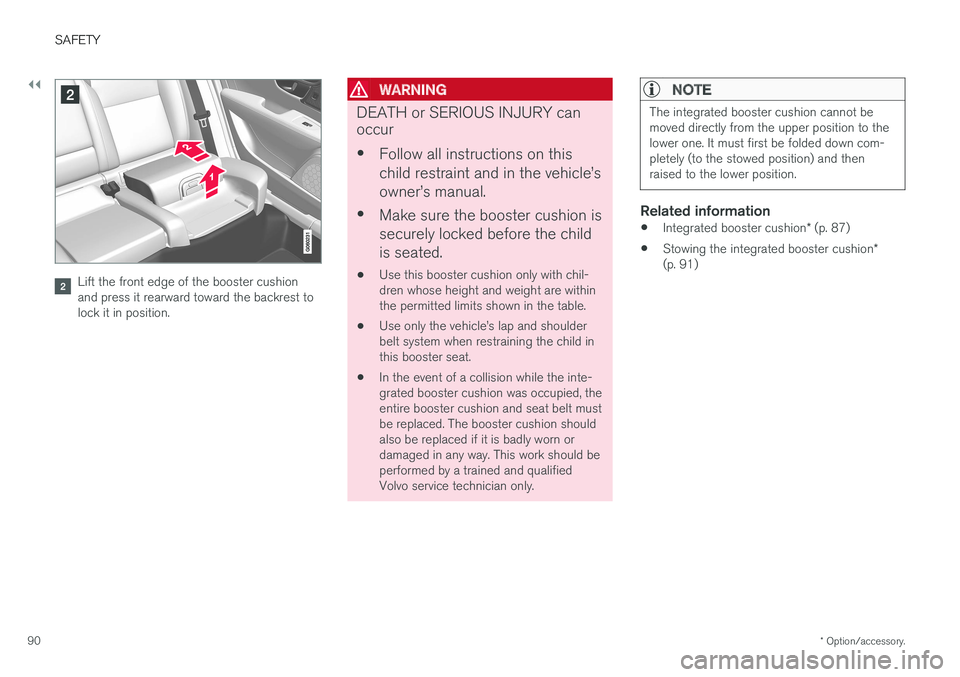
Lift the front edge of the booster cushion and press it rearward toward the backrest tolock it in position.
WARNING
DEATH or SERIOUS INJURY can occur •
Follow all instructions on this child restraint and in the vehicle
Page 106 of 548
||
INSTRUMENTS AND CONTROLS
* Option/accessory.
104
WARNING
• During manual closing, if the moonroof is obstructed, immediately open it again.
• Never open or close the moonroof if it isobstructed in any way.
• Never allow a child to operate the moon-roof.
• Never leave a child alone in a vehicle.
• When leaving the vehicle, ensure that the ignition is in mode
0 (see the article
"Ignition modes" for additional informa- tion) to disable the moonroof. Never leavethe remote key in the vehicle.
• Never extend any object or body partthough the open moonroof, even if thevehicle's ignition is completely switchedoff.
CAUTION
•
Remove ice and snow before opening the moonroof.
• Do not operate the moonroof if it is fro-zen closed.
• Never place heavy objects on the moon-roof.
CAUTION
The optional moonroof should not be opened while load carriers are installed on the vehicle.
Wind blocker
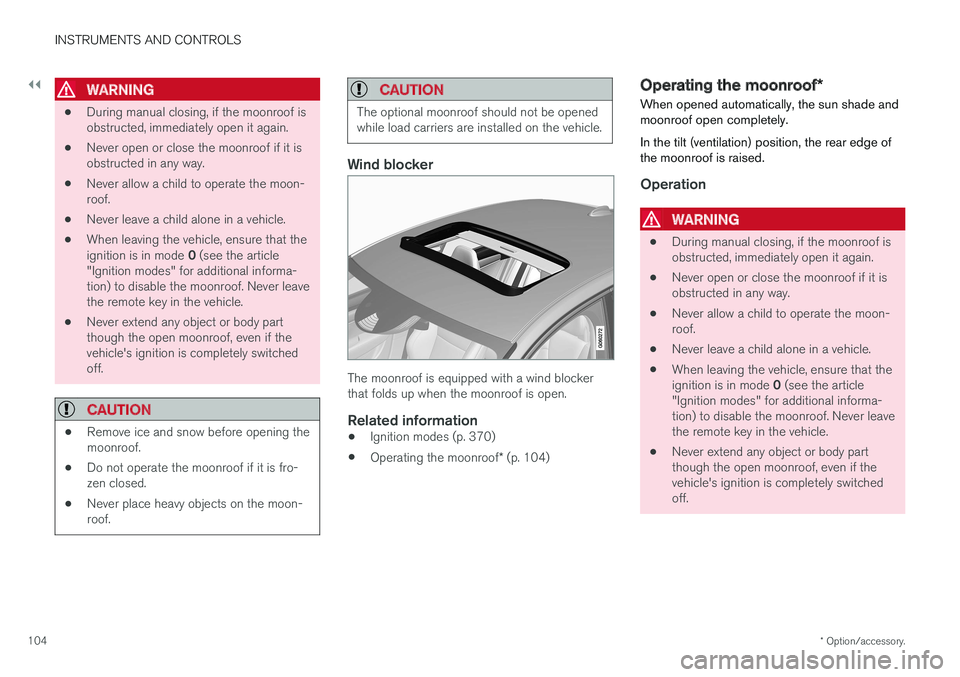
The moonroof is equipped with a wind blocker that folds up when the moonroof is open.
Related information
•Ignition modes (p. 370)
• Operating the moonroof
* (p. 104)
Operating the moonroof *
When opened automatically, the sun shade and moonroof open completely. In the tilt (ventilation) position, the rear edge of the moonroof is raised.
Operation
WARNING
• During manual closing, if the moonroof is obstructed, immediately open it again.
• Never open or close the moonroof if it isobstructed in any way.
• Never allow a child to operate the moon-roof.
• Never leave a child alone in a vehicle.
• When leaving the vehicle, ensure that the ignition is in mode
0 (see the article
"Ignition modes" for additional informa- tion) to disable the moonroof. Never leavethe remote key in the vehicle.
• Never extend any object or body partthough the open moonroof, even if thevehicle's ignition is completely switchedoff.
Page 108 of 548
||
INSTRUMENTS AND CONTROLS
* Option/accessory.
106
Sun shadeThe moonroof has a sun shade that can be opened and closed manually. The sun shadeopens automatically along with the moonroof. Toclose it, grasp its handle and pull forward.
Pinch protection (auto-stop)The moonroof has a pinch protection feature thatis triggered if the moonroof is blocked in any waywhen it is being closed. In this case, the moon-roof will stop and reverse automatically approxi-mately 2 in. (5 cm) from the point at which it wasblocked (or will open fully to the tilt position). The pinch protection feature also functions when the moonroof is being opened.
WARNING
If the pinch protection (auto-stop) feature has been triggered, the moonroof can still be operated once more within 10 seconds with-
out pinch protection . Pinch protection can
be overridden if the closing procedure has been interrupted (e.g., due to ice around themoonroof) by pressing and holding the con-trol forward/downward until the moonroof isclosed.
Related information
• Moonroof
* (p. 103)
• Locking/unlocking from outside the vehicle (p. 223)
• Ignition modes (p. 370)
Power windows
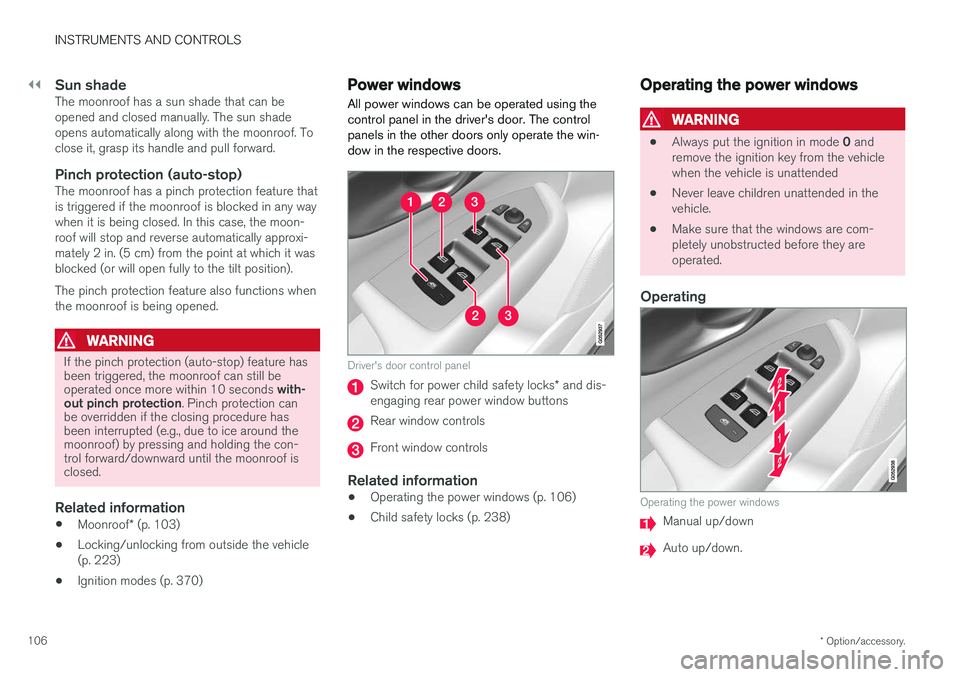
All power windows can be operated using the control panel in the driver's door. The controlpanels in the other doors only operate the win-dow in the respective doors.
Driver's door control panel
Switch for power child safety locks * and dis-
engaging rear power window buttons
Rear window controls
Front window controls
Related information
• Operating the power windows (p. 106)
• Child safety locks (p. 238)
Operating the power windows
WARNING
•
Always put the ignition in mode
0 and
remove the ignition key from the vehicle when the vehicle is unattended
• Never leave children unattended in thevehicle.
• Make sure that the windows are com-pletely unobstructed before they areoperated.
Operating
Operating the power windows
Manual up/down
Auto up/down.
Page 109 of 548

INSTRUMENTS AND CONTROLS
}}
107
For the power windows to function, the ignition must be in at least mode
I. When the vehicle has
been running, the power windows can be oper- ated for several minutes after the ignition hasbeen switched off, or until a door has beenopened.
NOTE
• Movement of the windows will stop if they are obstructed in any way. If this happenstwice in succession, the automatic func-tion will not work for several minutes andthe window can be closed by holding thebutton up.
• To reduce buffeting wind noise if the rearwindows are opened, also open the frontwindows slightly.
Manual up/down
–Move one of the controls up/down slightly.
> The power windows move up/down as
long as the control is held in position.
Auto up/down
–Move one of the controls up/down as far as possible and release it.
> The window will open or close completely.
ResettingIf the battery has been disconnected, the auto open function must be reset so that it will workproperly
1. Gently raise the front section of the button to close the window and hold it for one second.
2. Release the button briefly.
3. Raise the front section of the button again for one second.
Related information
• Child safety locks (p. 238)
Rearview mirror The interior rearview mirror has an auto-dim function that helps reduce glare from followingvehicle's headlights.
Auto-dim functionThe auto-dim function is controlled by two sen- sors: one pointing forward (located on the for-ward-facing side of the mirror, which monitors theamount of ambient light) and one pointing rear-ward (located on the side of the mirror facing thedriver at the upper edge, which senses thestrength of following vehicles' headlights), andwork together to help eliminate glare.
NOTE
Obstructing the sensors with e.g., parking stickers, transponders, etc., or by placingobjects on the seats or parcel shelf in such away that light is prevented from reaching thesensors will reduce the auto-dim function inthe interior rearview mirror and optional auto-dim function in the door mirrors.
The auto-dim function is always active while the vehicle is being driven except when the reversegear has been selected. The level of sensitivityfor this function can be set to three levels, whichaffect the rearview mirror and door mirrors.
Page 216 of 548
LOCKS AND ALARM
* Option/accessory.
214
Locks and remote keys
The vehicle can be locked and unlocked in vari- ous ways and there are several types of remotekeys that can be used.
Locking/unlocking/opening/closingThe vehicle can be locked/unlocked from the passenger compartment, using the buttons onthe remote key or by using the optional PassiveEntry system where it is only necessary to have akey in your possession to lock or unlock thedoors. On models equipped with a power trunk *, it can
also be opened/closed by moving your foot under a sensor * beneath the rear bumper.
If for any reason a remote key does not function properly, it may be necessary to replace its bat-teries but the vehicle can always be locked orunlocked manually using the remote key'sdetachable key blade.
Remote keyThe remote key does not have to be physicallyhandled in order to start the engine because thevehicle is equipped with the standard PassiveStart system (the key only needs to be in thefront part of the passenger compartment). If thevehicle is equipped with the optional PassiveEntry system that enables keyless entry and start,the key can be anywhere in the vehicle when theengine is started. Models with Passive Entry
* also have an extra,
smaller key without buttons called a Key Tag. Additional keys can be ordered from a Volvo retailer.
Related information
• Immobilizer (p. 214)
• Alarm (p. 236)
• Child safety locks (p. 238)
• Remote key (p. 217)
• Foot movement trunk operation
* (p. 232)
• Locking/unlocking from inside the vehicle(p. 224)
• Locking/unlocking from outside the vehicle(p. 223)
• Locking/unlocking the trunk (p. 228)
• Starting the engine (p. 372)
Immobilizer
The immobilizer is a start inhibitor that helps pre- vent unauthorized persons from starting theengine.
Each of the keys supplied with your vehicle con- tains a unique coded transponder. The vehiclecode in the key is transmitted to the vehicle'signition system where it is compared to the codestored in the start inhibitor module. The following message (which may appear in the instrument panel) is related to the immobilizer:
Symbol Message Explanation
Vehicle key not found See Owner'smanualRemote key not recognized duringstart. Place theremote key on thekey symbol in thetunnel console cupholder and try tostart the vehicleagain.
Related information
•Remote key's range (p. 219)
• Remote key (p. 217)
Page 220 of 548
||
LOCKS AND ALARM
* Option/accessory.
218 Each of the remote keys provided with the vehicle can be linked to a driver profile containing uniquepersonal settings that will be applied when thatparticular key is used. See also the article "Driverprofile" for additional information.
NOTE
Avoid placing the remote key closer than approx. (4-6 in.) (10-15 cm) to any metallicobjects or electronic devices such as cellphones, tablets, laptops or chargers.
If interference persists, unlock the vehicle with the detachable key blade and place the remotekey in the backup key reader in the tunnel con-sole cup holder to disarm the alarm.
WARNING
Always remove the remote key from the pas- senger compartment when leaving the vehicle and ensure that the ignition in mode
0, espe-
cially if there are children in the vehicle.
Key TagIn addition to the two remote keys provided, a smaller third key, called a Key Tag, is also provi-ded for vehicles equipped with the optionalPassive Entry system. This key functions in the same way as a standardremote key but does not have a detachable keyblade and its battery cannot be replaced; a newKey Tag has to be ordered.
Ordering new keysTwo remote keys are provided with the vehicle (a Key Tag
2
is also included for vehicles equipped
with the optional Passive Entry system). Addi- tional keys (a total of 12) can be ordered andused with the vehicle.
The remote key's buttons
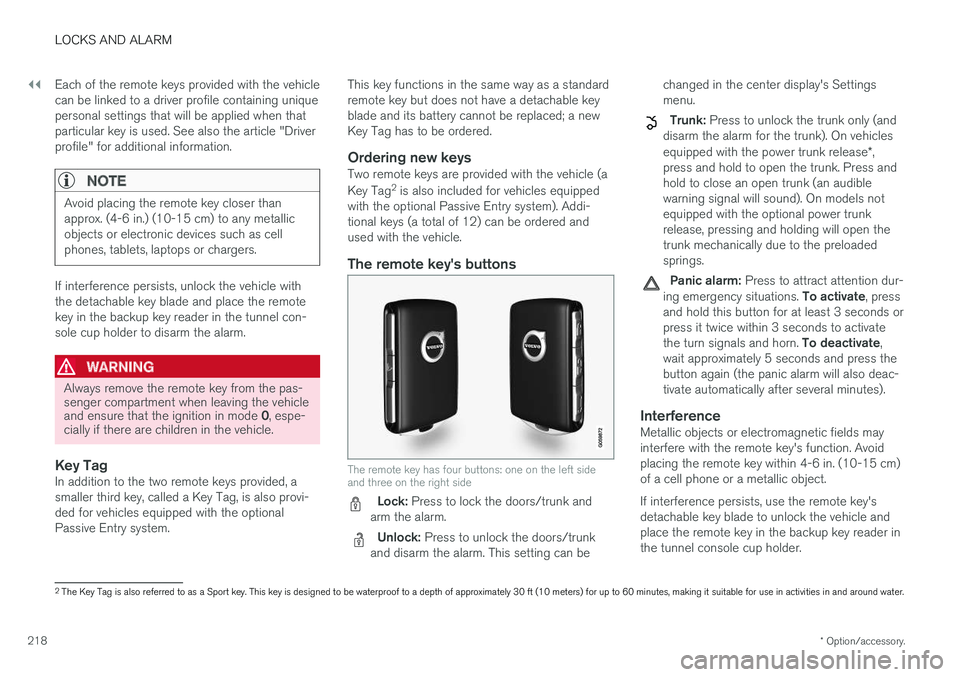
The remote key has four buttons: one on the left side and three on the right side
Lock: Press to lock the doors/trunk and
arm the alarm.
Unlock: Press to unlock the doors/trunk
and disarm the alarm. This setting can be changed in the center display's Settings menu.
Trunk: Press to unlock the trunk only (and
disarm the alarm for the trunk). On vehicles equipped with the power trunk release *,
press and hold to open the trunk. Press and hold to close an open trunk (an audiblewarning signal will sound). On models notequipped with the optional power trunkrelease, pressing and holding will open thetrunk mechanically due to the preloadedsprings.
Panic alarm: Press to attract attention dur-
ing emergency situations. To activate, press
and hold this button for at least 3 seconds or press it twice within 3 seconds to activate the turn signals and horn. To deactivate,
wait approximately 5 seconds and press the button again (the panic alarm will also deac-tivate automatically after several minutes).
InterferenceMetallic objects or electromagnetic fields mayinterfere with the remote key's function. Avoidplacing the remote key within 4-6 in. (10-15 cm)of a cell phone or a metallic object. If interference persists, use the remote key's detachable key blade to unlock the vehicle andplace the remote key in the backup key reader inthe tunnel console cup holder.
2 The Key Tag is also referred to as a Sport key. This key is designed to be waterproof to a depth of approximately 30 ft (10 meters) for up to 60 minutes, making it suitable for use in activities in and around water.
Page 223 of 548
LOCKS AND ALARM
}}
* Option/accessory.221
Settings for the Red Key can be made by a standard remote key user from the center dis- play's Top view under:
SettingsSystem
Driver ProfileRed key.
Several of the vehicle's safety function cannot be turned off by a Red Key user. The restrictions are designed to help reduce the risk of an accident and they cannot be changedby a Red Key user. These settings cannot bechanged by the Red Key's user.
Possible settingsThe following settings can be made for a RedKey:
Speed Limiter * (On/Off)
• Setting interval: 30-160 mph (50-250 km/h)
• Default setting: 75 mph (120 km/h)
• Increments: 1 mph (1 km/h)
This symbol will appear in the instru- ment panel and the message
Red
keySpeed limitation cannot be exceeded
will be displayed.
See the article "Speed limiter" for additional information.
Speed reminder (On/Off):
• Setting interval: 0-155 mph (0-250 km/h
• Default settings: 30, 45 and 55 mph (50, 70 and 90 km/h.)
• Increments: 1 mph (1 km/h) •
Max. number of reminders: 6
Reduced max. volume (on/off)
•Default setting: On
Adaptive cruise control
* (On/Off)
• Initial setting: On at the longest interval
• See the article "Adaptive cruise control" for additional information
Safety functionsThe following safety functions will always beactive for a Red Key user: •
Blind Spot Information (BLIS)
*
• Lane Keeping Aid (LKA)
*
• Distance Alert
*
• City Safety
*
• Driver Alert Control (DAC)
*
• Road Sign Information (RSI)
*
Related information
•Remote key (p. 217)
• Adaptive Cruise Control (ACC)
* (p. 261)
• Speed limiter (SL)
* (p. 247)
• Blind Spot Information (BLIS)
* (p. 309)
• Driving lane assistance (p. 320)
• Distance Alert
* (p. 259)
• City Safety
™ (p. 296)
• Driver Alert Control (DAC) (p. 318)
• Road Sign Information (RSI)
* (p. 316)
Detachable key blade Your vehicle's remote key contains a detachable key blade that can be used to unlock the driver'sdoor, etc. A Volvo retailer can provide you with the key blade's unique code.
Using the detachable key bladeThe remote key's detachable key blade can be used to:
• Unlock the driver's door if the central lockingsystem cannot be activated using the remotekey
• Lock all doors
• Activate/deactivate the mechanical childsafety locks in the rear doors
Page 224 of 548
||
LOCKS AND ALARM
222The Key Tag
4
does not have a detachable key
blade.
Detaching the key blade
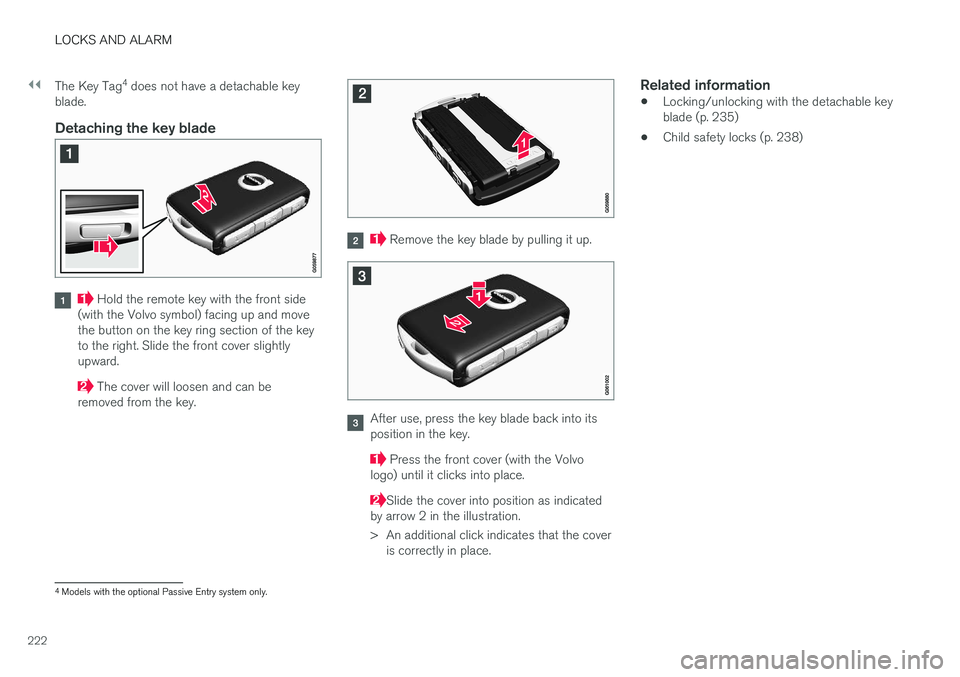
Hold the remote key with the front side
(with the Volvo symbol) facing up and move the button on the key ring section of the keyto the right. Slide the front cover slightlyupward.
The cover will loosen and can be
removed from the key.
Remove the key blade by pulling it up.
After use, press the key blade back into its position in the key.
Press the front cover (with the Volvo
logo) until it clicks into place.
Slide the cover into position as indicated
by arrow 2 in the illustration.
> An additional click indicates that the cover is correctly in place.
Related information
• Locking/unlocking with the detachable key blade (p. 235)
• Child safety locks (p. 238)
4
Models with the optional Passive Entry system only.
Page 227 of 548
LOCKS AND ALARM
}}
* Option/accessory.225
Unlocking
•
Press the button to unlock all doors and
the trunk.
• Pull the door opening handle on either of the front doors. This will unlock the vehicle com- pletely 5
and the door will open.
Locking
–Press the button on either of the front
doors to lock the vehicle (both front doors must be closed).
Lock buttons on the rear doors *
Lock button and indicator light in a rear door
The lock buttons in the rear doors lock/unlock each door respectively. To unlock a rear door:
–To open one of the rear doors individually, pull its handle to unlock and open the door
6
.
Automatic lockingAll of the doors/trunk will lock automatically when the vehicle begins to move.
Related information
• Locking/unlocking from outside the vehicle(p. 223)
• Locking and unlocking confirmation (p. 226)
• Child safety locks (p. 238)
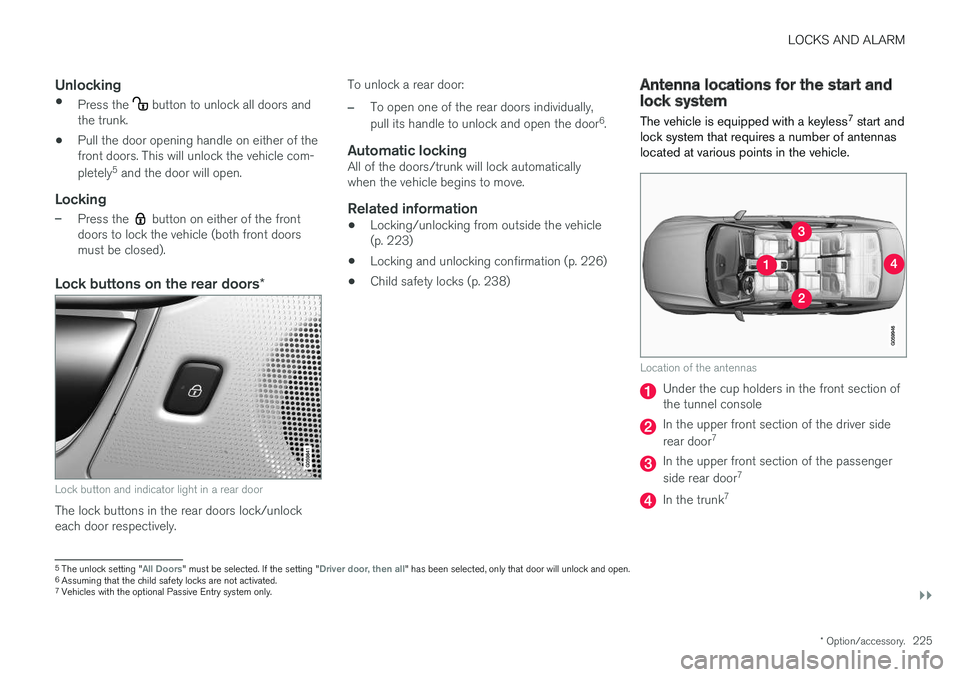
Antenna locations for the start and lock system
The vehicle is equipped with a keyless 7
start and
lock system that requires a number of antennas located at various points in the vehicle.
Location of the antennas
Under the cup holders in the front section of the tunnel console
In the upper front section of the driver side rear door 7
In the upper front section of the passenger side rear door 7
In the trunk7
5
The unlock setting "All Doors" must be selected. If the setting "Driver door, then all" has been selected, only that door will unlock and open.
6 Assuming that the child safety locks are not activated.
7 Vehicles with the optional Passive Entry system only.