roof VOLVO S90 2017 Owner´s Manual
[x] Cancel search | Manufacturer: VOLVO, Model Year: 2017, Model line: S90, Model: VOLVO S90 2017Pages: 548, PDF Size: 11.42 MB
Page 195 of 548
CLIMATE
* Option/accessory.193
2. Tap the steering wheel heating button
repeatedly to select one of four levels:
Off,High, Middle or Low.
> The level changes and is displayed in the button.
Automatic steering wheel heatingThe automatic function starts heating the steer- ing wheel automatically when the engine isstarted if the temperature is sufficiently cold. Thisfeature can be activated/deactivated. 1. Tap
Settings in the center display's Top
view.
2. Tap
Climate.
3. Under
Auto Steering Wheel Heating
Level, select Off, Low, Middle or High to
activate/deactivate the automatic function.
Related information
• Climate system controls (p. 182)
• Climate system controls in the center display (p. 183)
• Steering wheel (p. 159)
Air conditioning
The air conditioning cools and dehumidifies the air in the passenger compartment.
Activating/deactivating the main air conditioning unit
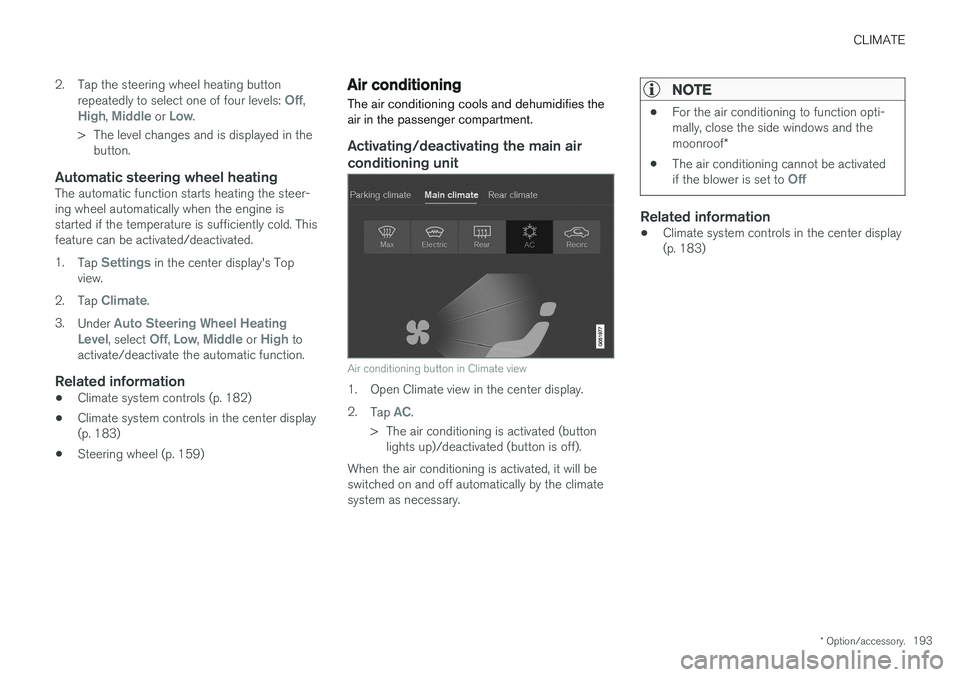
Air conditioning button in Climate view
1. Open Climate view in the center display. 2. Tap
AC.
> The air conditioning is activated (button lights up)/deactivated (button is off).
When the air conditioning is activated, it will be switched on and off automatically by the climatesystem as necessary.
NOTE
• For the air conditioning to function opti- mally, close the side windows and the moonroof
*
• The air conditioning cannot be activated if the blower is set to
Off
Related information
•Climate system controls in the center display (p. 183)
Page 205 of 548
LOADING AND STORAGE
}}
* Option/accessory.203
WARNING
•Stop the engine, put the gear selector in P
, and apply the parking brake when
loading or unloading long objects.
• The vehicle's driving characteristics may change depending on the weight and dis-tribution of the load.
• A 44-pound (20 kg) object produces aforce of 2,200 pounds (1,000 kg) in ahead-on collision at 30 mph (50 km/h).
• The cargo area and rear seat should notbe loaded to a level higher than 2 in.(5 cm) below the upper edge of the rearside windows. Objects placed higher thanthis level could impede the function ofthe Inflatable Curtain.
WARNING
• Cover sharp edges on long loads to help prevent injury to occupants. Secure theload to help prevent shifting during sud-den stops.
• Always secure large and heavy objectswith a seat belt or cargo retaining straps.
• Always secure the load to help prevent itfrom moving in the event of sudden stops.
• Switch off the engine, apply the parking brake and put the gear selector in
P
when loading and unloading the vehicle.
Extra loading space
The rear seat backrests can be folded down * to
added cargo space or for transporting long objects. The hatch in the center section of the rear seat backrest * can be opened without folding the
backrest down to transport long objects such as skis, etc.
WARNING
• Boxes, suitcases, etc. wedged behind the front seats could impede the function ofthe Whiplash Protection System.
• If the rear seat backrests are foldeddown, cargo must be secured to preventit from sliding forward against the frontseat backrests in the event of a collisionfrom the rear. This could interfere withthe action of the Whiplash ProtectionSystem.
WARNING
•
Cover sharp edges on long loads to help prevent injury to occupants. Secure theload to help prevent shifting during sud-den stops.
• Always secure large and heavy objectswith a seat belt or cargo retaining straps.
• Always secure the load to help prevent itfrom moving in the event of sudden stops.
• Switch off the engine, apply the parking brake and put the gear selector in
P
when loading and unloading the vehicle.
Roof loadsLoad carriers are available as Volvo accessories. Observe the following points when in use:
• To avoid damaging your vehicle and toachieve maximum safety when driving, werecommend using the load carriers that Volvohas developed especially for your vehicle.
• Volvo-approved removable roof racks aredesigned to carry the maximum allowableroof load for this vehicle (see the article"Weights" for specific information).
• Never exceed the rack manufacturer's weighlimits.
• Avoid single-point loads. Distribute loadsevenly.
Page 206 of 548
||
LOADING AND STORAGE
204•
Place heavier cargo at the bottom of the load.
• Secure the cargo correctly with appropriatetie-down equipment.
• Check periodically that the load carriers andload are properly secured.
• Remember that the vehicle's center of gravityand handling change when you carry a loadon the roof.
• The vehicle's wind resistance and fuel con-sumption will increase with the size of theload.
• Drive smoothly. Avoid rapid starts, fast cor-nering and hard braking.
CAUTION
The optional moonroof should not be opened while load carriers are installed on the vehicle.
See the article "Weights" for information about the maximum permissible load that can be trans-ported on the roof.
Related information
•
Weights (p. 525)
• Load anchoring eyelets (p. 207)
• Whiplash protection system (p. 59)
• Locking/unlocking the trunk (p. 228)
Passenger compartment storage spaces
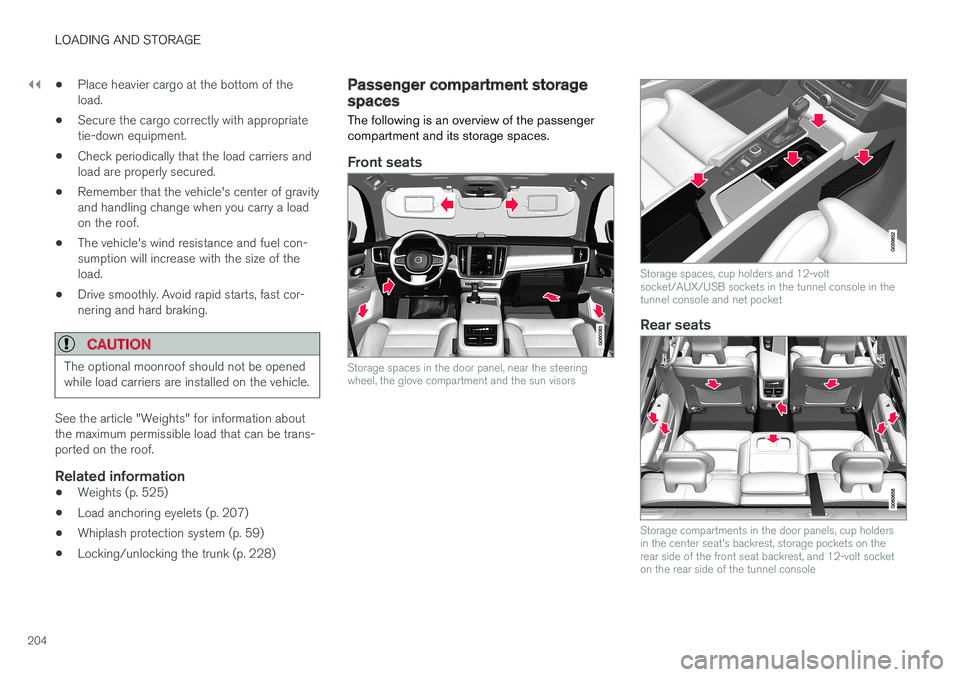
The following is an overview of the passenger compartment and its storage spaces.
Front seats
Storage spaces in the door panel, near the steering wheel, the glove compartment and the sun visors
Storage spaces, cup holders and 12-volt socket/AUX/USB sockets in the tunnel console in thetunnel console and net pocket
Rear seats
Storage compartments in the door panels, cup holders in the center seat's backrest, storage pockets on therear side of the front seat backrest, and 12-volt socketon the rear side of the tunnel console
Page 220 of 548
||
LOCKS AND ALARM
* Option/accessory.
218 Each of the remote keys provided with the vehicle can be linked to a driver profile containing uniquepersonal settings that will be applied when thatparticular key is used. See also the article "Driverprofile" for additional information.
NOTE
Avoid placing the remote key closer than approx. (4-6 in.) (10-15 cm) to any metallicobjects or electronic devices such as cellphones, tablets, laptops or chargers.
If interference persists, unlock the vehicle with the detachable key blade and place the remotekey in the backup key reader in the tunnel con-sole cup holder to disarm the alarm.
WARNING
Always remove the remote key from the pas- senger compartment when leaving the vehicle and ensure that the ignition in mode
0, espe-
cially if there are children in the vehicle.
Key TagIn addition to the two remote keys provided, a smaller third key, called a Key Tag, is also provi-ded for vehicles equipped with the optionalPassive Entry system. This key functions in the same way as a standardremote key but does not have a detachable keyblade and its battery cannot be replaced; a newKey Tag has to be ordered.
Ordering new keysTwo remote keys are provided with the vehicle (a Key Tag
2
is also included for vehicles equipped
with the optional Passive Entry system). Addi- tional keys (a total of 12) can be ordered andused with the vehicle.
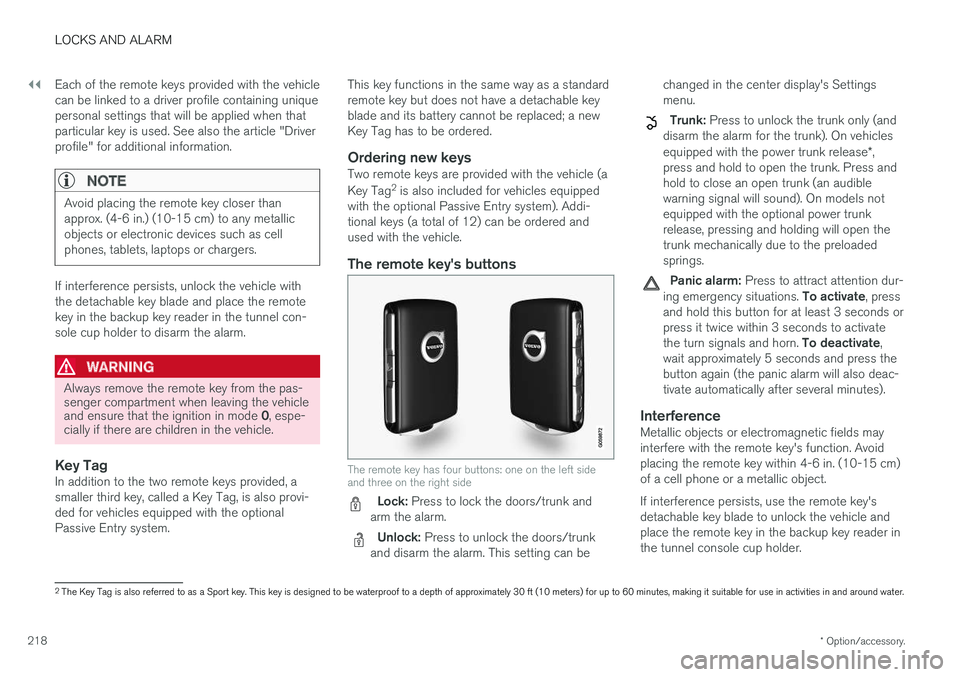
The remote key's buttons
The remote key has four buttons: one on the left side and three on the right side
Lock: Press to lock the doors/trunk and
arm the alarm.
Unlock: Press to unlock the doors/trunk
and disarm the alarm. This setting can be changed in the center display's Settings menu.
Trunk: Press to unlock the trunk only (and
disarm the alarm for the trunk). On vehicles equipped with the power trunk release *,
press and hold to open the trunk. Press and hold to close an open trunk (an audiblewarning signal will sound). On models notequipped with the optional power trunkrelease, pressing and holding will open thetrunk mechanically due to the preloadedsprings.
Panic alarm: Press to attract attention dur-
ing emergency situations. To activate, press
and hold this button for at least 3 seconds or press it twice within 3 seconds to activate the turn signals and horn. To deactivate,
wait approximately 5 seconds and press the button again (the panic alarm will also deac-tivate automatically after several minutes).
InterferenceMetallic objects or electromagnetic fields mayinterfere with the remote key's function. Avoidplacing the remote key within 4-6 in. (10-15 cm)of a cell phone or a metallic object. If interference persists, use the remote key's detachable key blade to unlock the vehicle andplace the remote key in the backup key reader inthe tunnel console cup holder.
2 The Key Tag is also referred to as a Sport key. This key is designed to be waterproof to a depth of approximately 30 ft (10 meters) for up to 60 minutes, making it suitable for use in activities in and around water.
Page 226 of 548
||
LOCKS AND ALARM
* Option/accessory.
224
Locking
All of the doors have to be closed before the vehicle can be locked but the trunk can be open. Lock the doors and trunk by pressing the pres- sure sensitive indentation on the outside of anyof the door handles. The lock indicator light onthe dashboard will begin to flash to show that thevehicle is locked and the alarm has been armed.
NOTE
Only one of a door handle's lock/unlock sur- faces should be pressed at a time. If bothareas are pressed simultaneously, the desiredlocking/unlocking action may not occur ormay be delayed.
To close windows or the moonroof * when locking
the vehicle, hold the pressure sensitive surface on the outside of a door handle until the win-dow(s)/moonroof have closed completely. Thewindows/moonroof will stop if the button isreleased before they are fully closed.
Unlocking
Pull a door handle to unlock and open the door or press the rubberized button under the trunkopening control. The lock indicator light on thedashboard will go out to show that the vehicle isunlocked and the alarm has been disarmed. The lock/unlock settings can be changed in the center display's Top view: Go to:
SettingsMy CarKeyless Unlockand select All Doors or Single Door.
Automatic relockingIf no door or the trunk is opened within two minutes after being unlocked, the vehicle willautomatically relock.
Remote door unlockThe vehicle can be unlocked using the Volvo OnCall app.
Related information
•
Remote key (p. 217)
• Remote key's range (p. 219)
• Detachable key blade (p. 221)
• Alarm (p. 236)
• Locking/unlocking from inside the vehicle(p. 224)
• Foot movement trunk operation
* (p. 232)
• Locking/unlocking the trunk (p. 228)
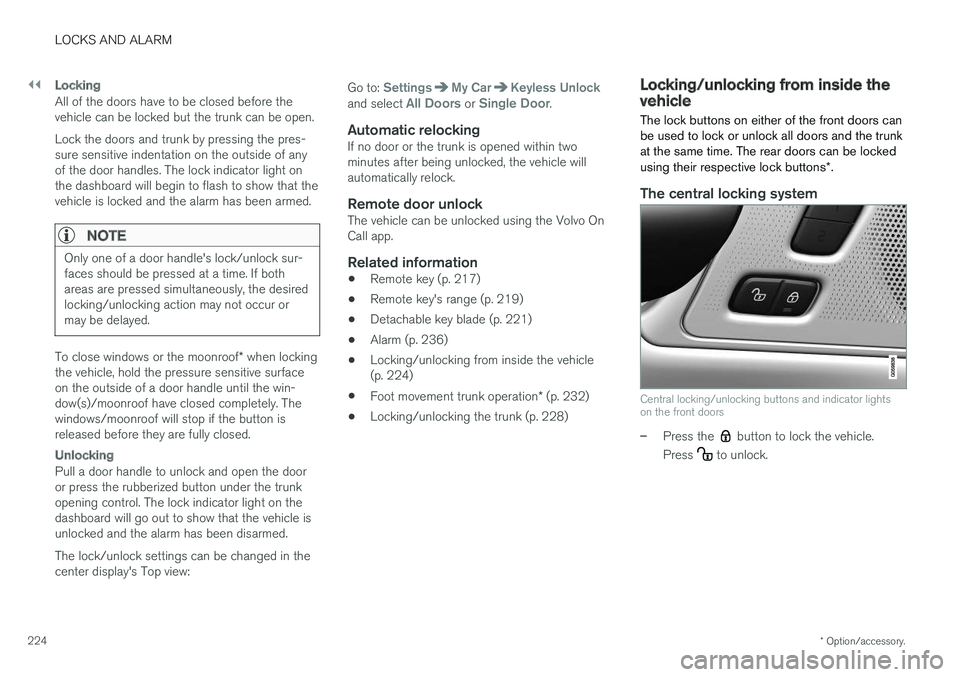
Locking/unlocking from inside the vehicle The lock buttons on either of the front doors can be used to lock or unlock all doors and the trunkat the same time. The rear doors can be locked using their respective lock buttons
*.
The central locking system
Central locking/unlocking buttons and indicator lights on the front doors
–Press the button to lock the vehicle.
Press
to unlock.
Page 356 of 548
STARTING AND DRIVING
354in countries where it may be difficult to obtain the correct fuel.
• Consider your destination. If you will be driv-ing through an area where snow or ice arelikely to occur, consider using snow tires.
Driving economically
Better driving economy can be obtained by thinking ahead, avoiding rapid starts and stopsand adjusting the speed of your vehicle to imme-diate traffic conditions.
Economical driving conserves natural resources
Observe the following rules: • Bring the engine to normal operating tem- perature as soon as possible by driving witha light foot on the accelerator pedal for thefirst few minutes of operation. A cold engineuses more fuel and is subject to increasedwear.
• Whenever possible, avoid using the vehiclefor driving short distances. This does notallow the engine to reach normal operatingtemperature.
• Drive carefully and avoid rapid accelerationand hard braking.
• Use the transmission's Drive (
D) position as
often as possible and avoid using kick-down.
• Using the engine's Eco function can helpimprove fuel economy.
• Do not exceed posted speed limits.
• Avoid carrying unnecessary items (extra load)in the vehicle.
• Maintain correct tire pressure. Check tirepressure regularly (when the tires are cold). •
Use tires recommended by Volvo for yourvehicle.
• Remove snow tires when threat of snow orice has ended.
• Note that roof racks, ski racks, etc, increaseair resistance and also fuel consumption.
• At highway driving speeds, fuel consumptionwill be lower with the air conditioning on andthe windows closed than with the air condi-tioning off and the windows open.
• Using the onboard trip computer's fuel con-sumption modes can help you learn how todrive more economically.
Other factors that decrease gas mileage are:
• Dirty air cleaner
• Dirty engine oil and clogged oil filter
• Dragging brakes
• Incorrect front end alignment
Some of the above mentioned items and othersare checked at the standard maintenance inter-vals.
Handling and roadholding
• Vehicle load, tire design and inflation pres-sure all affect vehicle handling. Therefore,check that the tires are inflated to the rec-ommended pressure according to the vehicleload. Loads should be distributed so that
Page 373 of 548
STARTING AND DRIVING
* Option/accessory.371
ModeFunctions available
0 •The odometer, clock and tem- perature gauge are illuminated
• Power seats
* can be adjusted
• The power windows can be oper-ated
• The 12-volt socket in the cargocompartment can be used
• The center display is activatedand can be used
• The infotainment system can beused for a limited time
In this mode, certain functions canonly be used for a limited time to helpminimize battery drain
I •The moonroof
*, power seats */
windows,12-volt sockets in thepassenger compartment, Blue- tooth, navigation system *, climate
system blower, windshield wipers can be operated
• The infotainment system will start(if it was started when the ignitionwas switched off)Mode
Functions available
II •The headlights illuminate
• Warning/indicator lights illumi- nate for 5 seconds
• A number of other functions willalso be activated. However, the heated seats
* and heated rear
window functions can only be activated when the engine is run-ning.
This mode should only be used forvery short periods to help avoiddraining the battery.
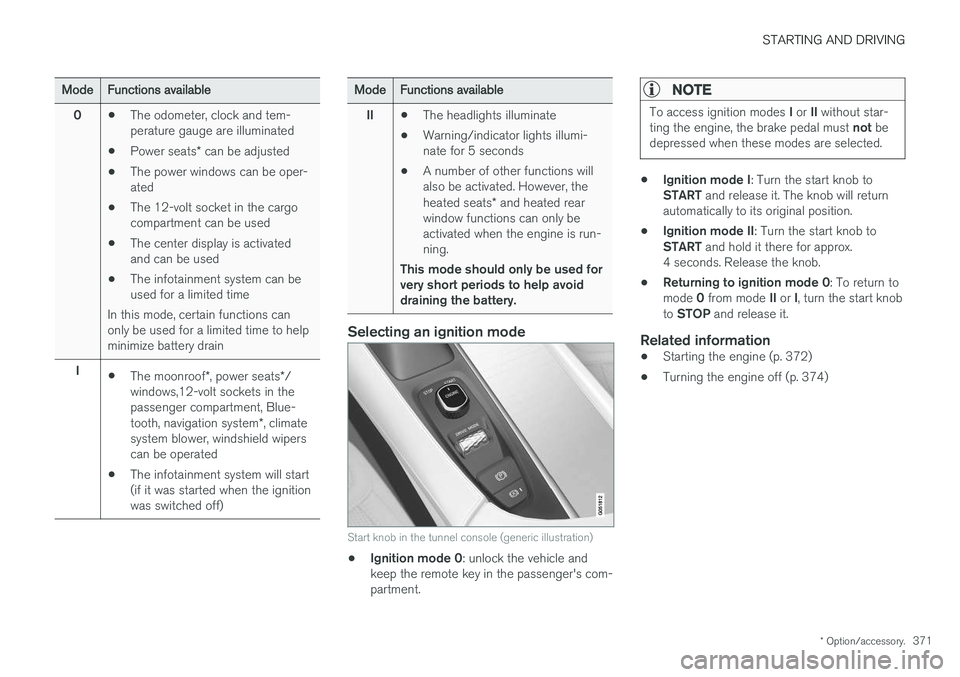
Selecting an ignition mode
Start knob in the tunnel console (generic illustration)
• Ignition mode 0
: unlock the vehicle and
keep the remote key in the passenger's com- partment.
NOTE
To access ignition modes I or II without star-
ting the engine, the brake pedal must not be
depressed when these modes are selected.
• Ignition mode I
: Turn the start knob to
START and release it. The knob will return
automatically to its original position.
• Ignition mode II
: Turn the start knob to
START and hold it there for approx.
4 seconds. Release the knob.
• Returning to ignition mode 0
: To return to
mode 0 from mode II or I, turn the start knob
to STOP and release it.
Related information
•Starting the engine (p. 372)
• Turning the engine off (p. 374)
Page 400 of 548

INFOTAINMENT
* Option/accessory.
398
SiriusXM ®
Satellite radio *
The SiriusXM ®
Satellite system broadcasts from
of a number of high elevation satellites in geo- synchronous orbit.
Listening to satellite radioThe digital signals from the satellites are line-of- sight, which means that physical obstructionssuch as bridges, tunnels, etc, may temporarilyinterfere with signal reception. Avoid any obstructions, such as metallic objects transported on roof racks or in a ski box, or otherantennas that may impede signals from the SiriusXM ®
satellites.
Selecting SiriusXM ®
Satellite radio
mode
1. From the center display's Home view, swipe from right to left to come to App view.
2.Tap the SiriusXM ®
Satellite radio icon.
Home view with SiriusXM ®
Satellite radio activated
If there is no subscription activated, tap channel 1, where you will be prompted on the screen to phone SiriusXM ®
.
If a cell phone is paired and connected to the vehicle, you can also subscribe by:
1. From Home view, pull down the Settings menu.
2. Open the settings menu for SiriusXM ®
Satel-
lite radio.
3. Tap
Unsubscribed Services
4.
Tap the phone number to call SiriusXM ®
,
who will activate the subscription of your choice. This may take several minutes.
When the subscription has been activated, tap the SiriusXM ®
Satellite radio icon to start the function and display the channel list included in your subscription.
Related information
•
Using SiriusXM ®
Satellite radio * (p. 399)
• SiriusXM Travel Link
* (p. 401)
Page 490 of 548
||
MAINTENANCE AND SERVICING
* Option/accessory.
488
Positions
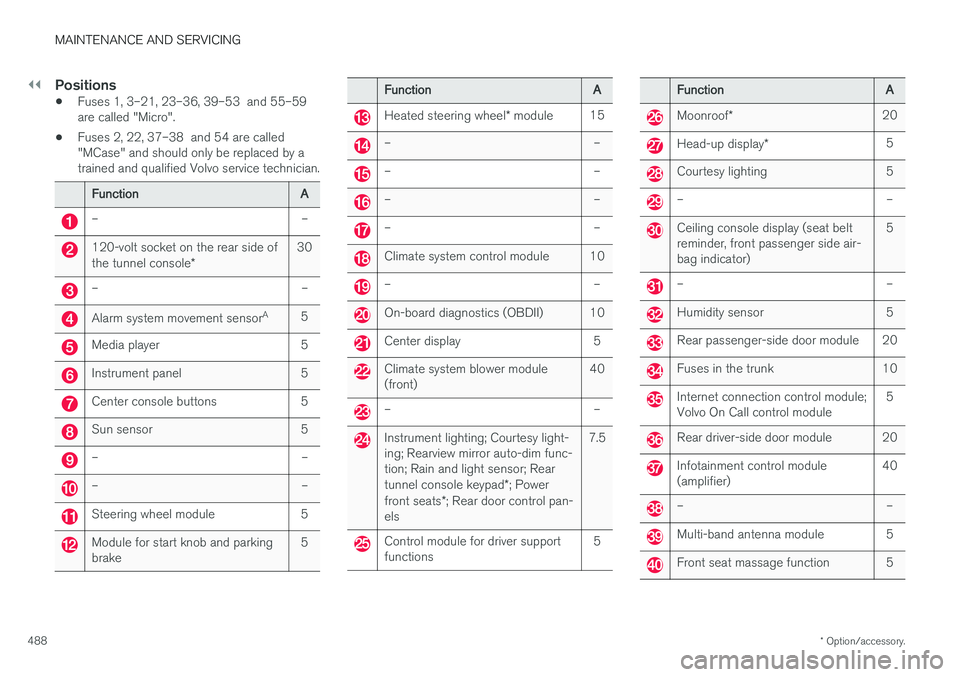
• Fuses 1, 3–21, 23–36, 39–53 and 55–59 are called "Micro".
• Fuses 2, 22, 37–38 and 54 are called"MCase" and should only be replaced by atrained and qualified Volvo service technician.
Function
A
– –
120-volt socket on the rear side of the tunnel console* 30
– –
Alarm system movement sensor
A
5
Media player 5
Instrument panel 5
Center console buttons 5
Sun sensor 5
– –
– –
Steering wheel module 5
Module for start knob and parking brake 5
Function
A
Heated steering wheel* module 15
– –
– –
– –
– –
Climate system control module 10
– –
On-board diagnostics (OBDII) 10
Center display 5
Climate system blower module (front) 40
– –
Instrument lighting; Courtesy light- ing; Rearview mirror auto-dim func-tion; Rain and light sensor; Rear tunnel console keypad
*; Power
front seats *; Rear door control pan-
els 7.5
Control module for driver support functions
5
Function
A
Moonroof* 20
Head-up display
* 5
Courtesy lighting 5
– –
Ceiling console display (seat belt reminder, front passenger side air-bag indicator) 5
– –
Humidity sensor 5
Rear passenger-side door module 20
Fuses in the trunk 10
Internet connection control module; Volvo On Call control module
5
Rear driver-side door module 20
Infotainment control module (amplifier)40
– –
Multi-band antenna module 5
Front seat massage function 5
Page 513 of 548
MAINTENANCE AND SERVICING
}}
511
Cleaning the exterior
The vehicle should be washed at regular inter- vals since dirt, dust, insects and tar spotsadhere to the paint and may cause damage. Tohelp prevent corrosion, it is particularly importantto wash the car frequently in the wintertime.
Hand washingThe following points should be kept in mind when washing and cleaning the vehicle:
CAUTION
Avoid using car washing detergents with a pH value lower than 3.5 or higher than 11.5.Doing so could result in discoloring of ano-dized aluminum surfaces on e.g., roof rails orthe frames around the side windows.
• Avoid washing your vehicle in direct sunlight. Doing so may cause detergents and wax todry out and become abrasive. To avoidscratching, use lukewarm water to soften thedirt before you wash with a soft sponge, andplenty of sudsy water.
• Bird droppings
: Remove from paintwork as
soon as possible. Otherwise the finish maybe permanently damaged.
• A car washing detergent can be used tofacilitate the softening of dirt and oil. •
Dry the vehicle with a clean chamois andremember to clean the drain holes in thedoors and rocker panels.
• Tar spots can be removed with tar removerafter the vehicle has been washed.
• A stiff-bristle brush and lukewarm soapywater can be used to clean the wiper blades.Frequent cleaning of the windshield andwiper blades improves visibility considerablyand also helps prolong the service life of thewiper blades.
• Wash off the dirt from the underside (wheelhousings, fenders, etc).
• In areas of high industrial fallout, more fre-quent washing is recommended.
CAUTION
•During high pressure washing, the spray mouthpiece must never be closer to thevehicle than 13" (30 cm). Do not sprayinto the locks.
• Dirt, snow, etc., on the headlights canreduce lighting capacity considerably.Clean the headlights regularly, for exam-ple when refueling.
Special moonroof cautions:
• Always close the moonroof and sunshade before washing your vehicle.
• Never use abrasive cleaning agents onthe moonroof.
• Never use wax on the rubber sealsaround the moonroof.
NOTE
When washing the vehicle, remember to remove dirt from the drain holes in the doorsand sills.
Automatic car washes
• We do NOT recommend washing your vehi- cle in an automatic wash during the first fewmonths (because the paint will not havehardened sufficiently).
• An automatic wash is a simple and quick wayto clean your vehicle, but it is worth remem-