ignition VOLVO S90 2020 Quick Guide
[x] Cancel search | Manufacturer: VOLVO, Model Year: 2020, Model line: S90, Model: VOLVO S90 2020Pages: 643, PDF Size: 13.68 MB
Page 154 of 643

||
LIGHTING
152
Tunnel detection
The vehicle will detect if it enters a tunnel and shift from daytime running lights to lowbeams. Note that the left-hand steering wheel lever must be in
position for tunnel detection
to work.
Related information
Lighting control and panel (p. 148)
Ignition modes (p. 381)
Daytime running lights (p. 150)
Replacing the low beam headlight bulbs (p. 560)
Using high beam
High beam is operated via the left-hand steering wheel lever. High beam is the vehi-cle's strongest lighting and should be usedwhen driving in dark conditions, provided itdoes not blind other road users, to improvevisibility.
Steering wheel lever with lighting ring.
High beam flashMove the steering wheel lever slightly backward to the high beam flash mode.The high beams will illuminate until thelever is released.
High beamsThe high beams can be activated when the lighting ring is in mode 2 or
. Activate high beams by moving the
steering wheel lever forward.
Deactivate by moving the steering wheel lever backward.
When the high beams are activated, the
symbol will be illuminated in the instrument panel.
Related information
Lighting control and panel (p. 148)
Active high beam (p. 153)
Replacing the high beam headlight bulbs(p. 561)
2
When the low beams are on.
Page 157 of 643

LIGHTING
}}
* Option/accessory.155
The function is only active in weak daylight or dark conditions and only when the vehicle ismoving and the low beams are on.
Deactivating/activating the functionThe function is activated as the default factorysetting and can be activated and deactivatedin the center display's Function view:
Tap the
Active Bending
Lights button.
Related information
Adjusting light functions via the center display (p. 149)
Front fog lights/corner illumination
*
(p. 155)
Front fog lights/corner illumination *
The fog lights can be activated manually when driving in fog and are activated auto-matically when backing up to help augmentthe backup light. If the vehicle is equipped with corner illumi- nation *, the fog lights are activated automati-
cally in weak daylight or dark conditions to illuminate the area diagonally in front of thevehicle.
Front fog lights button.
The front fog lights can be turned on when the ignition is in mode II and the lighting ring is in
position
, or .
Tap the button to activate or deactivate the function. The
symbol in the instrument
panel comes on when the front fog lights are on. The front fog lights turn off automaticallywhen the ignition is switched off or when the lighting ring is in position
.
NOTE
Regulations concerning fog light use vary from country to country.
Cornering illumination
*The front fog lamps can include the cornering lights function, which temporarily illuminates the area diagonally in front of the car in thedirection the steering wheel is turned on asharp bend, or in the direction shown by thedirection indicators. The function is activated in weak daylight or dark conditions when the lighting ring is in
or mode and the vehicle speed is
less than about 30 km/h (about 20 mph). Both cornering illumination are also illumi- nated as a complement to the taillights whenreversing. The function is activated as the default factory setting and can be activated and deactivated using the center display.
Related information
Lighting control and panel (p. 148)
Ignition modes (p. 381)
Rear fog light (p. 156)
Page 158 of 643

LIGHTING
* Option/accessory.
156
Active Bending Lights
* (p. 154)
Adjusting light functions via the center display (p. 149)
Rear fog light
The rear fog light is considerably brighter than ordinary taillights and should only beused to help other road users see the vehiclewhen visibility is reduced by conditions suchas fog, snow, smoke or dust.
Rear fog light button.
The rear fog light consists of a light on the rear of the vehicle on the driver's side. The rear fog light can only be used when:
ignition mode
II is active and the lighting
ring is in position
or
the lighting ring is in the position
and the front fog lights are on.
Press the button to switch on/off. The
symbol in the instrument panel illuminates when the rear fog light is on. The rear fog light turns off automatically when:
the ignition is off or the lighting ring is in the
position.
the lighting ring is in the
position
and the front fog lights are turned off.
NOTE
Regulations concerning rear fog light use vary from country to country.
Related information
Lighting control and panel (p. 148)
Front fog lights/corner illumination
*
(p. 155)
Ignition modes (p. 381)
Replacing the rear fog light bulb (p. 563)
Page 160 of 643
LIGHTING
* Option/accessory.
158
Using home safe lighting
Some of the exterior lights remain on to illu- minate the area around the vehicle. This iscalled home safe lighting.
To activate home safe lighting:
1. Switch off the ignition.
2. Push the left-side steering wheel lever toward the dashboard and release.
3. Exit the vehicle and lock the doors. > A symbol in the instrument panel illumi-nates to indicate that the function is activated and exterior lighting switcheson: Parking lights, headlights, licenseplate lighting and outer door handle lighting *.
The length of time home safe lighting remains illuminated can be set in the center display.
Related information
Adjusting light functions via the centerdisplay (p. 149)
Welcome Light (p. 158)
Welcome Light
Approach lighting is activated when the vehi- cle is unlocked and can be used to providelight as you walk toward the vehicle.
The function is activated when the remote key is used for unlocking. The parking lights, ceil-ing lights, footwell lights and trunk/cargocompartment lights are activated in daylightconditions. In weak daylight or dark condi-tions, the license plate lighting and outer door handle lighting * will also be activated, with the
light directed toward the ground. If no door is opened, the lights will remain illu- minated for approx. 2 minutes. If a door isopened while the function is activated, the interior lighting and outer door handle lighting *
will remain on for a longer period of time. This function can be activated and deactivated in the center display.
Related information
Adjusting light functions via the centerdisplay (p. 149)
Using home safe lighting (p. 158)
Remote key (p. 234)
Interior Lighting
The passenger compartment is equipped with several different types of lighting, e.g.general lighting, adjustable ambient lightingand reading lights.
All lighting in the passenger compartment can be turned on and off manually within5 minutes after:
the engine has been switched off and theignition is in mode
0.
the vehicle is unlocked but has not yetbeen started.
Front ceiling lighting
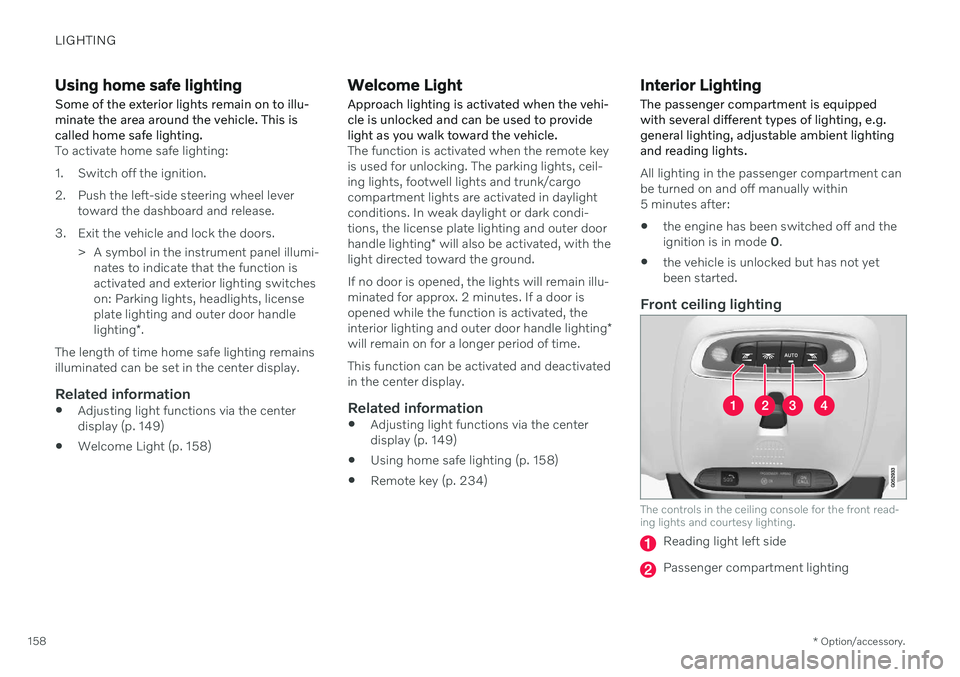
The controls in the ceiling console for the front read- ing lights and courtesy lighting.
Reading light left side
Passenger compartment lighting
Page 162 of 643
||
LIGHTING
* Option/accessory.
160 brightness can be adjusted using the thumb wheel in the dashboard.
Lighting in the tunnel console's front
cup holder
The lighting in front console cup holdersswitches on when the vehicle is unlocked andoff when the vehicle is locked. The brightnesscan be adjusted using the thumb wheel in thedashboard.
Related information
Adjusting interior lighting (p. 160)
Lighting control and panel (p. 148)
Ignition modes (p. 381)
Passenger compartment interior (p. 532)
Adjusting interior lighting
Illumination in the vehicle varies depending on ignition mode. The interior lighting can beadjusted with a thumb wheel in the dash-board and certain light functions can also beadjusted via the center display.
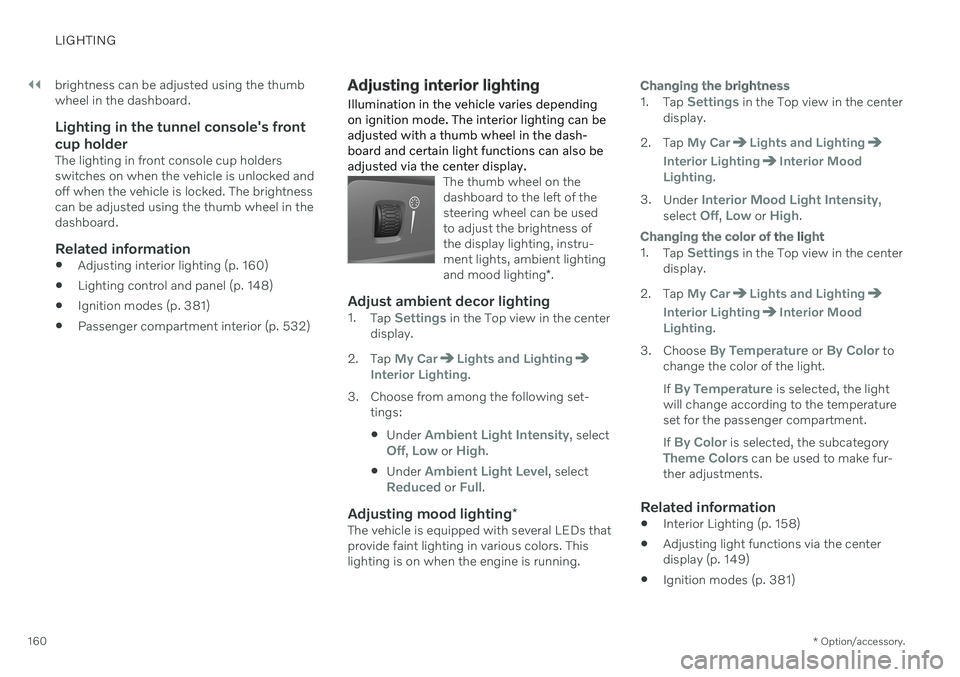
The thumb wheel on the dashboard to the left of thesteering wheel can be usedto adjust the brightness ofthe display lighting, instru-ment lights, ambient lighting and mood lighting *.
Adjust ambient decor lighting1.
Tap Settings in the Top view in the center
display.
2. Tap
My CarLights and LightingInterior Lighting.
3. Choose from among the following set- tings:
Under
Ambient Light Intensity, selectOff, Low or High.
Under
Ambient Light Level, selectReduced or Full.
Adjusting mood lighting
*The vehicle is equipped with several LEDs that provide faint lighting in various colors. Thislighting is on when the engine is running.
Changing the brightness
1.
Tap Settings in the Top view in the center
display.
2. Tap
My CarLights and Lighting
Interior LightingInterior Mood
Lighting.
3. Under
Interior Mood Light Intensity,
select Off, Low or High.
Changing the color of the light
1. Tap Settings in the Top view in the center
display.
2. Tap
My CarLights and Lighting
Interior LightingInterior Mood
Lighting.
3. Choose
By Temperature or By Color to
change the color of the light. If
By Temperature is selected, the light
will change according to the temperature set for the passenger compartment. If
By Color is selected, the subcategoryTheme Colors can be used to make fur-
ther adjustments.
Related information
Interior Lighting (p. 158)
Adjusting light functions via the center display (p. 149)
Ignition modes (p. 381)
Page 166 of 643
WINDOWS, GLASS AND MIRRORS
* Option/accessory.
164
Power windows Every door has a control panel for the power windows. The driver's door has controls foroperating all windows and for activating thechild safety locks. The power window in left rear door can also be operated with the control panel in theright rear door.
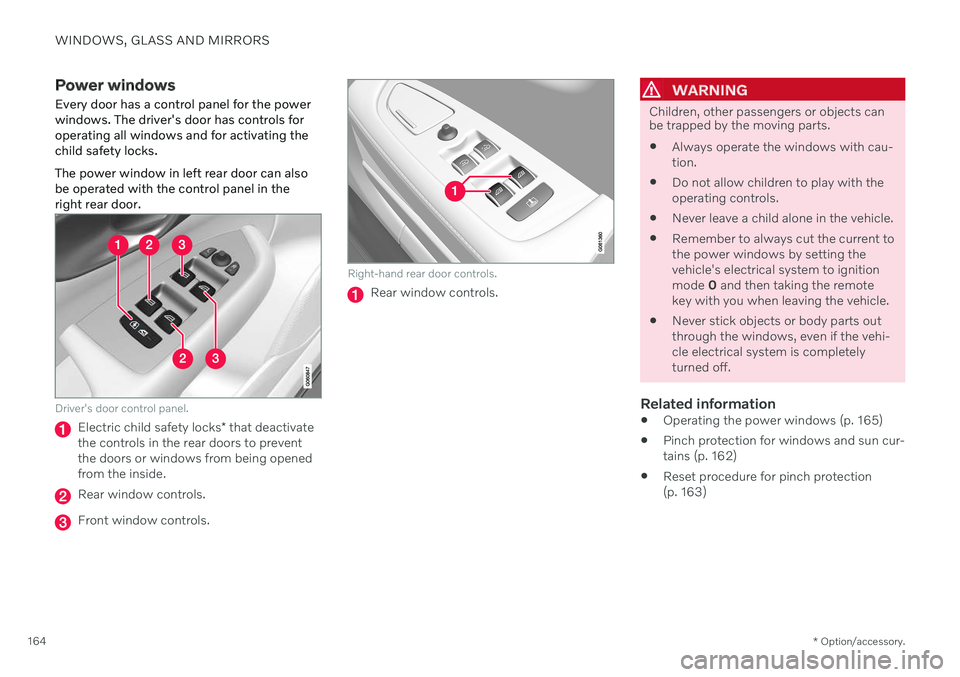
Driver's door control panel.
Electric child safety locks * that deactivate
the controls in the rear doors to prevent the doors or windows from being openedfrom the inside.
Rear window controls.
Front window controls.
Right-hand rear door controls.
Rear window controls.
WARNING
Children, other passengers or objects can be trapped by the moving parts.
Always operate the windows with cau- tion.
Do not allow children to play with theoperating controls.
Never leave a child alone in the vehicle.
Remember to always cut the current tothe power windows by setting thevehicle's electrical system to ignitionmode
0 and then taking the remote
key with you when leaving the vehicle.
Never stick objects or body parts outthrough the windows, even if the vehi-cle electrical system is completelyturned off.
Related information
Operating the power windows (p. 165)
Pinch protection for windows and sun cur-tains (p. 162)
Reset procedure for pinch protection(p. 163)
Page 167 of 643
WINDOWS, GLASS AND MIRRORS
}}
* Option/accessory.165
Operating the power windows
All power windows can be operated using the control panel in the driver's door. The controlpanels in the other doors can be used tooperate that particular door. The power window in left rear door can also be operated with the control panel in theright rear door.
The power windows have pinch protection. If there is any problem with the pinch protection,a rest procedure can be tested.
WARNING
Children, other passengers or objects can be trapped by the moving parts.
Always operate the windows with cau- tion.
Do not allow children to play with theoperating controls.
Never leave a child alone in the vehicle.
Remember to always cut the current tothe power windows by setting thevehicle's electrical system to ignitionmode
0 and then taking the remote
key with you when leaving the vehicle.
Never stick objects or body parts outthrough the windows, even if the vehi-cle electrical system is completelyturned off.
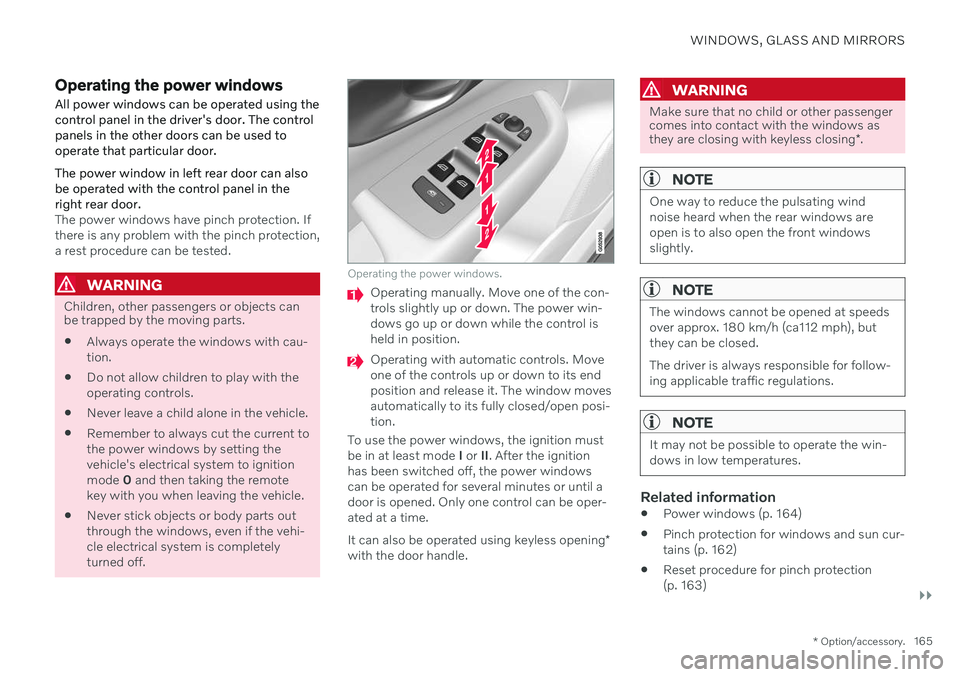
Operating the power windows.
Operating manually. Move one of the con- trols slightly up or down. The power win-dows go up or down while the control isheld in position.
Operating with automatic controls. Move one of the controls up or down to its endposition and release it. The window movesautomatically to its fully closed/open posi-tion.
To use the power windows, the ignition mustbe in at least mode I or II. After the ignition
has been switched off, the power windowscan be operated for several minutes or until adoor is opened. Only one control can be oper-ated at a time. It can also be operated using keyless opening *
with the door handle.
WARNING
Make sure that no child or other passenger comes into contact with the windows as they are closing with keyless closing *.
NOTE
One way to reduce the pulsating wind noise heard when the rear windows areopen is to also open the front windowsslightly.
NOTE
The windows cannot be opened at speeds over approx. 180 km/h (ca112 mph), butthey can be closed. The driver is always responsible for follow- ing applicable traffic regulations.
NOTE
It may not be possible to operate the win- dows in low temperatures.
Related information
Power windows (p. 164)
Pinch protection for windows and sun cur- tains (p. 162)
Reset procedure for pinch protection(p. 163)
Page 168 of 643
WINDOWS, GLASS AND MIRRORS
* Option/accessory.
166
Keyless locking and unlocking
* (p. 249)
Locking and unlocking using the remote key (p. 236)
Using sun curtains
*
There are integrated sun curtains in each rear door and in the parcel shelf in the rear win-dow.
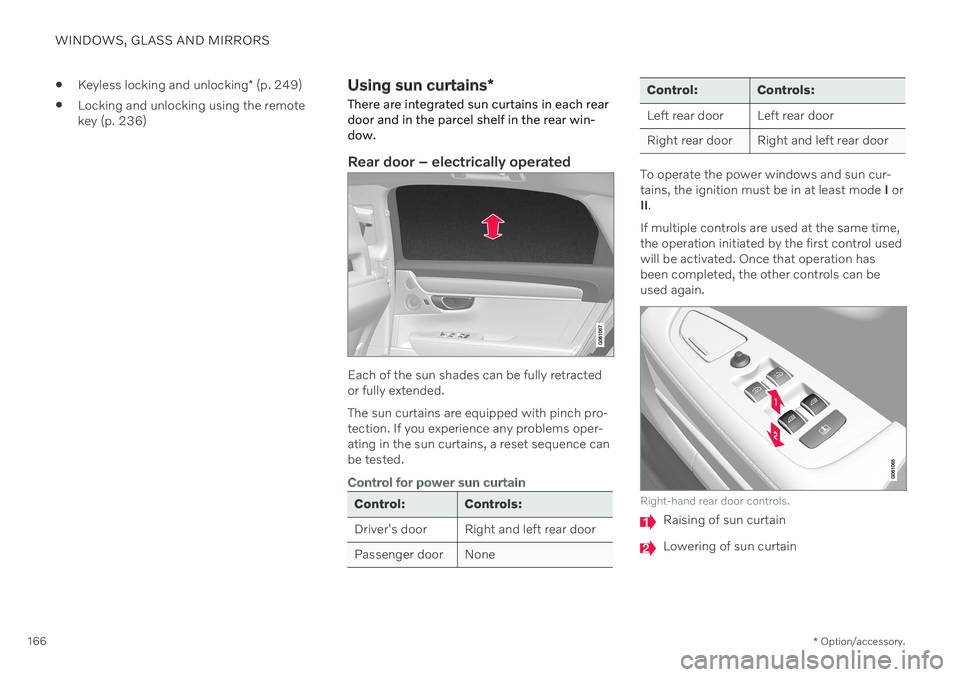
Rear door – electrically operated
Each of the sun shades can be fully retracted or fully extended. The sun curtains are equipped with pinch pro- tection. If you experience any problems oper-ating in the sun curtains, a reset sequence canbe tested.
Control for power sun curtain
Control: Controls:
Driver's door Right and left rear door
Passenger door None
Control: Controls:
Left rear door Left rear door
Right rear door Right and left rear door
To operate the power windows and sun cur- tains, the ignition must be in at least mode I or
II .
If multiple controls are used at the same time,the operation initiated by the first control usedwill be activated. Once that operation hasbeen completed, the other controls can beused again.
Right-hand rear door controls.
Raising of sun curtain
Lowering of sun curtain
Page 169 of 643

WINDOWS, GLASS AND MIRRORS
167
Close the window and raise the sun curtain
The window must be fully closed before the sun curtain can be raised.
1. Move the button upward and release.> The window moves automatically to itsupper end position.
2. Move the button upward again and release.
> The sun curtain moves automatically toits upper end position.
Lowering the sun curtain and opening the window
The sun curtain must be fully retracted (low- ered) before the window can be opened.
1. Move the button downward and release.
> The sun curtain moves automatically toits lower end position.
2. Move the button downward again to open the window.
> The window moves automatically to itslower end position.
Automatic operation - rapid opening/ closing
The window and sun curtain can be opened/ closed simultaneously:
–Open – press the control down twice to the automatic operation position andrelease.
–Close – press the control up twice to the automatic operation position and release.
Rear window shelf
An electrically operated sun curtain is inte- grated in the rear window shelf. To operate the sun curtain, the ignition must be in mode II.
NOTE
It may not be possible to operate the sun shade in low temperatures.
Operating using the center display
Tap Rear Sun Curtainin
Function view in the center display - the sun curtain willautomatically move to its endposition, up or down.
Operating with right-side rear door controls
Briefly press the button - the sun curtain will automatically move to its end position, up ordown.
Related information
Pinch protection for windows and sun cur- tains (p. 162)
Reset procedure for pinch protection(p. 163)
Power windows (p. 164)
Page 171 of 643

WINDOWS, GLASS AND MIRRORS
}}
* Option/accessory.169
The rearview mirror instead has two sensors - one pointing forward and one pointing rear-ward - which work together to identify andeliminate glare. The forward-pointing sensormonitors ambient light, while the rearward-pointing sensor monitors light from the head-lights of following vehicles. For the door mirrors to be equipped with auto- dim, the rearview mirror must also be equip-ped with auto-dim.
NOTE
If the sensors are obstructed by e.g. a parking permit, transponder, sunshade orobjects on the seats or parcel shelf in away that prevents light from reaching thesensors, the auto-dim function in the rear-view and door mirrors will be reduced.
Related information
Rearview/door mirrors (p. 168)
Adjusting the door mirrors (p. 169)
Adjusting the door mirrors
To improve visibility to the rear, the door mir- rors need to be adjusted to the driver's heightand seating position. There are several auto-matic settings that can also be connected tothe memory function buttons for the power seat *.
Controls used for door mirrors
Door mirror controls.
The joystick in the drivers' door control panel is used to adjust the position of the door mir-rors. The ignition must be in at least mode I.
1. Press the L button for the left door mirror
or R for the right door mirror. The button
will light up.
2. Adjust the position using the joystick located between the buttons. 3. Press the
L or R button again. The light in
the button will go out.
Automatically folding door mirrors *The door mirrors can be automatically foldedwhen driving or parking in tight spaces.
1. Press the L and R buttons at the same
time.
2. Release the buttons after about 1 second. The mirrors will automatically stop when they are completely folded in.
Open the mirrors by pressing L and R at the
same time. The mirrors will automatically stopwhen they are completely open.
Resetting the mirrors' positionA mirror that has been moved out of positionmanually (e.g. hit or bumped into) must beelectrically returned to its normal position for automatic folding * to function properly.
1. Fold in the mirrors by pressing the L and R
buttons at the same time.
2. Open them again by pressing the L and R
buttons at the same time.
3. Repeat the above procedure as needed. The mirrors are now reset to their original positions.