display VOLVO S90 2020 Quick Guide
[x] Cancel search | Manufacturer: VOLVO, Model Year: 2020, Model line: S90, Model: VOLVO S90 2020Pages: 643, PDF Size: 13.68 MB
Page 408 of 643

STARTING AND DRIVING
406
Deactivating the Start/Stop function
In certain situations, it may be advisable to turn the Start/Stop function off.
To turn off Start/Stop, tap theStart/Stop function button
in the center display's Func- tion view. The indicator lightin the button will go outwhen the function has beenturned off.
The function will remain turned off until:
it is reactivated
the drive mode is changed to
Eco.
Related information
Driving with the Start/Stop function (p. 404)
Conditions for the Start/Stop function(p. 406)
Conditions for the Start/Stop function
Certain conditions must be met for Start/ Stop to function.
If any condition is not met, this will be indi- cated in the instrument panel.
The engine does not auto-stopThe engine will not auto-stop if: The vehicle has not reached a speed of ca 10 km/h (6 mph) after starting.
After several auto-stops, the speed mustagain exceed approximately ca 10 km/h(6 mph) before the next auto-stop.
The driver has not fastened the seatbelt.
The engine is not running at its normaloperating temperature.
The ambient temperature is underapproximately -5 °C (23 °F) or overapproximately 30 °C (86 °F).
Windshield heating is activated.
The climate system settings and theactual climate in the passenger compart-ment differ.
The vehicle is in reverse.
The driver is making large steering wheelmovements.
The road gradient is very steep.
The hood is open.
Driving at high altitude and the engine hasnot reached its normal operating tempera-ture.
ABS has been activated.
Hard braking (even if the ABS system hasnot been activated).
Many starts during a short period of timehave triggered the starter motor's over-heating protection.
The exhaust system's particulate filter isfull
A trailer is connected to the vehicle's elec-trical system.
The transmission is not running at its nor-mal operating temperature.
The gear selector is in mode
M (±
).
If traffic conditions allow it (for example ina traffic jam).
The engine does not auto-startThe engine will not auto-start after an auto-stop if:
The driver is not wearing a seat belt, thegear selector is in the
P position and the
driver's door is open. The engine must bestarted normally.
Page 410 of 643

STARTING AND DRIVING
* Option/accessory.
408
Leveling control * and suspension
Self-leveling and suspension functions are controlled automatically.
Rear leveling control keeps the rear section of the vehicle at the same height regardless ofload. Leveling control may also remain activewhen the vehicle is parked.
Shock absorbers (Four-C)On vehicles equipped with Four-C, the shockabsorbers are adapted to the selected drive mode and the current vehicle speed. Theshock absorbers are normally set to help opti-mize comfort and are adjusted continuouslyaccording to the road surface and the vehicle'sacceleration, braking and cornering.
TransportingWhen transporting the vehicle on a ferry, trainor truck, only secure (lash) the vehicle aroundthe tires, not using any other parts of the chas-sis. Changes in the pneumatic suspension
may occur during transport, which couldadversely affect the lashing and result in dam-age.
Symbols and messages in driver display
Symbol Message Meaning
Suspension Deactivated by userActive chassis has been switched off manually by the user.
Suspension Temporarily reduced performanceActive chassis performance has been temporarily reduced due to extensive system use. If this message appears frequently (e.g. several times in one week) contact a workshop
A
.
Page 413 of 643
STARTING AND DRIVING
}}
* Option/accessory.411
Leveling control settings *
Turn off leveling control before lifting the vehicle with a jack to help avoid problemswith the pneumatic suspension.
Center display settings
Disable Leveling Control
In certain situations, this function must be turned off, e.g. before the vehicle is raised using a jack *. The level difference caused by
raising the vehicle with a jack could cause problems with the pneumatic suspension. Turning off the function in the center display:1. Tap
Settings in the Top view.
2. Tap
My CarParking Brake and
Suspension.
3. Select
Disable Leveling Control.
Related information
Leveling control
* and suspension (p. 408)
Loading recommendations (p. 538)
Economical driving
Drive economically and more environmentally conscious by thinking ahead and avoidingrapid starts and stops.
Adapt your driving style and speed to the cur- rent traffic conditions. Observe the following rules:
For lower fuel consumption, activate
Ecodrive mode.
Use the Eco Coast function in drive mode
Eco - engine braking is deactivated, allow-
ing the vehicle's kinetic energy to be used to roll greater distances.
Use gear
D as often as possible and avoid
using the kick-down function.
For manual gear shifting, use the highestpossible gear for the current traffic situa-tion and road conditions - fuel consump-tion is reduced at lower engine speeds (rpm). Use the gear indicator 13
.
Maintain a steady speed and a generous following distance to traffic ahead to mini-mize braking.
Fuel consumption is increased at highspeeds - air resistance increases withspeed.
The trip computer's current fuel consump-tion indicator can help promote more fuel-efficient driving.
Do not warm up the engine by idling. It isbetter to begin driving normally immedi-ately after starting the engine. A coldengine uses more fuel than a warmengine.
Whenever possible, avoid using the vehi-cle to drive short distances. The enginedoes not have time to reach a normaloperating temperature and this leads toincreased fuel consumption.
Use engine braking to brake the vehicle,when this is safe for other road users.
Maintain the correct pressure in the tiresand check pressure regularly.
The type of tires used could affect fuelconsumption - consult a retailer for adviceon suitable tires.
Remove unnecessary items from the vehi-cle - the heavier the load, the higher thefuel consumption.
Roof loads increase air resistance andincrease fuel consumption. Remove roofboxes, ski racks, etc. that are not in use.
Avoid driving with the windows open.
13
Only available in certain markets.
Page 420 of 643

STARTING AND DRIVING
418
Emission controls
Three-way catalytic converter
Keep your engine properly tuned. Certain engine malfunctions, particularly involvingthe electrical, fuel or distributor ignitionsystems, may cause unusually high three-way catalytic converter temperatures. Donot continue to operate your vehicle if youdetect engine misfire, noticeable loss ofpower or other unusual operating condi-tions, such as engine overheating or back-firing. A properly tuned engine will helpavoid malfunctions that could damage thethree-way catalytic converter.
Do not park your vehicle over combustiblematerials, such as grass or leaves, whichcan come into contact with the hotexhaust system and cause such materialsto ignite under certain wind and weatherconditions.
Excessive starter cranking (in excess ofone minute), or an intermittently firing orflooded engine can cause three-way cata-lytic converter or exhaust system over-heating.
Remember that tampering or unauthor-ized modifications to the engine, theEngine Control Module, or the vehicle maybe illegal and can cause three-way cata-lytic converter or exhaust system over-heating. This includes: altering fuel injec- tion settings or components, alteringemission system components or locationor removing components, and/or repeateduse of leaded fuel.
NOTE
Unleaded fuel is required for vehicles with three-way catalytic converters.
Heated oxygen sensorsThe heated oxygen sensors monitor the oxy- gen content of the exhaust gases. Readings are fed into a control module that continuouslymonitors engine functions and controls fuelinjection. The ratio of fuel to air into the engineis continuously adjusted for efficient combus-tion to help reduce harmful emissions.
Related information
Octane rating (p. 416)
Fuel (p. 415)
Overheating of engine and transmission
In certain driving conditions, such as driving in mountainous areas or hot weather, there isa risk of the engine or transmission overheat-ing, especially when carrying heavy loads.
Engine power may be temporarily limited.
Remove any auxiliary lights mounted in front of the grille when driving in hotweather.
If the temperature in the engine's coolingsystem becomes too high, a warning sym-bol will appear in the instrument panel along with the message
Engine
temperature High temperature Stop
safely. Pull over to a safe location and let
the engine idle for a few minutes to cool down.
If the message
Engine temperature
High temperature Turn off engine orEngine coolant Level low, turn off
engine is displayed, stop the vehicle and
turn off the engine.
If the transmission begins to overheat, an alternative gear shifting program will beselected. An integrated protective functionwill also be activated, the warning symbolwill illuminate and the message
Transmission warm Reduce speed to
lower temperature or Transmission hot
Stop safely, wait for cooling will be dis-
Page 421 of 643

STARTING AND DRIVING
419
played in the instrument panel. Follow the recommendations given by reducingspeed or stopping the vehicle safely andletting the engine idle for a few minutes tolet the transmission cool.
If the vehicle begins to overheat, the airconditioning may be temporarily switchedoff.
After a prolonged period of driving indemanding conditions, do not turn off theengine immediately after stopping.
NOTE
It is normal for the engine's cooling fan to operate for a short time after the engine isswitched off.
Symbols in the instrument panel
Symbol Meaning
High engine temperature. Follow the recommendations provided.
Low coolant level. Follow the recommendations provided.
Transmission hot/overheated/ cooling. Follow the recommen-dations provided.
Related information
Refilling coolant (p. 556)
Preparing for a long trip (p. 412)
Battery drain
The electrical functions in the vehicle drain the battery to varying degrees. Avoid usingignition mode II when the engine is switched
off. Use ignition mode I instead, as this uses
less electrical current.
Note that certain accessories may also drain power from the electrical system. Do not usefunctions that use a lot of electrical currentwhen the engine is turned off. Examples ofsuch functions are: blower
headlights
windshield wipers
audio system (especially at high volume).
If the starter battery voltage is low, a message is shown in the driver display. The vehicle'senergy-saving function will then turn off orreduce certain functions, such as the blowerand/or the audio system.
–Charge the battery by starting the engine and let it run for at least 15 minutes (driv-ing charges the battery faster than lettingthe engine idle).
Related information
Start battery (p. 567)
Ignition modes (p. 381)
Page 427 of 643

STARTING AND DRIVING
}}
* Option/accessory.425
Recovery
This section refers to transporting the vehicle with a tow truck or similar vehicle.
Call a professional towing service for assis- tance. In certain conditions, the towing eyelet can be used to pull the vehicle onto a flatbed towtruck. For vehicles equipped with leveling con- trol *: If the vehicle is equipped with pneumatic
suspension, this feature must be turned off before the vehicle is lifted onto a tow truck.Turning off the function in the center display. 1. Tap
Settings in the Top view.
2. Tap
My CarParking Brake and
Suspension.
3. Select
Disable Leveling Control.
The vehicle's location and ground clearance determine if it can be lifted onto a tow truck. Ifthe incline of the tow truck is too steep or ifthe ground clearance under the vehicle isinsufficient, attempting to pull it up may resultin damage. In this case, the vehicle shouldonly be lifted with the tow truck's lifting equip-ment.
WARNING
No person or object should be behind the tow truck when the vehicle is lifted ontothe bed of the truck.
CAUTION
The towing eyelet is only intended for tow- ing on roads, and must not be used to pull
vehicles from ditches or any similar pur-pose involving severe strain. Call a towtruck for professional assistance.
CAUTION
Note that the vehicle must always be towed with the wheels rolling forward.
Related information
Attaching and removing the towing eyelet (p. 423)
HomeLink ®
*17
HomeLink ®
18
is a programmable remote con-
trol, integrated in the vehicle electrical sys- tem, that can control up to three differentdevices (e.g. garage door opener, alarm sys-tem, outdoor and indoor lighting) and therebyreplace the remote controls for these.
General
The illustration is generic – the design may vary.
Button 1
Button 2
Button 3
Indicator light
17 Certain markets only.
18 HomeLink and the HomeLink house symbol are registered trademarks of Gentex Corporation.
Page 432 of 643
STARTING AND DRIVING
* Option/accessory.
430
Activating and deactivating the compass *
An integrated compass 25
in the upper right
corner of the rearview mirror shows the direction the vehicle is traveling.
The compass is automatically activated when the vehicle is started. To deactivate/activate the compass manually:
–Use a paper clip or similar object to press the button on the bottom of the mirror.
> If the compass is deactivated when the vehicle is switched off, it will not be activated the next time the vehicle isstarted. The compass will then need tobe activated manually.
Related information
Compass
* (p. 429)
Calibrating the compass
* (p. 430)
Calibrating the compass *
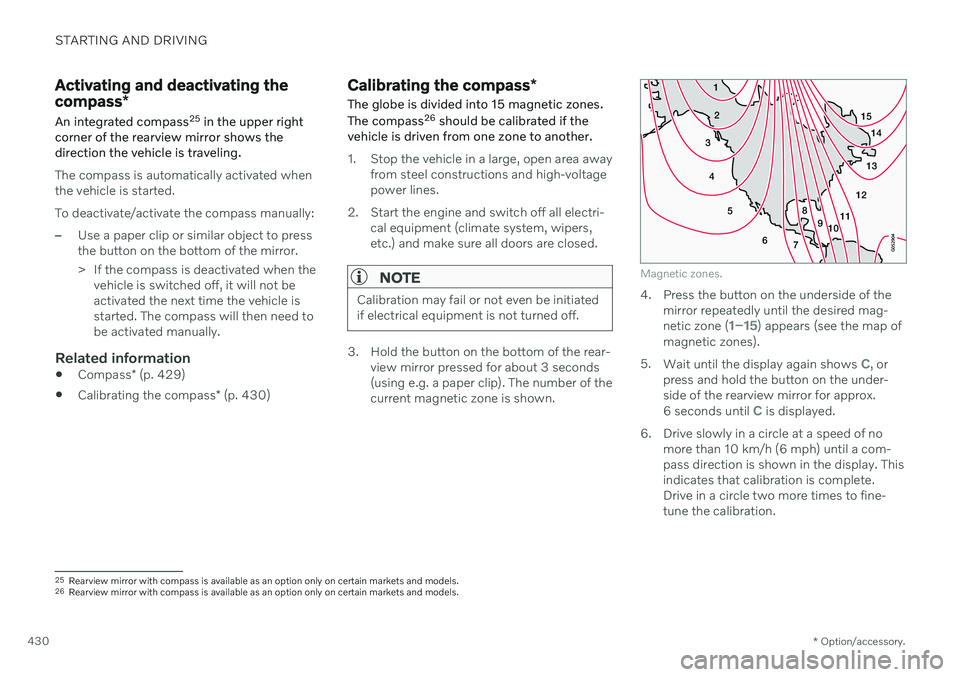
The globe is divided into 15 magnetic zones. The compass 26
should be calibrated if the
vehicle is driven from one zone to another.
1. Stop the vehicle in a large, open area away from steel constructions and high-voltage power lines.
2. Start the engine and switch off all electri- cal equipment (climate system, wipers,etc.) and make sure all doors are closed.
NOTE
Calibration may fail or not even be initiated if electrical equipment is not turned off.
3. Hold the button on the bottom of the rear-view mirror pressed for about 3 seconds (using e.g. a paper clip). The number of thecurrent magnetic zone is shown.
15
14
13
12
11
9
8
7
6
5
4
3
2
1
10
Magnetic zones.
4. Press the button on the underside of themirror repeatedly until the desired mag- netic zone (
1–15) appears (see the map of
magnetic zones).
5. Wait until the display again shows
C, or
press and hold the button on the under- side of the rearview mirror for approx.
6 seconds until
C is displayed.
6. Drive slowly in a circle at a speed of no more than 10 km/h (6 mph) until a com- pass direction is shown in the display. Thisindicates that calibration is complete.Drive in a circle two more times to fine-tune the calibration.
25Rearview mirror with compass is available as an option only on certain markets and models.
26 Rearview mirror with compass is available as an option only on certain markets and models.
Page 433 of 643
STARTING AND DRIVING
* Option/accessory.431
7.
Vehicles with heated windshields *: If
Cis shown in the display when the wind- shield heating function is activated, per-form step 6 above with the heating func-tion on.
8. Repeat the above procedure as needed.
Related information
Compass
* (p. 429)
Activating and deactivating the compass
*
(p. 430)
Page 436 of 643
AUDIO, MEDIA AND INTERNET
* Option/accessory.
434
Audio, media and Internet
The audio and media system consists of a media player and a radio. A cellular phone canalso be connected through Bluetooth to usehands-free functions or play music in thevehicle. When the vehicle is connected to theInternet, it is also possible to use apps to playmedia.
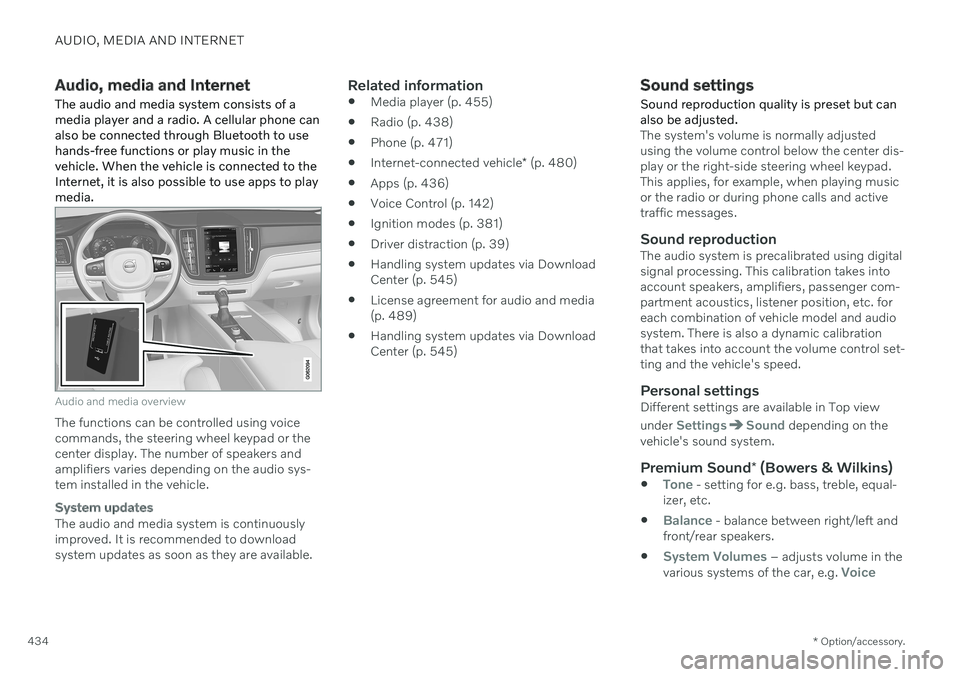
Audio and media overview
The functions can be controlled using voice commands, the steering wheel keypad or thecenter display. The number of speakers andamplifiers varies depending on the audio sys-tem installed in the vehicle.
System updates
The audio and media system is continuously improved. It is recommended to download system updates as soon as they are available.
Related information
Media player (p. 455)
Radio (p. 438)
Phone (p. 471)
Internet-connected vehicle
* (p. 480)
Apps (p. 436)
Voice Control (p. 142)
Ignition modes (p. 381)
Driver distraction (p. 39)
Handling system updates via DownloadCenter (p. 545)
License agreement for audio and media(p. 489)
Handling system updates via DownloadCenter (p. 545)
Sound settings
Sound reproduction quality is preset but can also be adjusted.
The system's volume is normally adjusted using the volume control below the center dis-play or the right-side steering wheel keypad.This applies, for example, when playing musicor the radio or during phone calls and activetraffic messages.
Sound reproductionThe audio system is precalibrated using digitalsignal processing. This calibration takes intoaccount speakers, amplifiers, passenger com-partment acoustics, listener position, etc. foreach combination of vehicle model and audiosystem. There is also a dynamic calibrationthat takes into account the volume control set-ting and the vehicle's speed.
Personal settingsDifferent settings are available in Top view under
SettingsSound depending on the
vehicle's sound system.
Premium Sound * (Bowers & Wilkins)
Tone - setting for e.g. bass, treble, equal-
izer, etc.
Balance - balance between right/left and
front/rear speakers.
System Volumes – adjusts volume in the
various systems of the car, e.g. Voice
Page 437 of 643
AUDIO, MEDIA AND INTERNET
* Option/accessory.435
Control, Park Assist and Phone
Ringtone.
High Performance Pro * (Harman
Kardon)
Equalizer - setting of equalizer.
Balance - balance between right/left and
front/rear speakers.
System Volumes – adjusts volume in the
various systems of the car, e.g. Voice
Control, Park Assist and Phone
Ringtone.
High Performance
Tone - setting for e.g. bass, treble, equal-
izer, etc.
Balance - balance between right/left and
front/rear speakers.
System Volumes – adjusts volume in the
various systems of the car, e.g. Voice
Control, Park Assist and Phone
Ringtone.
Related information
Sound experience
* (p. 435)
Media player (p. 455)
Voice control settings (p. 146)
Phone settings (p. 478)
Audio, media and Internet (p. 434)
Internet-connected vehicle
* (p. 480)
Sound experience *
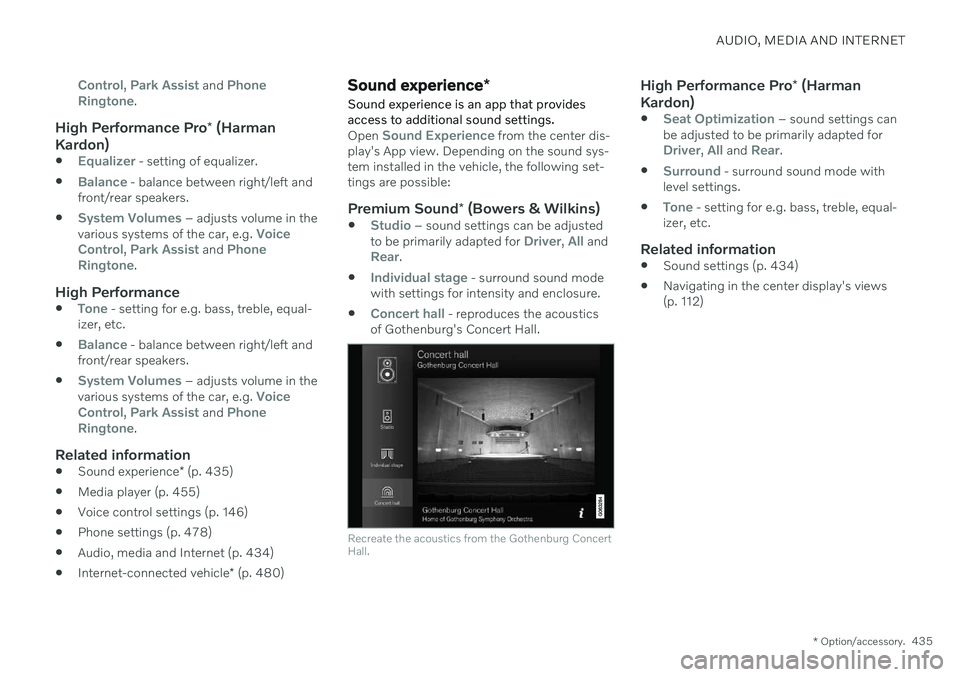
Sound experience is an app that provides access to additional sound settings.
Open Sound Experience from the center dis-
play's App view. Depending on the sound sys- tem installed in the vehicle, the following set-tings are possible:
Premium Sound * (Bowers & Wilkins)
Studio – sound settings can be adjusted
to be primarily adapted for Driver, All andRear.
Individual stage - surround sound mode
with settings for intensity and enclosure.
Concert hall - reproduces the acoustics
of Gothenburg's Concert Hall.
Recreate the acoustics from the Gothenburg Concert Hall.
High Performance Pro * (Harman
Kardon)
Seat Optimization – sound settings can
be adjusted to be primarily adapted for
Driver, All and Rear.
Surround - surround sound mode with
level settings.
Tone - setting for e.g. bass, treble, equal-
izer, etc.
Related information
Sound settings (p. 434)
Navigating in the center display's views (p. 112)