steering wheel VOLVO S90 2020 Quick Guide
[x] Cancel search | Manufacturer: VOLVO, Model Year: 2020, Model line: S90, Model: VOLVO S90 2020Pages: 643, PDF Size: 13.68 MB
Page 155 of 643

LIGHTING
153
Active high beam
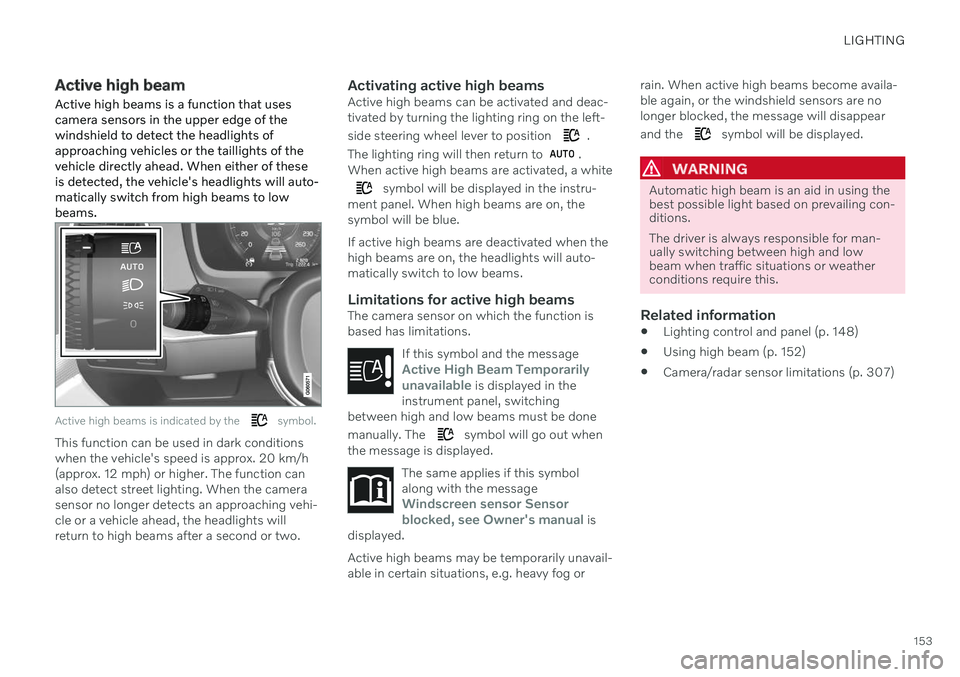
Active high beams is a function that uses camera sensors in the upper edge of thewindshield to detect the headlights ofapproaching vehicles or the taillights of thevehicle directly ahead. When either of theseis detected, the vehicle's headlights will auto-matically switch from high beams to lowbeams.
Active high beams is indicated by the symbol.
This function can be used in dark conditions when the vehicle's speed is approx. 20 km/h(approx. 12 mph) or higher. The function canalso detect street lighting. When the camerasensor no longer detects an approaching vehi-cle or a vehicle ahead, the headlights willreturn to high beams after a second or two.
Activating active high beamsActive high beams can be activated and deac-tivated by turning the lighting ring on the left- side steering wheel lever to position
.
The lighting ring will then return to
.
When active high beams are activated, a white
symbol will be displayed in the instru-
ment panel. When high beams are on, the symbol will be blue. If active high beams are deactivated when the high beams are on, the headlights will auto-matically switch to low beams.
Limitations for active high beamsThe camera sensor on which the function isbased has limitations.
If this symbol and the message
Active High Beam Temporarily
unavailable is displayed in the
instrument panel, switching
between high and low beams must be done manually. The
symbol will go out when
the message is displayed.
The same applies if this symbol along with the message
Windscreen sensor Sensor
blocked, see Owner's manual is
displayed.
Active high beams may be temporarily unavail- able in certain situations, e.g. heavy fog or rain. When active high beams become availa-ble again, or the windshield sensors are nolonger blocked, the message will disappear and the
symbol will be displayed.
WARNING
Automatic high beam is an aid in using the best possible light based on prevailing con-ditions. The driver is always responsible for man- ually switching between high and lowbeam when traffic situations or weatherconditions require this.
Related information
Lighting control and panel (p. 148)
Using high beam (p. 152)
Camera/radar sensor limitations (p. 307)
Page 156 of 643

LIGHTING
* Option/accessory.
154
Using turn signals
The vehicle's turn signals are controlled using the left-side steering wheel lever. The turnsignals flash three times or continuously,depending on how far up or down the lever ismoved.
Turn signals.
Triple flash indicatorMove the steering wheel lever up or down to the first position and release. The turnsignals will flash three times. If the func-tion is deactivated via the center display,the signals will flash once.
NOTE
This automatic flashing sequence can be interrupted by immediately movingthe lever in the opposite direction.
If the turn signal indicator flashes morequickly than normal, refer to the mes-sage in the instrument panel.
Continuous flashing sequenceMove the lever up or down as far as possi- ble.
The lever will stop in its end position and canbe moved back manually or automatically bymoving the steering wheel.
Related information
Hazard warning flashers (p. 157)
Adjusting light functions via the centerdisplay (p. 149)
Replacing front turn signal bulbs (p. 563)
Active Bending Lights
*
Active Bending Lights (ABL) are designed to help provide extra illumination in curves andintersections. Depending on equipment level, vehicles with LED 3
headlights * may be equip-
ped with Active Bending Lights.
Headlight pattern with function deactivated (left) and activated (right).
Active Bending Lights follow the movement of the steering wheel to help provide extra illumi-nation in curves and intersections, helping toimprove visibility for the driver. The function is automatically activated when the engine is started. If a fault is detected in the system, the
symbol will illuminate in
the instrument panel and a message will be displayed.
3 LED (Light Emitting Diode)
Page 157 of 643

LIGHTING
}}
* Option/accessory.155
The function is only active in weak daylight or dark conditions and only when the vehicle ismoving and the low beams are on.
Deactivating/activating the functionThe function is activated as the default factorysetting and can be activated and deactivatedin the center display's Function view:
Tap the
Active Bending
Lights button.
Related information
Adjusting light functions via the center display (p. 149)
Front fog lights/corner illumination
*
(p. 155)
Front fog lights/corner illumination *
The fog lights can be activated manually when driving in fog and are activated auto-matically when backing up to help augmentthe backup light. If the vehicle is equipped with corner illumi- nation *, the fog lights are activated automati-
cally in weak daylight or dark conditions to illuminate the area diagonally in front of thevehicle.
Front fog lights button.
The front fog lights can be turned on when the ignition is in mode II and the lighting ring is in
position
, or .
Tap the button to activate or deactivate the function. The
symbol in the instrument
panel comes on when the front fog lights are on. The front fog lights turn off automaticallywhen the ignition is switched off or when the lighting ring is in position
.
NOTE
Regulations concerning fog light use vary from country to country.
Cornering illumination
*The front fog lamps can include the cornering lights function, which temporarily illuminates the area diagonally in front of the car in thedirection the steering wheel is turned on asharp bend, or in the direction shown by thedirection indicators. The function is activated in weak daylight or dark conditions when the lighting ring is in
or mode and the vehicle speed is
less than about 30 km/h (about 20 mph). Both cornering illumination are also illumi- nated as a complement to the taillights whenreversing. The function is activated as the default factory setting and can be activated and deactivated using the center display.
Related information
Lighting control and panel (p. 148)
Ignition modes (p. 381)
Rear fog light (p. 156)
Page 160 of 643

LIGHTING
* Option/accessory.
158
Using home safe lighting
Some of the exterior lights remain on to illu- minate the area around the vehicle. This iscalled home safe lighting.
To activate home safe lighting:
1. Switch off the ignition.
2. Push the left-side steering wheel lever toward the dashboard and release.
3. Exit the vehicle and lock the doors. > A symbol in the instrument panel illumi-nates to indicate that the function is activated and exterior lighting switcheson: Parking lights, headlights, licenseplate lighting and outer door handle lighting *.
The length of time home safe lighting remains illuminated can be set in the center display.
Related information
Adjusting light functions via the centerdisplay (p. 149)
Welcome Light (p. 158)
Welcome Light
Approach lighting is activated when the vehi- cle is unlocked and can be used to providelight as you walk toward the vehicle.
The function is activated when the remote key is used for unlocking. The parking lights, ceil-ing lights, footwell lights and trunk/cargocompartment lights are activated in daylightconditions. In weak daylight or dark condi-tions, the license plate lighting and outer door handle lighting * will also be activated, with the
light directed toward the ground. If no door is opened, the lights will remain illu- minated for approx. 2 minutes. If a door isopened while the function is activated, the interior lighting and outer door handle lighting *
will remain on for a longer period of time. This function can be activated and deactivated in the center display.
Related information
Adjusting light functions via the centerdisplay (p. 149)
Using home safe lighting (p. 158)
Remote key (p. 234)
Interior Lighting
The passenger compartment is equipped with several different types of lighting, e.g.general lighting, adjustable ambient lightingand reading lights.
All lighting in the passenger compartment can be turned on and off manually within5 minutes after:
the engine has been switched off and theignition is in mode
0.
the vehicle is unlocked but has not yetbeen started.
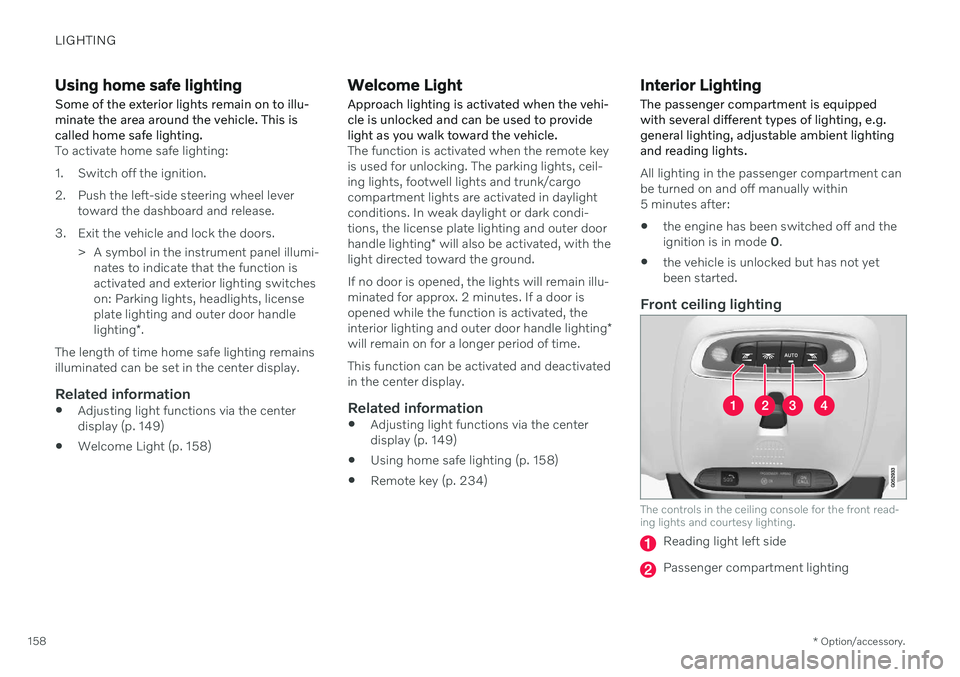
Front ceiling lighting
The controls in the ceiling console for the front read- ing lights and courtesy lighting.
Reading light left side
Passenger compartment lighting
Page 162 of 643

||
LIGHTING
* Option/accessory.
160 brightness can be adjusted using the thumb wheel in the dashboard.
Lighting in the tunnel console's front
cup holder
The lighting in front console cup holdersswitches on when the vehicle is unlocked andoff when the vehicle is locked. The brightnesscan be adjusted using the thumb wheel in thedashboard.
Related information
Adjusting interior lighting (p. 160)
Lighting control and panel (p. 148)
Ignition modes (p. 381)
Passenger compartment interior (p. 532)
Adjusting interior lighting
Illumination in the vehicle varies depending on ignition mode. The interior lighting can beadjusted with a thumb wheel in the dash-board and certain light functions can also beadjusted via the center display.
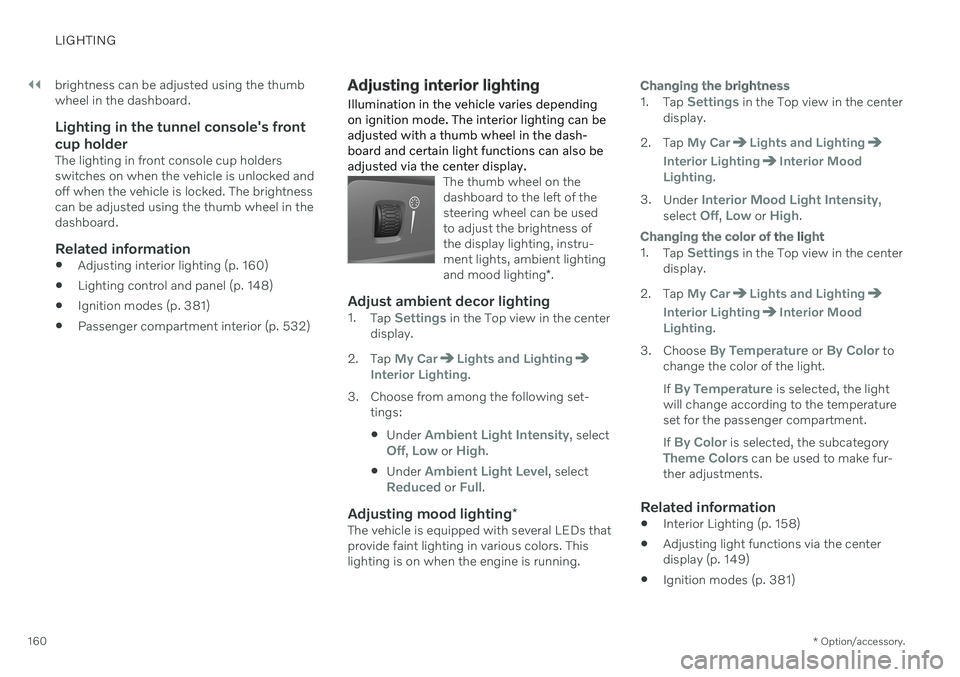
The thumb wheel on the dashboard to the left of thesteering wheel can be usedto adjust the brightness ofthe display lighting, instru-ment lights, ambient lighting and mood lighting *.
Adjust ambient decor lighting1.
Tap Settings in the Top view in the center
display.
2. Tap
My CarLights and LightingInterior Lighting.
3. Choose from among the following set- tings:
Under
Ambient Light Intensity, selectOff, Low or High.
Under
Ambient Light Level, selectReduced or Full.
Adjusting mood lighting
*The vehicle is equipped with several LEDs that provide faint lighting in various colors. Thislighting is on when the engine is running.
Changing the brightness
1.
Tap Settings in the Top view in the center
display.
2. Tap
My CarLights and Lighting
Interior LightingInterior Mood
Lighting.
3. Under
Interior Mood Light Intensity,
select Off, Low or High.
Changing the color of the light
1. Tap Settings in the Top view in the center
display.
2. Tap
My CarLights and Lighting
Interior LightingInterior Mood
Lighting.
3. Choose
By Temperature or By Color to
change the color of the light. If
By Temperature is selected, the light
will change according to the temperature set for the passenger compartment. If
By Color is selected, the subcategoryTheme Colors can be used to make fur-
ther adjustments.
Related information
Interior Lighting (p. 158)
Adjusting light functions via the center display (p. 149)
Ignition modes (p. 381)
Page 178 of 643

WINDOWS, GLASS AND MIRRORS
* Option/accessory.
176
Wiper blades and washer fluid The wipers and the washer fluid are designed to improve visibility and the headlight pat-tern.
The washer nozzles are heated * automatically
in cold weather to prevent the washer fluid from freezing. When there is approximately 1 liter (1 qt) of washer fluid remaining, a message to refill willappear in the instrument panel.
Related information
Using the rain sensor (p. 177)
Using the windshield and headlight wash-ers (p. 178)
Using the rain sensor's memory function(p. 178)
Filling washer fluid (p. 607)
Putting the wiper blades in service posi-tion (p. 606)
Replacing windshield wiper blades(p. 605)
Using the windshield wipers (p. 176)
Using the windshield wipers
The windshield wipers are designed to clean the windshield. The right-side steering wheellever is used to adjust windshield wiper set-tings.
Right-hand steering wheel lever.
The thumb wheel is used to set rain sen- sor sensitivity and interval wiper speed.
Single sweepMove the lever down and release for asingle sweep.
Wipers offMove the lever to position 0 to turn off
the windshield wipers.
Interval wipersMove the lever upward to put the wip- ers in interval wiping mode. Set the
number of sweeps per time unit with thethumb wheel when interval wipers areselected.
Continuous wipersMove the lever upward for the wipers to operate at normal speed.
Move the lever upward again for the wipers to operate at high speed.
CAUTION
Before activating the wipers, make sure that the wiper blades are not frozen inplace and that any snow or ice on thewindshield has been scraped away.
CAUTION
Use plenty of washer fluid when the wipers clean the windshield. The windshield mustbe wet when the windshield wipers areworking.
Related information
Using the rain sensor (p. 177)
Using the windshield and headlight wash- ers (p. 178)
Wiper blades and washer fluid (p. 176)
Page 179 of 643

WINDOWS, GLASS AND MIRRORS
}}
177
Using the rain sensor's memory function (p. 178)
Filling washer fluid (p. 607)
Putting the wiper blades in service posi-tion (p. 606)
Replacing windshield wiper blades(p. 605)
Using the rain sensor
The rain sensor monitors the amount of water on the windshield and automatically startsthe windshield wipers. Rain sensor sensitivitycan be adjusted using the thumb wheel onthe right-hand steering wheel lever.
Right-hand steering wheel lever.
Rain sensor button
Thumb wheel, sensitivity/interval wiper speed
When the rain sensor is activated, the
rain sensor symbol will be displayed in the instrument panel.
Activating the rain sensorWhen the rain sensor is activated, the enginemust be running or the ignition in mode I or II
while the windshield wiper lever is in position0 or in the single sweep position. Activate the rain sensor by pressing the rain sensor button
.
Move the lever downward for an extra wiper sweep. Turn the thumb wheel upward for increased sensitivity and downward for decreased sensi-tivity. The wipers will make one extra sweepwhen the thumb wheel is turned upward.
Deactivate the rain sensorDeactivate the rain sensor by pressing the
rain sensor button or moving the lever
upward to another wiper mode. The rain sensor is automatically deactivated in ignition mode 0 or when the engine is
switched off. The rain sensor is also automatically deacti- vated when the wiper blades are put in theservice position. The rain sensor will reactivatewhen service mode is switched off.
CAUTION
The windshield wipers may start inadver- tently and be damaged in automatic carwashes. Deactivate the rain sensor whenthe engine is running or when the ignitionis in mode I or II. The symbol in the instru-
ment panel will go out.
Page 180 of 643

||
WINDOWS, GLASS AND MIRRORS
178
Related information
Using the windshield and headlight wash- ers (p. 178)
Wiper blades and washer fluid (p. 176)
Using the rain sensor's memory function(p. 178)
Filling washer fluid (p. 607)
Putting the wiper blades in service posi-tion (p. 606)
Replacing windshield wiper blades(p. 605)
Using the windshield wipers (p. 176)
Using the rain sensor's memory function
The rain sensor monitors the amount of water on the windshield and automatically startsthe windshield wipers.
Activating/deactivating memory function
The rain sensor's memory function can be set to activate so that the rain sensor button doesnot need to be pressed each time the engineis started: 1. Tap
Settings in the Top view in the center
display.
2. Tap
My CarWipers.
3. Select
Rain Sensor Memory to activate/
deactivate the memory function.
Related information
Using the rain sensor (p. 177)
Using the windshield and headlight wash- ers (p. 178)
Wiper blades and washer fluid (p. 176)
Filling washer fluid (p. 607)
Putting the wiper blades in service posi-tion (p. 606)
Replacing windshield wiper blades(p. 605)
Using the windshield wipers (p. 176)
Using the windshield and headlight washers The windshield and headlight washers are designed to clean the windshield and head-lights. Use the right-side steering wheel leverto start the windshield and headlight wash-ers.
Starting the windshield and headlight washers
Washing function, right-hand steering wheel lever.
–Move the right-hand steering wheel lever toward the steering wheel to start thewindshield and headlight washers.
> After the lever is released, the wipers
make several extra sweeps.
Page 184 of 643

SEATS AND STEERING WHEEL
* Option/accessory.
182
Manual front seats
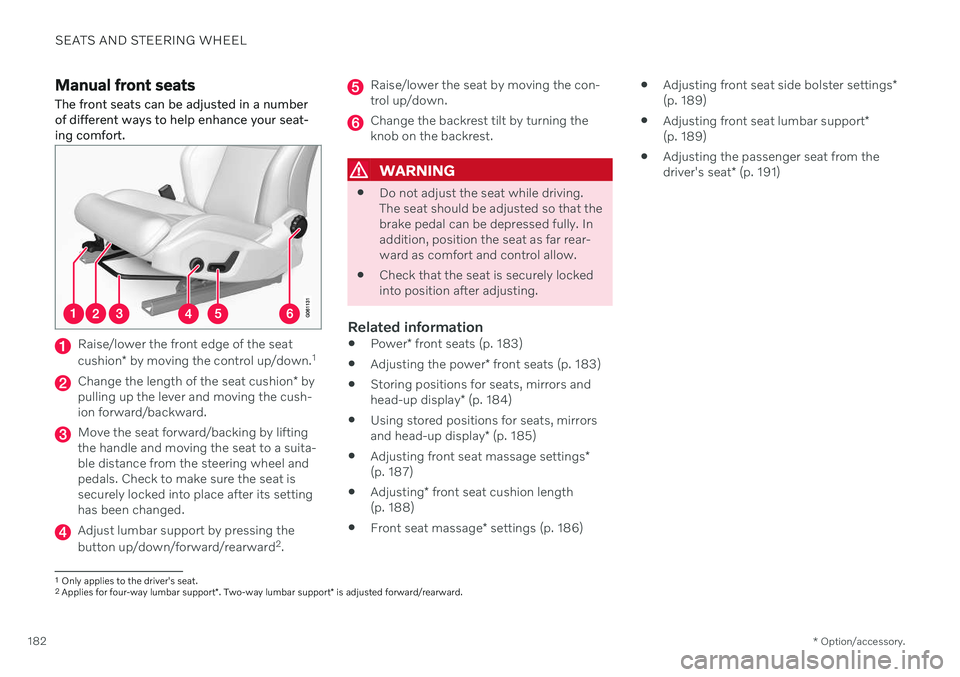
The front seats can be adjusted in a number of different ways to help enhance your seat-ing comfort.
Raise/lower the front edge of the seat cushion * by moving the control up/down. 1
Change the length of the seat cushion
* by
pulling up the lever and moving the cush- ion forward/backward.
Move the seat forward/backing by lifting the handle and moving the seat to a suita-ble distance from the steering wheel andpedals. Check to make sure the seat issecurely locked into place after its settinghas been changed.
Adjust lumbar support by pressing the button up/down/forward/rearward 2
.
Raise/lower the seat by moving the con- trol up/down.
Change the backrest tilt by turning the knob on the backrest.
WARNING
Do not adjust the seat while driving. The seat should be adjusted so that thebrake pedal can be depressed fully. Inaddition, position the seat as far rear-ward as comfort and control allow.
Check that the seat is securely lockedinto position after adjusting.
Related information
Power
* front seats (p. 183)
Adjusting the power
* front seats (p. 183)
Storing positions for seats, mirrors and head-up display
* (p. 184)
Using stored positions for seats, mirrorsand head-up display
* (p. 185)
Adjusting front seat massage settings
*
(p. 187)
Adjusting
* front seat cushion length
(p. 188)
Front seat massage
* settings (p. 186)
Adjusting front seat side bolster settings
*
(p. 189)
Adjusting front seat lumbar support
*
(p. 189)
Adjusting the passenger seat from thedriver's seat
* (p. 191)
1
Only applies to the driver's seat.
2 Applies for four-way lumbar support *. Two-way lumbar support * is adjusted forward/rearward.
Page 185 of 643

SEATS AND STEERING WHEEL
}}
* Option/accessory.183
Power* front seats
The front seats can be adjusted in a number of different ways to help enhance your seat-ing comfort. The power seat can be movedforward/backward and up/down. The height and length * of the seat cushion and the tilt of
the backrest can be adjusted. Lumbar sup-port * can be adjusted up, down, forward and
backward 3
.
The seats can be adjusted when the engine is running and for a certain period of time afterthe door has been unlocked without theengine running. They can also be adjusted fora short period after the engine is turned off.
CAUTION
The power seats have an overload protec- tor that is triggered if a seat is blocked byany object. If this occurs, remove theobject and attempt to adjust the seatagain.
Related information
Manual front seats (p. 182)
Adjusting the power
* front seats (p. 183)
Storing positions for seats, mirrors and head-up display
* (p. 184)
Using stored positions for seats, mirrorsand head-up display
* (p. 185)
Adjusting front seat massage settings
*
(p. 187)
Adjusting
* front seat cushion length
(p. 188)
Front seat massage
* settings (p. 186)
Adjusting front seat side bolster settings
*
(p. 189)
Adjusting front seat lumbar support
*
(p. 189)
Adjusting the passenger seat from thedriver's seat
* (p. 191)
Adjusting the power * front seats
Set the desired seating position using the controls on the front seat cushion. To set theconvenience functions, turn the multifunction control 4
upward/downward.
The illustration shows the controls in a vehicle with four-way lumbar support *. Vehicles with two-way
lumbar support * do not have the rotary multifunction
control.
In vehicles with four-way lumbar support *,
turn the multifunction control 4
up/down to
set the convenience functions. In vehicles with two-way lumbar support *, use the
round button to adjust the lumbar support forward/rearward.
Raise/lower the front edge of the seat cushion by moving the control up/down.
3 Applies for four-way lumbar support *. Two-way lumbar support * is adjusted forward/rearward.