height VOLVO S90 2020 Quick Guide
[x] Cancel search | Manufacturer: VOLVO, Model Year: 2020, Model line: S90, Model: VOLVO S90 2020Pages: 643, PDF Size: 13.68 MB
Page 49 of 643
SAFETY
}}
* Option/accessory.47
WARNING
Do not squeeze box-like cargo between the rear seat cushion and the front seat back-rest. If the rear seat backrests are folded down, cargo must be secured to prevent it fromsliding forward against the front seat back-rests in the event of a collision.
WARNING
If a rear seat backrest is folded down or if a rear-facing child restraint is being used inthe rear seat, the seat in front must bemoved forward so that it does not comeinto contact with the backrest or childrestraint.
Seating positionFor WHIPS to provide good protection, the driver and passenger must be seated correctlyand the system's function must not be impe-ded in any way. Set the front seat to the correct seating posi- tion before starting to drive. The driver and the front seat passenger should sit in the center of the seat with their heads asclose as possible to the head restraints.
Related information
Safety (p. 42)
Manual front seats (p. 182)
Power
* front seats (p. 183)
Rear Collision Warning
* (p. 326)
Seat belts
Seat belts should always be worn by all occu- pants in your vehicle. Children should beproperly restrained using an infant seat,adjustable child seat or booster cushion asdetermined by age, weight and height.
Most states and provinces make it mandatory for occupants of a vehicle to use seat belts.
Seat belt maintenanceCheck periodically that the seat belts are ingood condition. Use water and a mild deter-gent for cleaning. Check the seat belt mecha-nism's function as follows: attach the seat beltand pull rapidly on the strap.
Page 51 of 643
SAFETY
}}
49
2. Buckle the seat belt by pushing the latch
plate into the receptacle.
> A distinct "click" indicates that the beltis locked into place.
WARNING
Always insert the seat belt latch plate into the belt buckle on the correct side. Failureto do so could cause the seat belts and beltbuckles to malfunction in a collision. Thereis a risk of serious injury. 3. The height of the seat belts in the front
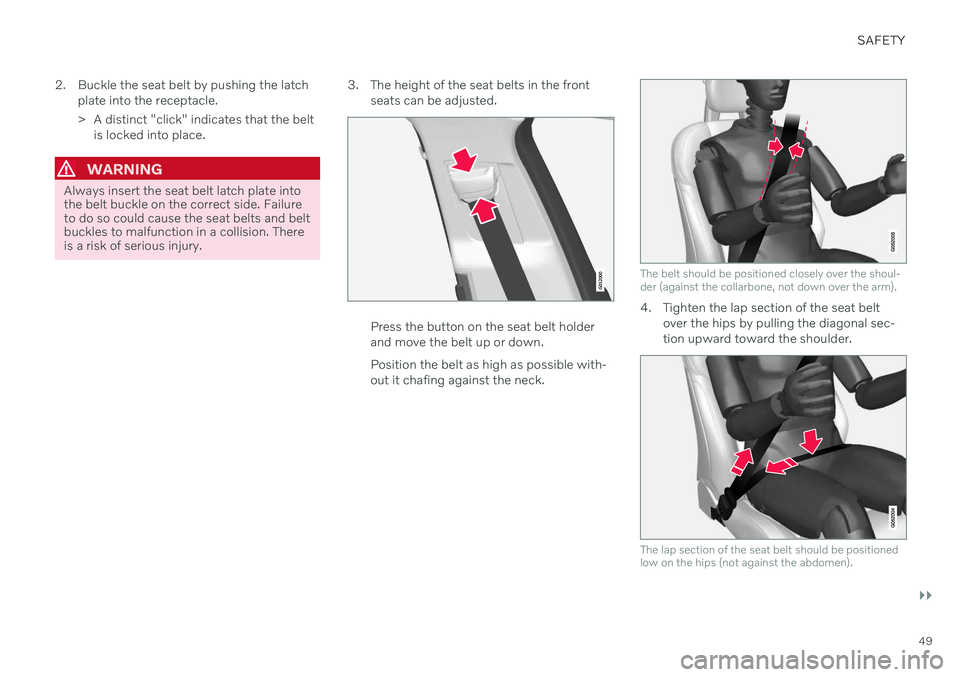
seats can be adjusted.
Press the button on the seat belt holder and move the belt up or down. Position the belt as high as possible with- out it chafing against the neck.
The belt should be positioned closely over the shoul- der (against the collarbone, not down over the arm).
4. Tighten the lap section of the seat beltover the hips by pulling the diagonal sec- tion upward toward the shoulder.
The lap section of the seat belt should be positioned low on the hips (not against the abdomen).
Page 57 of 643
SAFETY
}}
55
NOTE
Deployment of front airbags occurs only one time during an accident. In acollision where deployment occurs, theairbags and seat belt tensioners acti-vate. Some noise occurs and a smallamount of powder is released. Therelease of the powder may appear assmoke-like matter. This is a normalcharacteristic and does not indicatefire.
Volvo's front airbags use special sen-sors that are integrated with the frontseat buckles. The point at which theairbag deploys is determined bywhether or not the seat belt is beingused, as well as the severity of the col-lision.
Collisions can occur where only one ofthe airbags deploys. If the impact isless severe, but severe enough to pres-ent a clear injury risk, the airbags aretriggered at partial capacity. If theimpact is more severe, the airbags aretriggered at full capacity.
WARNING
Do not use child safety seats or child booster cushions/backrests in the frontpassenger's seat. We also recommendthat occupants under 140 cm (4 feet7 inches) in height who have outgrownthese devices sit in the rear seat withthe seat belt fastened. See also theOccupant Weight Sensor information.
Never drive with the airbags deployed.The fact that they hang out can impairthe steering of your vehicle. Othersafety systems can also be damaged.
The smoke and dust formed when theairbags are deployed can cause skinand eye irritation in the event of pro-longed exposure.
Should you have questions about any compo-nent in the SRS system, please contact atrained and qualified Volvo service technicianor Volvo customer support: In the United StatesVolvo Car USA, LLCCustomer Care Center 1 Volvo Drive P.O. Box 914Rockleigh, New Jersey 07647 1-800-458-1552www.volvocars.com/usIn CanadaVolvo Car Canada Ltd.Customer Care Centre9130 Leslie Street, Suite 101Richmond Hill, Ontario L4B 0B91-800-663-8255www.volvocars.com/ca
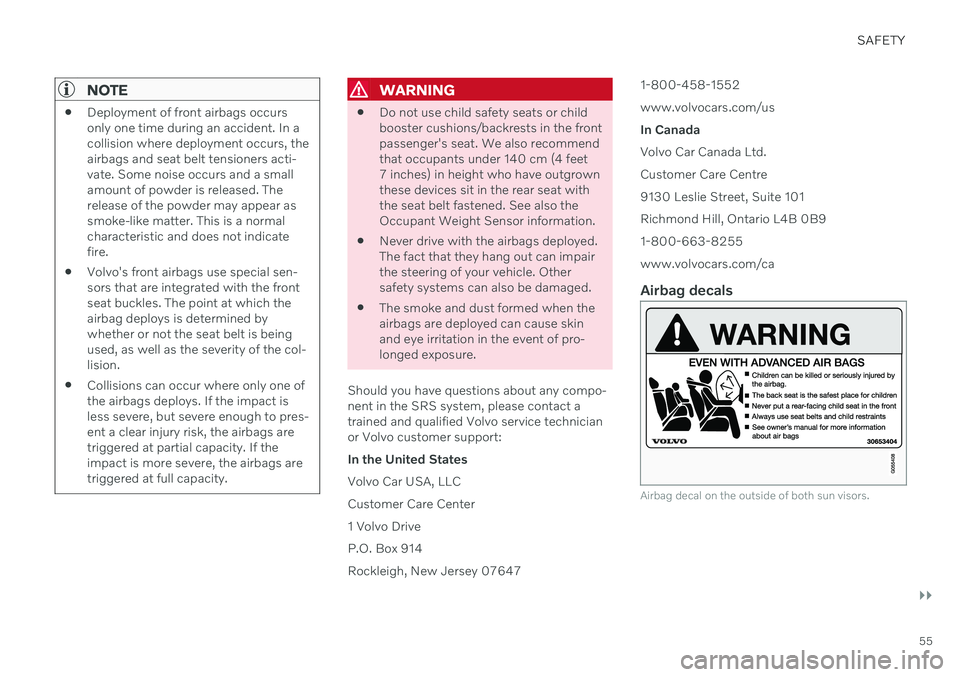
Airbag decals
Airbag decal on the outside of both sun visors.
Page 65 of 643

SAFETY
}}
63
WARNING
When the vehicle is in safety mode, it should not be towed behind another vehi-cle. It should be towed from the site on atow truck. Volvo recommends towing thevehicle directly to an authorized Volvoworkshop.
Related information
Safety mode (p. 61)
Starting the vehicle (p. 378)
Recovery (p. 425)
Child safety Children should always be seated safely when traveling in the vehicle.
General informationVolvo recommends the proper use of restraint systems for all occupants including children.Remember that, regardless of age and size, achild should always be properly restrained in avehicle. Your vehicle is also equipped with ISOFIX/ LATCH attachments, which make it more con-venient to install child seats. Some restraint systems for children are designed to be secured in the vehicle by lapbelts or the lap portion of a lap-shoulder belt.Such child restraint systems can help protectchildren in vehicles in the event of an accidentonly if they are used properly. However, chil-dren could be endangered in a crash if thechild restraints are not properly secured in thevehicle. Failure to follow the installationinstructions for your child restraint can resultin your child striking the vehicle's interior in asudden stop. Holding a child in your arms is NOT a suitable substitute for a child restraint system. In anaccident, a child held in a person's arms canbe crushed between the vehicle's interior andan unrestrained person. The child could alsobe injured by striking the interior, or by being ejected from the vehicle during a suddenmaneuver or impact. The same can also hap-pen if the infant or child rides unrestrained onthe seat. Other occupants should also beproperly restrained to help reduce the chanceof injuring or increasing the injury of a child. All states and provinces have legislation gov- erning how and where children should be car-ried in a vehicle. Find out the regulations exist-ing in your state or province. Recent accidentstatistics have shown that children are safer inrear seating positions than front seating posi-tions when properly restrained. A childrestraint system can help protect a child in avehicle. Here's what to look for when selectinga child restraint system: It should have a label certifying that it meets applicable Federal Motor Vehicle SafetyStandards (FMVSS 213) - or in Canada,CMVSS 213. Make sure the child restraint system is approved for the child's height, weight anddevelopment - the label required by the stand-ard or regulation, or instructions for infantrestraints, typically provide this information. In using any child restraint system, we urge you to carefully look over the instructions thatare provided with the restraint. Be sure youunderstand them and can use the device prop-erly and safely in this vehicle. A misused childrestraint system can result in increased inju-
Page 66 of 643
||
SAFETY
64ries for both the infant or child and other occu- pants in the vehicle. When a child has outgrown the child safety seat, you should use the rear seat with thestandard seat belt fastened. The best way tohelp protect the child here is to place the childon a cushion so that the seat belt is properlylocated on the hips. Legislation in your state orprovince may mandate the use of a child seator cushion in combination with the seat belt,depending on the child's age and/or size.Please check local regulations. A specially designed and tested booster cush- ion and backrest can be obtained from yourVolvo retailer. See also the article "Integratedbooster cushion."
WARNING
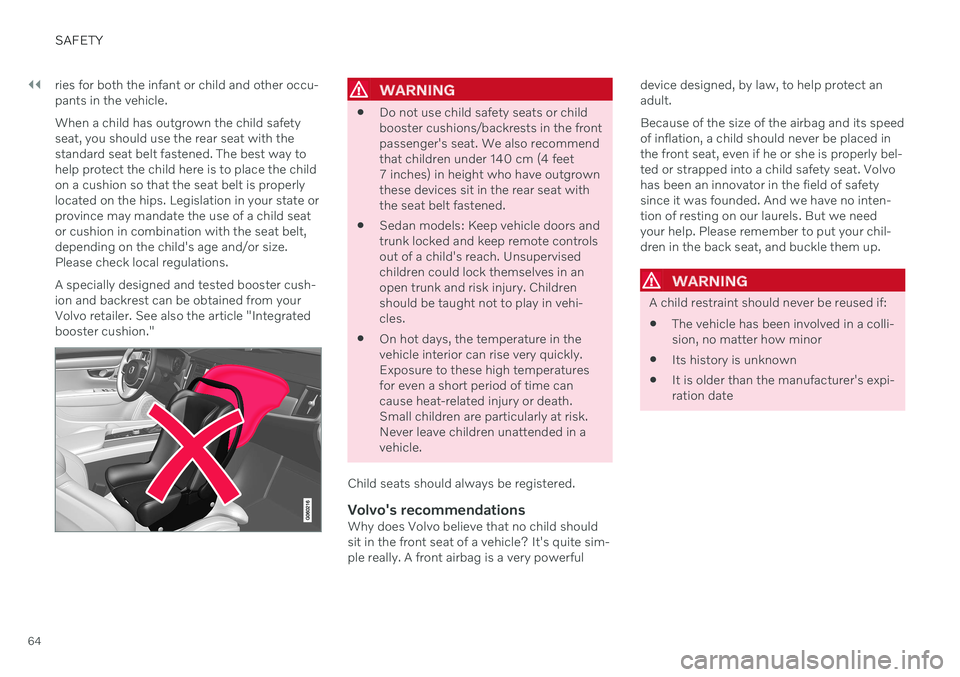
Do not use child safety seats or child booster cushions/backrests in the frontpassenger's seat. We also recommendthat children under 140 cm (4 feet7 inches) in height who have outgrownthese devices sit in the rear seat withthe seat belt fastened.
Sedan models: Keep vehicle doors andtrunk locked and keep remote controlsout of a child's reach. Unsupervisedchildren could lock themselves in anopen trunk and risk injury. Childrenshould be taught not to play in vehi-cles.
On hot days, the temperature in thevehicle interior can rise very quickly.Exposure to these high temperaturesfor even a short period of time cancause heat-related injury or death.Small children are particularly at risk.Never leave children unattended in avehicle.
Child seats should always be registered.
Volvo's recommendationsWhy does Volvo believe that no child shouldsit in the front seat of a vehicle? It's quite sim-ple really. A front airbag is a very powerful device designed, by law, to help protect anadult. Because of the size of the airbag and its speed of inflation, a child should never be placed inthe front seat, even if he or she is properly bel-ted or strapped into a child safety seat. Volvohas been an innovator in the field of safetysince it was founded. And we have no inten-tion of resting on our laurels. But we needyour help. Please remember to put your chil-dren in the back seat, and buckle them up.
WARNING
A child restraint should never be reused if:
The vehicle has been involved in a colli- sion, no matter how minor
Its history is unknown
It is older than the manufacturer's expi-ration date
Page 80 of 643
DISPLAYS AND VOICE CONTROL
* Option/accessory.
78
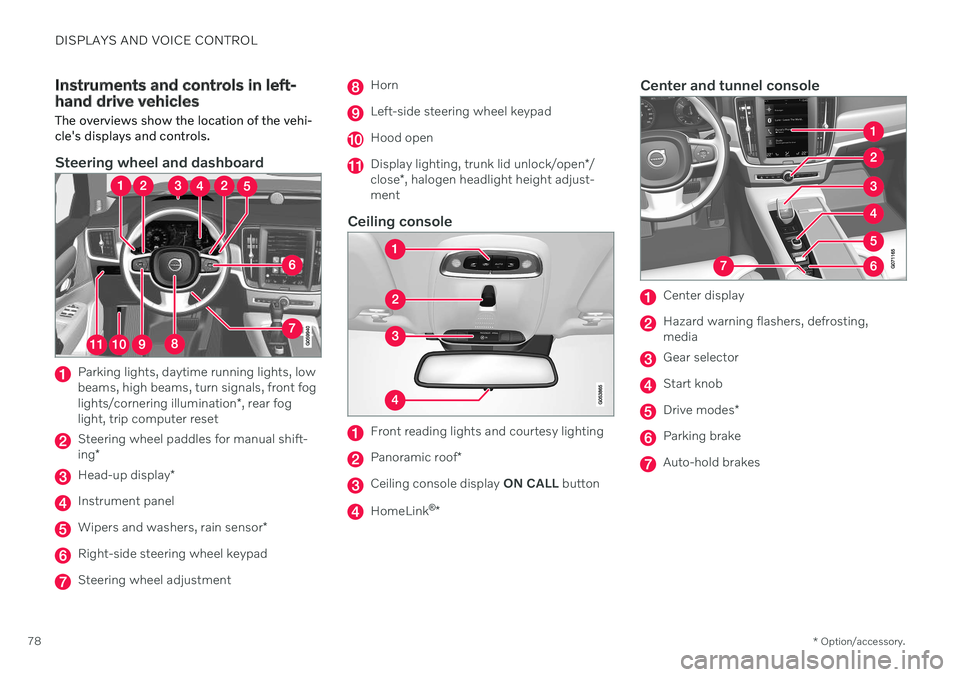
Instruments and controls in left- hand drive vehicles The overviews show the location of the vehi- cle's displays and controls.
Steering wheel and dashboard
Parking lights, daytime running lights, low beams, high beams, turn signals, front fog lights/cornering illumination *, rear fog
light, trip computer reset
Steering wheel paddles for manual shift- ing *
Head-up display *
Instrument panel
Wipers and washers, rain sensor *
Right-side steering wheel keypad
Steering wheel adjustment
Horn
Left-side steering wheel keypad
Hood open
Display lighting, trunk lid unlock/open */
close *, halogen headlight height adjust-
ment
Ceiling console
Front reading lights and courtesy lighting
Panoramic roof *
Ceiling console display ON CALL button
HomeLink ®
*
Center and tunnel console
Center display
Hazard warning flashers, defrosting, media
Gear selector
Start knob
Drive modes *
Parking brake
Auto-hold brakes
Page 143 of 643
DISPLAYS AND VOICE CONTROL
}}
* Option/accessory.141
Head-up display settings *
Adjusting settings for the head-up display.
Settings can be adjusted when the vehicle is started and a projected image is displayed onthe windshield.
Selecting display optionsSelect the functions to be shown in the head-up display. 1. Tap
Settings in the center display's Top
view.
2. Tap
My CarDisplaysHead-Up
Display Options.
3. Select one or more functions:
Show Navigation
Show Road Sign Information
Show Driver Support
Show Phone
This setting is stored as a personal setting in the driver profile.
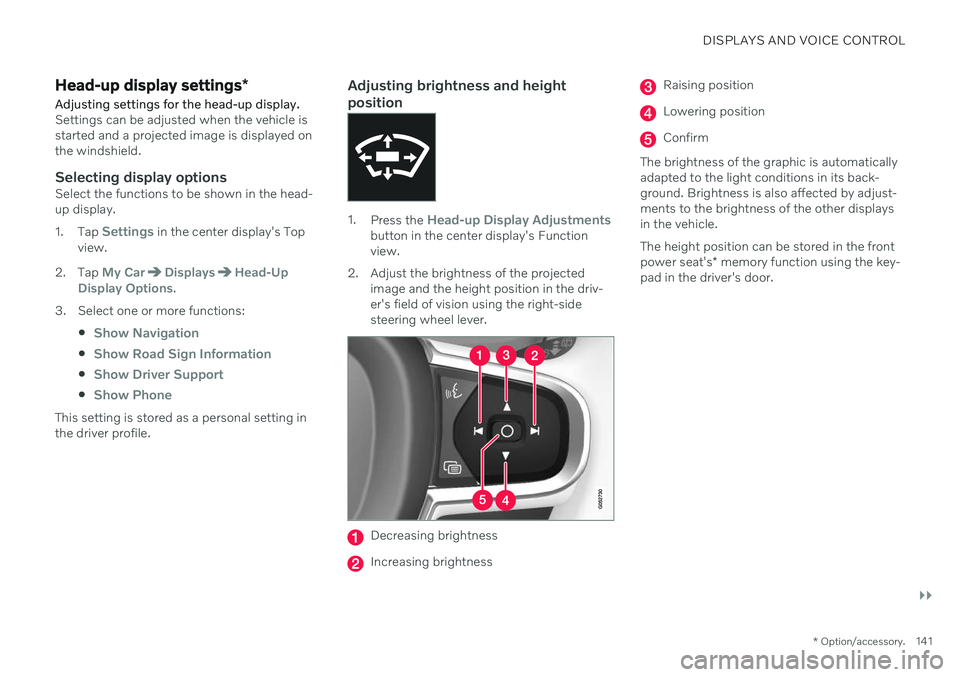
Adjusting brightness and height position
1.Press the Head-up Display Adjustmentsbutton in the center display's Function view.
2. Adjust the brightness of the projected image and the height position in the driv-er's field of vision using the right-sidesteering wheel lever.
Decreasing brightness
Increasing brightness
Raising position
Lowering position
Confirm
The brightness of the graphic is automatically adapted to the light conditions in its back-ground. Brightness is also affected by adjust-ments to the brightness of the other displaysin the vehicle. The height position can be stored in the front power seat's * memory function using the key-
pad in the driver's door.
Page 171 of 643

WINDOWS, GLASS AND MIRRORS
}}
* Option/accessory.169
The rearview mirror instead has two sensors - one pointing forward and one pointing rear-ward - which work together to identify andeliminate glare. The forward-pointing sensormonitors ambient light, while the rearward-pointing sensor monitors light from the head-lights of following vehicles. For the door mirrors to be equipped with auto- dim, the rearview mirror must also be equip-ped with auto-dim.
NOTE
If the sensors are obstructed by e.g. a parking permit, transponder, sunshade orobjects on the seats or parcel shelf in away that prevents light from reaching thesensors, the auto-dim function in the rear-view and door mirrors will be reduced.
Related information
Rearview/door mirrors (p. 168)
Adjusting the door mirrors (p. 169)
Adjusting the door mirrors
To improve visibility to the rear, the door mir- rors need to be adjusted to the driver's heightand seating position. There are several auto-matic settings that can also be connected tothe memory function buttons for the power seat *.
Controls used for door mirrors
Door mirror controls.
The joystick in the drivers' door control panel is used to adjust the position of the door mir-rors. The ignition must be in at least mode I.
1. Press the L button for the left door mirror
or R for the right door mirror. The button
will light up.
2. Adjust the position using the joystick located between the buttons. 3. Press the
L or R button again. The light in
the button will go out.
Automatically folding door mirrors *The door mirrors can be automatically foldedwhen driving or parking in tight spaces.
1. Press the L and R buttons at the same
time.
2. Release the buttons after about 1 second. The mirrors will automatically stop when they are completely folded in.
Open the mirrors by pressing L and R at the
same time. The mirrors will automatically stopwhen they are completely open.
Resetting the mirrors' positionA mirror that has been moved out of positionmanually (e.g. hit or bumped into) must beelectrically returned to its normal position for automatic folding * to function properly.
1. Fold in the mirrors by pressing the L and R
buttons at the same time.
2. Open them again by pressing the L and R
buttons at the same time.
3. Repeat the above procedure as needed. The mirrors are now reset to their original positions.
Page 185 of 643

SEATS AND STEERING WHEEL
}}
* Option/accessory.183
Power* front seats
The front seats can be adjusted in a number of different ways to help enhance your seat-ing comfort. The power seat can be movedforward/backward and up/down. The height and length * of the seat cushion and the tilt of
the backrest can be adjusted. Lumbar sup-port * can be adjusted up, down, forward and
backward 3
.
The seats can be adjusted when the engine is running and for a certain period of time afterthe door has been unlocked without theengine running. They can also be adjusted fora short period after the engine is turned off.
CAUTION
The power seats have an overload protec- tor that is triggered if a seat is blocked byany object. If this occurs, remove theobject and attempt to adjust the seatagain.
Related information
Manual front seats (p. 182)
Adjusting the power
* front seats (p. 183)
Storing positions for seats, mirrors and head-up display
* (p. 184)
Using stored positions for seats, mirrorsand head-up display
* (p. 185)
Adjusting front seat massage settings
*
(p. 187)
Adjusting
* front seat cushion length
(p. 188)
Front seat massage
* settings (p. 186)
Adjusting front seat side bolster settings
*
(p. 189)
Adjusting front seat lumbar support
*
(p. 189)
Adjusting the passenger seat from thedriver's seat
* (p. 191)
Adjusting the power * front seats
Set the desired seating position using the controls on the front seat cushion. To set theconvenience functions, turn the multifunction control 4
upward/downward.
The illustration shows the controls in a vehicle with four-way lumbar support *. Vehicles with two-way
lumbar support * do not have the rotary multifunction
control.
In vehicles with four-way lumbar support *,
turn the multifunction control 4
up/down to
set the convenience functions. In vehicles with two-way lumbar support *, use the
round button to adjust the lumbar support forward/rearward.
Raise/lower the front edge of the seat cushion by moving the control up/down.
3 Applies for four-way lumbar support *. Two-way lumbar support * is adjusted forward/rearward.
Page 195 of 643

SEATS AND STEERING WHEEL
* Option/accessory.193
Adjusting the steering wheel The steering wheel can be adjusted to various positions.
The steering wheel's reach and height can be adjusted.
WARNING
Adjust the steering wheel and ensure it locks into position before driving. Neveradjust the steering wheel while driving.
Steering wheel force can be adjusted with speed-dependent power steering. Steeringwheel force is adjusted according to the vehi-cle's speed to give the driver an enhancedsense of control and stability.
Steering wheel adjuster lever.
1. Move the lever forward to release the steering wheel.
2. Adjust the steering wheel to the desired position.
3. Pull the lever back to lock the steering wheel into place. If the lever is difficult to move, press the steering wheel lightlywhile pulling the lever.
Related information
Steering wheel controls and horn (p. 192)
Adjusting the power
* front seats (p. 183)