mirror controls VOLVO S90 2020 Quick Guide
[x] Cancel search | Manufacturer: VOLVO, Model Year: 2020, Model line: S90, Model: VOLVO S90 2020Pages: 643, PDF Size: 13.68 MB
Page 7 of 643
5
SEATS AND STEERING WHEEL
Manual front seats182
Power * front seats
183
Adjusting the power * front seats
183
Storing positions for seats, mir- rors and head-up display *184
Using stored positions for seats,mirrors and head-up display *185
Front seat massage * settings
186
Adjusting front seat massage set-tings * 187
Adjusting * front seat cushion length
188
Adjusting front seat side bolstersettings * 189
Adjusting front seat lumbar support *
189
Adjusting the passenger seat fromthe driver's seat * 191
Adjusting the passenger seat from the rear seat 192
Steering wheel controls and horn 192
Adjusting the steering wheel 193
CLIMATE CONTROL
Climate 196
Climate zones 196
Climate control sensors 197
Perceived temperature 197
Climate control system voice commands 198
Air quality 199
Clean Zone *
199
Clean Zone Interior Package *
200
Interior Air Quality System *
200
Activating and deactivating the air quality sensor * 201
Passenger compartment air filter 201
Air distribution 201
Adjusting air distribution 202
Opening, closing and directing air vents 203
Air distribution options 204
Climate system controls 207
Activating and deactivating power front seats * 209
Activating and deactivating theheated front seat * 210
Activating and deactivating theheated rear seats * 210
Activating and deactivating frontseat ventilation * 211
Activating and deactivating the ventilated rear seats
* 212
Activating and deactivating theheated steering wheel *213
Activating and deactivating auto-matic steering wheel heating *213
Activating auto climate control 214
Activating and deactivating recir- culation 214
Activating and deactivating therecirculation timer setting 215
Activating and deactivating maxdefroster 215
Activating and deactivating theheated rear window and door mirrors 216
Automatically activating and deac-tivating the heated rear windowand door mirrors 217
Setting the blower speed for thefront seats 217
Setting the blower speed for the rear seats * 218
Setting the temperature for the front seats 220
Setting the temperature for the rear seats * 221
Synchronize temperature 222
Activating and deactivating air conditioning 223
Page 81 of 643

DISPLAYS AND VOICE CONTROL
* Option/accessory.79
Driver's door
Memory for power front seat settings *,
door mirrors and head-up display *
Central locking
Power windows, door mirrors, electric child safety locks*
Controls for front seat
Related information
Manual front seats (p. 182)
Adjusting the power
* front seats (p. 183)
Adjusting the steering wheel (p. 193)
Lighting control and panel (p. 148)
Starting the vehicle (p. 378)
Instrument panel (p. 80)
Center display overview (p. 107)
Transmission (p. 391)
Page 110 of 643
||
DISPLAYS AND VOICE CONTROL
* Option/accessory.
108
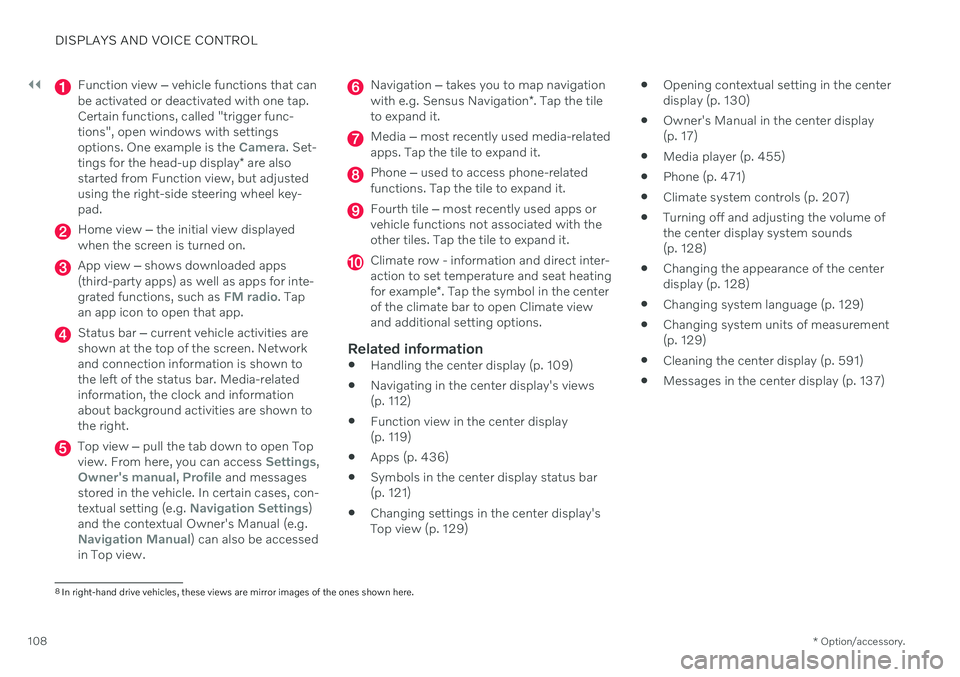
Function view ‒ vehicle functions that can
be activated or deactivated with one tap. Certain functions, called "trigger func-tions", open windows with settingsoptions. One example is the
Camera. Set-
tings for the head-up display * are also
started from Function view, but adjusted using the right-side steering wheel key-pad.
Home view ‒ the initial view displayed
when the screen is turned on.
App view ‒ shows downloaded apps
(third-party apps) as well as apps for inte- grated functions, such as
FM radio. Tap
an app icon to open that app.
Status bar ‒ current vehicle activities are
shown at the top of the screen. Network and connection information is shown tothe left of the status bar. Media-relatedinformation, the clock and informationabout background activities are shown tothe right.
Top view ‒ pull the tab down to open Top
view. From here, you can access Settings,Owner's manual, Profile and messages
stored in the vehicle. In certain cases, con- textual setting (e.g.
Navigation Settings)
and the contextual Owner's Manual (e.g.
Navigation Manual) can also be accessed
in Top view.
Navigation ‒ takes you to map navigation
with e.g. Sensus Navigation *. Tap the tile
to expand it.
Media ‒ most recently used media-related
apps. Tap the tile to expand it.
Phone ‒ used to access phone-related
functions. Tap the tile to expand it.
Fourth tile ‒ most recently used apps or
vehicle functions not associated with the other tiles. Tap the tile to expand it.
Climate row - information and direct inter- action to set temperature and seat heating for example *. Tap the symbol in the center
of the climate bar to open Climate view and additional setting options.
Related information
Handling the center display (p. 109)
Navigating in the center display's views (p. 112)
Function view in the center display (p. 119)
Apps (p. 436)
Symbols in the center display status bar(p. 121)
Changing settings in the center display'sTop view (p. 129)
Opening contextual setting in the centerdisplay (p. 130)
Owner's Manual in the center display(p. 17)
Media player (p. 455)
Phone (p. 471)
Climate system controls (p. 207)
Turning off and adjusting the volume ofthe center display system sounds(p. 128)
Changing the appearance of the centerdisplay (p. 128)
Changing system language (p. 129)
Changing system units of measurement(p. 129)
Cleaning the center display (p. 591)
Messages in the center display (p. 137)
8
In right-hand drive vehicles, these views are mirror images of the ones shown here.
Page 166 of 643
WINDOWS, GLASS AND MIRRORS
* Option/accessory.
164
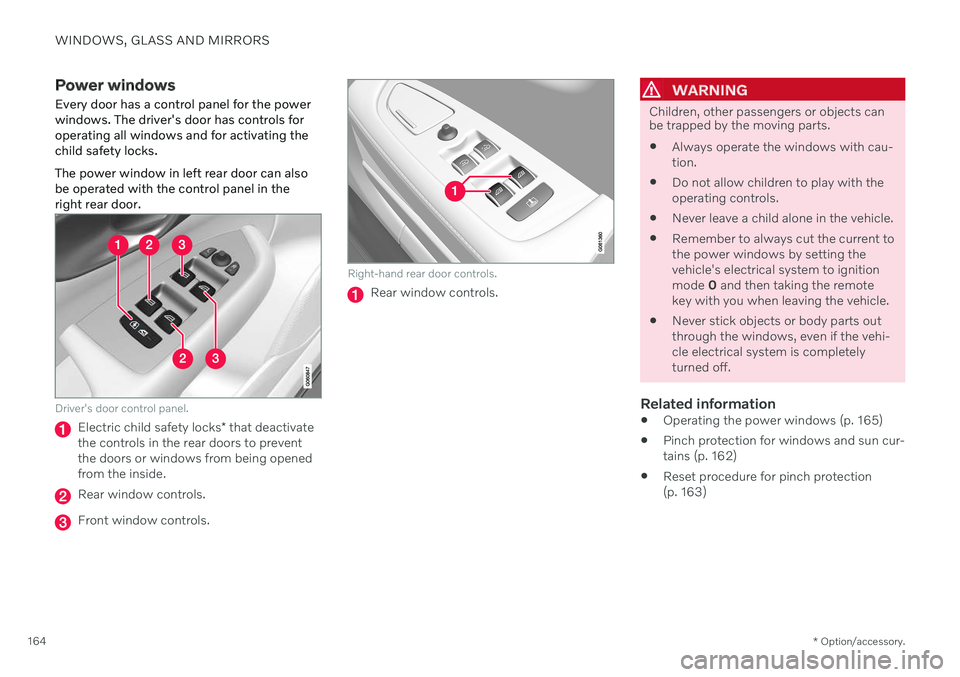
Power windows Every door has a control panel for the power windows. The driver's door has controls foroperating all windows and for activating thechild safety locks. The power window in left rear door can also be operated with the control panel in theright rear door.
Driver's door control panel.
Electric child safety locks * that deactivate
the controls in the rear doors to prevent the doors or windows from being openedfrom the inside.
Rear window controls.
Front window controls.
Right-hand rear door controls.
Rear window controls.
WARNING
Children, other passengers or objects can be trapped by the moving parts.
Always operate the windows with cau- tion.
Do not allow children to play with theoperating controls.
Never leave a child alone in the vehicle.
Remember to always cut the current tothe power windows by setting thevehicle's electrical system to ignitionmode
0 and then taking the remote
key with you when leaving the vehicle.
Never stick objects or body parts outthrough the windows, even if the vehi-cle electrical system is completelyturned off.
Related information
Operating the power windows (p. 165)
Pinch protection for windows and sun cur-tains (p. 162)
Reset procedure for pinch protection(p. 163)
Page 167 of 643
WINDOWS, GLASS AND MIRRORS
}}
* Option/accessory.165
Operating the power windows
All power windows can be operated using the control panel in the driver's door. The controlpanels in the other doors can be used tooperate that particular door. The power window in left rear door can also be operated with the control panel in theright rear door.
The power windows have pinch protection. If there is any problem with the pinch protection,a rest procedure can be tested.
WARNING
Children, other passengers or objects can be trapped by the moving parts.
Always operate the windows with cau- tion.
Do not allow children to play with theoperating controls.
Never leave a child alone in the vehicle.
Remember to always cut the current tothe power windows by setting thevehicle's electrical system to ignitionmode
0 and then taking the remote
key with you when leaving the vehicle.
Never stick objects or body parts outthrough the windows, even if the vehi-cle electrical system is completelyturned off.
Operating the power windows.
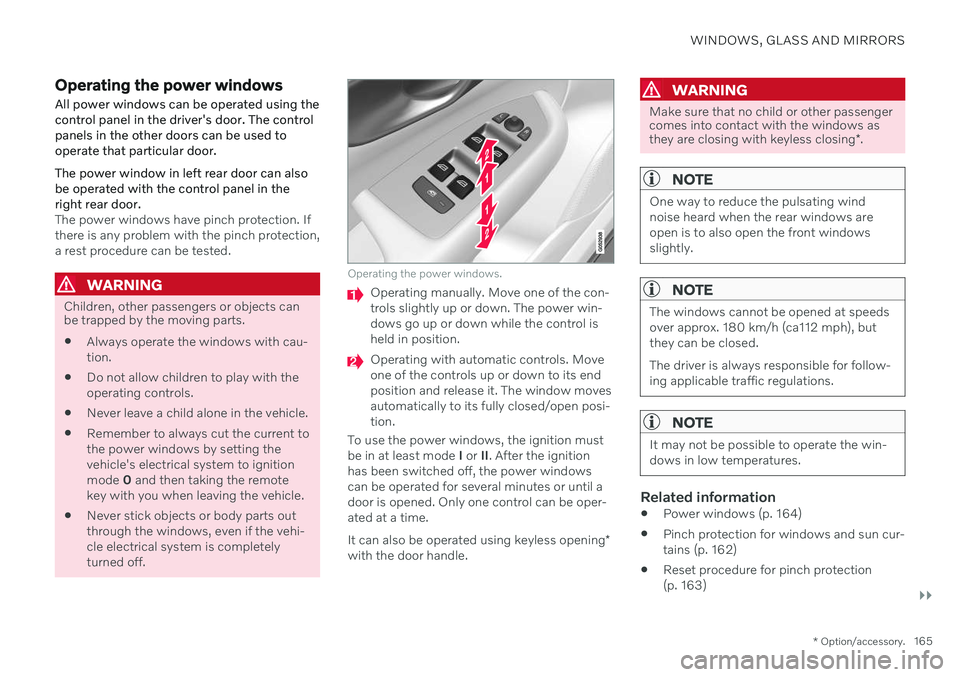
Operating manually. Move one of the con- trols slightly up or down. The power win-dows go up or down while the control isheld in position.
Operating with automatic controls. Move one of the controls up or down to its endposition and release it. The window movesautomatically to its fully closed/open posi-tion.
To use the power windows, the ignition mustbe in at least mode I or II. After the ignition
has been switched off, the power windowscan be operated for several minutes or until adoor is opened. Only one control can be oper-ated at a time. It can also be operated using keyless opening *
with the door handle.
WARNING
Make sure that no child or other passenger comes into contact with the windows as they are closing with keyless closing *.
NOTE
One way to reduce the pulsating wind noise heard when the rear windows areopen is to also open the front windowsslightly.
NOTE
The windows cannot be opened at speeds over approx. 180 km/h (ca112 mph), butthey can be closed. The driver is always responsible for follow- ing applicable traffic regulations.
NOTE
It may not be possible to operate the win- dows in low temperatures.
Related information
Power windows (p. 164)
Pinch protection for windows and sun cur- tains (p. 162)
Reset procedure for pinch protection(p. 163)
Page 168 of 643
WINDOWS, GLASS AND MIRRORS
* Option/accessory.
166
Keyless locking and unlocking
* (p. 249)
Locking and unlocking using the remote key (p. 236)
Using sun curtains
*
There are integrated sun curtains in each rear door and in the parcel shelf in the rear win-dow.
Rear door – electrically operated
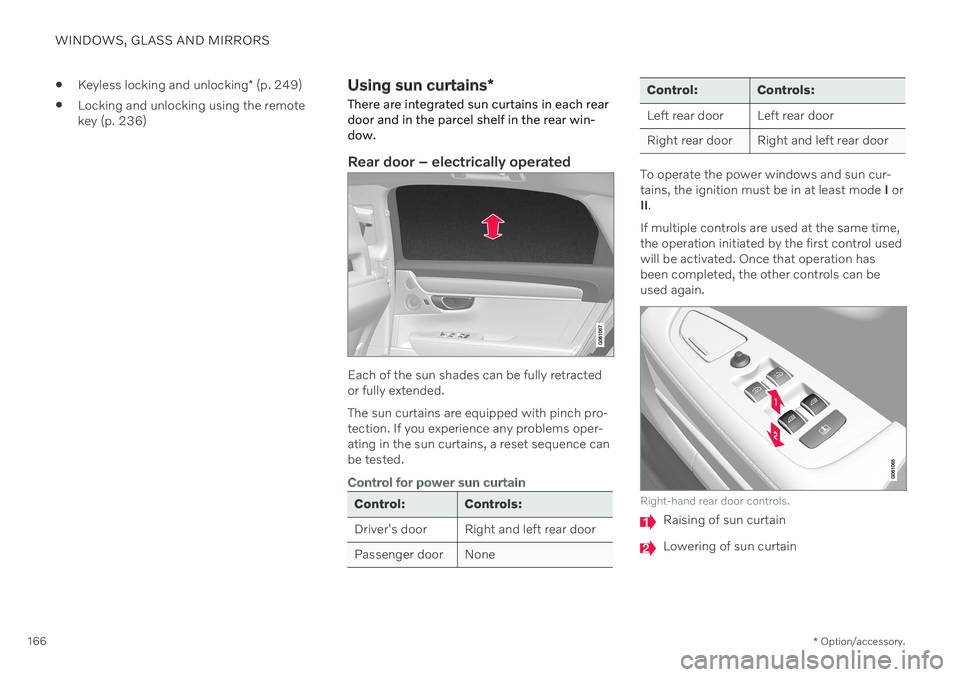
Each of the sun shades can be fully retracted or fully extended. The sun curtains are equipped with pinch pro- tection. If you experience any problems oper-ating in the sun curtains, a reset sequence canbe tested.
Control for power sun curtain
Control: Controls:
Driver's door Right and left rear door
Passenger door None
Control: Controls:
Left rear door Left rear door
Right rear door Right and left rear door
To operate the power windows and sun cur- tains, the ignition must be in at least mode I or
II .
If multiple controls are used at the same time,the operation initiated by the first control usedwill be activated. Once that operation hasbeen completed, the other controls can beused again.
Right-hand rear door controls.
Raising of sun curtain
Lowering of sun curtain
Page 169 of 643

WINDOWS, GLASS AND MIRRORS
167
Close the window and raise the sun curtain
The window must be fully closed before the sun curtain can be raised.
1. Move the button upward and release.> The window moves automatically to itsupper end position.
2. Move the button upward again and release.
> The sun curtain moves automatically toits upper end position.
Lowering the sun curtain and opening the window
The sun curtain must be fully retracted (low- ered) before the window can be opened.
1. Move the button downward and release.
> The sun curtain moves automatically toits lower end position.
2. Move the button downward again to open the window.
> The window moves automatically to itslower end position.
Automatic operation - rapid opening/ closing
The window and sun curtain can be opened/ closed simultaneously:
–Open – press the control down twice to the automatic operation position andrelease.
–Close – press the control up twice to the automatic operation position and release.
Rear window shelf
An electrically operated sun curtain is inte- grated in the rear window shelf. To operate the sun curtain, the ignition must be in mode II.
NOTE
It may not be possible to operate the sun shade in low temperatures.
Operating using the center display
Tap Rear Sun Curtainin
Function view in the center display - the sun curtain willautomatically move to its endposition, up or down.
Operating with right-side rear door controls
Briefly press the button - the sun curtain will automatically move to its end position, up ordown.
Related information
Pinch protection for windows and sun cur- tains (p. 162)
Reset procedure for pinch protection(p. 163)
Power windows (p. 164)
Page 171 of 643

WINDOWS, GLASS AND MIRRORS
}}
* Option/accessory.169
The rearview mirror instead has two sensors - one pointing forward and one pointing rear-ward - which work together to identify andeliminate glare. The forward-pointing sensormonitors ambient light, while the rearward-pointing sensor monitors light from the head-lights of following vehicles. For the door mirrors to be equipped with auto- dim, the rearview mirror must also be equip-ped with auto-dim.
NOTE
If the sensors are obstructed by e.g. a parking permit, transponder, sunshade orobjects on the seats or parcel shelf in away that prevents light from reaching thesensors, the auto-dim function in the rear-view and door mirrors will be reduced.
Related information
Rearview/door mirrors (p. 168)
Adjusting the door mirrors (p. 169)
Adjusting the door mirrors
To improve visibility to the rear, the door mir- rors need to be adjusted to the driver's heightand seating position. There are several auto-matic settings that can also be connected tothe memory function buttons for the power seat *.
Controls used for door mirrors
Door mirror controls.
The joystick in the drivers' door control panel is used to adjust the position of the door mir-rors. The ignition must be in at least mode I.
1. Press the L button for the left door mirror
or R for the right door mirror. The button
will light up.
2. Adjust the position using the joystick located between the buttons. 3. Press the
L or R button again. The light in
the button will go out.
Automatically folding door mirrors *The door mirrors can be automatically foldedwhen driving or parking in tight spaces.
1. Press the L and R buttons at the same
time.
2. Release the buttons after about 1 second. The mirrors will automatically stop when they are completely folded in.
Open the mirrors by pressing L and R at the
same time. The mirrors will automatically stopwhen they are completely open.
Resetting the mirrors' positionA mirror that has been moved out of positionmanually (e.g. hit or bumped into) must beelectrically returned to its normal position for automatic folding * to function properly.
1. Fold in the mirrors by pressing the L and R
buttons at the same time.
2. Open them again by pressing the L and R
buttons at the same time.
3. Repeat the above procedure as needed. The mirrors are now reset to their original positions.
Page 172 of 643

||
WINDOWS, GLASS AND MIRRORS
* Option/accessory.
170
Tilting when parking 3The door mirrors can be tilted down to help give the driver a better view along the sides ofthe vehicle, e.g. of the curb when parking.
–Select reverse gear and press the
L or R
mirror button.
Please note that the button may need to be pressed twice depending on settings. Whenthe door mirror is tilted down, the light in thebutton will flash. When reverse gear isengaged, the door mirrors will automaticallystart to move after 3 seconds and will reachtheir original position after about 8 seconds.
Automatically tilting when parking 3With this setting, the door mirrors will auto-matically tilt down when reverse gear isengaged. The folded position is preset andcannot be adjusted. 1.
Tap
Settings in the center display's Top
view.
2. Tap
My CarMirrors and Convenience.
3. Under
Exterior Mirror Tilt at Reverse,
select Off, Driver, Passenger or Both to
activate/deactivate and to select which mirror to tilt.
To immediately return the door mirrors to theiroriginal position, press the L or R button
twice.
Automatic folding when the vehicle is locked *
The door mirrors can automatically fold in when the vehicle is locked and open when thevehicle is unlocked using the remote key. Ifthe mirrors have been folded in manually, theymust be folded out manually as well. 1.
Tap
Settings in the center display's Top
view.
2. Tap
My CarMirrors and Convenience.
3. Select
Fold Mirror When Locked to acti-
vate/deactivate.
Related information
Rearview/door mirrors (p. 168)
Adjusting the rearview mirror dimming function (p. 168)
Storing positions for seats, mirrors and head-up display
* (p. 184)
Activating and deactivating the heated rear window and door mirrors (p. 216)
Panoramic roof The panoramic roof is divided into two glass sections. The front section can be openedvertically at the rear edge (ventilation posi-tion) or horizontally (open position). The rearsection cannot be moved. The panoramic roof has a wind deflector and sun curtain made of perforated fabric (locatedbeneath the glass sections) for extra protec-tion in e.g. bright sunlight.
The panoramic roof and sun curtain are oper- ated using the controls in the ceiling.
3
Only on models equipped with a power driver's seat with memory buttons *.
Page 173 of 643

WINDOWS, GLASS AND MIRRORS
}}
171
The panoramic roof and sun curtain can also be operated with the controls in the right-siderear door. To operate the panoramic roof and sun cur- tain, the ignition must be in mode I or II.
WARNING
Children, other passengers or objects can be trapped by the moving parts.
Always operate the windows with cau- tion.
Do not allow children to play with theoperating controls.
Never leave a child alone in the vehicle.
Remember to always cut the current tothe power windows by setting thevehicle's electrical system to ignitionmode
0 and then taking the remote
key with you when leaving the vehicle.
Never stick objects or body parts outthrough the windows, even if the vehi-cle electrical system is completelyturned off.
CAUTION
Do not open the panoramic roof when load carriers are installed.
Never place heavy objects on the pan-oramic roof.
CAUTION
Remove ice and snow before opening the panoramic roof. Be careful not toscratch any surfaces or damage thetrim.
Do not operate the panoramic roof if itis frozen in place.
Wind blocker
The panoramic roof is equipped with a wind blocker that folds up when the roof is open.
Related information
Operating the panoramic roof (p. 172)
Auto closing the panoramic roof sun cur-tain (p. 175)
Pinch protection for windows and sun cur- tains (p. 162)