radio controls VOLVO S90 2020 Quick Guide
[x] Cancel search | Manufacturer: VOLVO, Model Year: 2020, Model line: S90, Model: VOLVO S90 2020Pages: 643, PDF Size: 13.68 MB
Page 110 of 643

||
DISPLAYS AND VOICE CONTROL
* Option/accessory.
108
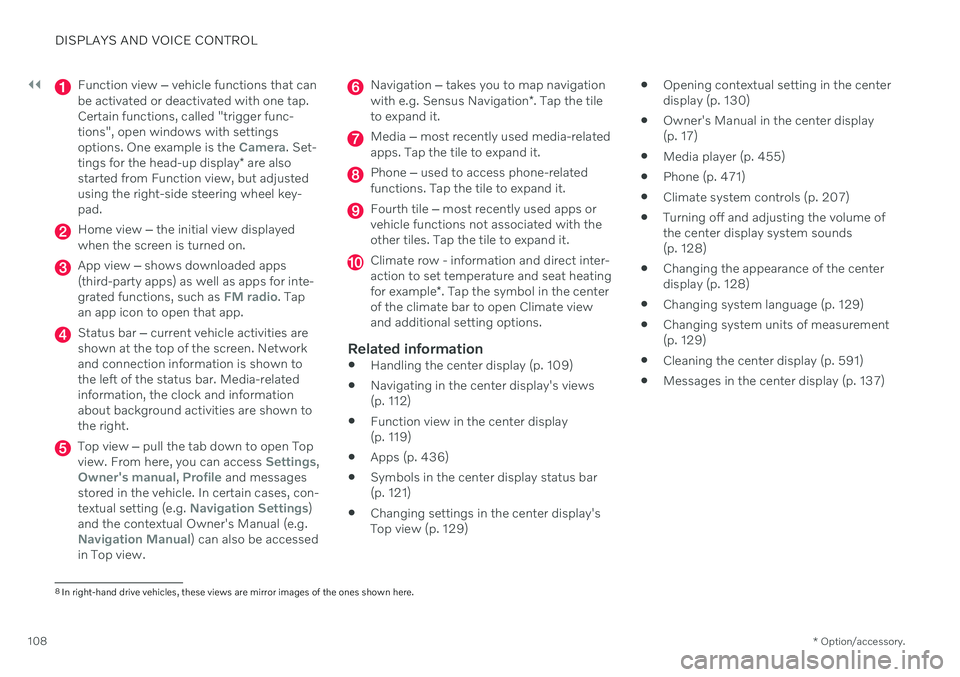
Function view ‒ vehicle functions that can
be activated or deactivated with one tap. Certain functions, called "trigger func-tions", open windows with settingsoptions. One example is the
Camera. Set-
tings for the head-up display * are also
started from Function view, but adjusted using the right-side steering wheel key-pad.
Home view ‒ the initial view displayed
when the screen is turned on.
App view ‒ shows downloaded apps
(third-party apps) as well as apps for inte- grated functions, such as
FM radio. Tap
an app icon to open that app.
Status bar ‒ current vehicle activities are
shown at the top of the screen. Network and connection information is shown tothe left of the status bar. Media-relatedinformation, the clock and informationabout background activities are shown tothe right.
Top view ‒ pull the tab down to open Top
view. From here, you can access Settings,Owner's manual, Profile and messages
stored in the vehicle. In certain cases, con- textual setting (e.g.
Navigation Settings)
and the contextual Owner's Manual (e.g.
Navigation Manual) can also be accessed
in Top view.
Navigation ‒ takes you to map navigation
with e.g. Sensus Navigation *. Tap the tile
to expand it.
Media ‒ most recently used media-related
apps. Tap the tile to expand it.
Phone ‒ used to access phone-related
functions. Tap the tile to expand it.
Fourth tile ‒ most recently used apps or
vehicle functions not associated with the other tiles. Tap the tile to expand it.
Climate row - information and direct inter- action to set temperature and seat heating for example *. Tap the symbol in the center
of the climate bar to open Climate view and additional setting options.
Related information
Handling the center display (p. 109)
Navigating in the center display's views (p. 112)
Function view in the center display (p. 119)
Apps (p. 436)
Symbols in the center display status bar(p. 121)
Changing settings in the center display'sTop view (p. 129)
Opening contextual setting in the centerdisplay (p. 130)
Owner's Manual in the center display(p. 17)
Media player (p. 455)
Phone (p. 471)
Climate system controls (p. 207)
Turning off and adjusting the volume ofthe center display system sounds(p. 128)
Changing the appearance of the centerdisplay (p. 128)
Changing system language (p. 129)
Changing system units of measurement(p. 129)
Cleaning the center display (p. 591)
Messages in the center display (p. 137)
8
In right-hand drive vehicles, these views are mirror images of the ones shown here.
Page 428 of 643

||
STARTING AND DRIVING
* Option/accessory.
426 HomeLink
®
is delivered integrated in the rear-
view mirror. The HomeLink ®
panel consists of
three programmable buttons and an indicator light in the mirror. For more information about HomeLink ®
,
please visit: www.HomeLink.com or call 1-800-355-3515. Save the original remote controls for future programming (e.g. for use in another vehicle).It is also advisable to delete the button pro-gramming if the vehicle is sold.
Related information
Using HomeLink ®
* (p. 428)
Programming HomeLink ®
* (p. 426)
Type approval for HomeLink ®
* (p. 429)
Programming HomeLink ®
*19
Follow these instructions to program HomeLink ®
, reset all programming, or pro-
gram individual buttons.
NOTE
In some vehicles, the ignition must be on or in the "accessory position" before HomeLink ®
can be programmed or used. It
can be a good idea to put new batteries in the remote control being replaced by HomeLink ®
for faster programming and
better radio signal transmission. TheHomeLink ®
buttons should be reset before
programming.
WARNING
While HomeLink ®
is being programmed,
the garage door or gate being programmed may be activated. Make sure that no one isnear the door or gate during programming.When programming a garage door opener,it is advised to park outside of the garage. 1. Point the remote control at the
HomeLink ®
button to be programmed and
hold it about 2-8 cm (1-3 inches) from the button. Do not obstruct the HomeLink ®
indicator light. Note: Some remote controls are more
effective at programming HomeLink ®
from
a distance of about 15-20 cm (6-12 inches). Keep this in mind if you experi-ence any programming difficulties.
2. Press and hold both the remote control button and the HomeLink ®
button to be
programmed.
19 Certain markets only.