set clock VOLVO S90 2020 Quick Guide
[x] Cancel search | Manufacturer: VOLVO, Model Year: 2020, Model line: S90, Model: VOLVO S90 2020Pages: 643, PDF Size: 13.68 MB
Page 82 of 643
DISPLAYS AND VOICE CONTROL
* Option/accessory.
80
Instrument panel The instrument panel displays information related to the vehicle and driving.
The instrument panel contains gauges, indica- tors and monitoring and warning symbols.What is shown in the instrument panel variesdepending on the equipment, settings andfunctions currently active. The instrument panel is activated as soon as a door is opened, i.e. in ignition mode 0. The
panel will power down after a short period oftime if it is not used. To reactivate it, do one ofthe following:
Depress the brake pedal.
Activate ignition mode
I.
Open one of the doors. The instrument panel is available in two ver- sions: 8" and 12"
*.WARNING
If the instrument panel turns off, does not activate when the ignition is switched on,or part/all of the panel cannot be read, donot drive the vehicle. Consult a workshopimmediately. Volvo recommends anauthorized Volvo workshop.
WARNING
If the instrument panel is not functioning properly, information about brakes, airbagsor other safety-related systems may not bedisplayed. The driver will then not be ableto check the status of the vehicle systemsor receive relevant warnings and informa-tion.
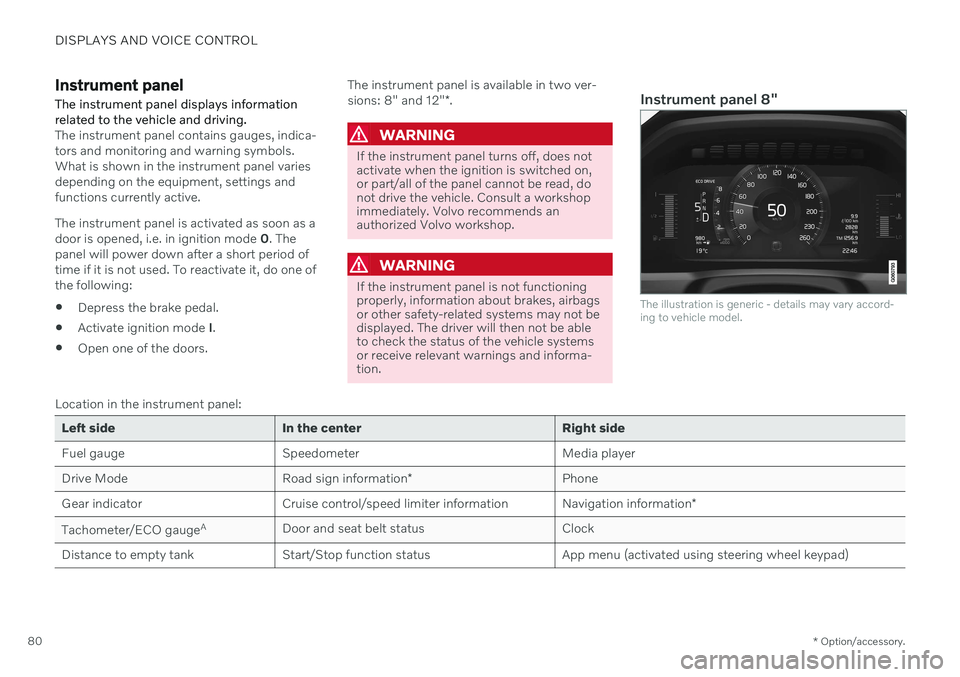
Instrument panel 8"
The illustration is generic - details may vary accord- ing to vehicle model.
Location in the instrument panel:
Left side In the center Right side
Fuel gauge Speedometer Media player Drive Mode
Road sign information* Phone
Gear indicator Cruise control/speed limiter information Navigation information*
Tachometer/ECO gauge A
Door and seat belt status Clock
Distance to empty tank Start/Stop function status App menu (activated using steering wheel keypad)
Page 92 of 643
DISPLAYS AND VOICE CONTROL
* Option/accessory.
90
Date and time The clock is displayed in both the instrument panel and the center display.
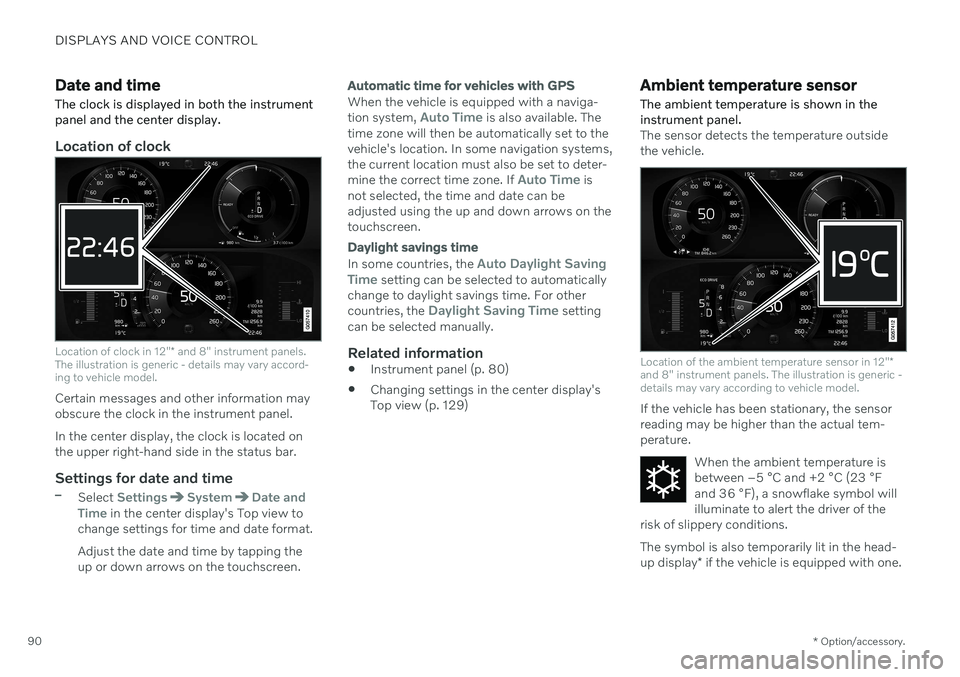
Location of clock
Location of clock in 12" * and 8" instrument panels.
The illustration is generic - details may vary accord- ing to vehicle model.
Certain messages and other information may obscure the clock in the instrument panel. In the center display, the clock is located on the upper right-hand side in the status bar.
Settings for date and time–Select SettingsSystemDate and
Time in the center display's Top view to
change settings for time and date format. Adjust the date and time by tapping the up or down arrows on the touchscreen.
Automatic time for vehicles with GPS
When the vehicle is equipped with a naviga- tion system, Auto Time is also available. The
time zone will then be automatically set to the vehicle's location. In some navigation systems,the current location must also be set to deter- mine the correct time zone. If
Auto Time is
not selected, the time and date can be adjusted using the up and down arrows on thetouchscreen.
Daylight savings time
In some countries, the Auto Daylight Saving
Time setting can be selected to automatically
change to daylight savings time. For other countries, the
Daylight Saving Time setting
can be selected manually.
Related information
Instrument panel (p. 80)
Changing settings in the center display's Top view (p. 129)
Ambient temperature sensor
The ambient temperature is shown in the instrument panel.
The sensor detects the temperature outside the vehicle.
Location of the ambient temperature sensor in 12" *
and 8" instrument panels. The illustration is generic - details may vary according to vehicle model.
If the vehicle has been stationary, the sensor reading may be higher than the actual tem-perature.
When the ambient temperature isbetween –5 °C and +2 °C (23 °F
and 36 °F), a snowflake symbol will
illuminate to alert the driver of the
risk of slippery conditions. The symbol is also temporarily lit in the head- up display * if the vehicle is equipped with one.
Page 110 of 643
||
DISPLAYS AND VOICE CONTROL
* Option/accessory.
108
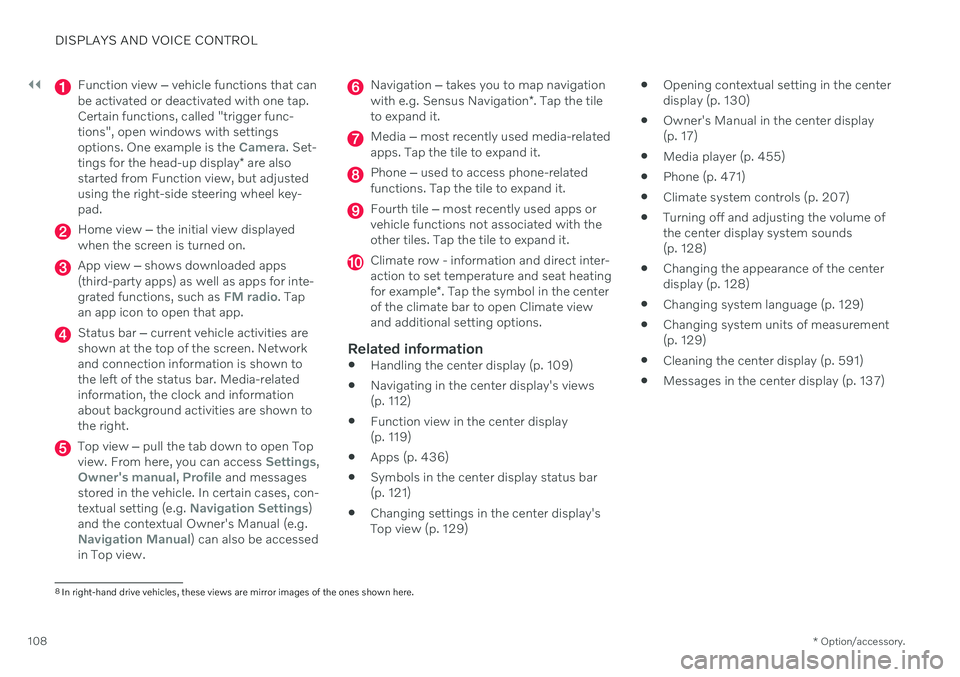
Function view ‒ vehicle functions that can
be activated or deactivated with one tap. Certain functions, called "trigger func-tions", open windows with settingsoptions. One example is the
Camera. Set-
tings for the head-up display * are also
started from Function view, but adjusted using the right-side steering wheel key-pad.
Home view ‒ the initial view displayed
when the screen is turned on.
App view ‒ shows downloaded apps
(third-party apps) as well as apps for inte- grated functions, such as
FM radio. Tap
an app icon to open that app.
Status bar ‒ current vehicle activities are
shown at the top of the screen. Network and connection information is shown tothe left of the status bar. Media-relatedinformation, the clock and informationabout background activities are shown tothe right.
Top view ‒ pull the tab down to open Top
view. From here, you can access Settings,Owner's manual, Profile and messages
stored in the vehicle. In certain cases, con- textual setting (e.g.
Navigation Settings)
and the contextual Owner's Manual (e.g.
Navigation Manual) can also be accessed
in Top view.
Navigation ‒ takes you to map navigation
with e.g. Sensus Navigation *. Tap the tile
to expand it.
Media ‒ most recently used media-related
apps. Tap the tile to expand it.
Phone ‒ used to access phone-related
functions. Tap the tile to expand it.
Fourth tile ‒ most recently used apps or
vehicle functions not associated with the other tiles. Tap the tile to expand it.
Climate row - information and direct inter- action to set temperature and seat heating for example *. Tap the symbol in the center
of the climate bar to open Climate view and additional setting options.
Related information
Handling the center display (p. 109)
Navigating in the center display's views (p. 112)
Function view in the center display (p. 119)
Apps (p. 436)
Symbols in the center display status bar(p. 121)
Changing settings in the center display'sTop view (p. 129)
Opening contextual setting in the centerdisplay (p. 130)
Owner's Manual in the center display(p. 17)
Media player (p. 455)
Phone (p. 471)
Climate system controls (p. 207)
Turning off and adjusting the volume ofthe center display system sounds(p. 128)
Changing the appearance of the centerdisplay (p. 128)
Changing system language (p. 129)
Changing system units of measurement(p. 129)
Cleaning the center display (p. 591)
Messages in the center display (p. 137)
8
In right-hand drive vehicles, these views are mirror images of the ones shown here.
Page 115 of 643
DISPLAYS AND VOICE CONTROL
}}
* Option/accessory.113
NOTE
In Home view's standard mode – short press on the Home button. An animationdescribing access to the various views isshown on the screen.
NOTE
When the vehicle is moving:
Certain functions (e.g. using the center display's keyboard) may be deacti-vated.
Certain texts (e.g. those generated byapps) will be shortened to three rows. Tap the
Read out button to have the
entire message read aloud.
Text messages will be shortened to one row. Tap the
Read out button to
have the entire message read aloud.
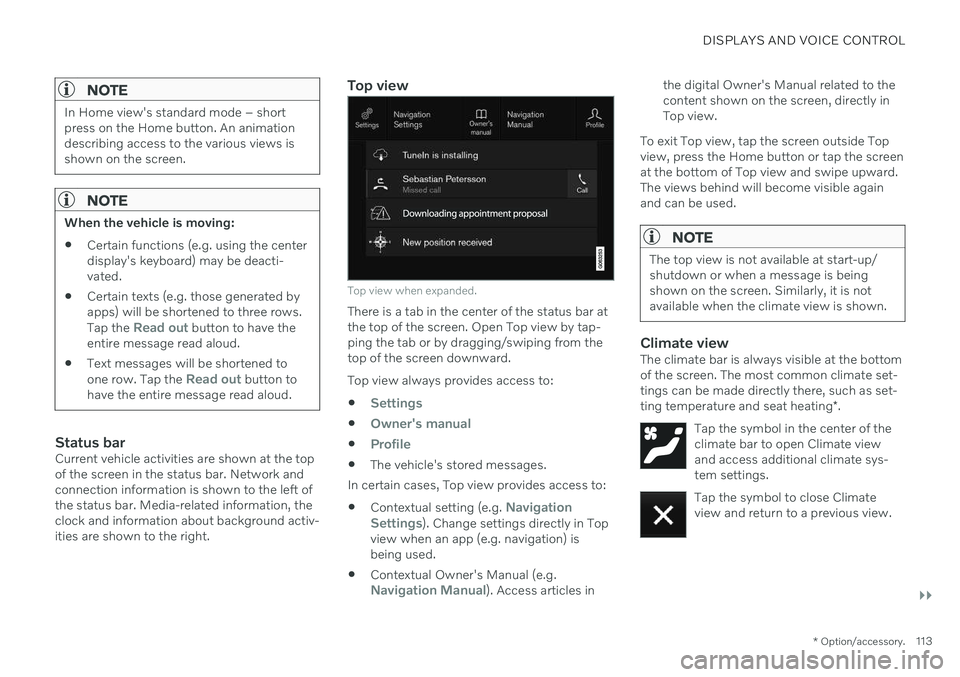
Status barCurrent vehicle activities are shown at the top of the screen in the status bar. Network andconnection information is shown to the left ofthe status bar. Media-related information, theclock and information about background activ-ities are shown to the right.
Top view
Top view when expanded.
There is a tab in the center of the status bar at the top of the screen. Open Top view by tap-ping the tab or by dragging/swiping from thetop of the screen downward. Top view always provides access to:
Settings
Owner's manual
Profile
The vehicle's stored messages.
In certain cases, Top view provides access to: Contextual setting (e.g.
Navigation
Settings). Change settings directly in Top
view when an app (e.g. navigation) is being used.
Contextual Owner's Manual (e.g.
Navigation Manual). Access articles in the digital Owner's Manual related to the content shown on the screen, directly inTop view.
To exit Top view, tap the screen outside Topview, press the Home button or tap the screenat the bottom of Top view and swipe upward.The views behind will become visible againand can be used.
NOTE
The top view is not available at start-up/ shutdown or when a message is beingshown on the screen. Similarly, it is notavailable when the climate view is shown.
Climate viewThe climate bar is always visible at the bottom of the screen. The most common climate set-tings can be made directly there, such as set- ting temperature and seat heating *.
Tap the symbol in the center of the climate bar to open Climate viewand access additional climate sys-tem settings.
Tap the symbol to close Climate view and return to a previous view.
Page 144 of 643
||
DISPLAYS AND VOICE CONTROL
* Option/accessory.
142
Calibrating the horizontal positionIf the windshield or display unit has been replaced, the head-up display's horizontalposition may need to be calibrated. Calibrationmeans that the projected image is rotatedclockwise or counterclockwise. 1.
Tap
Settings in the center display's Top
view.
2. Select
My CarDisplaysHead-Up
Display Options
Head-Up Display
Calibration.
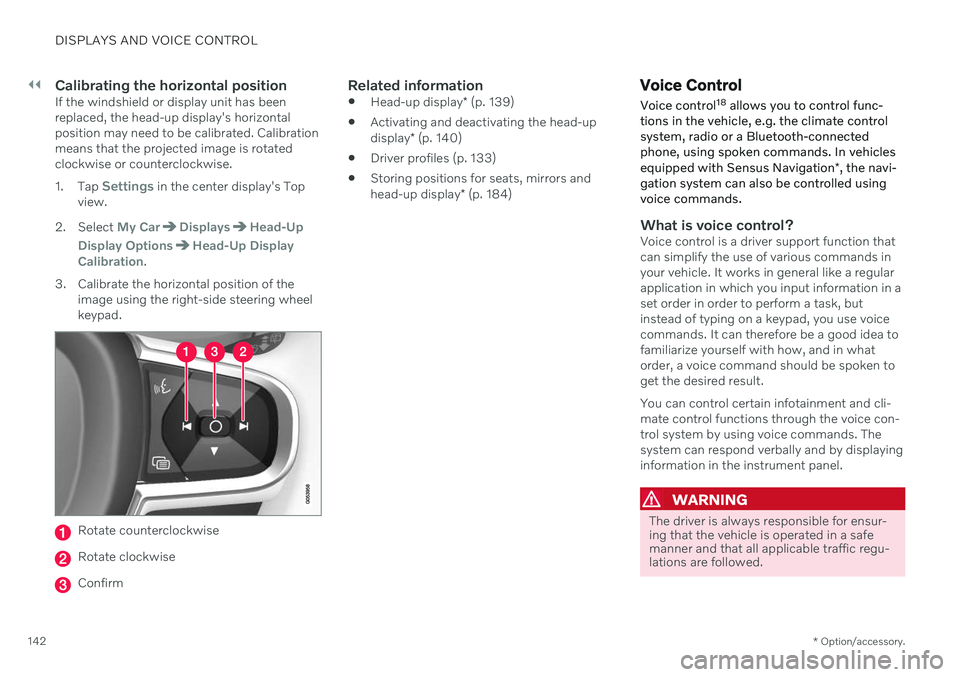
3. Calibrate the horizontal position of the image using the right-side steering wheel keypad.
Rotate counterclockwise
Rotate clockwise
Confirm
Related information
Head-up display
* (p. 139)
Activating and deactivating the head-up display
* (p. 140)
Driver profiles (p. 133)
Storing positions for seats, mirrors andhead-up display
* (p. 184)
Voice Control
Voice control 18
allows you to control func-
tions in the vehicle, e.g. the climate control system, radio or a Bluetooth-connectedphone, using spoken commands. In vehicles equipped with Sensus Navigation *, the navi-
gation system can also be controlled using voice commands.
What is voice control?Voice control is a driver support function that can simplify the use of various commands inyour vehicle. It works in general like a regularapplication in which you input information in aset order in order to perform a task, butinstead of typing on a keypad, you use voicecommands. It can therefore be a good idea tofamiliarize yourself with how, and in whatorder, a voice command should be spoken toget the desired result. You can control certain infotainment and cli- mate control functions through the voice con-trol system by using voice commands. Thesystem can respond verbally and by displayinginformation in the instrument panel.
WARNING
The driver is always responsible for ensur- ing that the vehicle is operated in a safemanner and that all applicable traffic regu-lations are followed.
Page 227 of 643
CLIMATE CONTROL
}}
* Option/accessory.225
Preconditioning timer *
The timer can be set to finish preconditioning at a predetermined time.
The timer can store up to 8 preset times for: A time on a particular date
A time on one or more days of the week, with or without the repeat function.
Related information
Preconditioning
* (p. 224)
Adding and editing timer settings for pre- conditioning
* (p. 225)
Activating and deactivating precondition-ing timer
* (p. 226)
Deleting preconditioning timer settings
*
(p. 227)
Adding and editing timer settings for preconditioning *
The preconditioning timer can store up to 8 preset timer settings.
Adding a timer setting
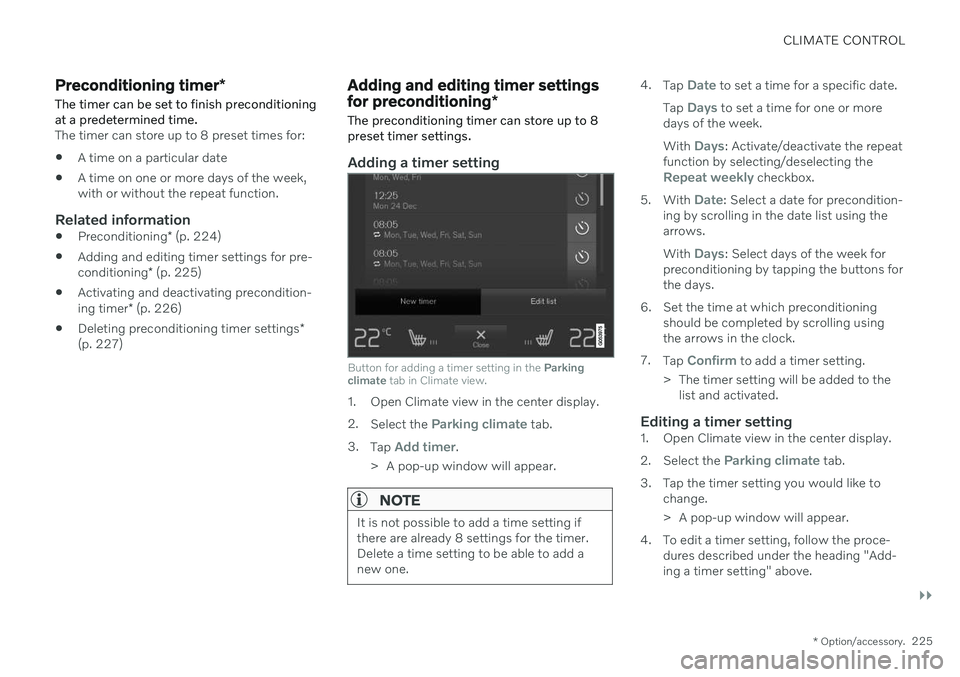
Button for adding a timer setting in the Parking
climate tab in Climate view.
1. Open Climate view in the center display. 2.
Select the
Parking climate tab.
3. Tap
Add timer.
> A pop-up window will appear.
NOTE
It is not possible to add a time setting if there are already 8 settings for the timer.Delete a time setting to be able to add anew one.
4. Tap Date to set a time for a specific date.
Tap
Days to set a time for one or more
days of the week. With
Days: Activate/deactivate the repeat
function by selecting/deselecting the
Repeat weekly checkbox.
5. With
Date: Select a date for precondition-
ing by scrolling in the date list using the arrows. With
Days: Select days of the week for
preconditioning by tapping the buttons for the days.
6. Set the time at which preconditioning should be completed by scrolling usingthe arrows in the clock.
7. Tap
Confirm to add a timer setting.
> The timer setting will be added to the list and activated.
Editing a timer setting1. Open Climate view in the center display. 2. Select the
Parking climate tab.
3. Tap the timer setting you would like to change.
> A pop-up window will appear.
4. To edit a timer setting, follow the proce- dures described under the heading "Add- ing a timer setting" above.
Page 265 of 643
KEY, LOCKS AND ALARM
* Option/accessory.263
Disarming the alarmUnlock and disarm the vehicle alarm by
pressing the unlock button on the remote key
.
grip a door handle or lightly press the trunk lid's rubberized button 16
.
Disarming the alarm without a functioning
remote key
The vehicle can be unlocked and disarmed even if the remote key is not functioning, e.g. ifthe battery is discharged.
1. Open the driver's door using the detacha- ble key blade.
> This will trigger the alarm.
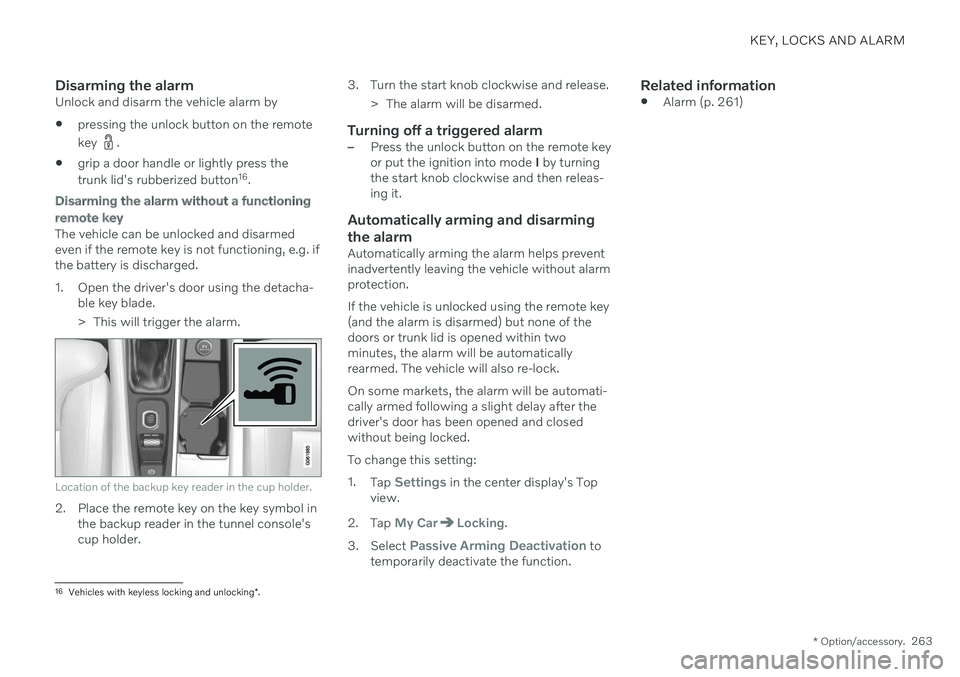
Location of the backup key reader in the cup holder.
2. Place the remote key on the key symbol inthe backup reader in the tunnel console's cup holder. 3. Turn the start knob clockwise and release.
> The alarm will be disarmed.
Turning off a triggered alarm–Press the unlock button on the remote key or put the ignition into mode I by turning
the start knob clockwise and then releas-ing it.
Automatically arming and disarming the alarm
Automatically arming the alarm helps prevent inadvertently leaving the vehicle without alarmprotection. If the vehicle is unlocked using the remote key (and the alarm is disarmed) but none of thedoors or trunk lid is opened within twominutes, the alarm will be automaticallyrearmed. The vehicle will also re-lock. On some markets, the alarm will be automati- cally armed following a slight delay after thedriver's door has been opened and closedwithout being locked. To change this setting:1. Tap
Settings in the center display's Top
view.
2. Tap
My CarLocking.
3. Select
Passive Arming Deactivation to
temporarily deactivate the function.
Related information
Alarm (p. 261)
16
Vehicles with keyless locking and unlocking *.
Page 384 of 643
STARTING AND DRIVING
382
Selecting ignition modeThe vehicle's ignition can be put in various modes (levels) to make different functionsavailable.
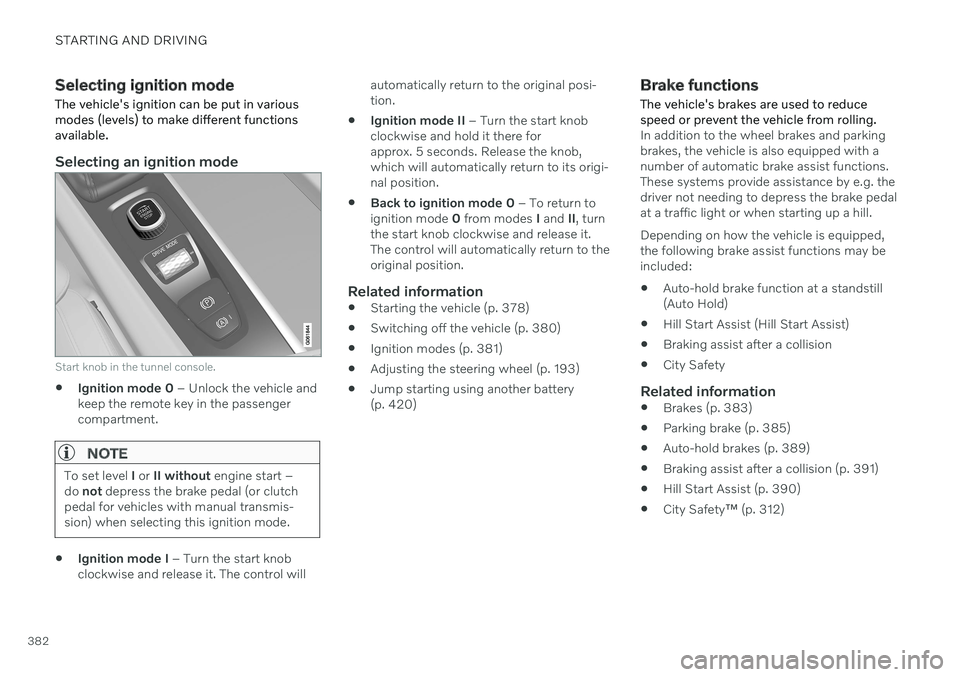
Selecting an ignition mode
Start knob in the tunnel console.
Ignition mode 0
– Unlock the vehicle and
keep the remote key in the passenger compartment.
NOTE
To set level I or II without engine start –
do not depress the brake pedal (or clutch
pedal for vehicles with manual transmis- sion) when selecting this ignition mode.
Ignition mode I
– Turn the start knob
clockwise and release it. The control will automatically return to the original posi- tion.
Ignition mode II
– Turn the start knob
clockwise and hold it there forapprox. 5 seconds. Release the knob,which will automatically return to its origi-nal position.
Back to ignition mode 0
– To return to
ignition mode 0 from modes I and II, turn
the start knob clockwise and release it.The control will automatically return to theoriginal position.
Related information
Starting the vehicle (p. 378)
Switching off the vehicle (p. 380)
Ignition modes (p. 381)
Adjusting the steering wheel (p. 193)
Jump starting using another battery(p. 420)
Brake functions
The vehicle's brakes are used to reduce speed or prevent the vehicle from rolling.
In addition to the wheel brakes and parking brakes, the vehicle is also equipped with anumber of automatic brake assist functions.These systems provide assistance by e.g. thedriver not needing to depress the brake pedalat a traffic light or when starting up a hill. Depending on how the vehicle is equipped, the following brake assist functions may beincluded:
Auto-hold brake function at a standstill(Auto Hold)
Hill Start Assist (Hill Start Assist)
Braking assist after a collision
City Safety
Related information
Brakes (p. 383)
Parking brake (p. 385)
Auto-hold brakes (p. 389)
Braking assist after a collision (p. 391)
Hill Start Assist (p. 390)
City Safety
™ (p. 312)
Page 519 of 643
WHEELS AND TIRES
* Option/accessory.517
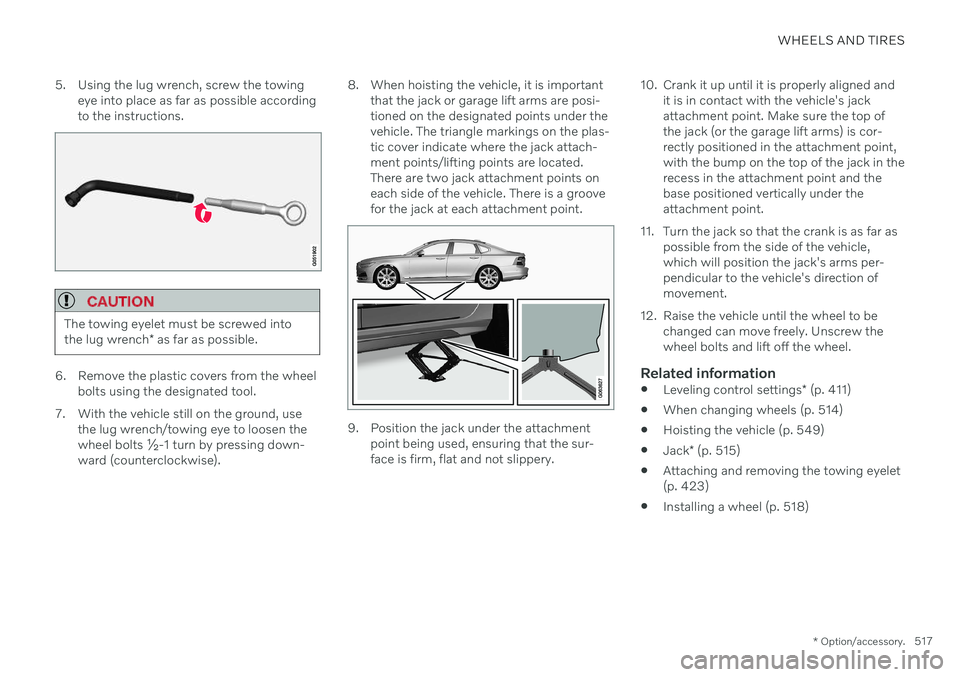
5. Using the lug wrench, screw the towing
eye into place as far as possible according to the instructions.
CAUTION
The towing eyelet must be screwed into the lug wrench * as far as possible.
6. Remove the plastic covers from the wheel
bolts using the designated tool.
7. With the vehicle still on the ground, use the lug wrench/towing eye to loosen the wheel bolts ½-1 turn by pressing down-ward (counterclockwise). 8. When hoisting the vehicle, it is important
that the jack or garage lift arms are posi-tioned on the designated points under thevehicle. The triangle markings on the plas-tic cover indicate where the jack attach-ment points/lifting points are located.There are two jack attachment points oneach side of the vehicle. There is a groovefor the jack at each attachment point.
9. Position the jack under the attachmentpoint being used, ensuring that the sur- face is firm, flat and not slippery. 10. Crank it up until it is properly aligned and
it is in contact with the vehicle's jackattachment point. Make sure the top ofthe jack (or the garage lift arms) is cor-rectly positioned in the attachment point,with the bump on the top of the jack in therecess in the attachment point and thebase positioned vertically under theattachment point.
11. Turn the jack so that the crank is as far as possible from the side of the vehicle,which will position the jack's arms per-pendicular to the vehicle's direction ofmovement.
12. Raise the vehicle until the wheel to be changed can move freely. Unscrew thewheel bolts and lift off the wheel.
Related information
Leveling control settings
* (p. 411)
When changing wheels (p. 514)
Hoisting the vehicle (p. 549)
Jack
* (p. 515)
Attaching and removing the towing eyelet(p. 423)
Installing a wheel (p. 518)
Page 523 of 643
WHEELS AND TIRES
521
Stowing a flat tire1. Screw the spare tire's retaining bolt backon.
CAUTION
Do not attempt to unscrew the lower part of the retaining bolt if it is attached to thebody, as this could cause it to break. If the retaining bolt becomes dislodged from its lower attachment point in thebody under the spare tire, replace it in thehole and turn clockwise to secure it again.
2. Put the tools back in their correct posi-tions in the foam block.
3. Then lower the trunk/cargo compartment floor and place the punctured tire in the trunk/cargo compartment.
Related information
Spare wheel (p. 519)
Tool kit (p. 514)
Removing a wheel (p. 516)
Snow tires
Snow tires are designed for winter driving conditions.
Volvo recommends snow tires with specific dimensions. The tire dimensions vary depend-ing on engine type. When driving with snowtires, the correct type of tires must be moun-ted on all four wheels.
NOTE
Contact a Volvo dealer for advice on the best choice of rims and tires.
Tips for changing snow tiresWhen switching between regular tires and snow tires, mark the tires according to whichside they were mounted on, e.g. L for left and
R for right.
Studded tiresStudded tires should be broken in by driving500–1000 km (300–600 miles) slowly andgently to help the studs settle properly in thetires. This gives the tire, and especially thestuds, a longer service life.
NOTE
Regulations regarding the use of studded tires vary from country to country.
Tread depthRoad conditions with ice, slush and low tem- peratures place considerably higher demandson tires than summer conditions. Volvo there-fore recommends not driving on snow tiresthat have a tread depth of less than 4 mm(0.15 inch).
Related information
When changing wheels (p. 514)
Winter driving (p. 412)
Tread wear indicator (p. 503)