light VOLVO V4 2002 Owners Manual
[x] Cancel search | Manufacturer: VOLVO, Model Year: 2002, Model line: V4, Model: VOLVO V4 2002Pages: 88, PDF Size: 2.34 MB
Page 6 of 88
Seat belts
Always fasten the seat belts before you drive or ride.
Two lights above the rear view mirror will be illuminated for 4-8 seconds after the starting (ignition) key is turned to
the driving position. A chime will sound at the same time if the driver has not fastened his seat belt. The rear seats are
provided with self -retracting inertial reel belts. The front seats are provided with single roller belts with tensioners.
To buckle:
Pull the belt out far enough to insert the latch plate into the buckle until a distinct snapping sound is heard. The seat
belt retractor is normally "unlocked" and you can move freely, provided that the shoulder belt is not pulled out too far.
The retractor will lock up as follows:
· if the belt is pulled out rapidly
· during braking and acceleration
· if the vehicle is leaning excessively
· when driving in turns
For the seat belt to provide maximum protection in the event of an accident, it must be worn correctly. When wearing
the seat belt remember:
· The belt should not be twisted or turned.
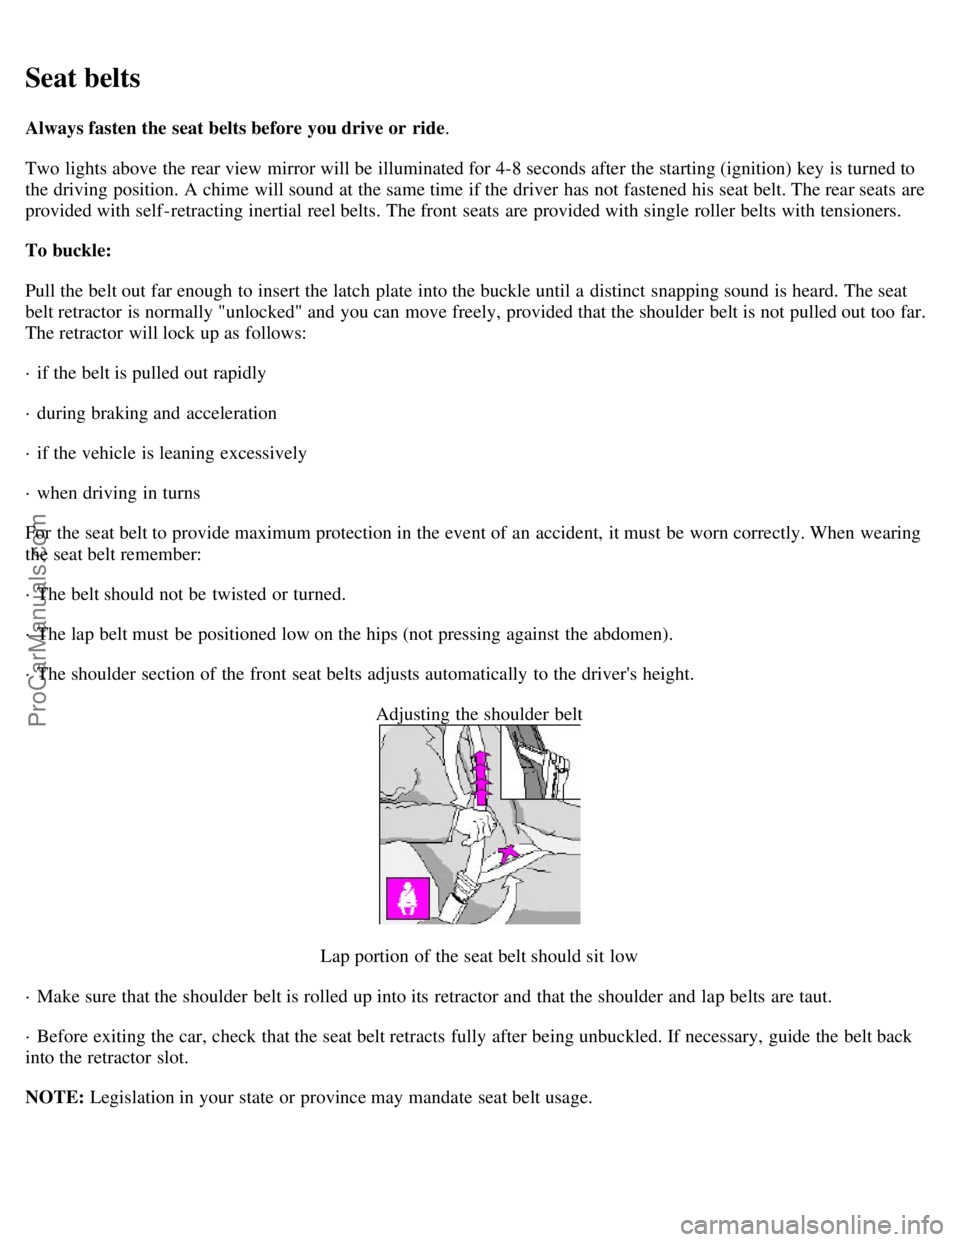
· The lap belt must be positioned low on the hips (not pressing against the abdomen).
· The shoulder section of the front seat belts adjusts automatically to the driver's height. Adjusting the shoulder belt
Lap portion of the seat belt should sit low
· Make sure that the shoulder belt is rolled up into its retractor and that the shoulder and lap belts are taut.
· Before exiting the car, check that the seat belt retracts fully after being unbuckled. If necessary, guide the belt back
into the retractor slot.
NOTE: Legislation in your state or province may mandate seat belt usage.
ProCarManuals.com
Page 9 of 88
The entire process, including inflation and deflation of the airbags, takes approximately two-tenths of a second.
WARNING!
· As its name implies, SRS is designed to be a SUPPLEMENT to - not a replacement for - the three-point belt
system. For maximum protection, wear seat belts at all times. Be aware that no system can prevent all possible
injuries that may occur in an accident.
· When installing any optional equipment, make sure that the SRS system is not damaged. Do not attempt to service
any component of the SRS yourself. Attempting to do so may result in serious personal injury. If a problem arises,
take your car to the nearest authorized Volvo retailer for inspection as soon as possible.
pg. 5 Volvo SRS
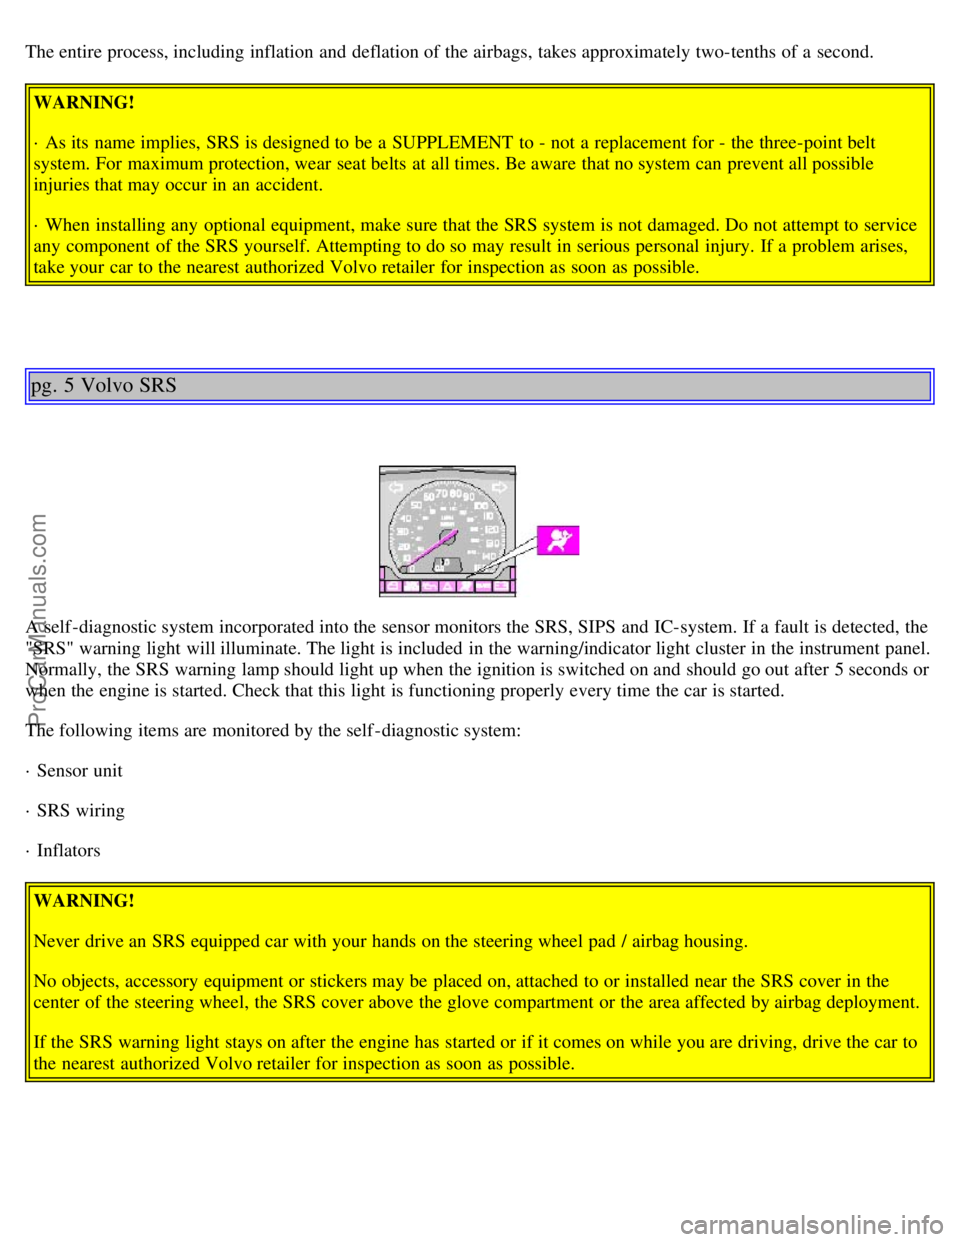
A self -diagnostic system incorporated into the sensor monitors the SRS, SIPS and IC-system. If a fault is detected, the
"SRS" warning light will illuminate. The light is included in the warning/indicator light cluster in the instrument panel.
Normally, the SRS warning lamp should light up when the ignition is switched on and should go out after 5 seconds or
when the engine is started. Check that this light is functioning properly every time the car is started.
The following items are monitored by the self -diagnostic system:
· Sensor unit
· SRS wiring
· InflatorsWARNING!
Never drive an SRS equipped car with your hands on the steering wheel pad / airbag housing.
No objects, accessory equipment or stickers may be placed on, attached to or installed near the SRS cover in the
center of the steering wheel, the SRS cover above the glove compartment or the area affected by airbag deployment.
If the SRS warning light stays on after the engine has started or if it comes on while you are driving, drive the car to
the nearest authorized Volvo retailer for inspection as soon as possible.
ProCarManuals.com
Page 13 of 88
2 0 0 2
VOLVO
S40 & V40
Chapter 2 - Instruments, switches and controls
pg. 17 Instruments, switches and controls
Instruments, switches and controls
Instruments, switches, controls etc. are described on the following pages. Instruments
18
Indicator and warning lights21
Headlights, Parking lights, Instrument illumination, Fog lights24
Turn signals, home Safe lighting, Wipers/washers25
Ignition switch/steering wheel locks, Flashers, Heated rear window/mirrors26
Trip Computer27
Dynamic Stability Assistance30
Cruise control31
Heated seats, Parking brake32
Auxiliary socket, Cupholder33
Steering wheel adjustment34
Heating, Ventilation and Air Conditioning35
Electrcaly operated windows38
pg. 18 Instruments, switches and controls
ProCarManuals.com
Page 14 of 88
pg. 19 Instruments, switches and controls
Chapter 2 - Instruments, switches and controls
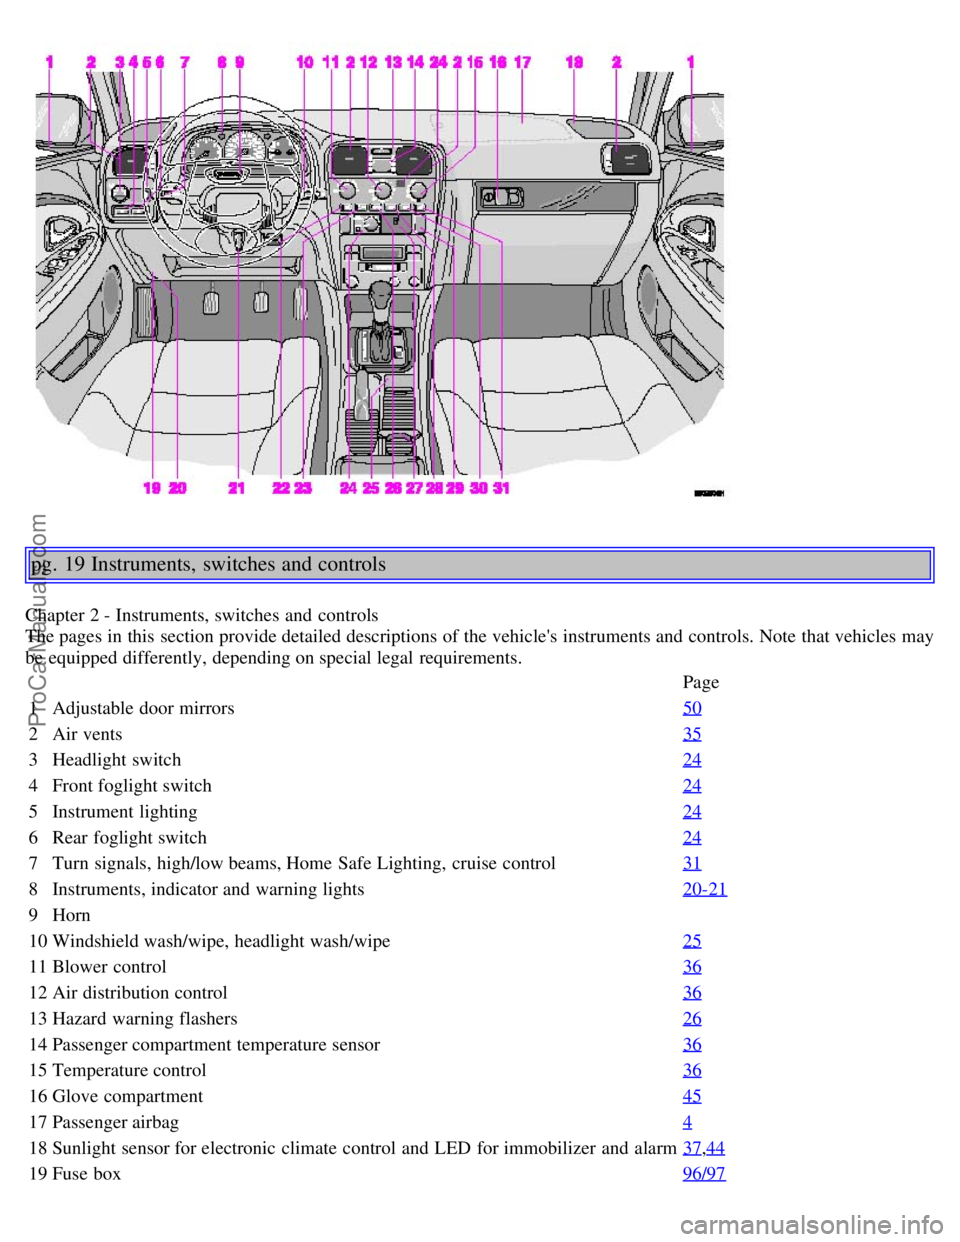
The pages in this section provide detailed descriptions of the vehicle's instruments and controls. Note that vehicles may
be equipped differently, depending on special legal requirements.Page
1 Adjustable door mirrors 50
2Air vents 35
3Headlight switch 24
4Front foglight switch 24
5Instrument lighting 24
6Rear foglight switch 24
7Turn signals, high/low beams, Home Safe Lighting, cruise control 31
8Instruments, indicator and warning lights 20-21
9Horn
10 Windshield wash/wipe, headlight wash/wipe 25
11Blower control 36
12Air distribution control 36
13Hazard warning flashers 26
14Passenger compartment temperature sensor 36
15Temperature control 36
16Glove compartment 45
17Passenger airbag 4
18Sunlight sensor for electronic climate control and LED for immobilizer and alarm 37,44
19Fuse box 96/97
ProCarManuals.com
Page 16 of 88
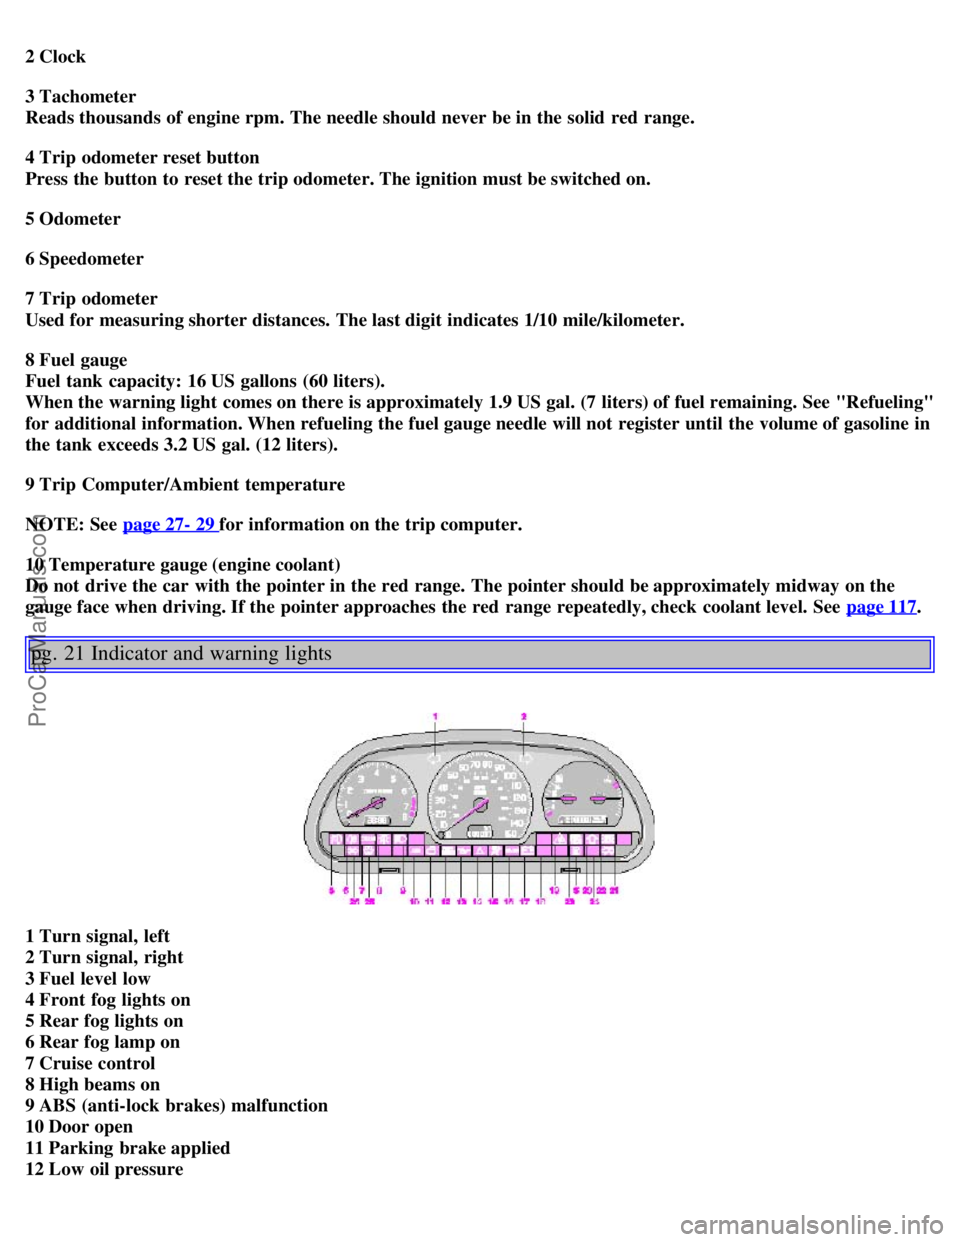
2 Clock
3 Tachometer
Reads thousands of engine rpm. The needle should never be in the solid red range.
4 Trip odometer reset button
Press the button to reset the trip odometer. The ignition must be switched on.
5 Odometer
6 Speedometer
7 Trip odometer
Used for measuring shorter distances. The last digit indicates 1/10 mile/kilometer.
8 Fuel gauge
Fuel tank capacity: 16 US gallons (60 liters).
When the warning light comes on there is approximately 1.9 US gal. (7 liters) of fuel remaining. See "Refueling"
for additional information. When refueling the fuel gauge needle will not register until the volume of gasoline in
the tank exceeds 3.2 US gal. (12 liters).
9 Trip Computer/Ambient temperature
NOTE: See page 27- 29
for information on the trip computer.
10 Temperature gauge (engine coolant)
Do not drive the car with the pointer in the red range. The pointer should be approximately midway on the
gauge face when driving. If the pointer approaches the red range repeatedly, check coolant level. See page 117
.
pg. 21 Indicator and warning lights
1 Turn signal, left
2 Turn signal, right
3 Fuel level low
4 Front fog lights on
5 Rear fog lights on
6 Rear fog lamp on
7 Cruise control
8 High beams on
9 ABS (anti-lock brakes) malfunction
10 Door open
11 Parking brake applied
12 Low oil pressure
ProCarManuals.com
Page 17 of 88
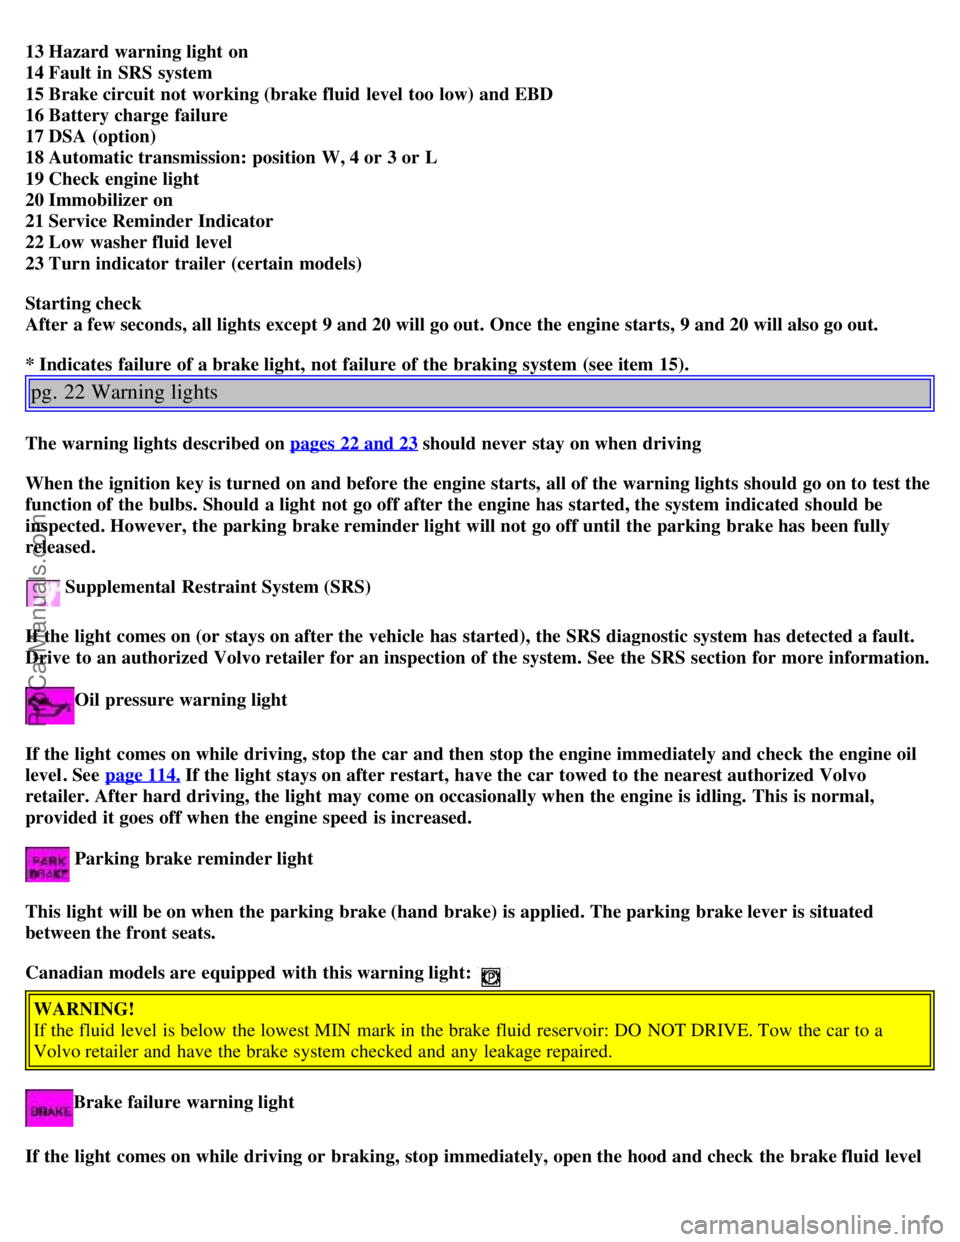
13 Hazard warning light on
14 Fault in SRS system
15 Brake circuit not working (brake fluid level too low) and EBD
16 Battery charge failure
17 DSA (option)
18 Automatic transmission: position W, 4 or 3 or L
19 Check engine light
20 Immobilizer on
21 Service Reminder Indicator
22 Low washer fluid level
23 Turn indicator trailer (certain models)
Starting check
After a few seconds, all lights except 9 and 20 will go out. Once the engine starts, 9 and 20 will also go out.
* Indicates failure of a brake light, not failure of the braking system (see item 15).
pg. 22 Warning lights
The warning lights described on pages 22 and 23 should never stay on when driving
When the ignition key is turned on and before the engine starts, all of the warning lights should go on to test the
function of the bulbs. Should a light not go off after the engine has started, the system indicated should be
inspected. However, the parking brake reminder light will not go off until the parking brake has been fully
released.
Supplemental Restraint System (SRS)
If the light comes on (or stays on after the vehicle has started), the SRS diagnostic system has detected a fault.
Drive to an authorized Volvo retailer for an inspection of the system. See the SRS section for more information.
Oil pressure warning light
If the light comes on while driving, stop the car and then stop the engine immediately and check the engine oil
level . See page 114.
If the light stays on after restart, have the car towed to the nearest authorized Volvo
retailer. After hard driving, the light may come on occasionally when the engine is idling. This is normal,
provided it goes off when the engine speed is increased.
Parking brake reminder light
This light will be on when the parking brake (hand brake) is applied. The parking brake lever is situated
between the front seats.
Canadian models are equipped with this warning light:
WARNING!
If the fluid level is below the lowest MIN mark in the brake fluid reservoir: DO NOT DRIVE. Tow the car to a
Volvo retailer and have the brake system checked and any leakage repaired.
Brake failure warning light
If the light comes on while driving or braking, stop immediately, open the hood and check the brake fluid level
ProCarManuals.com
Page 18 of 88
in the reservoir. See page 116 for reservoir position.
If the control lamp still stays on, the EBD (Electronic Brakeforce Distribution) is not working.
Drive to your Volvo dealer. See ABS control lamp and also page 73.
Canadian models are equipped with this warning light:
Bulb failure warning light
The light will come on if one of the brake light bulbs are defective when the brake pedal is pressed.
Check the fuse and bulb. See sections "Replacing bulbs" and "fuses".
pg. 23 Warning lights, Daytime Running Lights
DSA (option)
Dynamic Stability Assistance
This is a system which helps keep the drivewheels from spinning. The light flashes if the road surface is slippery,
the wheels are spinning and the system is working.
The control light comes on if a fault occurs in the DSA system. It also comes on if the system is switched off via
the switch.
For more information see page 30.
Service Reminder Light
This light will come on according to preset service intervals or after 750 hours of driving or after 12 months,
whichever occurs first. It is a reminder to the driver that the service interval has been exceeded. The light will
stay on for 2 minutes after start until reset by the servicing retailer.
Anti-lock Brake system (ABS)
If the warning lamp lights up there is a malfunction of the ABS system (the standard braking system will
however function). The vehicle should be driven to a Volvo retailer for inspection.
See page 73
for additional information.
Malfunction Indicator Lamp
On-Board Diagnostics II (OBDII): As you drive, a computer called "OBDII" monitors your car's engine,
transmission, electrical and emission systems. The CHECK ENGINE light will light up if the computer senses a
condition that potentially may need correcting. When this happens, please have your car checked by a Volvo
retailer as soon as possible.
A CHECK ENGINE light may have many causes. Sometimes, you may not notice a change in your car's
behavior. Even so, an uncorrected condition could hurt fuel economy, emission cleanliness, and driveability.
Extended driving without correcting the cause could even damage other components in your car.
ProCarManuals.com
Page 19 of 88
Canadian models are equipped with this warning light:
NOTE: If the fuel filler cap is not closed tightly or if the engine is running when the car is refueled, the Check
Engine Lamp may indicate a fault. However, your vehicle's performance will not be affected. Use only Volvo
original or approved fuel filler caps.
Daytime Running Lights:
The S40 and V40 come from the factory with daytime running lights activated. Carry out the following steps if
you will deactivate them(in the U.S. only *). These steps may be carried out again to reactivate and deactivate
the daytime running lights as desired.
Programming for On or OFF
Turn the headlight switch to position
.
Turn the ignition key in position II.
Pull the turn signal lever towards you and hold it while turning the headlight switch to position 0.
WARNING!
Do not activate or deactivate the daytime running lights while driving. Laws in your area may mandate the use of
daytime running lights. Check your local laws before deactivating daytime running lights.
* The use of daytime running lights is mandatory in Canada.
pg. 24 Headlights, Parking lights, Instrument illumination, Fog lights
A Headlights and parking lights 0 Switch position
Ignition key in positions 0+I: All lights switched off
Ignition key in position II:
Low beam headlights on (+ front and rear parking lights, license plate light and instrument lighting).
Switch position
Parking lights front and rear.
Ignition key in positions 0, I and II
Parking lights should only be used when the car is parked, never when the car is being driven.
It also switches on the position lights in bumpers, and license plate light (and the instrument lights in position II).
Switch position
Ignition key in positions 0 and I: All lights off.
Ignition key in position II: Headlights on (+ parking lights front and rear, license plate light, position lights in
the bumpers and instrument lights).
Note: You have to turn the light switch to this position in order to switch on high beams.
B Instrument lighting dimmer
Instrument lighting can be dimmed to 6% of maximum lighting.
ProCarManuals.com
Page 20 of 88
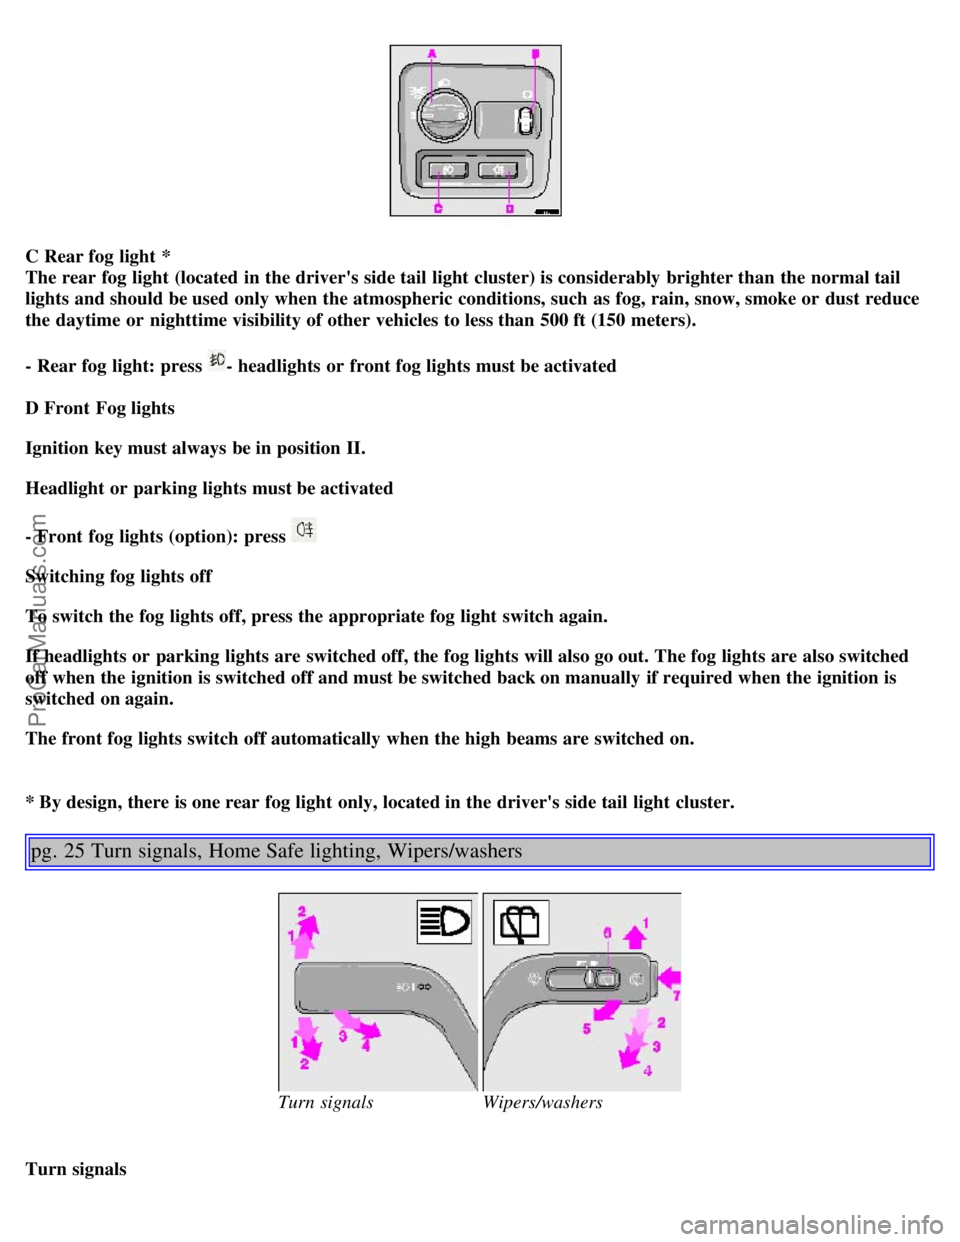
C Rear fog light *
The rear fog light (located in the driver's side tail light cluster) is considerably brighter than the normal tail
lights and should be used only when the atmospheric conditions, such as fog, rain, snow, smoke or dust reduce
the daytime or nighttime visibility of other vehicles to less than 500 ft (150 meters).
- Rear fog light: press
- headlights or front fog lights must be activated
D Front Fog lights
Ignition key must always be in position II.
Headlight or parking lights must be activated
- Front fog lights (option): press
Switching fog lights off
To switch the fog lights off, press the appropriate fog light switch again.
If headlights or parking lights are switched off, the fog lights will also go out. The fog lights are also switched
off when the ignition is switched off and must be switched back on manually if required when the ignition is
switched on again.
The front fog lights switch off automatically when the high beams are switched on.
* By design, there is one rear fog light only, located in the driver's side tail light cluster.
pg. 25 Turn signals, Home Safe lighting, Wipers/washers
Turn signalsWipers/washers
Turn signals
ProCarManuals.com
Page 21 of 88
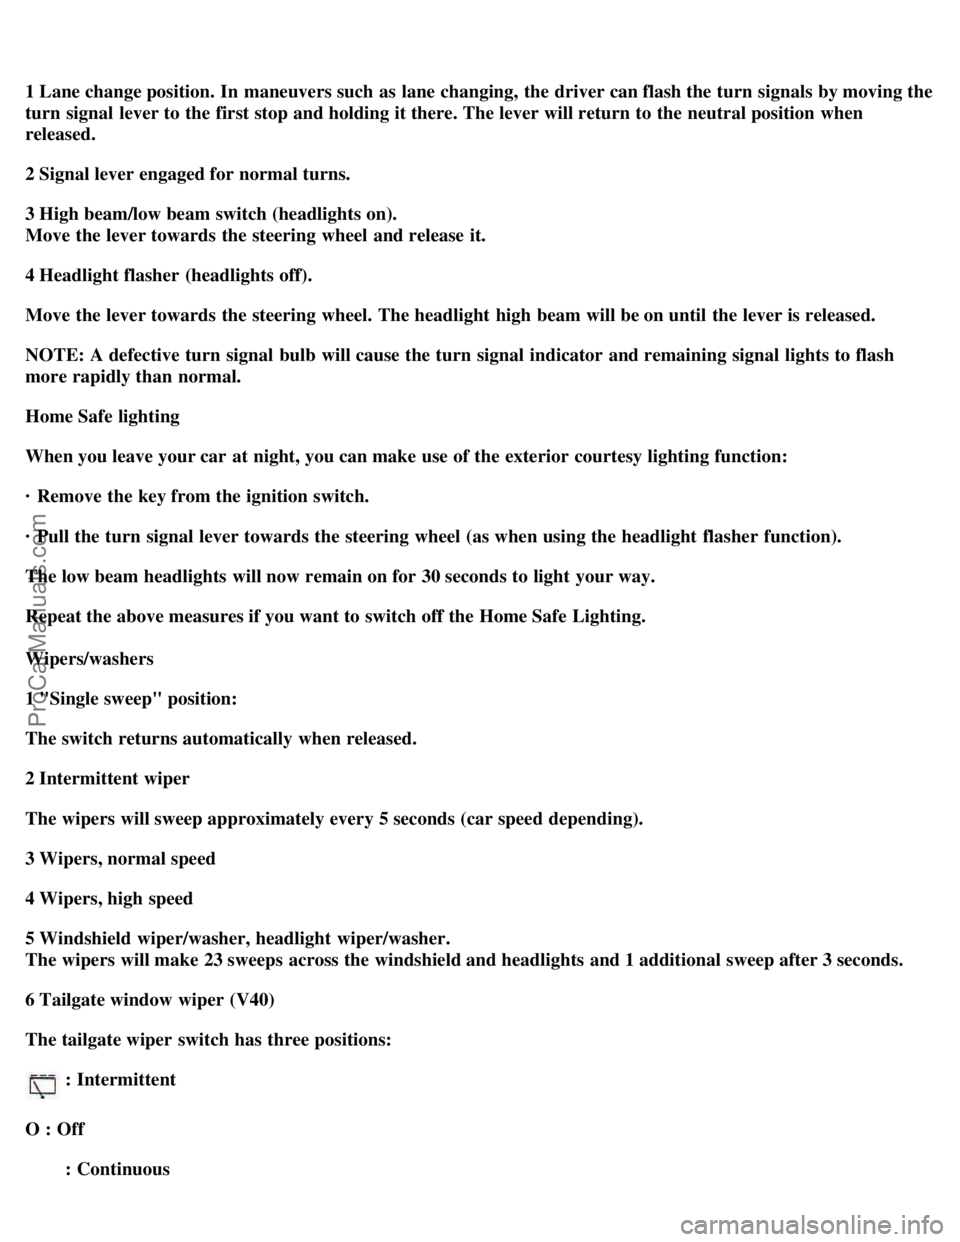
1 Lane change position. In maneuvers such as lane changing, the driver can flash the turn signals by moving the
turn signal lever to the first stop and holding it there. The lever will return to the neutral position when
released.
2 Signal lever engaged for normal turns.
3 High beam/low beam switch (headlights on).
Move the lever towards the steering wheel and release it.
4 Headlight flasher (headlights off).
Move the lever towards the steering wheel. The headlight high beam will be on until the lever is released.
NOTE: A defective turn signal bulb will cause the turn signal indicator and remaining signal lights to flash
more rapidly than normal.
Home Safe lighting
When you leave your car at night, you can make use of the exterior courtesy lighting function:
· Remove the key from the ignition switch.
· Pull the turn signal lever towards the steering wheel (as when using the headlight flasher function).
The low beam headlights will now remain on for 30 seconds to light your way.
Repeat the above measures if you want to switch off the Home Safe Lighting.
Wipers/washers
1 "Single sweep" position:
The switch returns automatically when released.
2 Intermittent wiper
The wipers will sweep approximately every 5 seconds (car speed depending).
3 Wipers, normal speed
4 Wipers, high speed
5 Windshield wiper/washer, headlight wiper/washer.
The wipers will make 23 sweeps across the windshield and headlights and 1 additional sweep after 3 seconds.
6 Tailgate window wiper (V40)
The tailgate wiper switch has three positions:
: Intermittent
O : Off : Continuous
ProCarManuals.com