VOLVO V4 2004 Owner's Guide
Manufacturer: VOLVO, Model Year: 2004, Model line: V4, Model: VOLVO V4 2004Pages: 89, PDF Size: 2.05 MB
Page 31 of 89

Each Volvo has a three-way catalytic converter and must use only unleaded gasoline. U.S. and Canadian regulations
require that pumps delivering unleaded gasoline be labelled "UNLEADED". Only these pumps have nozzles which fit
your car's filler inlet. It is unlawful to dispense leaded fuel into a vehicle labelled "unleaded gasoline only". Leaded
gasoline damages the three-way catalytic converter and the heated oxygen sensor system. Repeated use of leaded
gasoline will lessen the effectiveness of the emission control system and could result in loss of emission warranty
coverage. State and local vehicle inspection programs will make detection of misfueling easier, possibly resulting in
emission test failure for misfueled vehicles.
NOTE: Some U.S. and Canadian gasolines contain an octane enhancing additive called methyl-cyclopentadienyl
manganese tricarbonyl (MMT). If such fuels are used, your Emission Control System performance may be affected,
and the Check Engine Lamp located on your instrument panel may light. If this occurs, please return your vehicle to
an authorized Volvo retailer for service.
Carbon Monoxide - Important Warning
Carbon monoxide is a poisonous, colorless, and odorless gas. It is present in all exhaust gases. If you ever smell
exhaust fumes inside the vehicle, make sure the passenger compartment is ventilated, and immediately return the
vehicle to your retailer for correction.
Fuel Formulations
Do not use gasoline that contains lead as a knock inhibitor, and do not use lead additives. Besides damaging the
exhaust emission control systems on your car, lead has been strongly linked to certain forms of cancer.
Many fuels contain benzene as a solvent. Unburned benzene has been strongly linked to certain forms of cancer. If you
live in an area where you must fill your own gas tank, take precautions. These may include:
standing upwind away from the filler nozzle while refueling
refueling only at gas stations with vapor recovery systems that fully seal the mouth of the filler neck during refueling
wear neoprene gloves while handling a fuel filler nozzle.
Use of Additives
With the exception of gas line antifreeze during winter months, do not add solvents, thickeners, or other store -bought
additives to your car's fuel, cooling, or lubricating systems. Overuse may damage your engine, and some of these
additives contain organically volatile chemicals. Do not needlessly expose yourself to these chemicals.
ENGINE OIL
Although some oil consumption occurs during normal engine operation, more oil is consumed when the engine is new
as the internal parts generate higher friction while wearing in to each other. From the time the engine is new until
the first service is performed, the oil consumption could be higher than normal. For this reason, it is especially
important to check the oil every time you refuel your car during this period. See page 114
.
pg. 63 Fuel requirements, Refueling
Octane rating
Volvo engines are designed for optimum performance on unleaded premium gasoline with an octane rating. AKI of 91,
or above. AKI (ANTI KNOCK INDEX) is an average of the Research Octane Number, RON, and the Motor Octane
Number, MON. (RON + MON/2).
The minimum octane requirement is AKI 87 (RON 91).
Gasoline containing alcohol and ethers
"Oxygenated fuels"
Some fuel suppliers sell gasoline containing "oxygenates" which are usually alcohols or ethers. In some areas, state or
local laws require that the service pump be marked indicating use of alcohols or ethers.
However, there are areas in which the pumps are unmarked. If you are not sure whether there is alcohol or ethers in the
ProCarManuals.com
Page 32 of 89

gasoline you buy, check with the service station operator. To meet seasonal air quality standards, some areas require
the use of "oxygenated" fuel.
Volvo allows the use of the following "oxygenated" fuels; however, the octane ratings listed on this page must still be
met.
Alcohol — Ethanol
Fuels containing up to 10% ethanol by volume may be used.
Ethanol may also be referred to as Ethyl alcohol, or "Gasohol".
Ethers — MTBE
Fuels containing up to 15% MTBE may be used.
Refueling
The fuel tank is designed to hold approximately: 16 US gallons (60 liters) with sufficient volume left over to
accommodate possible expansion of the fuel in hot weather.
WARNING!
Never carry a cell phone that is switched on while refueling your vehicle. If the phone rings, this may cause a spark
that could ignite gasoline fumes, resulting in fire and injury.
Fuel filler door
The fuel filler door (on the left rear fender) is unlocked along with the car's central locking system.
Open fuel filler cap slowly during hot weather.
CAUTION:
Do not refuel with the engine running *. Turn the ignition off or to position I. If the ignition is on, an incorrect
reading could occur in the fuel gauge.
After refueling, close the fuel filler cap by turning it clockwise until it clicks into place *.
Avoid spilling gasoline during refueling. Gasoline containing alcohol can cause paint damage that may not be
covered under the New Vehicle Limited Warranty.
Do not use gasolines containing methanol (methyl alcohol, wood alcohol). This practice can result in vehicle
performance deterioration and can damage critical parts in the fuel system. Such damage may not be covered under the
New Vehicle Limited Warranty.
Do not overfill the fuel tank. Overfilling could damage the emission control system.
* If the fuel filler cap is not closed tightly or if the engine is running when the car is refueled, the Check Engine
Lamp may indicate a fault. However, your vehicle's performance will not be affected. Use only Volvo original or
approved fuel filler caps.
pg. 64 Driving economy
Economical driving conserves natural resources
Better driving economy may be obtained by thinking ahead, avoiding rapid starts and stops and adjusting the speed of
your vehicle to immediate traffic conditions. Observe the following rules:
Bring the engine to normal operating temperature as soon as possible by driving with a light foot on the accelerator
pedal for the first few minutes of operation. A cold engine uses more fuel and is subject to increased wear.
Whenever possible, avoid using the car for short trips. Short trips do not allow the engine to reach normal operating
temperature.
Drive carefully and avoid rapid acceleration and hard braking.
ProCarManuals.com
Page 33 of 89

Do not exceed posted speed limits.
Avoid carrying unnecessary items (extra load) in the car.
Maintain correct tire pressure. Check tire pressure regularly (check when tires are cold).
Remove snow tires when threat of snow or ice has ended.
Note that roof racks, ski racks, etc., increase air resistance and thereby fuel consumption.
Avoid using automatic transmission kick-down feature unless necessary.
Avoid using the air conditioning when it is not required. When engaged, the air conditioner's compressor places an
additional load on the engine. However, please note that fuel consumption is lower with the air conditioning on than it
is when driving with the air conditioning switched off and the windows down.
Utilizing the fuel consumption modes in the Trip Computer can help you "learn" how to drive more economically.
Other factors which decrease gas mileage are:
Dirty air cleaner
Dirty engine oil and clogged oil filter
Dragging brakes
Incorrect front end alignment
Some of the above mentioned items and others are checked at the standard Maintenance Service intervals.
NOTE : The automatic transmission's ( D)rive position should be used as often as possible to help improve fuel
economy.
WARNING!
It is recommended that tires of the same make and dimensions be used on all four wheels (including the use of
snow tires). Do not use bias ply tires as this will adversely alter vehicle handling characteristics. Maintain correct tire
pressure.
Do not drive with trunk lid open! A warning light in the instrument panel will indicate that the trunk is open.
Poisonous exhaust gases may enter via the open trunk lid. If the trunk lid/tailgate must be kept open for any reason,
proceed as follows:
Close the windows.
Set the ventilation system control to air flow to floor, windshield and side windows and blower control to its
highest setting.
pg. 65 Starting the engine
Starting and stopping
1. Fasten the seat belt.
WARNING!
Before starting, check that the seat, steering wheel and mirrors are adjusted properly. Make sure the brake pedal can
be depressed completely. Move the seat closer if necessary. Refer to section "front seats".
2. Make sure the gear selector is in the Park position.
3. Without touching the accelerator pedal, turn the ignition key to the starting position. Allow the starter to operate
for up to 5 seconds. Release the key as soon as the engine starts. If the engine fails to start, repeat step 3.
For cold starts at altitudes above 6000 ft (1800 meters), depress the accelerator pedal halfway and turn the key to the
starting position. Release the pedal slowly when the engine starts. Depress the brake pedal and release the parking
brake.
ProCarManuals.com
Page 34 of 89

4. To release the gear selector from the (P)ark position, the ignition key must be in position II and the brake pedal
must be depressed.
5. Select the desired gear. The gear engages after a slight delay which is especially noticeable when selecting R.
NOTE: Your car is equipped with a KEYLOCK system. When the engine is switched off, the gear selector must be
in the (P)ark position before the starting key can be removed from the ignition switch.
WARNING!
Volvo offers floor mats specially manufactured for your vehicle. They must be properly placed and secured in the
mat clips.
An extra mat on the driver's floor can cause the accelerator pedal to catch. Check that the movement of the
accelerator pedal is not impeded. No more than one protective floor covering may be used at one time.
CAUTION :
The engine should be idling; never accelerate until after you feel the gear engage! Too-rapid acceleration immediately
after selecting a gear will cause harsh engagement and premature transmission wear.
NOTE : Selecting P or N when idling at a standstill for prolonged periods of time will help prevent overheating of
transmission oil.
Ignition sleep mode
If the key is turned to "drive" position (see page 26
) for several minutes without the engine running, the car's starting
system will power down to "sleep" mode. To start the car, momentarily turn the key back to the "locked" position.
Then start the car as you would normally do.
WARNING!
Always place the gear selector in Park and apply the parking brake before leaving the vehicle. Never leave the car
unattended with the engine running.
Always open the garage doors fully before starting the engine inside a garage to ensure adequate ventilation. The
exhaust gases contain carbon monoxide, which is invisible and odorless but very poisonous.
CAUTION:
Never race the engine immediately after starting. Oil flow may not reach some lubricating points fast enough to
prevent engine damage.
Do not race the engine just prior to switching off!
pg. 66 Automatic transmission
ProCarManuals.com
Page 35 of 89

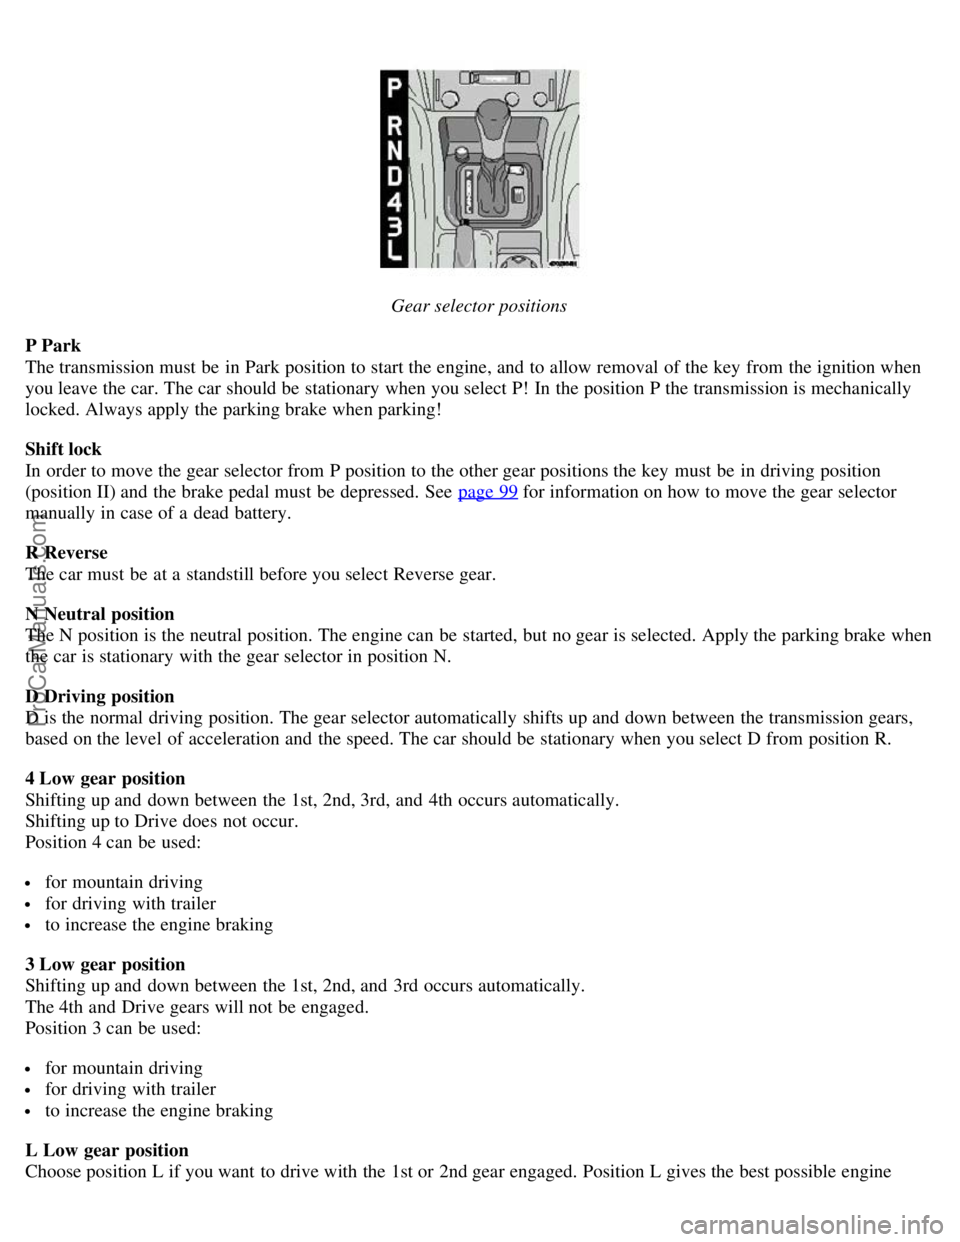
Gear selector positions
P Park
The transmission must be in Park position to start the engine, and to allow removal of the key from the ignition when
you leave the car. The car should be stationary when you select P! In the position P the transmission is mechanically
locked. Always apply the parking brake when parking!
Shift lock
In order to move the gear selector from P position to the other gear positions the key must be in driving position
(position II) and the brake pedal must be depressed. See page 99
for information on how to move the gear selector
manually in case of a dead battery.
R Reverse
The car must be at a standstill before you select Reverse gear.
N Neutral position
The N position is the neutral position. The engine can be started, but no gear is selected. Apply the parking brake when
the car is stationary with the gear selector in position N.
D Driving position
D is the normal driving position. The gear selector automatically shifts up and down between the transmission gears,
based on the level of acceleration and the speed. The car should be stationary when you select D from position R.
4 Low gear position
Shifting up and down between the 1st, 2nd, 3rd, and 4th occurs automatically.
Shifting up to Drive does not occur.
Position 4 can be used:
for mountain driving
for driving with trailer
to increase the engine braking
3 Low gear position
Shifting up and down between the 1st, 2nd, and 3rd occurs automatically.
The 4th and Drive gears will not be engaged.
Position 3 can be used:
for mountain driving
for driving with trailer
to increase the engine braking
L Low gear position
Choose position L if you want to drive with the 1st or 2nd gear engaged. Position L gives the best possible engine
ProCarManuals.com
Page 36 of 89

braking effect when, for example, mountain driving.
Shifting up to 5th does not occur.
Position 4 can be used:
for mountain driving
for driving with trailer
to increase the engine braking
Downshifting protection
There is a built in protection in the transmission which prevents over revving in the engine when you select one of the
low gear positions.
pg. 67 Automatic transmission
W - Winter/Wet Weather
Use the W button to turn the Winter/Wet Weather function on or off.
The Winter/Wet Weather function limits downshifting during acceleration, helping to reduce wheel spin. Because
downshifting is limited in W mode, performance may seem sluggish and fuel economy may be reduced.
W mode is recommended for acceleration from a standstill on rain-slicked roads.
Automatic transmission - shift gate positions
The gear selector can be moved freely between N and D. Selections of other positions are obtained by depressing the
selector knob prior to moving the selector.
Slightly depressing the selector knob allows selection of positions R, N, D, 4, 3 and L. Fully depressing the selector
knob allows selection of position P. This is also necessary when initially bringing the selector out of position P. Fully
ProCarManuals.com
Page 37 of 89

depressing the selector knob permits shifting freely between all positions.
Kick-down
Automatic shift to a lower gear (kick-down) is achieved by depressing the accelerator pedal fully and briskly. An
upshift will be achieved when approaching the top speed for a particular gear or by releasing the accelerator pedal
slightly. Kick -down can be used for maximum acceleration or when passing at highway speeds. Avoid using the kick-
down function during the break-in period (first 1,200 miles of vehicle operation).
Transmission Lamp
If the indicator lamp (see page 21 item 18
) begins to flash, this is an indication of a fault in the automatic transmission.
The Check Engine Lamp will also light up if a fault is detected. If the transmission does not shift properly, place the
gear selector in position L. Please contact your Volvo retailer if this occurs.
Contents | Top of Page
ProCarManuals.com
Page 38 of 89

2 0 0 4
VOLVO
S40 & V40
Chapter 5 - Wheels and tires
pg. 79 Wheels and tires
Wheels and tires
The handling and riding comfort of the vehicle is dependent on the inflation pressure and the type of tires fitted. Read
the following pages carefully. General information, Wear indicator, Tire economy, Flat spots
80
Snow chains, Snow tires, Studded tires81
Inflation pressure, Tire rotation82
Uniform tire quality grading83
"Special spare" tire84
pg. 80 Wheels and tires
General information
Your vehicle is equipped with tires according to the tire information label located on the inside of the fuel filler
door.
The following is an example of a tire designation code 195/60R15:
195 = tire width in mm.
60 = tire profile. This is the relationship (in percent) between the section height and width of the tire.
R = radial tires.
15 = diameter in inches.
The tires have good road holding characteristics and offer good handling on dry and wet surfaces. It should be noted
however that the tires have been developed to give these features on snow/icefree surfaces. However, for optimum road
holding on icy or snow covered roads we recommend suitable winter tires on all four wheels. When replacing tires,
be sure that the new tires are the same size designation, type (radial) and from the same manufacturer, on all four
wheels. Otherwise there is a risk of altering the car's roadholding and handling characteristics.
NOTE: When storing wheel/tire assemblies (e.g. winter tires and wheels), either stand the assemblies upright, or
suspend them off the ground. Laying wheel/tire assemblies on their sides for prolonged periods can cause wheel and/or
ProCarManuals.com
Page 39 of 89

tire damage.
Wear indicator
The tires have a so-called "wear indicator" in the form of a number of narrow strips running across or parallel to the
tread. When approx. 1/16" (1.6 mm) is left on the tread, these strips become visible and indicate that the tire should be
replaced.
Tires with less than 1/16" (1.6 mm) tread have a very poor grip in rain or snow.
When replacing worn tires, it is recommended that the tire be identical in type (radial) and size as the one being
replaced. Using a tire of the same make (manufacturer) will prevent alteration of the driving characteristics of the
vehicle.
To improve tire economy:
Maintain correct tire pressure. See the tire pressure label on the inside of the fuel filler door.
Drive smoothly: avoid fast starts, hard braking and tire screeching.
Tire wear increases with speed.
Correct front wheel alignment is very important.
Unbalanced wheels impair tire economy and driving comfort.
If the wheels are rotated, they should be kept on the same side of the car so that they revolve in the same direction
as prior to rotation.
Hitting curbs or potholes can damage the tires and/or wheels permanently.
Flat spots
All tires become warm during use. After cooling, when the vehicle is parked, the tires have a tendency to distort
slightly, forming flat spots. These flat spots can cause vibrations similar to the vibrations caused by unbalanced wheels.
They do, however, disappear when the tire warms up. The degree to which flat spots form depends on the type of cord
used in the tire. Remember that, in cold weather, it takes longer for the tire to warm up and consequently longer for the
flat spot to disappear.
pg. 81 Wheels and tires
Snow chains
Snow chains can be used on your Volvo with the following restrictions:
Snow chains should be installed on front wheels only. Use only Volvo approved snow chains.
Snow chains may only be mounted on approved snow tires 185/65 R15. Consult your Volvo retailer.
If accessory, aftermarket or "custom" tires and wheels are installed and are of a size different than the original tires
and wheels, chains in some cases CANNOT be used. Sufficient clearances between chains and brakes, suspension and
body components must be maintained.
Some strap on type chains will interfere with brake components and therefore CANNOT be used.
Consult your Volvo retailer for additional snow chain information.
CAUTION:
Check local regulations regarding the use of snow chains before installing.
Always follow the chain manufacturer's installation instructions carefully. Install chains as tightly as possible and
retighten periodically.
Never exceed the chain manufacturer's specified maximum speed limit. (Under no circumstances should that limit
be higher than 30 mph (45 km/h)).
Avoid bumps, holes or sharp turns when driving with snow chains.
The handling of the vehicle can be adversely affected when driving with chains. Avoid fast or sharp turns as well as
locked wheel braking.
Snow tires, studded tires *
Tires for winter use:
ProCarManuals.com
Page 40 of 89

Owners who live in or regularly commute through areas with sustained periods of snow or icy driving
conditions are strongly advised to fit suitable winter tires to help retain the highest degree of traction.
It is important to install winter tires on all four wheels to help retain traction during cornering, braking, and
accelerating. Failure to do so could reduce traction to an unsafe level or adversely affect handling. Do not mix tires of
different design as this could also negatively affect overall tire road grip. Volvo recommends 185/65 R15 winter tires
on 15" steel rims on all S/V 40 models.
Winter tires wear more quickly on dry roads in warm weather. They should be removed when the winter driving
season has ended.
Studded tires should be run-in 300-600 miles (50-1000 km) during which the car should be driven as smoothly as
possible to give the studs the opportunity to seat properly in the tires. The car tires should have the same rotational
direction throughout their entire lifetime. In other words, if you wish to rotate the wheels, make sure that the same
wheels are always on the same side of the car.
NOTE: Please consult state or provincial regulations restricting the use of studded winter tires before installing such
tires.
* Where permitted.
pg. 82 Wheels and tires
Checking and correcting tire pressure
Refer to the tire pressure label located on the inside of the fuel filler door. The tire pressures shown on the top line
of the label will provide best fuel economy. The tire pressures shown on the second line will provide a softer ride, but
may reduce fuel economy.
Check the tire pressure when refueling.
The tire pressure should be corrected only when the tires are cold.
With warm tires, correct only when the pressure is too low. The tire temperature rises after driving just a few miles.
Vehicle loading
The tires on your Volvo will perform to specifications at all normal loads when inflated as recommended on the tire
information label located on the inside of the fuel filler door*. This label also lists vehicle load limits. Do not load
your car beyond the indicated limits.
*Please note that the tire information label indicates pressure for both comfort and fuel economy.
Tire pressure label on fuel filler door
Tire rotation
Volvo recommends rotating the tires every 7,500 miles (12,000 km) and 15,000 miles (24,000 km). Tires should be
rotated front -to-back/back-to-front only. Tires must maintain the same direction of rotation throughout their lifetime,
ProCarManuals.com