headlamp VOLVO V60 2014 Owner's Manual
[x] Cancel search | Manufacturer: VOLVO, Model Year: 2014, Model line: V60, Model: VOLVO V60 2014Pages: 442, PDF Size: 13.85 MB
Page 354 of 442
10 Maintenance and service
10
352
Climate control system - fault tracing and repair
The air conditioning system must only be serviced and repaired by an authorised work-shop.
Troubleshooting and repairThe air conditioning system contains fluores-cent tracing agents. Use ultraviolet light whenlooking for leaks. Volvo recommends that you contact an authorised Volvo workshop.
WARNING
The air conditioning system contains pres- surised refrigerant R134a. This systemmust only be serviced and repaired by anauthorised workshop.
Related information
•Volvo service programme (p. 340)
Lamp replacement
Lamp replacement can be carried out for bulbs. When replacing LED and Xenon lamps,please refer to a workshop. The bulbs are specified (p. 358). The follow- ing list contains locations of bulbs and otherlight sources that are specialised, such as LED 10
lamps, or are unsuitable for changing
for some other reason, except at a workshop:
• Active Xenon headlamps - ABL (Xenon lamps)
• Daytime running lights/Position/parkinglamps front
• Side marker lamps front
• Cornering lights
• Side direction indicators, door mirrors
• Approach lighting, door mirrors
• Interior lighting apart from Courtesy light-ing front
• Glovebox lighting
• Position/parking lamps rear/Side markerlamps rear
• Brake light.WARNING
On cars with Xenon headlamps, the replacement of Xenon lamps must be car-ried out at a workshop - an authorisedVolvo workshop is recommended. Workingwith Xenon lamps demands extreme cau-tion because the headlamp is equippedwith a high voltage unit.
WARNING
The car's electrical system must be in key position
0 for bulb replacement; see Key
positions - functions at different levels (p.70).
IMPORTANT
Never touch the glass part of the bulbs with your fingers. Grease from your fingersis vaporised by the heat, coating thereflector and then causing damage.
NOTE
If an error message remains after the bro- ken bulb has been replaced then we rec-ommend that you visit an authorised Volvoworkshop.
10 LED (Light Emitting Diode)
ProCarManuals.co’
Page 355 of 442
10 Maintenance and service
10
353
NOTE
Outside lighting such as headlamps, fog lamps and rear lamps may temporarilyhave condensation on the inside of thelens. This is normal, all exterior lighting isdesigned to withstand this. Condensationis normally vented out of the lamp housingwhen the lamp has been switched on for atime.
Related information
•Lamp replacement - headlamps (p. 353)
• Lamp replacement - location of rear lamps (p. 357)
• Lamp replacement - vanity mirror lighting(p. 358)
• Lamp replacement - lighting in cargo area(p. 357)
• Lamp replacement - number plate lighting(p. 357)
Lamp replacement - headlamps
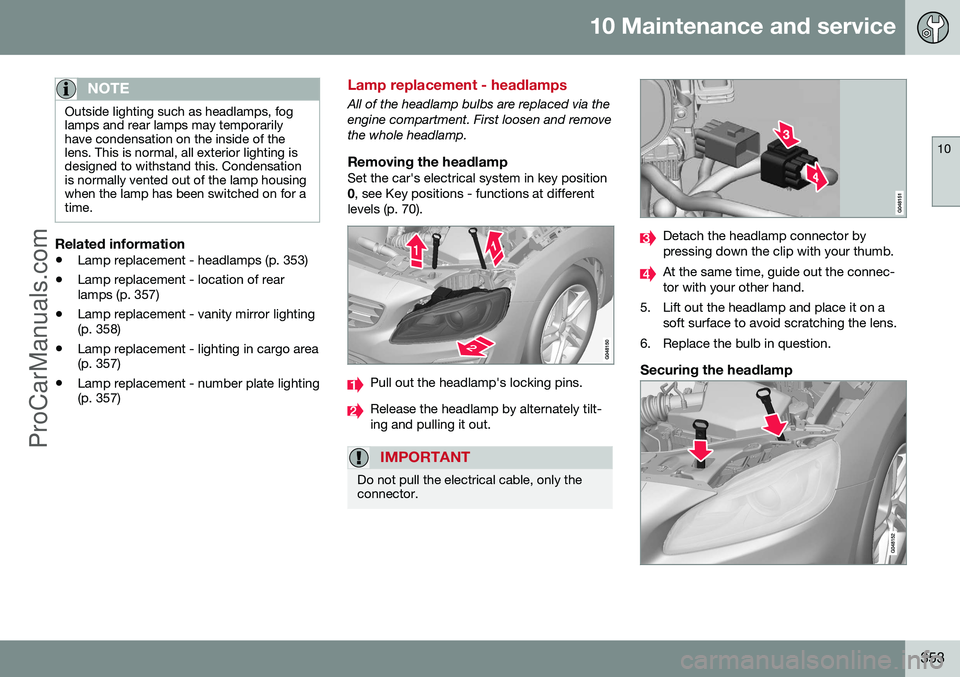
All of the headlamp bulbs are replaced via the engine compartment. First loosen and removethe whole headlamp.
Removing the headlampSet the car's electrical system in key position0
, see Key positions - functions at different
levels (p. 70).
Pull out the headlamp's locking pins.
Release the headlamp by alternately tilt- ing and pulling it out.
IMPORTANT
Do not pull the electrical cable, only the connector.
Detach the headlamp connector by pressing down the clip with your thumb.
At the same time, guide out the connec- tor with your other hand.
5. Lift out the headlamp and place it on a soft surface to avoid scratching the lens.
6. Replace the bulb in question.
Securing the headlamp
ProCarManuals.com
Page 356 of 442
||
10 Maintenance and service
10
354
1. Plug in the connector, a clicking soundshould be heard.
2. Reinstall the headlamp and locking pins. The short pin is fitted closest to the grille. Check that they are correctly inserted.
3. Check the lighting. The headlamp must be mounted and the con- nector correctly installed before the lighting isswitched on or the remote control key isinserted into the ignition switch.
Related information
• Lamp replacement (p. 352)
• Lamp replacement - cover for main/ dipped beam bulbs (p. 354)
• Lamps - specifications (p. 358)
Lamp replacement - cover for main/ dipped beam bulbs
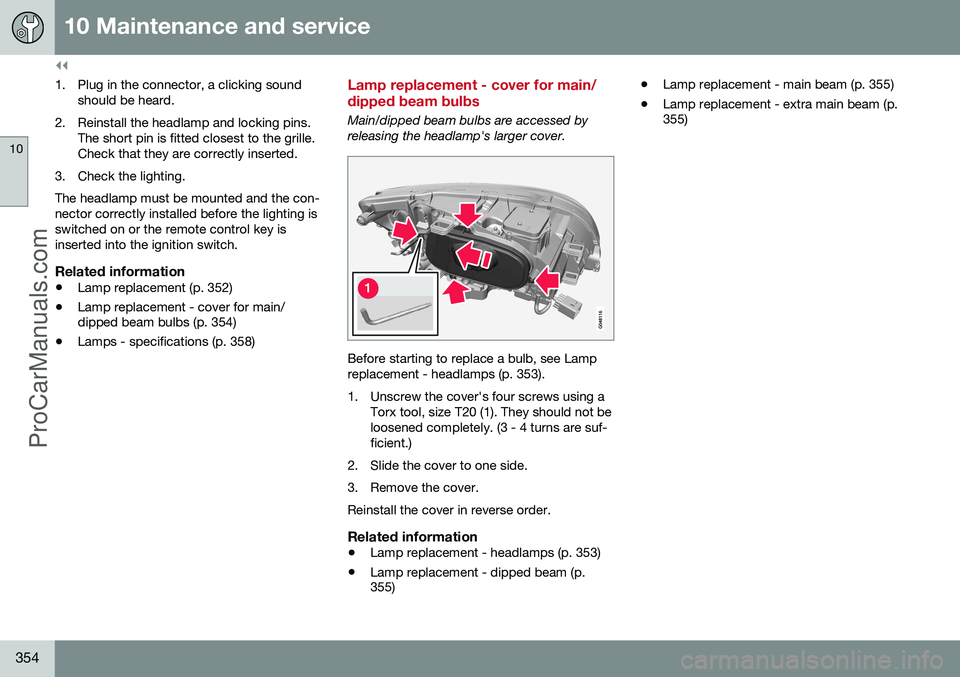
Main/dipped beam bulbs are accessed by releasing the headlamp's larger cover.
Before starting to replace a bulb, see Lamp replacement - headlamps (p. 353).
1. Unscrew the cover's four screws using a
Torx tool, size T20 (1). They should not be loosened completely. (3 - 4 turns are suf-ficient.)
2. Slide the cover to one side.
3. Remove the cover.Reinstall the cover in reverse order.
Related information
• Lamp replacement - headlamps (p. 353)
• Lamp replacement - dipped beam (p. 355) •
Lamp replacement - main beam (p. 355)
• Lamp replacement - extra main beam (p.355)
ProCarManuals.co’
Page 357 of 442
10 Maintenance and service
10
* Option/accessory, for more information, see Introduction.355
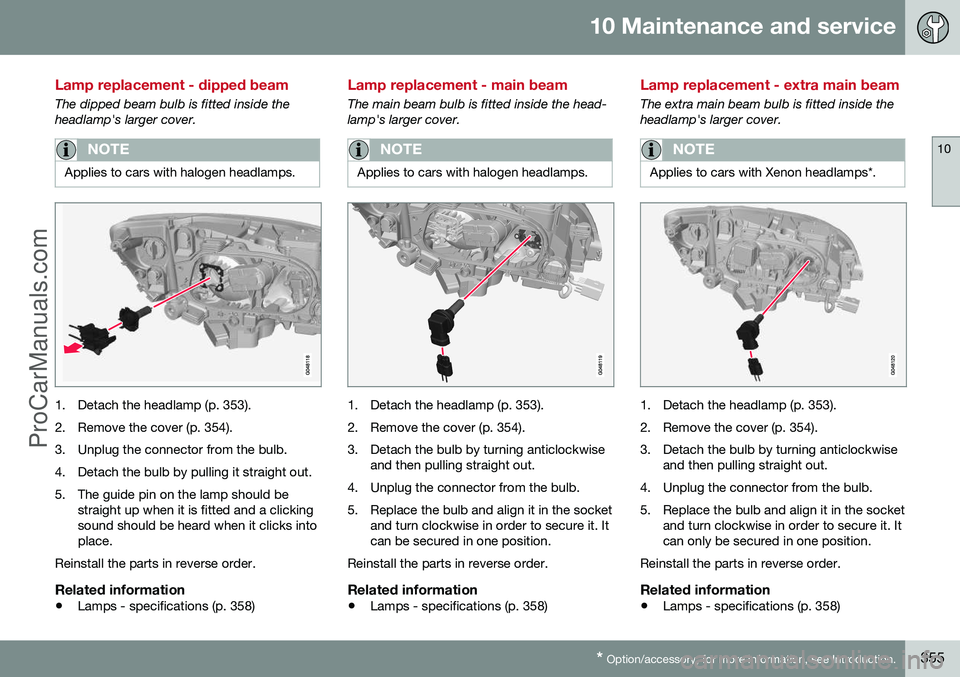
Lamp replacement - dipped beam
The dipped beam bulb is fitted inside the headlamp's larger cover.
NOTE
Applies to cars with halogen headlamps.
1. Detach the headlamp (p. 353).
2. Remove the cover (p. 354).
3. Unplug the connector from the bulb.
4. Detach the bulb by pulling it straight out.
5. The guide pin on the lamp should be
straight up when it is fitted and a clicking sound should be heard when it clicks intoplace.
Reinstall the parts in reverse order.
Related information
• Lamps - specifications (p. 358)
Lamp replacement - main beam
The main beam bulb is fitted inside the head- lamp's larger cover.
NOTE
Applies to cars with halogen headlamps.
1. Detach the headlamp (p. 353).
2. Remove the cover (p. 354).
3. Detach the bulb by turning anticlockwise
and then pulling straight out.
4. Unplug the connector from the bulb.
5. Replace the bulb and align it in the socket and turn clockwise in order to secure it. It can be secured in one position.
Reinstall the parts in reverse order.
Related information
• Lamps - specifications (p. 358)
Lamp replacement - extra main beam
The extra main beam bulb is fitted inside the headlamp's larger cover.
NOTE
Applies to cars with Xenon headlamps*.
1. Detach the headlamp (p. 353).
2. Remove the cover (p. 354).
3. Detach the bulb by turning anticlockwise
and then pulling straight out.
4. Unplug the connector from the bulb.
5. Replace the bulb and align it in the socket and turn clockwise in order to secure it. It can only be secured in one position.
Reinstall the parts in reverse order.
Related information
• Lamps - specifications (p. 358)
ProCarManuals.co’
Page 358 of 442
10 Maintenance and service
10
356
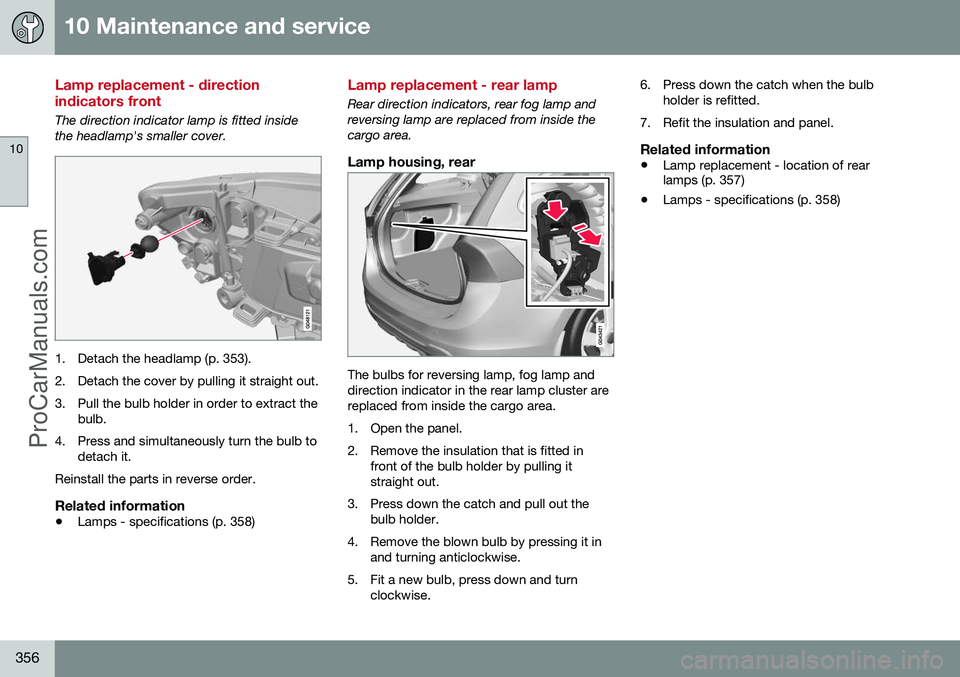
Lamp replacement - direction indicators front
The direction indicator lamp is fitted inside the headlamp's smaller cover.
1. Detach the headlamp (p. 353).
2. Detach the cover by pulling it straight out.
3. Pull the bulb holder in order to extract thebulb.
4. Press and simultaneously turn the bulb to detach it.
Reinstall the parts in reverse order.
Related information
• Lamps - specifications (p. 358)
Lamp replacement - rear lamp
Rear direction indicators, rear fog lamp and reversing lamp are replaced from inside thecargo area.
Lamp housing, rear
The bulbs for reversing lamp, fog lamp and direction indicator in the rear lamp cluster arereplaced from inside the cargo area.
1. Open the panel.
2. Remove the insulation that is fitted in
front of the bulb holder by pulling it straight out.
3. Press down the catch and pull out the bulb holder.
4. Remove the blown bulb by pressing it in and turning anticlockwise.
5. Fit a new bulb, press down and turn clockwise. 6. Press down the catch when the bulb
holder is refitted.
7. Refit the insulation and panel.
Related information
• Lamp replacement - location of rear lamps (p. 357)
• Lamps - specifications (p. 358)
ProCarManuals.co’
Page 363 of 442
10 Maintenance and service
10
361
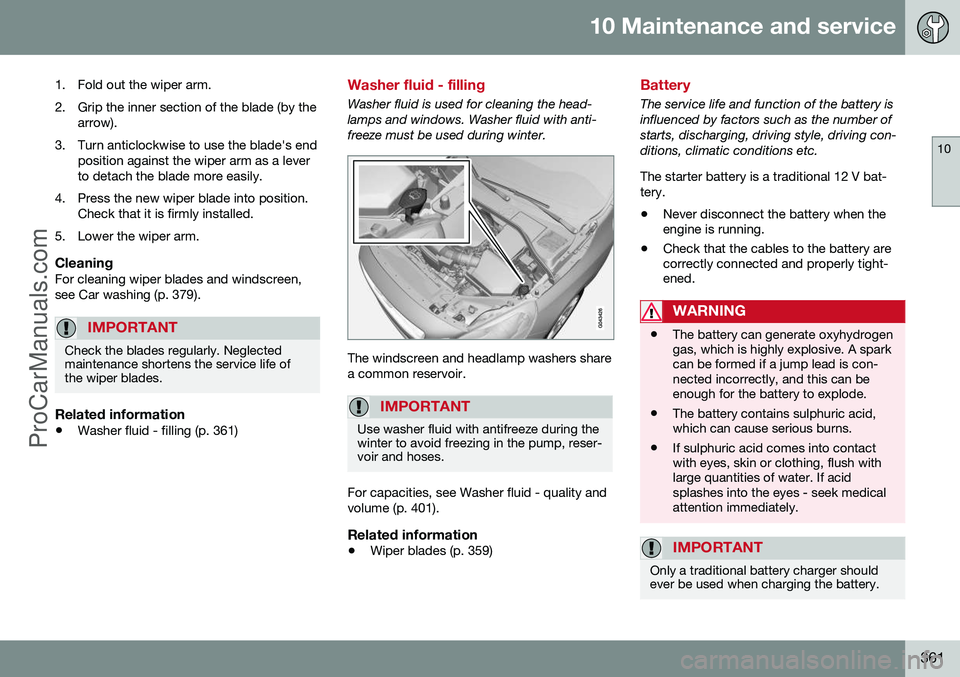
1. Fold out the wiper arm.
2. Grip the inner section of the blade (by the arrow).
3. Turn anticlockwise to use the blade's end position against the wiper arm as a lever to detach the blade more easily.
4. Press the new wiper blade into position. Check that it is firmly installed.
5. Lower the wiper arm.
CleaningFor cleaning wiper blades and windscreen,see Car washing (p. 379).
IMPORTANT
Check the blades regularly. Neglected maintenance shortens the service life ofthe wiper blades.
Related information
• Washer fluid - filling (p. 361)
Washer fluid - filling
Washer fluid is used for cleaning the head- lamps and windows. Washer fluid with anti-freeze must be used during winter.
The windscreen and headlamp washers share a common reservoir.
IMPORTANT
Use washer fluid with antifreeze during the winter to avoid freezing in the pump, reser-voir and hoses.
For capacities, see Washer fluid - quality and volume (p. 401).
Related information
•Wiper blades (p. 359)
Battery
The service life and function of the battery is influenced by factors such as the number ofstarts, discharging, driving style, driving con-ditions, climatic conditions etc. The starter battery is a traditional 12 V bat- tery.
• Never disconnect the battery when the engine is running.
• Check that the cables to the battery arecorrectly connected and properly tight-ened.
WARNING
•The battery can generate oxyhydrogen gas, which is highly explosive. A sparkcan be formed if a jump lead is con-nected incorrectly, and this can beenough for the battery to explode.
• The battery contains sulphuric acid,which can cause serious burns.
• If sulphuric acid comes into contactwith eyes, skin or clothing, flush withlarge quantities of water. If acidsplashes into the eyes - seek medicalattention immediately.
IMPORTANT
Only a traditional battery charger should ever be used when charging the battery.
ProCarManuals.co’
Page 371 of 442
10 Maintenance and service
10
}}
* Option/accessory, for more information, see Introduction.369
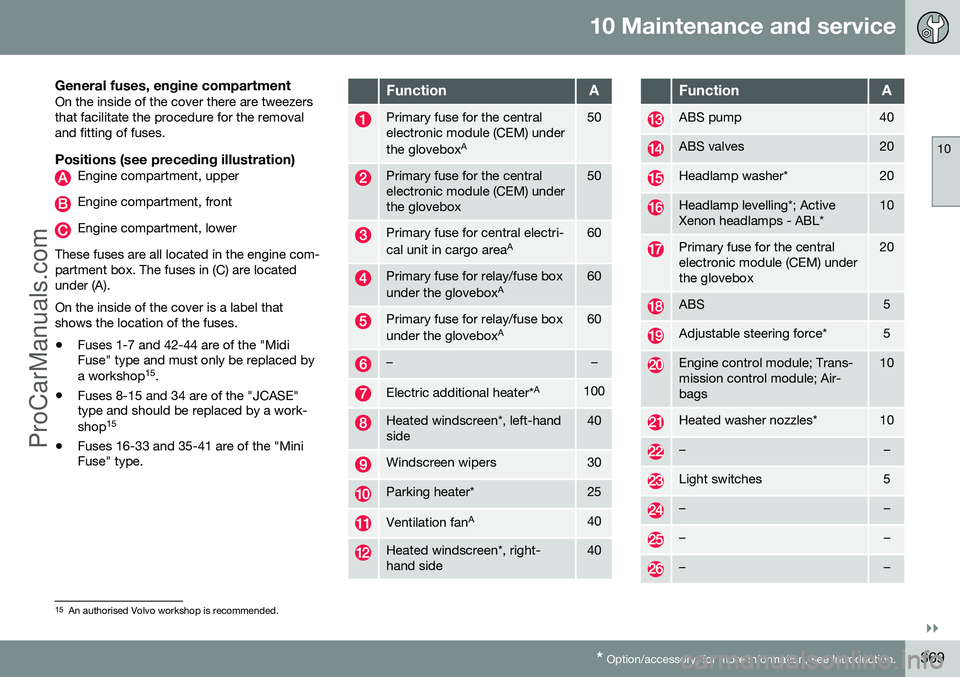
General fuses, engine compartmentOn the inside of the cover there are tweezers that facilitate the procedure for the removaland fitting of fuses.
Positions (see preceding illustration)Engine compartment, upper
Engine compartment, front
Engine compartment, lower
These fuses are all located in the engine com- partment box. The fuses in (C) are locatedunder (A). On the inside of the cover is a label that shows the location of the fuses. • Fuses 1-7 and 42-44 are of the "Midi Fuse" type and must only be replaced by a workshop 15
.
• Fuses 8-15 and 34 are of the "JCASE" type and should be replaced by a work- shop 15
• Fuses 16-33 and 35-41 are of the "Mini Fuse" type.
FunctionA
Primary fuse for the central electronic module (CEM) under the glovebox A50
Primary fuse for the central electronic module (CEM) underthe glovebox50
Primary fuse for central electri- cal unit in cargo area
A60
Primary fuse for relay/fuse box under the gloveboxA60
Primary fuse for relay/fuse box under the gloveboxA60
––
Electric additional heater* A100
Heated windscreen*, left-hand side40
Windscreen wipers30
Parking heater*25
Ventilation fanA40
Heated windscreen*, right- hand side40
FunctionA
ABS pump40
ABS valves20
Headlamp washer*20
Headlamp levelling*; Active Xenon headlamps - ABL*10
Primary fuse for the central electronic module (CEM) underthe glovebox20
ABS5
Adjustable steering force*5
Engine control module; Trans- mission control module; Air-bags10
Heated washer nozzles*10
––
Light switches5
––
––
––
15
An authorised Volvo workshop is recommended.
ProCarManuals.co’
Page 381 of 442
10 Maintenance and service
10
}}
379
Car washing
The car should be washed as soon as it becomes dirty. Wash the car in a car washwith oil separator. Use car shampoo.
Washing by hand
•Remove bird droppings from the paint- work as soon as possible. Bird droppingscontain chemicals that affect and discol-our paintwork very quickly. An authorisedVolvo workshop is recommended for theremoval of any discoloration.
• Hose down the underbody.
• Rinse the entire car until the dissolved dirthas been removed so as to reduce therisk of scratches from washing. Do notspray directly onto the locks.
• If necessary, use cold degreasing agenton very dirty surfaces. Note that in thiscase, the surfaces must not be hot fromthe sun!
• Wash using a sponge, car shampoo andplenty of lukewarm water.
• Clean the wiper blades with a lukewarmsoap solution or car shampoo.
• Dry the car using a clean, soft chamois ora water scraper. If you avoid allowingdrops of water to dry in strong sunlight,you reduce the risk of water drying stainswhich may need to be polished out.
WARNING
Always have the engine cleaned by a workshop. There is a risk of fire if theengine is hot.
IMPORTANT
Dirty headlamps have impaired functional- ity. Clean them regularly, when refuellingfor example. Do not use any corrosive cleaning agents but use water and a non-scratchingsponge instead.
NOTE
Outside lighting such as headlamps, fog lamps and rear lamps may temporarilyhave condensation on the inside of thelens. This is normal, all exterior lighting isdesigned to withstand this. Condensationis normally vented out of the lamp housingwhen the lamp has been switched on for atime.
Wiper bladesAsphalt, dust and salt residue on wiper blades, as well as insects, ice etc. on thewindscreen, impair the service life of wiperblades. For cleaning:- Set the wiper blades to the service position, see Wiper blades (p. 359).
NOTE
Wash the wiper blades and windscreen regularly with lukewarm soap solution orcar shampoo. Do not use any strong sol-vents.
Automatic car washesAn automatic car wash is a simple and quick way of washing the car, but it cannot reacheverywhere. Handwashing the car is recom-mended for achieving optimum results.
NOTE
The car must only be washed by hand over the first few months. This is becausethe paint is more delicate when it is new.
High-pressure washingWhen using high-pressure washing, use sweeping movements and make sure that thenozzle does not come closer than 30 cm tothe surface of the car (the distance applies toall exterior parts). Do not spray directly ontothe locks.
ProCarManuals.co’
Page 403 of 442
11 Specifications
11
401
Brake fluid - grade and volume
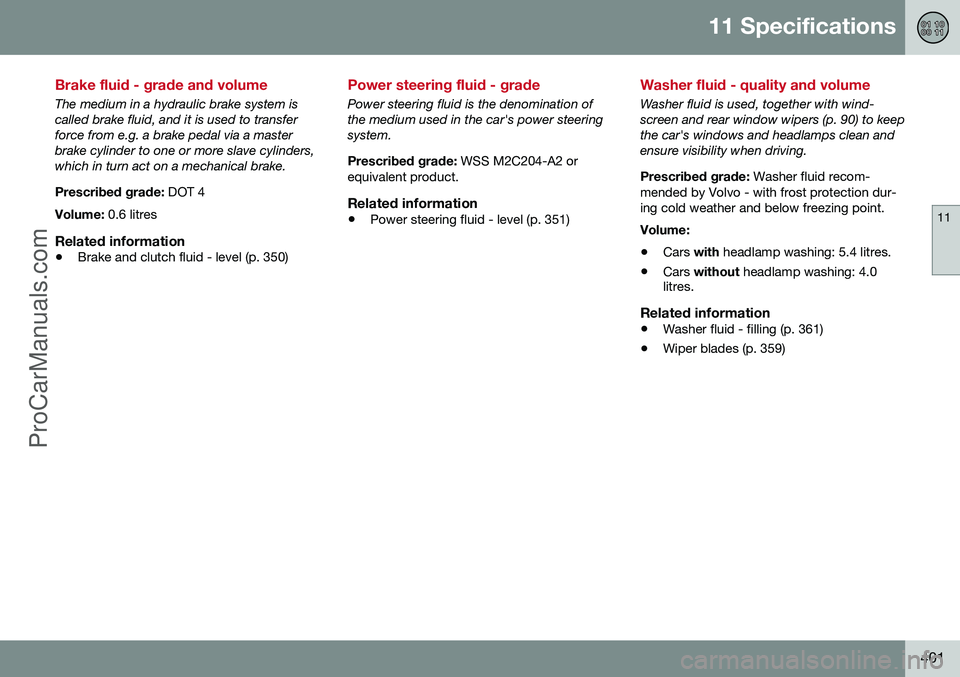
The medium in a hydraulic brake system is called brake fluid, and it is used to transferforce from e.g. a brake pedal via a masterbrake cylinder to one or more slave cylinders,which in turn act on a mechanical brake. Prescribed grade: DOT 4
Volume: 0.6 litres
Related information
•Brake and clutch fluid - level (p. 350)
Power steering fluid - grade
Power steering fluid is the denomination of the medium used in the car's power steeringsystem. Prescribed grade:
WSS M2C204-A2 or
equivalent product.
Related information
• Power steering fluid - level (p. 351)
Washer fluid - quality and volume
Washer fluid is used, together with wind- screen and rear window wipers (p. 90) to keepthe car's windows and headlamps clean andensure visibility when driving. Prescribed grade:
Washer fluid recom-
mended by Volvo - with frost protection dur- ing cold weather and below freezing point. Volume: • Cars
with headlamp washing: 5.4 litres.
• Cars
without headlamp washing: 4.0
litres.
Related information
• Washer fluid - filling (p. 361)
• Wiper blades (p. 359)
ProCarManuals.co’
Page 430 of 442
12 Alphabetical Index
12
428
A
ACC – Adaptive cruise control................. 188Active Bending Lights (ABL)...................... 84
Active chassis - FOUR-C......................... 175
Active high beam....................................... 82
Active Park Assist.................................... 247 function............................................... 248
Limitations.......................................... 251
operation............................................. 249
Symbols and messages..................... 252
Active Xenon headlamps........................... 84
Active Yaw Control.................................. 175
Adapting driving characteristics...... 175, 257
Adaptive Cruise Control........................... 188 change cruise control functionality..... 196
deactivate........................................... 194
fault tracing......................................... 199
function............................................... 189
managing speed................................. 191
overtaking........................................... 194
overview.............................................. 190
radar sensor........................................ 197
setting the time interval...................... 192
standby mode..................................... 193
temporary deactivation....................... 193 Additional heater
electric........................................ 134, 135
fuel-driven........................................... 134
Adjusting the steering wheel...................... 76 Airbag activating/deactivating, PACOS........... 30
driver's side.................................... 28, 36
passenger side......................... 29, 30, 36
AIRBAG ............................................... 28, 29
Airbag system............................................ 28 warning symbol.................................... 27
Air cleaning material............................................... 118
passenger compartment.... 116, 117, 118
Air conditioning........................................ 124 Air conditioning system repair................................................... 352
Air distribution.......................................... 119 Recirculation....................................... 126
table.................................................... 127
Air quality system IAQS........................... 118
Alarm........................................ 171, 172, 173 alarm indicator.................................... 172
alarm signals....................................... 173
automatic re-arming........................... 172
checking the alarm............................. 153
reduced alarm level............................ 173
remote control key not working.......... 172 Alcolock................................................... 259
Allergy and asthma inducing substances. 117
All Wheel Drive, (AWD)............................. 290
All Wheel Drive (AWD).............................. 290
Approach lighting.............................. 89, 152
Automatic car washes............................. 379
Automatic gearbox.......................... 273, 276
manual gear positions (Geartronic)..... 273
towing and recovery........................... 314
trailer................................................... 308
Automatic relocking................................. 164
AWD, All Wheel Drive............................... 290
B
Backrest..................................................... 72 front seat, lowering............................... 72
Backrest rear seat, lowering...................... 75
Bag holder .............................................. 144
Battery..................................... 298, 361, 411 jump starting....................................... 270
maintenance....................................... 361
overload.............................................. 298
remote control key/PCC..................... 158
specification....................................... 411
ProCarManuals.co’