ESP VOLVO V60 2016 Owner´s Manual
[x] Cancel search | Manufacturer: VOLVO, Model Year: 2016, Model line: V60, Model: VOLVO V60 2016Pages: 402, PDF Size: 10.3 MB
Page 141 of 402
05 Loading and storage
05
}}
139
Loading – general
The load carrying capacity of your vehicle is determined by factors such as the number ofpassengers, the amount of cargo, the weightof any accessories that may be installed, etc. To increase loading space, the rear seat backrests can be folded down, see Rearseats – folding backrest (p. 84). When loading the cargo area, keep the fol- lowing in mind:
• Load objects in the cargo area against the backrest whenever possible.
• Unstable loads can be secured to theload anchoring eyelets with straps or weblashings to help keep them from shifting.
• Stop the engine and apply the parkingbrake when loading or unloading longobjects. The gear selector can beknocked out of position by long loads,which could set the vehicle in motion.WARNING
•Stop the engine, put the gear selector in
P, and apply the parking brake
when loading or unloading longobjects.
• The vehicle's driving characteristicsmay change depending on the weightand distribution of the load.
• A 44-pound (20 kg) object produces aforce of 2,200 pounds (1,000 kg) in ahead-on collision at 30 mph (50 km/h).
• The cargo area and rear seat shouldnot be loaded to a level higher than2 in. (5 cm) below the upper edge ofthe rear side windows. Objects placedhigher than this level could impede thefunction of the Inflatable Curtain.
Related information
•
Load anchoring eyelets (p. 140)
• Steel cargo grid (p. 143)
• Loading – roof load carriers (p. 139)
Loading – roof load carriers
Using load carriersLoad carriers are available as Volvo accesso- ries. Observe the following points when inuse:
• To avoid damaging your vehicle and to achieve maximum safety when driving,we recommend using the load carriersthat Volvo has developed especially foryour vehicle.
• Volvo-approved removable roof racks aredesigned to carry the maximum allowableroof load for this vehicle: 220 lbs (100 kg).For non-Volvo roof racks, check the man-ufacturer's weight limits for the rack.
• Never exceed the rack manufacturer'sweigh limits and never exceed the maxi-mum rated roof load of 220 lbs (100 kg).
• Avoid single-point loads. Distribute loadsevenly.
• Place heavier cargo at the bottom of theload.
• Secure the cargo correctly with appropri-ate tie-down equipment.
• Check periodically that the load carriersand load are properly secured.
• Remember that the vehicle's center ofgravity and handling change when youcarry a load on the roof.
Page 163 of 402
06 Locks and alarm
06
}}
161
UnlockingThe vehicle can be unlocked from inside the vehicle in two ways:• By pressing the unlock button
.
• The
front doors can be unlocked and
opened by pulling the door handle once. The rear doors can be unlocked by pull-
ing the door handle once and opened bypulling the handle again.
Locking
• Press the lock button after the front
doors have been closed.
• Press the lock button
: all of the
doors that are closed will lock.
• Each door can be locked individually with the lock button on the respective doors.The door must be closed first.
Alternative locking when parkingThe central locking button on the driver's door can also be used to lock the vehiclewhen you leave it. To do so:
1. Open the door.
2. Press the lock section of the button.
3. Close the door. This will lock the vehicle
completely and arm the alarm.
NOTE
Please be aware that locking the vehicle in this way makes it possible to lock theremote key in the passenger compartment.To help avoid this, lock the vehicle fromthe outside by pressing the lock button onthe remote key. If the vehicle is locked using the central locking button, be sure that the remote keyis in your possession before closing thedoor.
Indicator light in the lock buttonsThere are two versions of the central locking system that affect the indicator light in thedriver's door central locking button. If only the driver's door has a central locking
button:
• If the light is on, this indicates that all of the doors are locked.
If there are central locking buttons in both
front doors and electric lock buttons in the rear side doors: • If a light is on in one of the buttons, this means that only that door is locked.When the lights are on in all of the but-tons, all of the doors are locked.
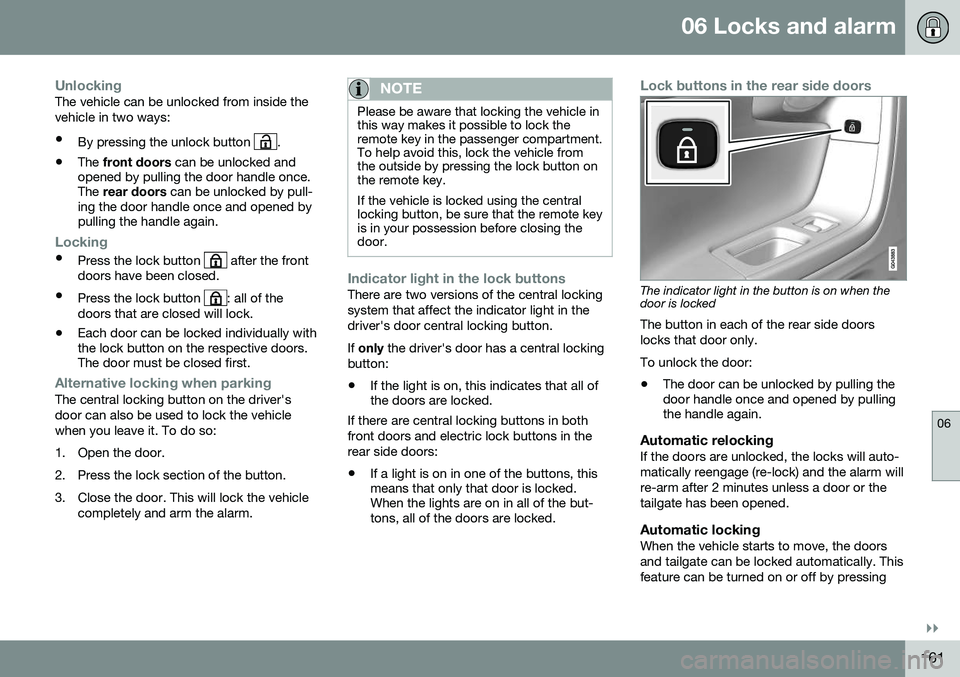
Lock buttons in the rear side doors
The indicator light in the button is on when the door is locked
The button in each of the rear side doors locks that door only. To unlock the door:
• The door can be unlocked by pulling the door handle once and opened by pullingthe handle again.
Automatic relockingIf the doors are unlocked, the locks will auto- matically reengage (re-lock) and the alarm willre-arm after 2 minutes unless a door or thetailgate has been opened.
Automatic lockingWhen the vehicle starts to move, the doorsand tailgate can be locked automatically. Thisfeature can be turned on or off by pressing
Page 171 of 402
07 Driver support
07
}}
* Option/accessory, for more information, see Introduction.169
Active chassis* (Four C)
Active chassis, Four-C (Continuously Controlled Chassis Concept), regulates thecharacteristics of the shock absorbers so thatthe vehicle's driving characteristics can beadjusted. There are three settings: Comfort,Sport and Advanced.
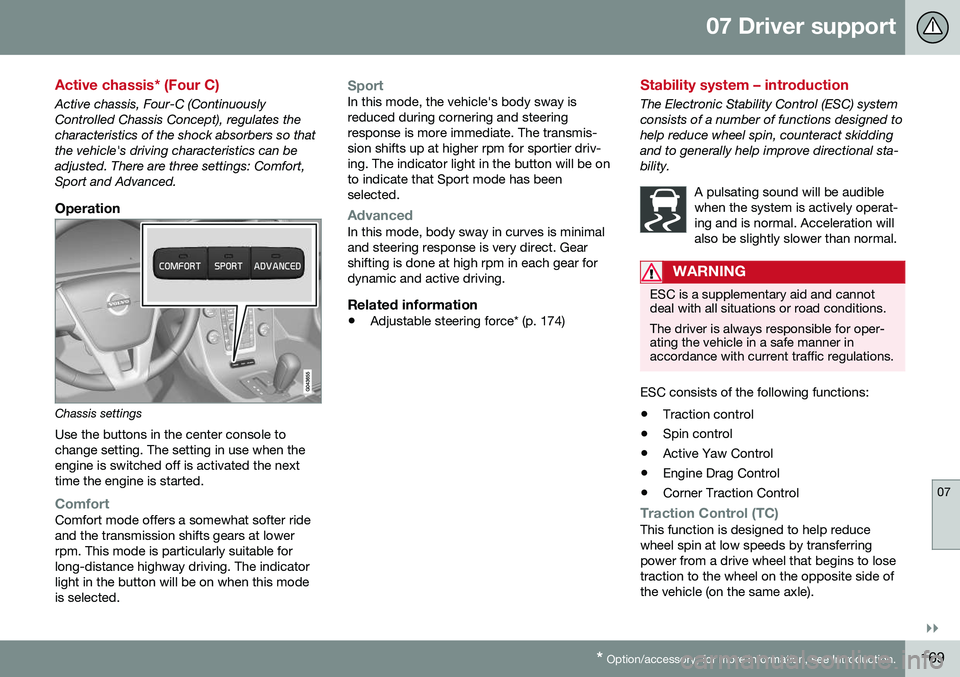
Operation
Chassis settings
Use the buttons in the center console to change setting. The setting in use when theengine is switched off is activated the nexttime the engine is started.
ComfortComfort mode offers a somewhat softer ride and the transmission shifts gears at lowerrpm. This mode is particularly suitable forlong-distance highway driving. The indicatorlight in the button will be on when this modeis selected.
SportIn this mode, the vehicle's body sway is reduced during cornering and steeringresponse is more immediate. The transmis-sion shifts up at higher rpm for sportier driv-ing. The indicator light in the button will be onto indicate that Sport mode has beenselected.
AdvancedIn this mode, body sway in curves is minimal and steering response is very direct. Gearshifting is done at high rpm in each gear fordynamic and active driving.
Related information
• Adjustable steering force* (p. 174)
Stability system – introduction
The Electronic Stability Control (ESC) system consists of a number of functions designed tohelp reduce wheel spin, counteract skiddingand to generally help improve directional sta-bility.
A pulsating sound will be audiblewhen the system is actively operat-ing and is normal. Acceleration willalso be slightly slower than normal.
WARNING
ESC is a supplementary aid and cannot deal with all situations or road conditions. The driver is always responsible for oper- ating the vehicle in a safe manner inaccordance with current traffic regulations.
ESC consists of the following functions:
• Traction control
• Spin control
• Active Yaw Control
• Engine Drag Control
• Corner Traction Control
Traction Control (TC)This function is designed to help reduce wheel spin at low speeds by transferringpower from a drive wheel that begins to losetraction to the wheel on the opposite side ofthe vehicle (on the same axle).
Page 175 of 402
07 Driver support
07
173
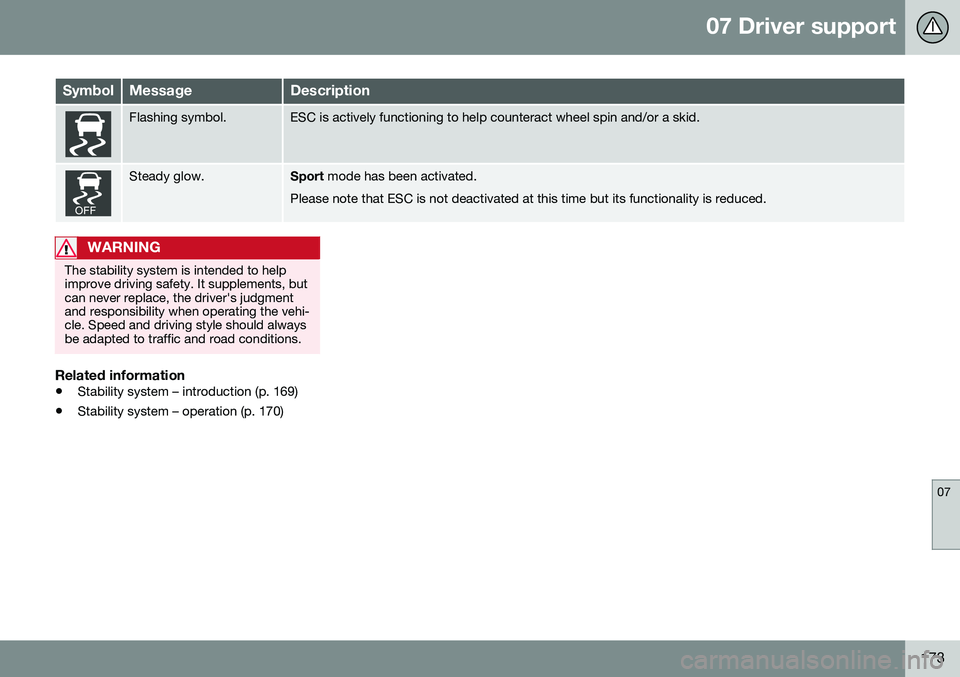
SymbolMessageDescription
Flashing symbol.ESC is actively functioning to help counteract wheel spin and/or a skid.
Steady glow.Sport mode has been activated.
Please note that ESC is not deactivated at this time but its functionality is reduced.
WARNING
The stability system is intended to help improve driving safety. It supplements, butcan never replace, the driver's judgmentand responsibility when operating the vehi-cle. Speed and driving style should alwaysbe adapted to traffic and road conditions.
Related information
• Stability system – introduction (p. 169)
• Stability system – operation (p. 170)
Page 176 of 402
07 Driver support
07
174* Option/accessory, for more information, see Introduction.
Adjustable steering force*
Steering force increases with the speed of the vehicle to give the driver enhanced sense ofcontrol and stability. At low speed the vehicleis easy to steer in order to facilitate parking,etc.
Adjustable steering force*Steering force can be changed under MY
CAR
Car settingsSteering wheel
force
. Select Low, Medium or High. For a
description of the menu system, My Car – introduction (p. 74).
NOTE
This steering force level menu function cannot be accessed when the vehicle is inmotion.
NOTE
In certain situations, the power steering may become too warm and will have to betemporarily cooled down. While this ishappening, the power steering effect willbe reduced slightly and somewhat moreeffort may be required to turn the steeringwheel. If this occurs, a message will be displayed in the instrument panel.
Related information
• Active chassis* (Four C) (p. 169)
Road Sign Information (RSI)* – introduction
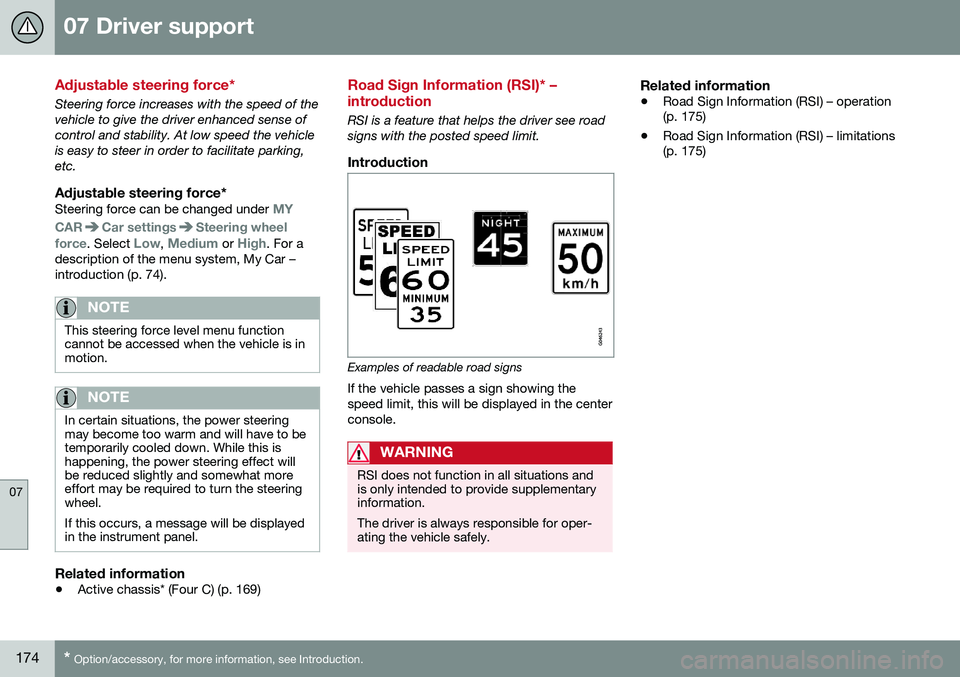
RSI is a feature that helps the driver see road signs with the posted speed limit.
Introduction
Examples of readable road signs If the vehicle passes a sign showing the speed limit, this will be displayed in the centerconsole.
WARNING
RSI does not function in all situations and is only intended to provide supplementaryinformation. The driver is always responsible for oper- ating the vehicle safely.
Related information
•Road Sign Information (RSI) – operation (p. 175)
• Road Sign Information (RSI) – limitations(p. 175)
Page 181 of 402
07 Driver support
07
}}
179
Resume set speedIf the cruise control has been deactivated temporarily, it can be reactivated by pressing
. The vehicle's speed returns to the most
recently set speed.
WARNING
There may be a significant increase in speed after the
button has been
pressed.
DeactivationThe Cruise control is disengaged by pressing
or by switching off the engine. The set
speed is cleared.
WARNING
Cruise control should not be used in heavy traffic or when driving on wet or slipperyroads. Cruise control may not maintain setspeed on steep downgrades.
Related information
• Cruise control (CC) – introduction (p. 176)
• Cruise control (CC) – engaging and set- ting speed (p. 176)
Adaptive Cruise Control – introduction
ACC is an optional system designed to assist the driver by maintaining a set speed or a settime interval to the vehicle ahead. It is primar-ily intended for use on long straight roads insteady traffic, such as on highways and othermain roads. When the driver has set the desired speed and the time interval to the vehicle ahead,ACC functions as follows:
• If there are no other vehicles in the lane ahead of you, your vehicle will travel atthe set speed.
• If ACC's radar sensor detects a slowermoving vehicle in the lane ahead, the sys-tem will adapt your vehicle's speed tohelp maintain the set time interval to thevehicle ahead. When there are no longerslower moving vehicles ahead, your vehi-cle will accelerate to resume the setspeed.
If ACC is switched off completely or in standby mode and your vehicle comes tooclose to another vehicle ahead, the driver willbe warned by the Distance Alert system (seeDistance Alert – introduction (p. 193)).WARNING
• Adaptive Cruise Control cannot cover all driving situations and traffic,weather and road conditions. The"Function" section provides informa-tion about limitations that the drivermust be aware of before using thisfeature.
• This system is designed to be a sup-plementary driving aid. It is not, how-ever, intended to replace the driver'sattention and judgement. The driver isresponsible for maintaining a safe dis-tance and speed and must intervene ifAdaptive Cruise Control does notmaintain a suitable speed or suitabledistance to the vehicle ahead.
• Maintenance of ACC components mayonly be performed by a trained andqualified Volvo technician.
Page 182 of 402
||
07 Driver support
07
180
Operation
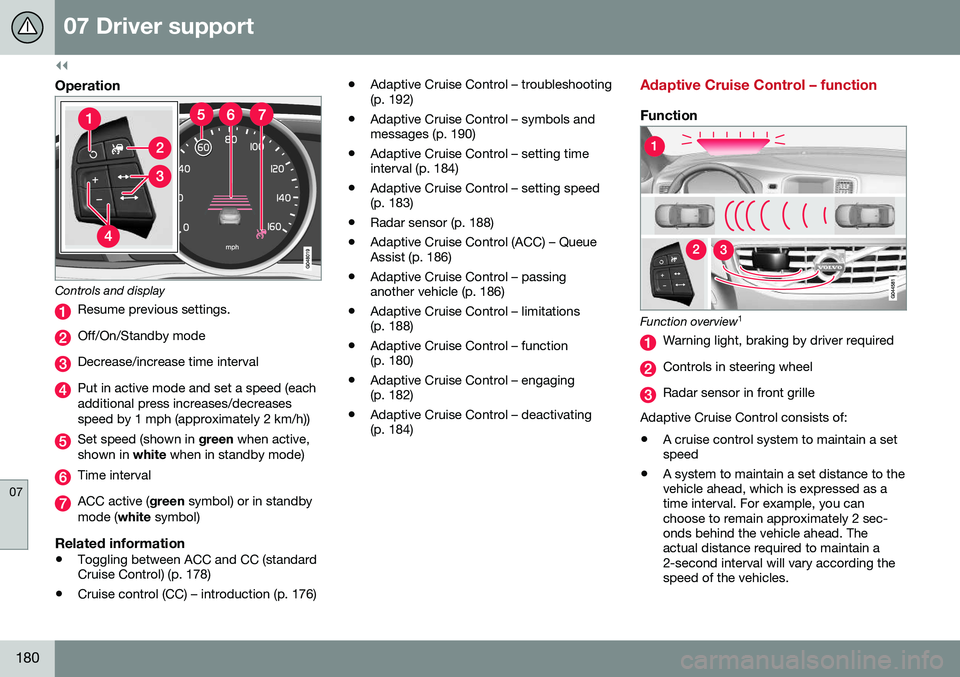
Controls and display
Resume previous settings.
Off/On/Standby mode
Decrease/increase time interval
Put in active mode and set a speed (each additional press increases/decreasesspeed by 1 mph (approximately 2 km/h))
Set speed (shown in green when active,
shown in white when in standby mode)
Time interval
ACC active ( green symbol) or in standby
mode ( white symbol)
Related information
•Toggling between ACC and CC (standard Cruise Control) (p. 178)
• Cruise control (CC) – introduction (p. 176) •
Adaptive Cruise Control – troubleshooting(p. 192)
• Adaptive Cruise Control – symbols andmessages (p. 190)
• Adaptive Cruise Control – setting timeinterval (p. 184)
• Adaptive Cruise Control – setting speed(p. 183)
• Radar sensor (p. 188)
• Adaptive Cruise Control (ACC) – QueueAssist (p. 186)
• Adaptive Cruise Control – passinganother vehicle (p. 186)
• Adaptive Cruise Control – limitations(p. 188)
• Adaptive Cruise Control – function(p. 180)
• Adaptive Cruise Control – engaging(p. 182)
• Adaptive Cruise Control – deactivating(p. 184)
Adaptive Cruise Control – function
Function
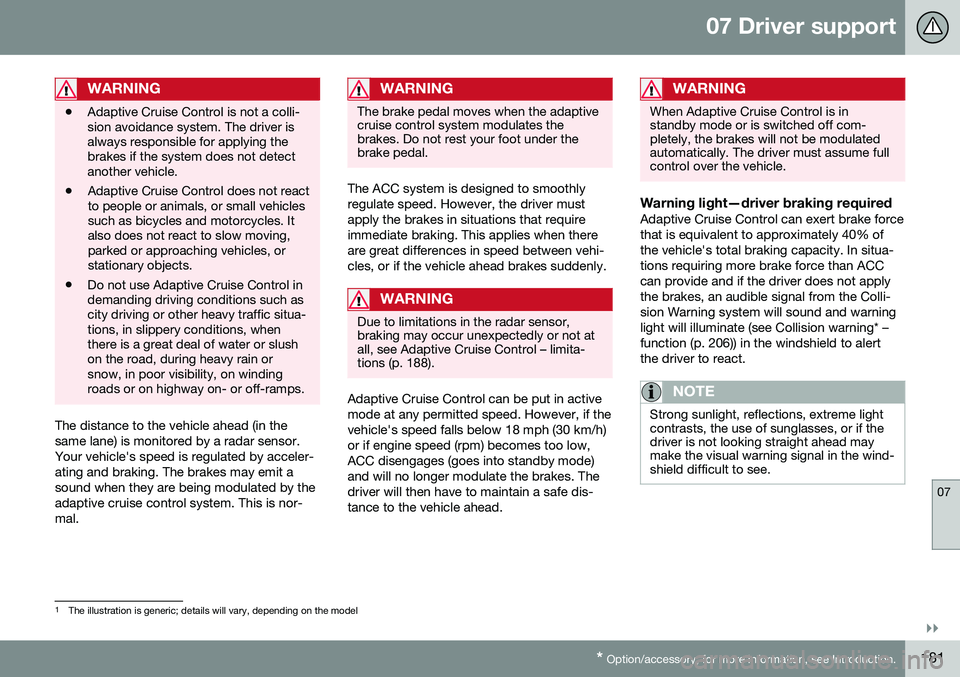
Function overview 1
Warning light, braking by driver required
Controls in steering wheel
Radar sensor in front grille
Adaptive Cruise Control consists of: • A cruise control system to maintain a set speed
• A system to maintain a set distance to thevehicle ahead, which is expressed as atime interval. For example, you canchoose to remain approximately 2 sec-onds behind the vehicle ahead. Theactual distance required to maintain a2-second interval will vary according thespeed of the vehicles.
Page 183 of 402
07 Driver support
07
}}
* Option/accessory, for more information, see Introduction.181
WARNING
• Adaptive Cruise Control is not a colli- sion avoidance system. The driver isalways responsible for applying thebrakes if the system does not detectanother vehicle.
• Adaptive Cruise Control does not reactto people or animals, or small vehiclessuch as bicycles and motorcycles. Italso does not react to slow moving,parked or approaching vehicles, orstationary objects.
• Do not use Adaptive Cruise Control indemanding driving conditions such ascity driving or other heavy traffic situa-tions, in slippery conditions, whenthere is a great deal of water or slushon the road, during heavy rain orsnow, in poor visibility, on windingroads or on highway on- or off-ramps.
The distance to the vehicle ahead (in the same lane) is monitored by a radar sensor.Your vehicle's speed is regulated by acceler-ating and braking. The brakes may emit asound when they are being modulated by theadaptive cruise control system. This is nor-mal.
WARNING
The brake pedal moves when the adaptive cruise control system modulates thebrakes. Do not rest your foot under thebrake pedal.
The ACC system is designed to smoothly regulate speed. However, the driver mustapply the brakes in situations that requireimmediate braking. This applies when thereare great differences in speed between vehi-cles, or if the vehicle ahead brakes suddenly.
WARNING
Due to limitations in the radar sensor, braking may occur unexpectedly or not atall, see Adaptive Cruise Control – limita-tions (p. 188).
Adaptive Cruise Control can be put in active mode at any permitted speed. However, if thevehicle's speed falls below 18 mph (30 km/h)or if engine speed (rpm) becomes too low,ACC disengages (goes into standby mode)and will no longer modulate the brakes. Thedriver will then have to maintain a safe dis-tance to the vehicle ahead.
WARNING
When Adaptive Cruise Control is in standby mode or is switched off com-pletely, the brakes will not be modulatedautomatically. The driver must assume fullcontrol over the vehicle.
Warning light—driver braking requiredAdaptive Cruise Control can exert brake force that is equivalent to approximately 40% ofthe vehicle's total braking capacity. In situa-tions requiring more brake force than ACCcan provide and if the driver does not applythe brakes, an audible signal from the Colli-sion Warning system will sound and warninglight will illuminate (see Collision warning* –function (p. 206)) in the windshield to alertthe driver to react.
NOTE
Strong sunlight, reflections, extreme light contrasts, the use of sunglasses, or if thedriver is not looking straight ahead maymake the visual warning signal in the wind-shield difficult to see.
1
The illustration is generic; details will vary, depending on the model
Page 185 of 402
07 Driver support
07
183
Adaptive Cruise Control – setting speed
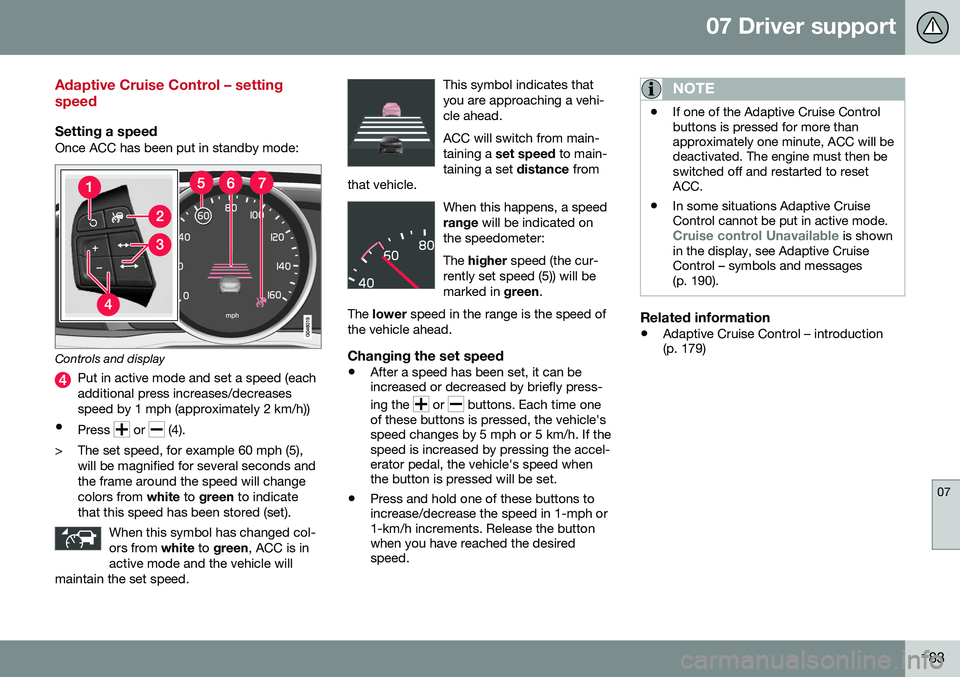
Setting a speedOnce ACC has been put in standby mode:
Controls and display
Put in active mode and set a speed (each additional press increases/decreasesspeed by 1 mph (approximately 2 km/h))
• Press
or (4).
> The set speed, for example 60 mph (5), will be magnified for several seconds and the frame around the speed will changecolors from white to green to indicate
that this speed has been stored (set).
When this symbol has changed col-ors from white to green , ACC is in
active mode and the vehicle will
maintain the set speed.
This symbol indicates that you are approaching a vehi-cle ahead. ACC will switch from main- taining a set speed to main-
taining a set distance from
that vehicle.
When this happens, a speed range will be indicated on
the speedometer: The higher speed (the cur-
rently set speed (5)) will be marked in green.
The lower speed in the range is the speed of
the vehicle ahead.
Changing the set speed
• After a speed has been set, it can be increased or decreased by briefly press- ing the
or buttons. Each time one
of these buttons is pressed, the vehicle's speed changes by 5 mph or 5 km/h. If thespeed is increased by pressing the accel-erator pedal, the vehicle's speed whenthe button is pressed will be set.
• Press and hold one of these buttons toincrease/decrease the speed in 1-mph or1-km/h increments. Release the buttonwhen you have reached the desiredspeed.
NOTE
•If one of the Adaptive Cruise Control buttons is pressed for more thanapproximately one minute, ACC will bedeactivated. The engine must then beswitched off and restarted to resetACC.
• In some situations Adaptive CruiseControl cannot be put in active mode.
Cruise control Unavailable is shown
in the display, see Adaptive Cruise Control – symbols and messages(p. 190).
Related information
• Adaptive Cruise Control – introduction (p. 179)
Page 188 of 402
07 Driver support
07
186
Adaptive Cruise Control – passing another vehicle
Passing another vehicleIf your vehicle’s speed is being regulated by ACC and the driver indicates that he/shewould like to pass the vehicle ahead by usingthe left turn signal, ACC can assist by accel-
erating briefly. This function is active at speeds above approximately 45 mph (70 km/h).
WARNING
Please be aware that this function will also cause the vehicle to accelerate briefly incertain situations other than passinganother vehicle, for example using the leftturn signal to indicate a lane change or aturn toward a highway exit at speedsabove approximately 45 mph (70 km/h).
Related information
• Adaptive Cruise Control – introduction (p. 179)
Adaptive Cruise Control (ACC) – Queue Assist
Queue Assist is an added ACC feature that is linked to your vehicle's automatic transmis-sion.
IntroductionQueue Assist is an added ACC feature that islinked to your vehicle's automatic transmis-sion. Queue Assist consists of the following func- tions: •Enhanced speed interval (including when the vehicle is at a complete stop or ismoving at speed below 18 mph(30 km/h))
• Automatic standby mode when ACCchanges target vehicles
• No automatic braking when at a standstill
• The parking brake is applied automati-cally
Please note that the lowest speed that can be set is 18 mph (30 km/h), although ACC canmaintain a set speed/distance to a vehicleahead down to a standstill. Queue Assistconsists of the following features:
Enhanced speed interval
NOTE
The driver's door must be closed and the driver's seat belt must be fastened beforeACC can be put in active mode. If the driv-er's seat belt is taken off or if the driver'sdoor is opened, ACC will return to standbymode.
Your vehicle can maintain the set time interval to the vehicle ahead at any permissiblespeed, including a complete stop. In order to activate ACC at speeds below 18 mph (30 km/h):
• The vehicle ahead must be within a rea- sonable distance (not farther away thanapprox. 100 ft/30 meters)
• The lowest speed that can be selected is18 mph (30 km/h), although ACC will alsohelp maintain the set time interval to thevehicle ahead at lower speeds, includinga complete stop.
During short stops (less than approximately 3 seconds) in slow-moving traffic, your vehi-cle will begin moving again automatically assoon as the vehicle ahead begins to move. If it takes more than 3 seconds for the vehicle ahead to begin moving, ACC will be automat-ically go into standby mode.