change key battery VOLVO V60 2018 Owner´s Manual
[x] Cancel search | Manufacturer: VOLVO, Model Year: 2018, Model line: V60, Model: VOLVO V60 2018Pages: 406, PDF Size: 9.59 MB
Page 161 of 406

LOCKS AND ALARM
}}
159
G017870
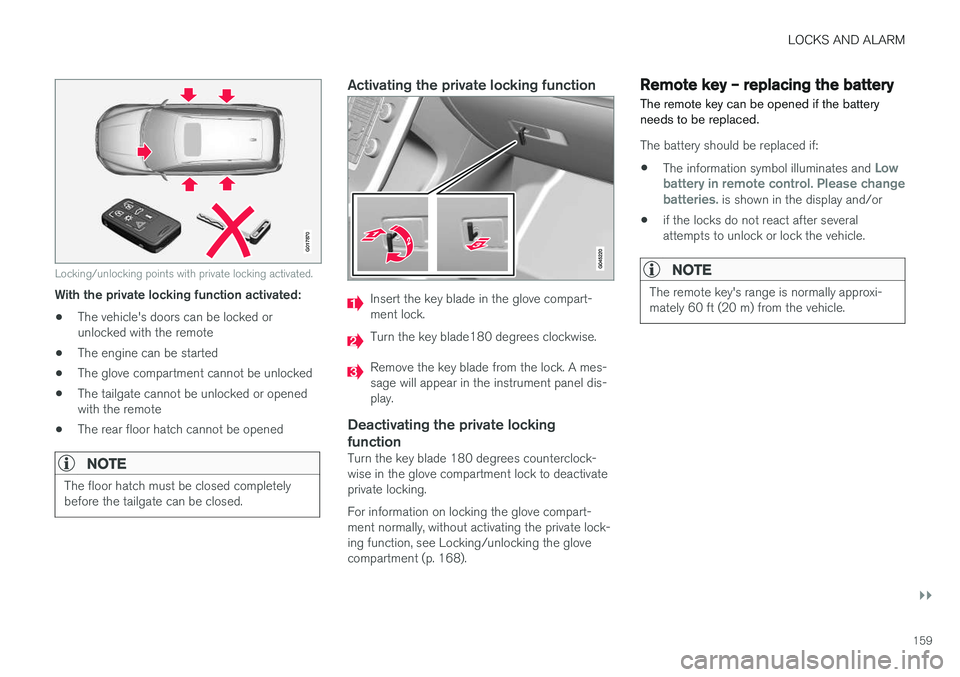
Locking/unlocking points with private locking activated.
With the private locking function activated:• The vehicle's doors can be locked or unlocked with the remote
• The engine can be started
• The glove compartment cannot be unlocked
• The tailgate cannot be unlocked or openedwith the remote
• The rear floor hatch cannot be opened
NOTE
The floor hatch must be closed completely before the tailgate can be closed.
Activating the private locking function
Insert the key blade in the glove compart- ment lock.
Turn the key blade180 degrees clockwise.
Remove the key blade from the lock. A mes- sage will appear in the instrument panel dis-play.
Deactivating the private locking function
Turn the key blade 180 degrees counterclock- wise in the glove compartment lock to deactivateprivate locking. For information on locking the glove compart- ment normally, without activating the private lock-ing function, see Locking/unlocking the glovecompartment (p. 168).
Remote key – replacing the battery The remote key can be opened if the battery needs to be replaced.
The battery should be replaced if:
• The information symbol illuminates and
Low
battery in remote control. Please change batteries.
is shown in the display and/or
• if the locks do not react after several attempts to unlock or lock the vehicle.
NOTE
The remote key's range is normally approxi- mately 60 ft (20 m) from the vehicle.
Page 162 of 406

||
LOCKS AND ALARM
160
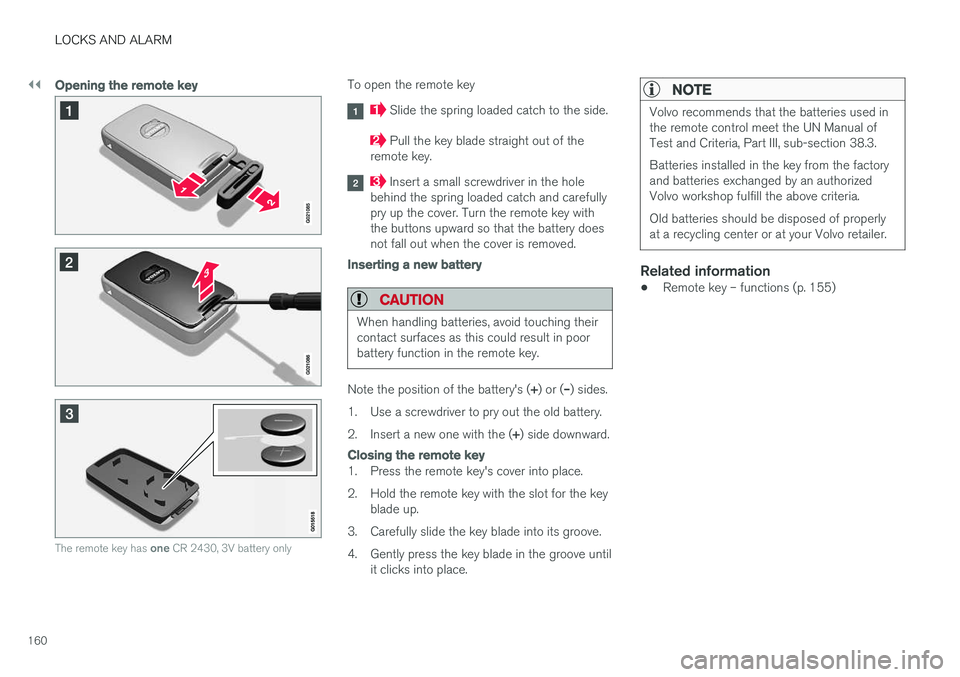
Opening the remote key
The remote key has one CR 2430, 3V battery only
To open the remote key
Slide the spring loaded catch to the side.
Pull the key blade straight out of the
remote key.
Insert a small screwdriver in the hole
behind the spring loaded catch and carefully pry up the cover. Turn the remote key withthe buttons upward so that the battery doesnot fall out when the cover is removed.
Inserting a new battery
CAUTION
When handling batteries, avoid touching their contact surfaces as this could result in poorbattery function in the remote key.
Note the position of the battery's ( +) or ( –) sides.
1. Use a screwdriver to pry out the old battery. 2. Insert a new one with the ( +) side downward.
Closing the remote key
1. Press the remote key's cover into place.
2. Hold the remote key with the slot for the key
blade up.
3. Carefully slide the key blade into its groove.
4. Gently press the key blade in the groove until it clicks into place.
NOTE
Volvo recommends that the batteries used in the remote control meet the UN Manual ofTest and Criteria, Part III, sub-section 38.3. Batteries installed in the key from the factory and batteries exchanged by an authorizedVolvo workshop fulfill the above criteria. Old batteries should be disposed of properly at a recycling center or at your Volvo retailer.
Related information
• Remote key – functions (p. 155)
Page 167 of 406

LOCKS AND ALARM
* Option/accessory.165
WARNING
People with implanted pacemakers should not allow the pacemaker to come closer than9 inches (22 cm) to any of the keyless drivesystem's antennas. This is to help preventinterference between the pacemaker and thekeyless drive system.
Related information
•Keyless drive
*– locking/unlocking (p. 161)
Locking/unlocking – from the outside
The remote key (p. 152) is used to lock/unlock all of the doors and the tailgate at the same time.Different settings for unlocking the vehicle canbe selected, see Remote key – functions(p. 155). Before the vehicle can be locked from the out- side with the remote key, the driver's door mustbe closed. If the tailgate or any other door isopen, it will be locked and the alarm will bearmed.
NOTE
Be sure the remote key is outside of the vehi- cle before the other doors/tailgate are closedto help avoid locking the remote inside thevehicle.
If the vehicle is equipped with the optional key- less drive system, all doors/tailgate must beclosed before the vehicle can be locked. The first press on the unlock button unlocks the driver's door and a second press unlocks theother doors and the tailgate (see also remote keyand key blade (p. 152)). This setting can be changed in the menu system. See MY
CAR (p. 79) for a description.
If the locks repeatedly do not react when the unlock button is pressed, it may be necessary to replace the battery in the remote, see Remotekey – replacing the battery (p. 159). In this casethe vehicle can be unlocked with the detachablekey blade (p. 158).
Related information
•
Locking/unlocking – from inside (p. 166)
Page 173 of 406

LOCKS AND ALARM
171
Alarm – arming/disarming The alarm system provides a warning if an attempt is made to break into the vehicle.
Arming the alarm
–Press the Lock button on the remote key. One long flash of the turn signals will confirmthat the alarm (p. 170) is armed.
Alarm confirmation settings can be changed in MY CAR , under
Car settingsLock settings
Keyless entry. For a description of the menu
system, see My Car – introduction (p. 79).
USA FCC ID: MAYDA 5823(3) This device complies with part 15 of the FCC rules. Operation is subject to the following condi-tions: (1) This device may not cause harmfulinterference, and (2) this device must accept anyinterference received, including interference thatmay cause undesired operation.
Canada IC: 4405A-DA 5823(3)
This device is subject to the following conditions:(1) this device may not cause interference, and(2) this device must accept any interference,including interference that may cause undesiredoperation of the device.
Disarming the alarm
–Press the Unlock button on the remote key.
> Two short flashes from the car's direction indicators confirm that the alarm has been deactivated and that all doors areunlocked.
Related information
• Alarm indicator (p. 170)
• Alarm signal (p. 171)
• Alarm – turning off (p. 172)
• Alarm-related functions (p. 172)
Alarm signal
An audible (p. 170) signal is given by a battery powered siren. The alarm cycle lasts for 30 sec-onds.
The visual alarm signal is given by flashing all turn signals for approximately 5 minutes or untilthe alarm is turned off.
Related information
• Alarm indicator (p. 170)
• Alarm – arming/disarming (p. 171)
• Alarm – turning off (p. 172)