warning VOLVO V60 2021 Owners Manual
[x] Cancel search | Manufacturer: VOLVO, Model Year: 2021, Model line: V60, Model: VOLVO V60 2021Pages: 661, PDF Size: 12.68 MB
Page 535 of 661
WHEELS AND TIRES
* Option/accessory.533
Action when warned of low tire pressure When the tire inflation pressure monitoring system11
detects low inflation pressure in a
tire, immediate action is required.
If the system's indicator sym- bol illuminates and the mes- sage
Tire pressure low is
displayed, check the tire pressure and inflate if neces-sary.
1. Switch off the ignition.
2. Check the inflation pressure on all four tires using a tire pressure gauge.
3. Inflate the tire to the correct inflation pres- sure; see the tire pressure placard on the driver's side B pillar for recommendedpressures for factory-mounted tires.
4. After the inflation pressure has been adjusted, always save the new inflationpressure in the system via the center dis-play. Please be aware that the indicator symbol will not go out until the low tire pressurehas been corrected and a storing proce-dure has been started for the new inflationpressure.
NOTE
To help prevent incorrect inflation pressure, pressure should be checked when the tiresare cold. The tires are considered to becold when they have reached the sametemperature as the ambient temperature(about 3 hours after the vehicle was lastdriven). After driving for a few kilometers,the tires will warm up and the pressure willincrease.
NOTE
After inflating a tire, always replace the valve cap to help prevent valve damagecaused by gravel, dirt, etc.
Use plastic valve caps only. Metal capscould corrode and become difficult toremove.
WARNING
Incorrect inflation pressure could lead to tire failure, which could cause thedriver to lose control of the vehicle.
The system cannot predict sudden tiredamage.
Related information
Recommended tire pressure (p. 529)
Adjusting tire pressure (p. 528)
Saving new reference values for tire infla- tion pressure monitoring
* (p. 531)
Viewing tire pressure status in the centerdisplay
* (p. 532)
Tire pressure monitoring system
* (p. 529)
Inflate tires with the compressor included in the tire sealing system (p. 546)
11
Tire Pressure Monitoring System (TPMS)
Page 536 of 661
WHEELS AND TIRES
* Option/accessory.
534
Tire inflation pressure monitoring system * messages
A number of messages related to the tire inflation pressure monitoring system 12
may
be displayed. Several examples are provided below.
Instrument panel: Tire
pressure low Check CarStatus app incenter displayThe indicator symbol will illuminate to indicate thatinflation pressure is lowin one or more tires. See the
Car Status app in
the center display for more information.
Instrument panel:
Tire
pressure sys- tem
Tempo-
rarily unavaila- ble
The indicator symbol will flash for about 1 minuteand then glow steadily.The system is temporarilyunavailable and will beactivated momentarily.
Instrument panel:
Tire
pressure sys- tem
Service
required
The indicator symbol will flash for about 1 minuteand then glow steadily. Ifthe system is not work-ing properly, contact a workshop A
.
A An authorized Volvo workshop is recommended.
Related information
Tire pressure monitoring system
* (p. 529)
Saving new reference values for tire infla- tion pressure monitoring
* (p. 531)
Action when warned of low tire pressure (p. 533)
Vehicle status (p. 570)
Volvo Cars support site (p. 21)
Changing a wheel
Wheel changes must always be carried out correctly. The following instructions showhow to remove and install a wheel and whatis important to keep in mind. Make sure thatthe tire dimension is approved for use on thevehicle.
WARNING
If a tire must be changed near passing traffic, make sure all passengers moveto a safe location.
Use a jack intended for the vehiclewhen changing a tire. For any otherjob, use stands to support the vehicle.
Never crawl under or allow any part ofyour body to be extended under a vehi-cle supported by a jack.
Never let anyone remain in the vehiclewhen it is raised on a jack.
12
Tire Pressure Monitoring System (TPMS)
Page 537 of 661
WHEELS AND TIRES
}}
* Option/accessory.535
CAUTION
When not in use, the jack
* should be
kept in its storage compartment under the cargo compartment floor.
The jack provided with your vehicle isintended to be used only in temporarysituations such as changing wheels inthe event of a flat tire. Only the jackthat came with your particular modelshould be used to lift the vehicle. If thevehicle needs to be lifted more fre-quently or for a prolonged period, usinga garage jack or hoist is recommended.Always follow this device's instructionsfor use.
Removing a wheelRead through all instructions before starting. Before raising the vehicle using a jack or lift,take out all the tools you will need.
1. Turn on the vehicle's hazard warning
flashers if a wheel change must be per- formed in an area with traffic.
2. Make sure that the parking brake is engaged and put the gear selector in P
position.
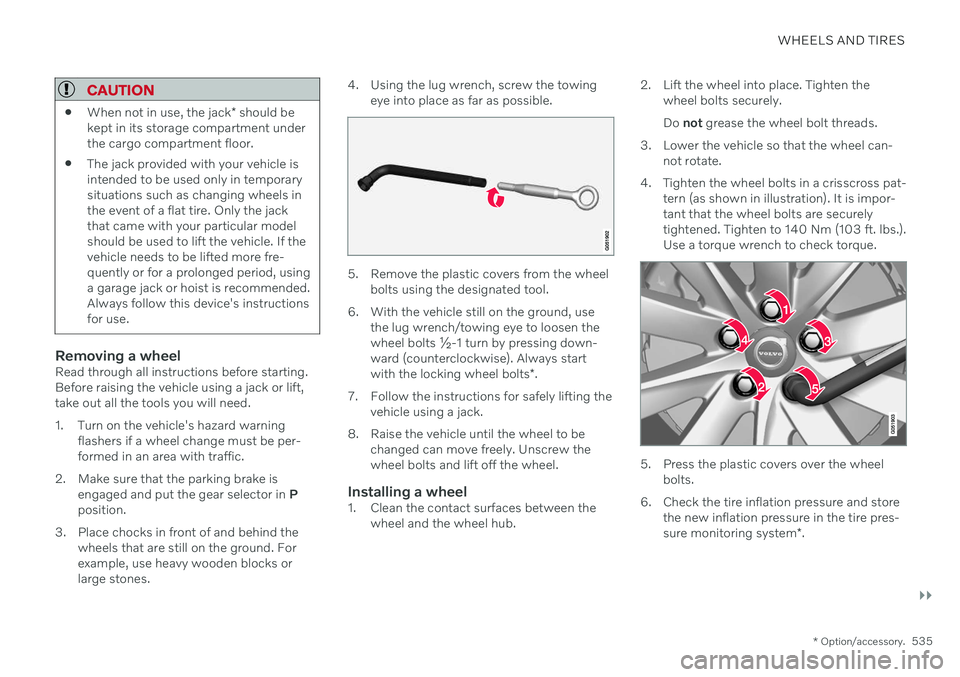
3. Place chocks in front of and behind the wheels that are still on the ground. Forexample, use heavy wooden blocks orlarge stones. 4. Using the lug wrench, screw the towing
eye into place as far as possible.
5. Remove the plastic covers from the wheelbolts using the designated tool.
6. With the vehicle still on the ground, use the lug wrench/towing eye to loosen the wheel bolts ½-1 turn by pressing down-ward (counterclockwise). Always start with the locking wheel bolts *.
7. Follow the instructions for safely lifting the vehicle using a jack.
8. Raise the vehicle until the wheel to be changed can move freely. Unscrew the wheel bolts and lift off the wheel.
Installing a wheel1. Clean the contact surfaces between thewheel and the wheel hub. 2. Lift the wheel into place. Tighten the
wheel bolts securely. Do not grease the wheel bolt threads.
3. Lower the vehicle so that the wheel can- not rotate.
4. Tighten the wheel bolts in a crisscross pat- tern (as shown in illustration). It is impor- tant that the wheel bolts are securelytightened. Tighten to 140 Nm (103 ft. lbs.).Use a torque wrench to check torque.
5. Press the plastic covers over the wheelbolts.
6. Check the tire inflation pressure and store the new inflation pressure in the tire pres- sure monitoring system *.
Page 538 of 661
||
WHEELS AND TIRES
* Option/accessory.
536
WARNING
The wheel bolts may need to be tightened again several days after a wheel change.Temperature fluctuations and vibrationscan cause them to loosen slightly.
NOTE
After inflating a tire, always replace the valve cap to help prevent valve damagecaused by gravel, dirt, etc.
Use plastic valve caps only. Metal capscould corrode and become difficult toremove.
Related information
Hoisting the vehicle (p. 573)
Tool kit (p. 536)
Saving new reference values for tire infla- tion pressure monitoring
* (p. 531)
Tool kit
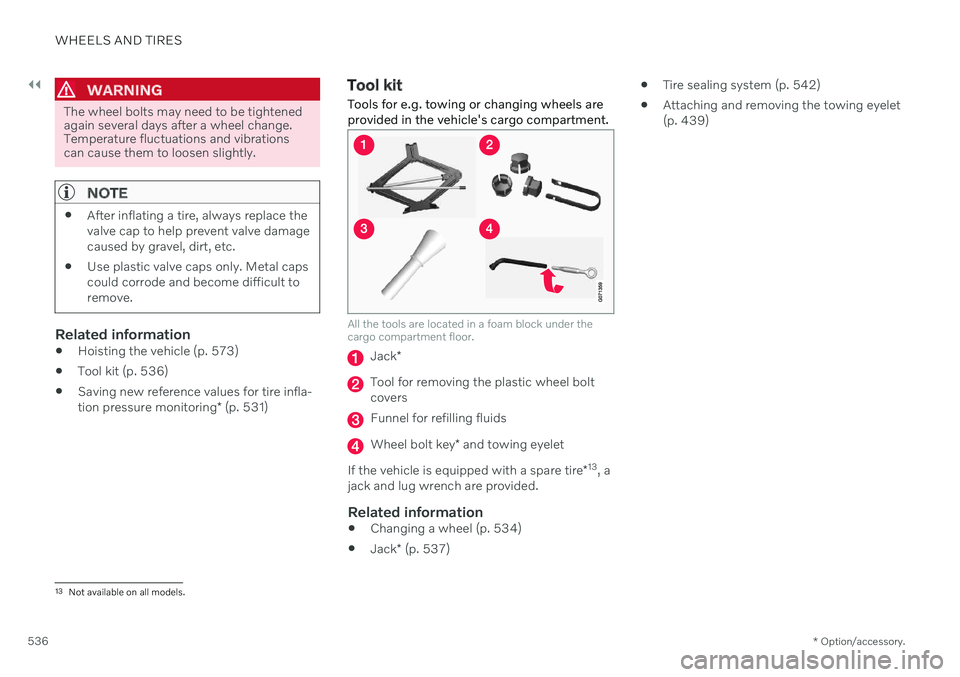
Tools for e.g. towing or changing wheels are provided in the vehicle's cargo compartment.
All the tools are located in a foam block under the cargo compartment floor.
Jack *
Tool for removing the plastic wheel bolt covers
Funnel for refilling fluids
Wheel bolt key * and towing eyelet
If the vehicle is equipped with a spare tire *13
, a
jack and lug wrench are provided.
Related information
Changing a wheel (p. 534)
Jack
* (p. 537)
Tire sealing system (p. 542)
Attaching and removing the towing eyelet (p. 439)
13
Not available on all models.
Page 539 of 661
WHEELS AND TIRES
}}
* Option/accessory.537
Jack*
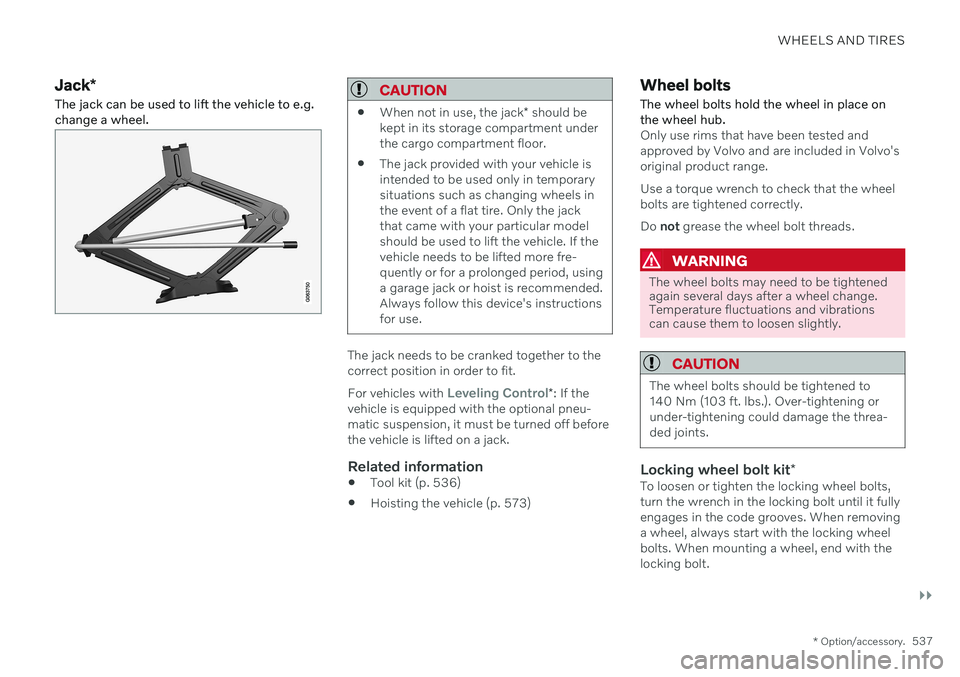
The jack can be used to lift the vehicle to e.g. change a wheel.CAUTION
When not in use, the jack
* should be
kept in its storage compartment under the cargo compartment floor.
The jack provided with your vehicle isintended to be used only in temporarysituations such as changing wheels inthe event of a flat tire. Only the jackthat came with your particular modelshould be used to lift the vehicle. If thevehicle needs to be lifted more fre-quently or for a prolonged period, usinga garage jack or hoist is recommended.Always follow this device's instructionsfor use.
The jack needs to be cranked together to the correct position in order to fit. For vehicles with
Leveling Control*
: If the
vehicle is equipped with the optional pneu- matic suspension, it must be turned off beforethe vehicle is lifted on a jack.
Related information
Tool kit (p. 536)
Hoisting the vehicle (p. 573)
Wheel bolts
The wheel bolts hold the wheel in place on the wheel hub.
Only use rims that have been tested and approved by Volvo and are included in Volvo'soriginal product range. Use a torque wrench to check that the wheel bolts are tightened correctly. Do not grease the wheel bolt threads.
WARNING
The wheel bolts may need to be tightened again several days after a wheel change.Temperature fluctuations and vibrationscan cause them to loosen slightly.
CAUTION
The wheel bolts should be tightened to 140 Nm (103 ft. lbs.). Over-tightening orunder-tightening could damage the threa-ded joints.
Locking wheel bolt kit *To loosen or tighten the locking wheel bolts, turn the wrench in the locking bolt until it fullyengages in the code grooves. When removinga wheel, always start with the locking wheelbolts. When mounting a wheel, end with thelocking bolt.
Page 540 of 661
||
WHEELS AND TIRES
538
CAUTION
Make sure you have a solid connection between bolt and wheel bolt key whenloosening/tightening the wheel bolts.Applying force at an angle could damagethe slots in the wheel bolts and the wheelbolt key and make it impossible to install orremove the wheel.
When the wheel bolt key is not being used, stow it in its designated location in the foamblock under the cargo compartment floor. Thisis important to remember so that the tool isavailable if the vehicle is taken to a workshop.If you lose the key, contact your Volvo retailer.
Related information
Changing a wheel (p. 534)
Tool kit (p. 536)
Spare wheel 14
The spare wheel is a Temporary Spare and can be used to temporarily replace a punc-tured tire on one of the vehicle's regularwheels.
The spare wheel is only intended for tempo- rary use. Replace it with a normal wheel assoon as possible. The driving characteristics of the vehicle change and ground clearance reduces whenthe spare wheel is used. Do not wash the vehi-cle in an automatic car wash while using theTemporary Spare. The recommended tire pressure must be maintained regardless of at which position thetemporary spare wheel is used on the vehicle. If the spare wheel is damaged, a replacement can be purchased from a Volvo retailer.
WARNING
Current legislation prohibits the use of the "Temporary Spare" wheel other than as atemporary replacement for a puncturedtire. It must be replaced as soon as possi-ble by a standard tire. Roadholding andhandling may be affected with the "Tempo-rary Spare" wheel in use.
WARNING
Never drive faster than 80 km/h (50 mph) with a spare tire mounted onthe vehicle.
The vehicle must never be driven withmore than one "Temporary Spare"wheel mounted.
Driving with a spare wheel may alterthe driving characteristics of the vehi-cle. Replace the spare wheel with anormal wheel as soon as possible.
The spare wheel is smaller than thenormal wheel, which affects the vehi-cle's ground clearance. Watch for highcurbs and do not wash the vehicle inan automatic car wash when a sparewheel is mounted.
Follow the manufacturer's recom-mended tire inflation pressure for thespare wheel.
On all-wheel drive vehicles, the driveon the rear axle can be disconnected.
If the spare wheel is mounted on thefront axle, snow chains must not beused.
The spare wheel must not be repaired.
14
Not available on all models.
Page 541 of 661
WHEELS AND TIRES
}}
539
CAUTION
The vehicle must not be driven with tires of different dimensions or with a spare wheelother than the one that came with the vehi-cle. The use of different size wheels canseriously damage your vehicle's transmis-sion.
Related information
Changing a wheel (p. 534)
Recommended tire pressure (p. 529)
Handling the spare wheel 15
Follow these instructions regarding handling the spare wheel.
Accessing the spare wheel
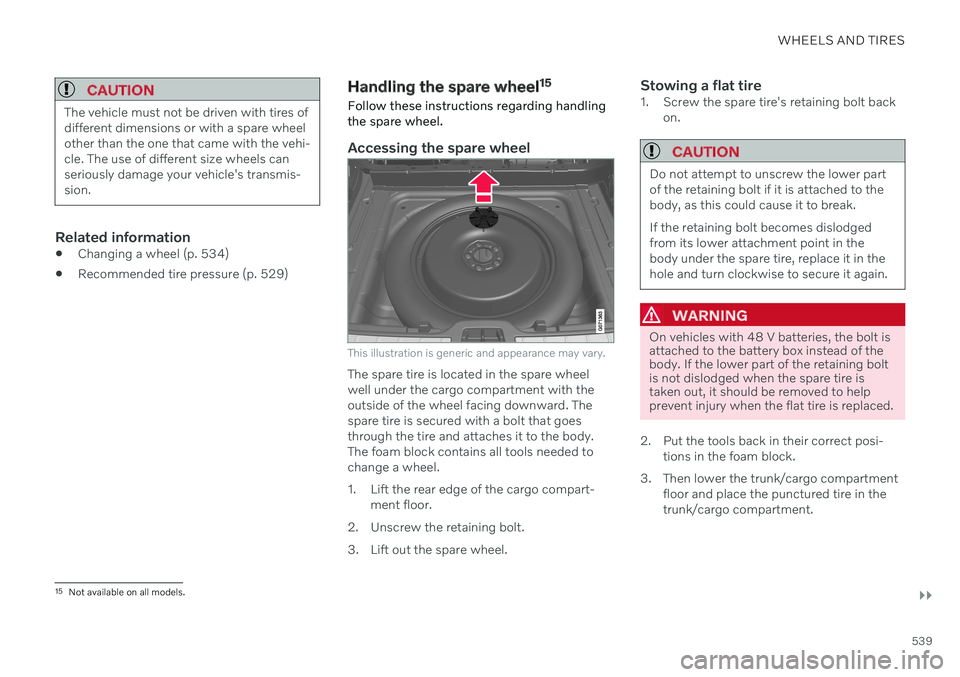
This illustration is generic and appearance may vary.
The spare tire is located in the spare wheel well under the cargo compartment with theoutside of the wheel facing downward. Thespare tire is secured with a bolt that goesthrough the tire and attaches it to the body.The foam block contains all tools needed tochange a wheel.
1. Lift the rear edge of the cargo compart- ment floor.
2. Unscrew the retaining bolt.
3. Lift out the spare wheel.
Stowing a flat tire1. Screw the spare tire's retaining bolt back on.
CAUTION
Do not attempt to unscrew the lower part of the retaining bolt if it is attached to thebody, as this could cause it to break. If the retaining bolt becomes dislodged from its lower attachment point in thebody under the spare tire, replace it in thehole and turn clockwise to secure it again.
WARNING
On vehicles with 48 V batteries, the bolt is attached to the battery box instead of thebody. If the lower part of the retaining boltis not dislodged when the spare tire istaken out, it should be removed to helpprevent injury when the flat tire is replaced.
2. Put the tools back in their correct posi- tions in the foam block.
3. Then lower the trunk/cargo compartment floor and place the punctured tire in the trunk/cargo compartment.
15Not available on all models.
Page 543 of 661
WHEELS AND TIRES
541
Snow chainsUsing snow chains and/or snow tires can help improve traction in winter driving condi-tions.
Volvo does not recommend use of snow chains on wheel dimensions other than these 16
:
7x16 ET 37 215/60
7x17 ET 40.5 225/50
8x18 ET 42 235/45
WARNING
Use Volvo genuine snow chains or equiva- lent snow chains that are suitable for thevehicle model and the tire and wheel sizes.Only
one-sided snow chains are permit-
ted. If uncertain about snow chains, Volvo rec- ommends contacting an authorized Volvoworkshop. Use of the wrong snow chainscould cause serious damage to the vehicleand result in an accident.
CAUTION
Snow chains can be used on the vehicle, with the following restrictions:
Always follow the manufacturer'sinstallation instructions carefully. Installchains as tightly as possible andretighten periodically.
Only put snow chains on the frontwheels (also applies to all-wheel drivevehicles).
If accessory, aftermarket or "custom"tires and wheels with different dimen-sions than the original tires and wheelsare used, snow chains in some casesmay NOT be used. Sufficient distancebetween the chains and brakes, sus-pension and body components mustbe maintained.
Check local regulations regarding theuse of snow chains before installing.
Never exceed the snow chain manu-facturer's specified maximum speedlimit. Under no circumstances shouldyou exceed 50 km/h (30 mph).
Avoid bumps, holes or sharp turnswhen driving with snow chains.
Avoid driving on surfaces without snow as this wears out both the snowchains and the tires.
The handling of the vehicle can beadversely affected when driving withchains. Avoid fast or sharp turns aswell as locked wheel braking.
Some types of strap-on chains affectbrake components and therefore mustNOT be used.
Consult a Volvo retailer for more information about snow chains.
Related information
Winter driving (p. 424)
16
The wheels on the vehicle may vary depending on model and market.
Page 544 of 661
WHEELS AND TIRES
542
Tire sealing system17
The temporary tire sealing system can be used to seal a puncture in a tire or to checkand adjust the pressure in the tire. Models equipped with a spare wheel 18
do not
have the tire sealing system.
WARNING
California Proposition 65 Operating, servicing and maintaining a pas- senger vehicle can expose you to chemi-cals including engine exhaust, carbon mon-oxide, phthalates, and lead, which areknown to the State of California to causecancer and birth defects or other reproduc-tive harm. To minimize exposure, avoidbreathing exhaust, do not idle the engineexcept as necessary, service your vehicle ina well ventilated area and wear gloves orwash your hands frequently when servicingyour vehicle. For more information go towww.P65Warnings.ca.gov/passenger-vehicle.
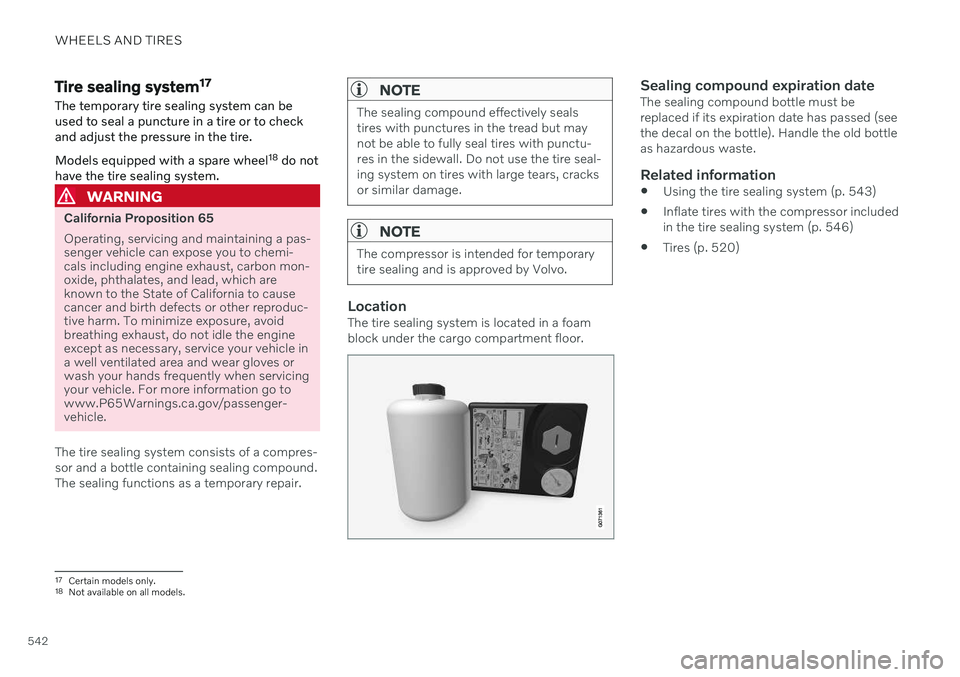
The tire sealing system consists of a compres- sor and a bottle containing sealing compound.The sealing functions as a temporary repair.
NOTE
The sealing compound effectively seals tires with punctures in the tread but maynot be able to fully seal tires with punctu-res in the sidewall. Do not use the tire seal-ing system on tires with large tears, cracksor similar damage.
NOTE
The compressor is intended for temporary tire sealing and is approved by Volvo.
LocationThe tire sealing system is located in a foam block under the cargo compartment floor.
Sealing compound expiration dateThe sealing compound bottle must be replaced if its expiration date has passed (seethe decal on the bottle). Handle the old bottleas hazardous waste.
Related information
Using the tire sealing system (p. 543)
Inflate tires with the compressor includedin the tire sealing system (p. 546)
Tires (p. 520)
17
Certain models only.
18 Not available on all models.
Page 545 of 661
WHEELS AND TIRES
}}}}
543
Using the tire sealing system
The temporary tire sealing system (TMK 19
)
can be used to seal a puncture in a tire. Read through all instructions before use.
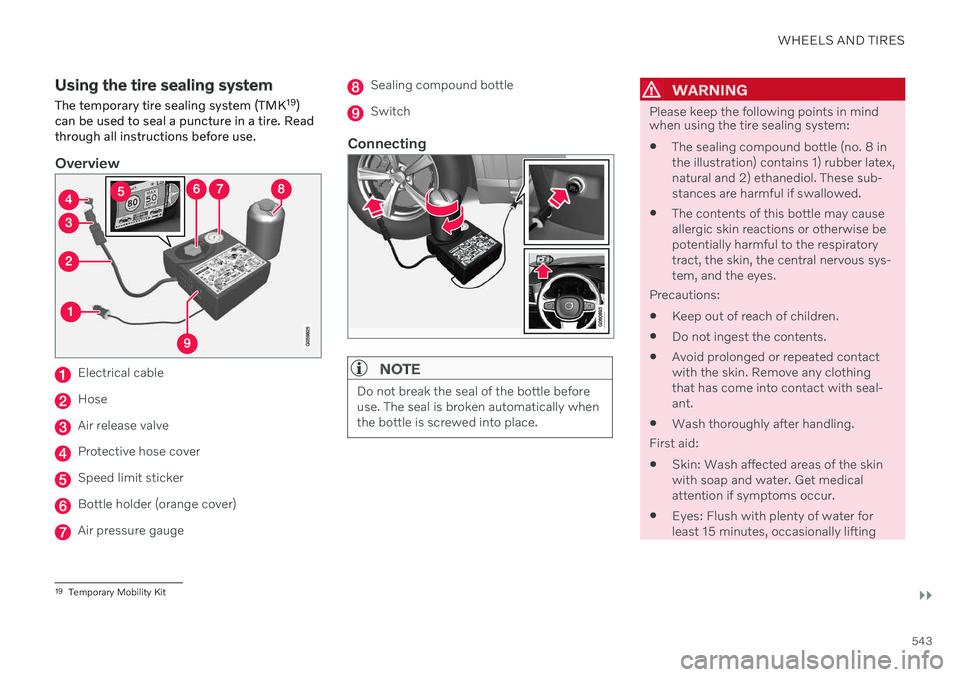
Overview
Electrical cable
Hose
Air release valve
Protective hose cover
Speed limit sticker
Bottle holder (orange cover)
Air pressure gauge
Sealing compound bottle
Switch
Connecting
NOTE
Do not break the seal of the bottle before use. The seal is broken automatically whenthe bottle is screwed into place.
WARNING
Please keep the following points in mind when using the tire sealing system:
The sealing compound bottle (no. 8 in the illustration) contains 1) rubber latex,natural and 2) ethanediol. These sub-stances are harmful if swallowed.
The contents of this bottle may causeallergic skin reactions or otherwise bepotentially harmful to the respiratorytract, the skin, the central nervous sys-tem, and the eyes.
Precautions:
Keep out of reach of children.
Do not ingest the contents.
Avoid prolonged or repeated contact with the skin. Remove any clothing that has come into contact with seal-ant.
Wash thoroughly after handling.
First aid:
Skin: Wash affected areas of the skinwith soap and water. Get medicalattention if symptoms occur.
Eyes: Flush with plenty of water forleast 15 minutes, occasionally lifting
19
Temporary Mobility Kit