warning VOLVO V60 2021 Owners Manual
[x] Cancel search | Manufacturer: VOLVO, Model Year: 2021, Model line: V60, Model: VOLVO V60 2021Pages: 661, PDF Size: 12.68 MB
Page 584 of 661
MAINTENANCE AND SERVICE
582
Refilling coolant
When refilling coolant, follow the instructions on the package. Never fill the cooling systemwith only water. The risk of freezing isincreased with too low or too high amountsof coolant.
If there is coolant under the vehicle, smoke from the cooling system, or if more than2 liters (about 2 quarts) of coolant has beenadded to the system, there could be some-thing wrong with the cooling system and star-ting the vehicle could damage the engine. Calla tow truck and do not attempt to start theengine.
WARNING
The coolant may be very hot. Never unscrew the cap when the coolant is hot. Ifcoolant must be filled, unscrew the expan-sion tank cap slowly to relieve overpres-sure.
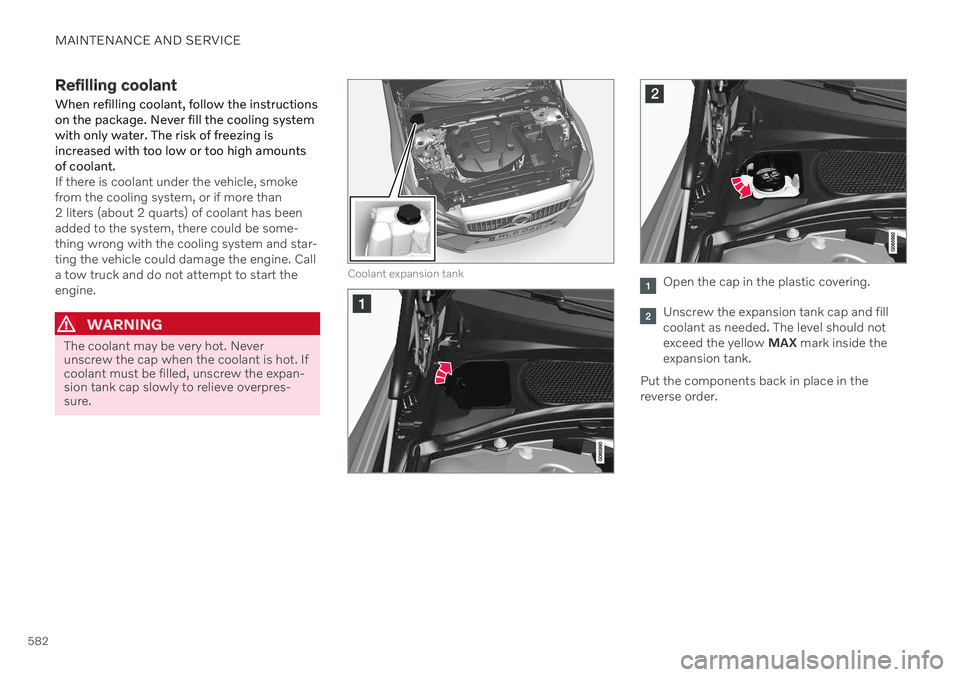
Coolant expansion tankOpen the cap in the plastic covering.
Unscrew the expansion tank cap and fill coolant as needed. The level should notexceed the yellow MAX mark inside the
expansion tank.
Put the components back in place in thereverse order.
Page 586 of 661
MAINTENANCE AND SERVICE
584
Starter battery The starter battery is used to start the electri- cal system and power the starter motor andother electrical equipment in the vehicle.
The vehicle has a single-pole electrical system that uses the chassis and engine mount asconductors. The vehicle has a voltage-regulated alternating current generator. The starter battery is a 12 V battery, dimen- sioned for the carbon dioxide-reducing func-tions Start/Stop and regenerative chargingand to support the function of the vehicle'svarious systems. The service life and performance of the starter battery are affected by factors such as drivingstyle, driving conditions, climate, battery dis-charges, number of starts, etc. Never disconnect the starter battery while the engine is running.
Make sure the cables to the starter batteryare correctly connected and the clampsare securely tightened.
WARNING
Batteries generate hydrogen gas, which is flammable and explosive.
Do not connect the jumper cable toany part of the fuel system or to anymoving parts. Avoid touching hotmanifolds.
Battery fluid contains sulfuric acid. Donot allow battery fluid to contact eyes,skin, fabrics or painted surfaces.
If contact occurs, flush the affectedarea immediately with water. Obtainmedical help immediately if eyes areaffected.
Never expose the battery to open flameor electric spark. Do not smoke nearthe battery. Failure to follow theinstructions for jump starting can leadto injury.
Starter battery service life and capacity
The service life of the starter battery is affec- ted by several factors, such as number ofstarts, battery discharges, driving style, drivingconditions, climate, etc. The starting capacityof the battery reduces gradually over time. Thebattery must therefore be recharged if thevehicle is not used for a long period of time orif it is only driven short distances. Severe cold further limits starting capacity. If the starterbattery becomes discharged too many times,its service life will be shortened. To help keep the starter battery in good condi- tion, the vehicle should be driven at least15 minutes per week or the battery should beconnected to a battery charger with automatictrickle charging. A starter battery that isalways kept fully charged has the maximumservice life.
Location
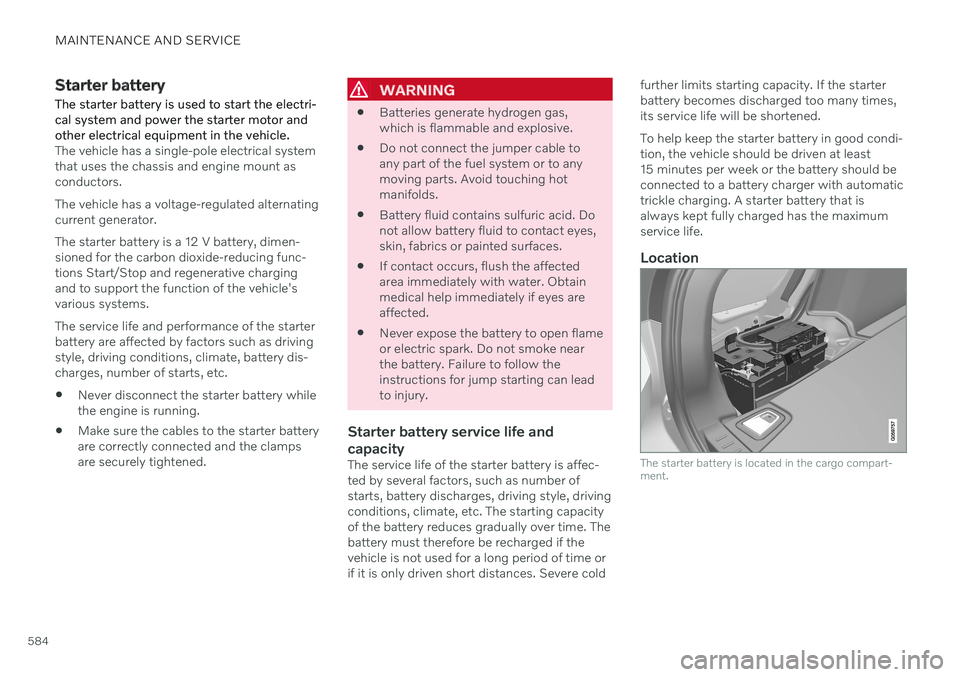
The starter battery is located in the cargo compart- ment.
Page 587 of 661
MAINTENANCE AND SERVICE
585
WARNING
If the starter battery is disconnected, the function for automatic opening and closingmust be reset to function correctly. A resetis required in order for the pinch protectionto work.
CAUTION
On certain models, the battery is secured with a tensioning strap. Make sure that thetensioning strap is always securely tight-ened.
Specifications for starter battery
Battery type H7 AGMH8 AGM
Voltage (V) 12 12
Cold start capacity A
- CCA B
(A) 800
850
Dimensions, L×W×H 315×175×190 mm (12.4×6.9×7.5 inches) 353×175×190 mm (13.9×6.9×7.5 inches)
Capacity (Ah) 80 95
A
According to EN standard.
B Cold Cranking Amperes.
Volvo recommends that batteries are replaced by an authorized Volvo workshop.
CAUTION
If replacing the battery, make sure you replace it with a battery of the same size,cold start capacity and type as the originalbattery (see the decal on the battery).
Related information
Battery symbols (p. 588)
Support battery (p. 586)
Jump starting using another battery (p. 431)
Reset procedure for pinch protection(p. 165)
Battery recycling (p. 588)
Page 588 of 661
MAINTENANCE AND SERVICE
586
Support battery Vehicles with the Start/Stop function are equipped with two batteries – a more power-ful 12 V start battery and a support batterythat provides stronger current during thefunction's start sequence.
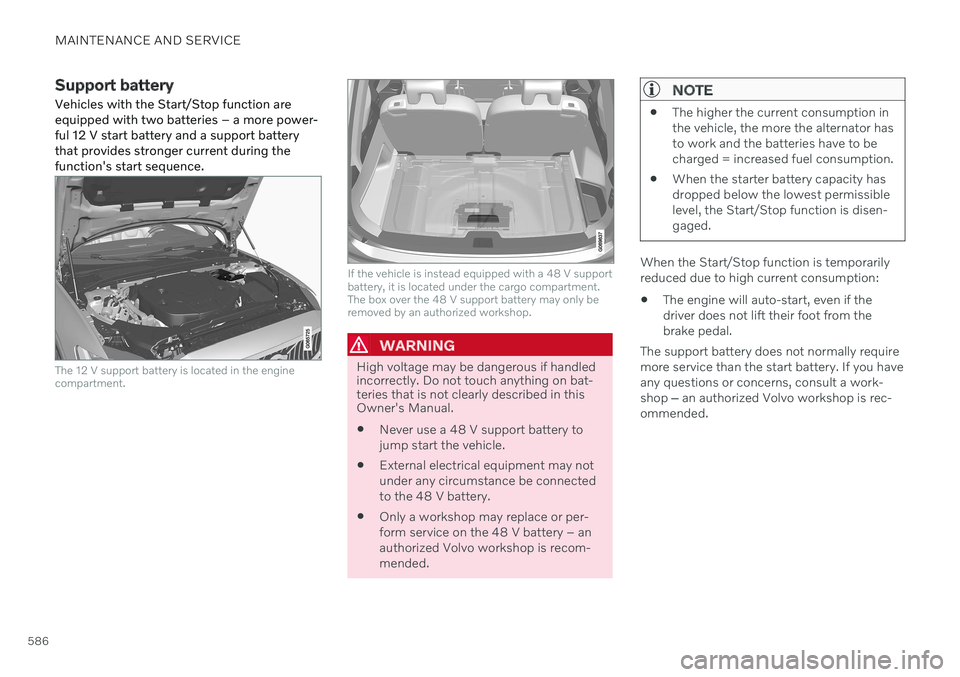
The 12 V support battery is located in the engine compartment.
If the vehicle is instead equipped with a 48 V support battery, it is located under the cargo compartment.The box over the 48 V support battery may only beremoved by an authorized workshop.
WARNING
High voltage may be dangerous if handled incorrectly. Do not touch anything on bat-teries that is not clearly described in thisOwner's Manual. Never use a 48 V support battery to jump start the vehicle.
External electrical equipment may notunder any circumstance be connectedto the 48 V battery.
Only a workshop may replace or per-form service on the 48 V battery – anauthorized Volvo workshop is recom-mended.
NOTE
The higher the current consumption in the vehicle, the more the alternator hasto work and the batteries have to becharged = increased fuel consumption.
When the starter battery capacity hasdropped below the lowest permissiblelevel, the Start/Stop function is disen-gaged.
When the Start/Stop function is temporarily reduced due to high current consumption: The engine will auto-start, even if the driver does not lift their foot from thebrake pedal.
The support battery does not normally requiremore service than the start battery. If you haveany questions or concerns, consult a work-shop ‒
an authorized Volvo workshop is rec-
ommended.
Page 590 of 661
MAINTENANCE AND SERVICE
588
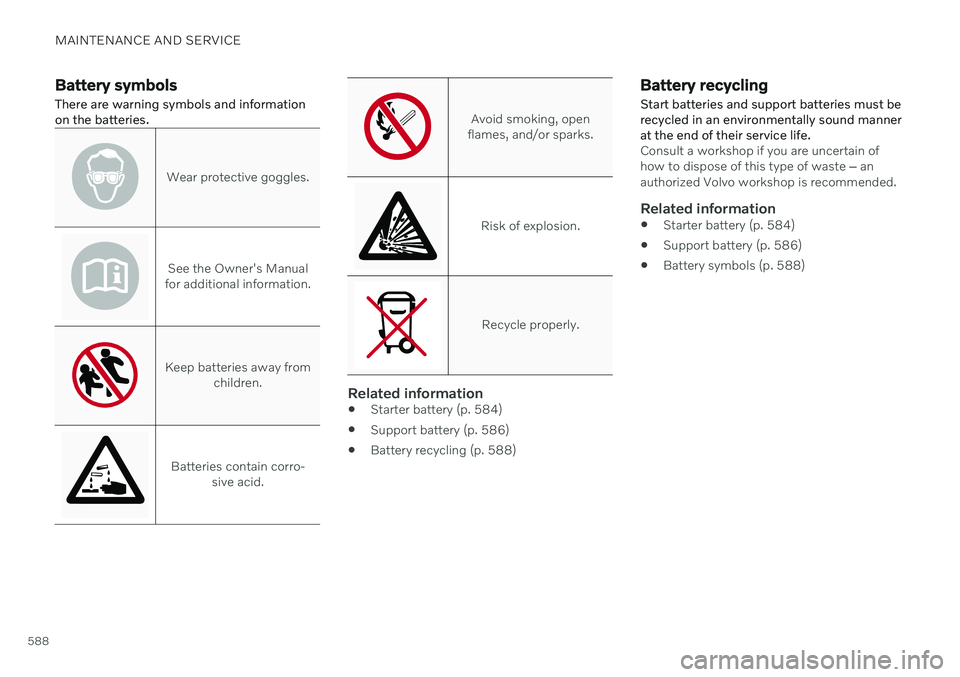
Battery symbolsThere are warning symbols and information on the batteries.
Wear protective goggles.
See the Owner's Manual
for additional information.
Keep batteries away from children.
Batteries contain corro-sive acid.
Avoid smoking, open
flames, and/or sparks.
Risk of explosion.
Recycle properly.
Related information
Starter battery (p. 584)
Support battery (p. 586)
Battery recycling (p. 588)
Battery recycling Start batteries and support batteries must be recycled in an environmentally sound mannerat the end of their service life.
Consult a workshop if you are uncertain of how to dispose of this type of waste
‒ an
authorized Volvo workshop is recommended.
Related information
Starter battery (p. 584)
Support battery (p. 586)
Battery symbols (p. 588)
Page 591 of 661

MAINTENANCE AND SERVICE
}}
589
Fuses and fuseboxes All electrical functions and components are protected by a number of fuses in order toprotect the vehicle's electrical system fromdamage by short circuiting or overloading.
WARNING
Never use a foreign object or a fuse with a higher amperage than that specified toreplace a fuse. This could cause significantdamage to the electrical system and possi-bly lead to a fire.
If any electrical component or function is not responding, the component may have blown afuse due to temporary overload. If the samefuse blows repeatedly, there may be a prob-lem with the component. Volvo recommendscontacting an authorized Volvo workshop tohave the component checked.
Location of fuseboxes
The illustration is generic - appearance may vary according to vehicle model.
Engine compartment
Under the glove compartment
Trunk/cargo compartment
Related information
Replacing fuses (p. 589)
Fuses in the cargo compartment (p. 602)
Fuses in the engine compartment(p. 591)
Fuses under the glove compartment(p. 596)
Replacing fuses
All electrical functions and components are protected by a number of fuses in order toprotect the vehicle's electrical system fromdamage by short circuiting or overloading.
1. Refer to the fuse diagram to locate the fuse.
2. Pull out the fuse and examine it from the side to determine if the curved metal wire in the fuse is intact.
3. If the wire is broken, replace the fuse with a new fuse of the same color and amper-age.
WARNING
Never use a foreign object or a fuse with a higher amperage than that specified toreplace a fuse. This could cause significantdamage to the electrical system and possi-bly lead to a fire.
WARNING
Contact an authorized Volvo workshop for assistance replacing fuses not listed in theOwner's Manual. If fuse replacement isperformed incorrectly, significant damagecan be caused to the electrical system.
Page 613 of 661
MAINTENANCE AND SERVICE
}}
* Option/accessory.611
Cleaning textile floor and inlay mats
Use of textile cleaner is recommended when cleaning textile mats. Clean regularly andtreat stains immediately. It is important tovacuum before using a cleaning agent.
Remove the inlay mats to clean the floor mats and inlay mats separately. Each inlay mat issecured into place with pins.
1. Remove the inlay mat by grasping the inlay mat at each pin and lifting the mat straight up.
2. Use a vacuum to remove dust and dirt.
NOTE
Do not swing or strike the inlay mats vio- lently against another object to remove dirtas this could damage the mats.
3. After vacuuming, a specially designed tex- tile cleaning agent should be used to remove stains on floor mats.
4. After cleaning, put the inlay mat back into place by pressing it in at each pin.
WARNING
Never use more than one inlay mat at a time on the driver's floor. If any othertype of floor mat is used, remove theoriginal mat from the driver's seat floorbefore driving. All types of mats mustbe securely anchored in the attach-ment points in the floor. Make sure thefloor mat does not impede the move-ment of the brake pedal or acceleratorpedal in any way, as this could be aserious safety hazard.
Volvo's floor mats are specially manu-factured for your vehicle. They must beproperly secured in the attachmentpoints in the floor to help ensure theycannot slide and become trappedunder the pedals.
Related information
Cleaning the interior (p. 607)
Cleaning the center display (p. 608)
Cleaning fabric upholstery and ceiling liner(p. 609)
Cleaning the seat belt (p. 610)
Cleaning leather upholstery
* (p. 611)
Cleaning the leather steering wheel(p. 612)
Cleaning interior plastic, metal and woodsurfaces (p. 613)
Cleaning leather upholstery
*
Use cleaning agents and car care products recommended by Volvo. Clean regularly andtreat stains immediately. It is important tovacuum before using a cleaning agent.
Volvo's leather upholstery * is treated to pro-
tect its original appearance. Over time, sun- light, grease, dirt, etc. could break down theprotective layer. This could result in scratchesand cracking. Leather upholstery * is a natural product that
changes and acquires a beautiful patina over time. Regular cleaning and treatments arerequired to preserve the qualities and color ofthe leather. Volvo offers a comprehensiveproduct, Volvo Leather Care KitWipes, forcleaning and treating leather upholstery.When used as directed, it helps preserve theleather's protective coating. For optimal results, Volvo recommends clean- ing and applying protective cream one to fourtimes a year (or more often as needed). VolvoLeather Care Kit 951 0251 and Volvo LeatherSoftener 943 7429 are available for purchaseat Volvo retailers.
Cleaning the leather upholstery1. Apply the leather cleaner to a damp sponge and squeeze it until the cleanerfoams.
Page 617 of 661
MAINTENANCE AND SERVICE
}}
* Option/accessory.615
Hand washing
The vehicle should be washed as soon as it becomes dirty. This makes the vehicle easierto clean because dirt does not attach asstrongly. It also reduces the risk of scratchesand keeps the vehicle looking new. Wash thevehicle in a car wash or garage with an oilseparator and use car washing detergent.Use cleaning agents and car care productsrecommended by Volvo.
Important to keep in mind when handwashing your vehicle
Avoid washing the vehicle in direct sun- light. This could cause the detergent orwax to dry out and become abrasive.
Remove bird droppings from paintwork assoon as possible. It contains chemicalsthat affect and discolor paintwork veryquickly. Use e.g. soft paper or a spongesoaked in lots of water. Consult an author-ized Volvo workshop for assistanceremoving discoloration.
Hose down the underbody, including thewheel housings and bumper.
Hose down the entire vehicle and removeany loose dirt, droppings etc. to reducethe risk of scratches from washing. Do notspray directly onto locks.
If necessary, use cold degreaser on heavilysoiled surfaces. Note that in such casesthe surfaces must not be hot from the sun.
Wash using a sponge, car washing deter-gent and plenty of lukewarm water. Makesure that the sponge is clean. A dirtysponge can scratch the paint.
Clean the wiper blades with lukewarmsoap solution or car washing detergent.
Dry the vehicle using a clean, soft chamoisor a squeegee. Try not to let drops ofwater dry in strong sunlight. This couldcause water drying stains that may needto be polished out.
In areas with heavy industrial emissions,more frequent washing of the vehicle'sexterior is recommended.
Tar spots from asphalt may remain evenafter washing. Use a Volvo-recommendedtar remover to remove these spots afterwashing the vehicle.
WARNING
Always entrust engine washing to a work- shop. If the engine is hot, there is a risk offire.
CAUTION
Dirty headlights do not work as well. Clean them regularly, e.g. when refueling. Do not use corrosive cleaners. Use water and a non-abrasive sponge.
NOTE
Exterior lighting such as headlights and taillights may develop temporary conden-sation on the inside of the lens. This is nor-mal. All exterior lighting is designed toresist this. Condensation is normally ven-ted out of the lamp housing once the lighthas been lit for some period of time.
CAUTION
Make sure that the panoramic roof
*
and sun shade are closed before wash- ing the vehicle.
Never use abrasive polishing agents onthe panoramic roof.
Never use wax on the rubber sealsaround the panoramic roof.
Page 619 of 661
MAINTENANCE AND SERVICE
* Option/accessory.617
CAUTION
The system will automatically change to P
mode if the above steps are not followed. In P mode, the wheels are locked, which
they should not be when the vehicle isbeing washed in a car wash.
NOTE
Keep in mind that if the vehicle is equipped with the keyless locking and unlocking function *, the doors and tailgate/trunk lid
may open when washing the vehicle if the remote key is within range.
Testing the brakes
WARNING
Always test the brakes after washing the vehicle, including the parking brake, toensure moisture and corrosion do notattach the brake pads and impair brakefunctionality.
Lightly depress the brake pedal from time to time when driving long distances in rain orslush. The heat from the friction will helpwarm up and dry the brake pads. Do the sameafter starting the vehicle in very damp or coldweather.
Related information
Cleaning the exterior (p. 613)
Polishing and waxing (p. 614)
Hand washing (p. 615)
High-pressure washing (p. 617)
Cleaning the wiper blades (p. 618)
Cleaning exterior plastic, rubber and trimcomponents (p. 618)
Cleaning rims (p. 619)
Corrosion protection (p. 620)
Auto-hold brakes (p. 403)
Settings for automatically activating theparking brake (p. 402)
Keyless and touch-sensitive surfaces
*
(p. 254)
High-pressure washing The vehicle should be washed as soon as it becomes dirty. The longer the dirt remains,the more difficult it will be to keep the vehicleclean. It could also lead to paint damage.Wash the vehicle in a car wash or garagewith an oil separator. Use a car washingdetergent recommended by Volvo.
If washing the vehicle with a high-pressure wash, use sweeping movements and keep thenozzle at least 30 cm (13 in.) from the vehicle.Do not spray directly onto locks.
Related information
Cleaning the exterior (p. 613)
Polishing and waxing (p. 614)
Hand washing (p. 615)
Automatic car washes (p. 616)
Cleaning the wiper blades (p. 618)
Cleaning exterior plastic, rubber and trimcomponents (p. 618)
Cleaning rims (p. 619)
Corrosion protection (p. 620)
Page 640 of 661
||
SPECIFICATIONS
638
Explanation of symbols for R1234yf
Symbol Explanation
Caution
Mobile air condition system (MAC)
Lubricant
Only a trained and certified tech- nician can perform service on themobile air conditioning system(MAC)
Flammable refrigerant
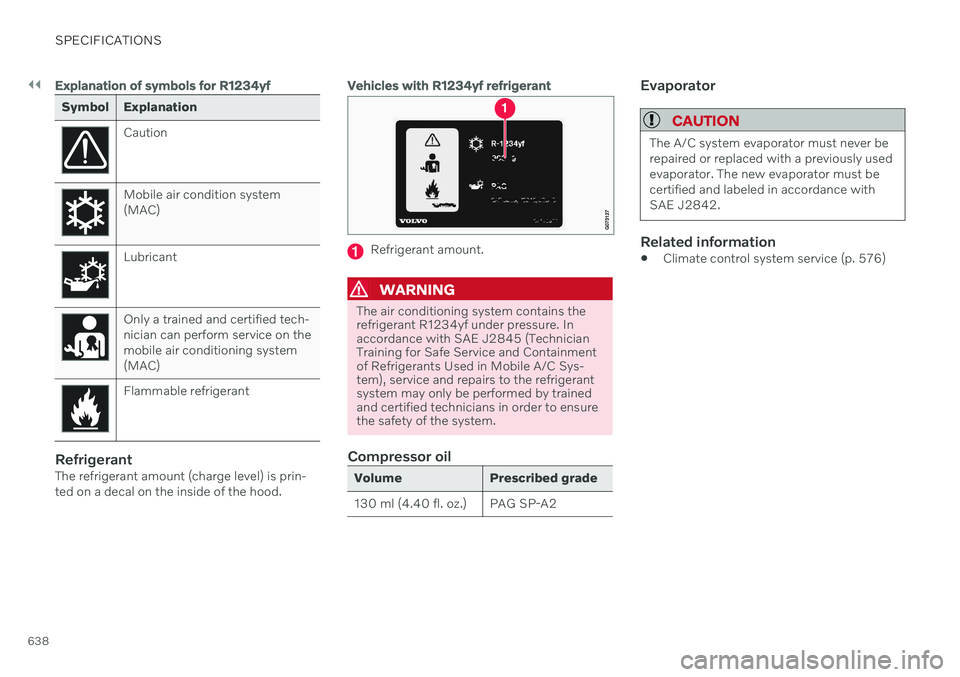
RefrigerantThe refrigerant amount (charge level) is prin- ted on a decal on the inside of the hood.
Vehicles with R1234yf refrigerant
Refrigerant amount.
WARNING
The air conditioning system contains the refrigerant R1234yf under pressure. Inaccordance with SAE J2845 (TechnicianTraining for Safe Service and Containmentof Refrigerants Used in Mobile A/C Sys-tem), service and repairs to the refrigerantsystem may only be performed by trainedand certified technicians in order to ensurethe safety of the system.
Compressor oil
Volume Prescribed grade
130 ml (4.40 fl. oz.) PAG SP-A2
Evaporator
CAUTION
The A/C system evaporator must never be repaired or replaced with a previously usedevaporator. The new evaporator must becertified and labeled in accordance withSAE J2842.
Related information
Climate control system service (p. 576)