ECO mode VOLVO V60 2021 Workshop Manual
[x] Cancel search | Manufacturer: VOLVO, Model Year: 2021, Model line: V60, Model: VOLVO V60 2021Pages: 661, PDF Size: 12.68 MB
Page 421 of 661

STARTING AND DRIVING
419
Stop the vehicle by applying the brakes and keep the brake pedal depressed. Theengine will auto-stop.
In
Comfort or Eco drive mode, the engine
may auto-stop before the vehicle has com- pletely stopped. With Adaptive Cruise Control or Pilot Assist activated, the engine will auto-stop aboutthree seconds after the vehicle has stopped.
Auto-startThe following conditions must be met for theengine to auto-start.
Release the brake pedal. The engine willauto-start and the vehicle can be driven.On an uphill gradient, Hill Start Assist (HSA 13
) will activate to help prevent the
vehicle from rolling backward.
When the Auto-hold function is activated, auto-start will be delayed until the acceler-ator is pressed.
When Adaptive Cruise Control or PilotAssist are activated, the engine will auto- start when the accelerator pedal is depressed or the
button on the left-
side steering wheel keypad is pressed.
Maintain pressure on the brake pedal and press the accelerator pedal. The enginewill auto-start.
On a downhill gradient: Release the brakepedal slightly so that the vehicle begins toroll. The engine will auto-start after a slightincrease in speed.
Symbols in the instrument panel
White – Displayed in the tachometer
when the function is available.
Green – Shown in the tachometer
when the function is active and the engine is auto-stopped.
Gray – When the symbol is grayed-
out with a line through it, the function is not available. If no symbol is shown, the function is switched off.
The function is active and the engine has auto-stop- ped.
On vehicles with the 8-inch instrument panel, the symbol will be shown at the bottom of thespeedometer.
Related information
Deactivating the Start/Stop function(p. 420)
Conditions for the Start/Stop function(p. 420)
Start/Stop function (p. 418)
Hill Start Assist (p. 405)
Auto-hold brakes (p. 403)
13
Hill Start Assist
Page 422 of 661
STARTING AND DRIVING
420
Deactivating the Start/Stop function
In certain situations, it may be advisable to turn the Start/Stop function off.
To turn off Start/Stop, tap theStart/Stop function button
in the center display's Func- tion view. The indicator lightin the button will go outwhen the function has beenturned off.
The function will remain turned off until:
it is reactivated
the drive mode is changed to
Eco.
Related information
Driving with the Start/Stop function (p. 418)
Conditions for the Start/Stop function(p. 420)
Conditions for the Start/Stop function
Certain conditions must be met for Start/ Stop to function.
If any condition is not met, this will be indi- cated in the instrument panel.
The engine does not auto-stopThe engine will not auto-stop if: The vehicle has not reached a speed of ca 10 km/h (6 mph) after starting.
After several auto-stops, the speed mustagain exceed approximately ca 10 km/h(6 mph) before the next auto-stop.
The driver has not fastened the seatbelt.
The engine is not running at its normaloperating temperature.
The ambient temperature is underapproximately -5 °C (23 °F) or overapproximately 30 °C (86 °F).
Windshield heating is activated.
The climate system settings and theactual climate in the passenger compart-ment differ.
The vehicle is in reverse.
The driver is making large steering wheelmovements.
The road gradient is very steep.
The hood is open.
Driving at high altitude and the engine hasnot reached its normal operating tempera-ture.
ABS has been activated.
Hard braking (even if the ABS system hasnot been activated).
Many starts during a short period of timehave triggered the starter motor's over-heating protection.
The exhaust system's particulate filter isfull.
A trailer is connected to the vehicle's elec-trical system.
The transmission is not running at its nor-mal operating temperature.
The gear selector is in mode
M (±
).
If traffic conditions allow it (for example ina traffic jam).
The engine does not auto-startThe engine will not auto-start after an auto-stop if:
The driver is not wearing a seat belt, thegear selector is in the
P position and the
driver's door is open. The engine must bestarted normally.
Page 424 of 661
STARTING AND DRIVING
* Option/accessory.
422
Leveling control * and suspension
Self-leveling and suspension functions are controlled automatically.
Shock absorbers (Four-C)On vehicles equipped with Four-C, the shock absorbers are adapted to the selected drive mode and the current vehicle speed. Theshock absorbers are normally set to help opti-mize comfort and are adjusted continuouslyaccording to the road surface and the vehicle'sacceleration, braking and cornering.
Symbols and messagesIf a problem occurs with the leveling control, amessage will be displayed in the instrumentpanel.
Symbol Message Meaning
Suspension Service requiredA fault has occurred. Visit a workshop
A
as soon as possible.
A An authorized Volvo workshop is recommended.
Related information
Drive modes
* (p. 413)
Page 425 of 661
STARTING AND DRIVING
* Option/accessory.423
Economical driving
A more economical driving style can help lower fuel consumption.
Before driving
If possible, precondition the vehicle before driving.
If preconditioning is not possible when itis cold outside, use seat and steeringwheel heating first. Avoid heating theentire passenger compartment to reducethe amount of current being taken fromthe start battery.
Avoid using idling to warm up the vehiclebefore driving.
The type of tires and inflation pressureused could affect energy consumption –consult an authorized Volvo retailer foradvice on suitable tires.
Remove unnecessary items from the vehi-cle - the heavier the load, the higher thefuel consumption.
While driving
Activate Eco drive mode.
Use gear selector position
D as often as
possible.
When using manual gear shifting, drive using the highest possible gear. Use the gear indicator 14
.
Maintain a steady speed and a generous following distance to traffic ahead to mini-mize braking. Use engine braking if possi-ble.
Higher speeds increase energy consump-tion because air resistance increases withspeed.
In a cold climate, reduce heating of thewindshield/rear window, mirrors, seatsand the steering wheel.
Avoid driving with the windows open.
Do not use the accelerator pedal to keepthe vehicle stationary on an uphill gradi-ent. Instead, activate the auto-hold brakefunction at a standstill.
Use trip data to see current fuel consump-tion.
WARNING
Never turn off the engine while the vehicle is moving, e.g. when driving downhill. Thisdeactivates certain important systemssuch as power steering and brakes.
After driving
If possible, park in a climate-controlled garage.
Related information
Eco drive mode (p. 416)
Starting and stopping preconditioning
*
(p. 226)
Checking tire pressure (p. 527)
Activating and deactivating Auto-hold at astandstill (p. 404)
Start/Stop function (p. 418)
Trip computer (p. 87)
14
Only available in certain markets.
Page 426 of 661
STARTING AND DRIVING
* Option/accessory.
424
Preparing for a long trip
It is important to have the vehicle's systems and equipment checked carefully before driv-ing long distances.
Check that
the engine is running properly and that fuel consumption is normal
there are no leaks (fuel, oil or other fluid)
the brake pedal is functioning properly
all lights work
tire tread depth and air pressure are atcorrect levels. Change to snow tires whendriving in areas where there is a risk ofsnowy or icy roads
the start battery is sufficiently charged
the wiper blades are in good condition
Related information
Checking tire pressure (p. 527)
Filling washer fluid (p. 626)
Winter driving (p. 424)
Economical driving (p. 423)
Vehicle modem settings (p. 503)
Loading recommendations (p. 556)
Driving with a trailer (p. 434)
Pilot Assist
* (p. 296)
Tire sealing system (p. 542)
Winter driving
It is important to check the vehicle before driving in cold/snowy conditions to makesure it can be driven safely.
Before the cold season arrives: Make sure the engine coolant contains 50% antifreeze. This mixture helps pro-tect the engine from frost erosion down toapprox. –35 °C (–31 °F). Do not mix dif-ferent types of antifreeze as this couldpose a health risk.
Keep the fuel tank well filled to preventcondensation from forming.
Check the viscosity of the engine oil. Oilwith low viscosity (thinner oil) improvescold-weather starting and reduces fuelconsumption when driving with a coldengine.
Check the condition and charge level ofthe start battery. Cold weather placesgreater demands on the start battery andreduces its capacity.
Use washer fluid containing antifreeze tohelp prevent ice from forming in thewasher fluid reservoir.
See separate section for engine oil recommen-dations.
Slippery driving conditionsTo help optimize traction and roadholding,Volvo recommends using snow tires on allwheels whenever there is a risk of snow or iceon the road.
NOTE
Certain countries require use of winter tires by law. Not all countries permit the use ofstudded tires.
Practice driving on slippery surfaces under controlled conditions to learn how the vehiclereacts.
Related information
Engine oil specifications (p. 636)
Snow tires (p. 540)
Snow chains (p. 541)
Braking on salted roads (p. 399)
Braking on wet roads (p. 399)
Filling washer fluid (p. 626)
Starter battery (p. 584)
Replacing windshield wiper blades(p. 624)
Changing rear window wipers (p. 622)
Refilling coolant (p. 582)
Page 433 of 661
STARTING AND DRIVING
}}
431
Related information
Refilling coolant (p. 582)
Driving with a trailer (p. 434)
Preparing for a long trip (p. 424)
Battery drain
The electrical functions in the vehicle drain the battery to varying degrees. Avoid usingignition mode II when the engine is switched
off. Use ignition mode I instead, as this uses
less electrical current.
Note that certain accessories may also drain power from the electrical system. Do not usefunctions that use a lot of electrical currentwhen the engine is turned off. Examples ofsuch functions are: blower
headlights
windshield wipers
audio system (especially at high volume).
If the starter battery voltage is low, a message is shown in the driver display. The vehicle'senergy-saving function will then turn off orreduce certain functions, such as the blowerand/or the audio system.
–To charge the battery, start the engine and let it run for at least 15 minutes (drivingcharges the battery faster than letting theengine idle).
Related information
Starter battery (p. 584)
Ignition modes (p. 395)
Jump starting using another battery If the start battery is discharged, current from another battery can be used to start the vehi-cle.
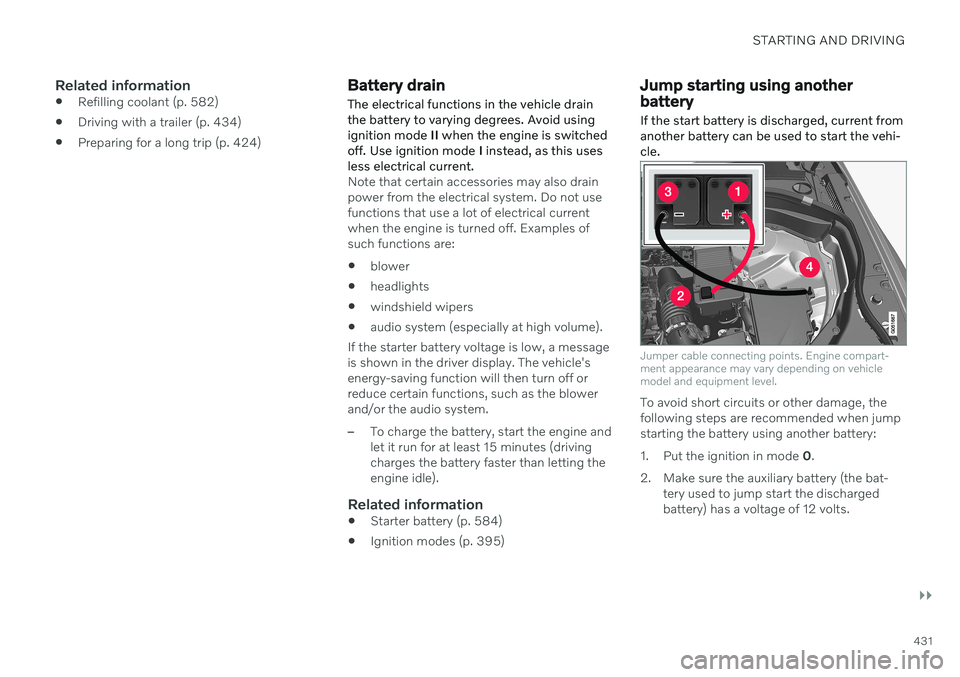
Jumper cable connecting points. Engine compart- ment appearance may vary depending on vehiclemodel and equipment level.
To avoid short circuits or other damage, the following steps are recommended when jumpstarting the battery using another battery:
1. Put the ignition in mode
0.
2. Make sure the auxiliary battery (the bat- tery used to jump start the discharged battery) has a voltage of 12 volts.
Page 436 of 661
STARTING AND DRIVING
434
Driving with a trailer
There are a number of things to consider when towing a trailer, such as the towbar, thetrailer and how the load is distributed in thetrailer.
Load-carrying capacity is determined by the vehicle's curb weight. The total weight of allpassengers and any installed accessories, e.g.towbar, reduces the vehicle's load-carryingcapacity by the corresponding amount.
Towbars used on the vehicle must beapproved for the applicable use.
Distribute the load on the trailer so thatthe weight on the towbar complies withthe specified maximum towball weight.The tongue weight is calculated as part ofthe vehicle's payload.
Increase the tire pressure to the recom-mended pressure for a full load.
The engine is subjected to more load thanusual when towing a trailer.
Towing a trailer affects the vehicle's han-dling, durability and driving economy.
Do not drive with a heavy trailer when thevehicle is very new. Wait until the mileagehas reached at least 1000 km (620 miles).
On long and steep downgrades, the vehi-cle's brakes are subjected to much moreload than usual. When manually shifting, downshift and adapt speed accordingly.
Follow applicable regulations regarding permitted speed and weight.
Drive slowly when towing a trailer up along and steep incline.
The maximum trailer weights given onlyapply to altitudes up to 1000 meters(3280 feet) above sea level. At higher alti-tudes, engine power (and thus the vehi-cle's climbing ability) is decreased due tothe reduced air density, and the maximumtrailer weight must therefore be reduced.The weight of the vehicle and trailer mustbe decreased by 10% for each additional1000 m (3280 feet) or part thereof.
Avoid driving with a trailer on inclines ofmore than 12%.
Avoid overloading and other incorrect use.
The trailer's brakes must be balanced withthe vehicle's brakes to help ensure safestops (follow applicable local regulations).
CAUTION
Bumper-attached trailer hitches must not be used on Volvos, nor shouldsafety chains be attached to thebumper.
Trailer hitches attaching to the vehiclerear axle must not be used.
Never connect a trailer's hydraulicbrake system directly to the vehiclebrake system, nor a trailer's lightingsystem directly to the vehicle lightingsystem. Consult your nearest author-ized Volvo retailer for correct installa-tion.
When towing a trailer, the trailer'ssafety chains or wire must be correctlyfastened to the attachment points pro-vided in the trailer hitch on the vehicle.The safety chain or wire must never befastened to or wound around the tow-ing ball.
NOTE
The optional detachable trailer hitch may not be available in all markets or on allmodels. Consult your Volvo retailer.
Page 438 of 661
STARTING AND DRIVING
* Option/accessory.
436
Trailer Stability Assist *
Trailer Stability Assist (TSA 18
) is part of the
ESC 19
stability system and is a function
designed to help stabilize a vehicle that is towing a trailer when the vehicle and trailerhave begun to sway. The function is addedwhen installing a towbar. Contact a Volvoretailer for more information.
Reasons for swayingA vehicle towing a trailer may begin to sway for various reasons. Normally this only occursat high speeds. However, if the trailer is over-loaded or unevenly distributed, e.g. too farback, there is a risk of swaying even at lowspeeds. Swaying may be caused by factors such as:
The vehicle and trailer are hit by a sudden, strong crosswind.
The vehicle and trailer are traveling on anuneven road or over a bump.
Sudden movements of the steering wheel.
Once swaying has begun, it can be difficult orimpossible to stop it. This makes the vehicleand trailer difficult to control and there is a riskof swerving into oncoming traffic or driving offthe road.
Trailer Stability Assist functionTrailer Stability Assist continuously monitorsthe vehicle's movements, particularly lateralmovements. If swaying is detected, the brakesare applied individually on the front wheels,which has a stabilizing effect on the vehicleand trailer. This is often enough to enable thedriver to regain control of the vehicle. If the Trailer Stability Assist function's first attempt is not adequate to stop the swayingmotion, the brakes are applied on all wheelsand engine power is temporarily reduced. Asthe swaying motion begins to decrease andthe vehicle and trailer have once againbecome stable, TSA stops regulating thebrakes/engine power and the driver regainscontrol of the vehicle.
NOTE
Trailer Stability Assist is deactivated if the driver activates ESC Sport Mode in the
center display's menu system.
Trailer Stability Assist may not intervene if the driver tries to compensate for the swayingmotion by moving the steering wheel rapidly,because the system will then not be able todetermine if it is the trailer or the driver caus-ing the swaying. When Trailer Stability Assistis activated, the ESC symbolis displayed in the instrumentpanel.
NOTE
A vehicle software update is required when a towbar is retrofitted. Contact a Volvoretailer.
Related information
Driving with a trailer (p. 434)
Electronic Stability Control (p. 271)
18
Trailer Stability Assist
19 Electronic Stability Control
Page 440 of 661
STARTING AND DRIVING
438
Towing using a towline
This section refers to one vehicle being towed behind another using a towline.
Before towing another vehicle, check applica- ble speed limit regulations.
Preparations and towing
CAUTION
For some transmission variants, it is not possible to shift from P position if theengine is switched off. Contact an author-ized Volvo workshop for assistance towingor call a professional towing service.
CAUTION
Note that the vehicle must always be towed with the wheels rolling forward.
Do not tow a vehicle with automatictransmission at a speed greater than80 km/h (50 mph) or for a distancegreater than 80 km (50 miles).
WARNING
Ignition mode
II must be active – all
airbags are deactivated in ignition mode I.
Always have the remote key in thevehicle when it is towed.
WARNING
The brake and steering servos do not work when the engine is off – it takesabout 5 times more pressure on the brakepedal and steering requires much moreeffort than normal.
1. Turn on the hazard warning flashers.
2. Attach the towline to the towing eyelet.
3. Put the vehicle in ignition mode II – with-
out pressing the brake pedal, turn the start knob clockwise and hold it there for about4 seconds. Release the knob, which willautomatically return to its original position.
4. Move the gear selector to neutral (N) and release the parking brake. If the battery charge level is too low, it may not be possible to release the parkingbrake. Connect an auxiliary battery to thevehicle if the battery is discharged.
> The towing vehicle can now start driv-ing. 5. Keep the towline taut when the towing
vehicle slows down by applying light pres- sure to the brake pedal. This will helpavoid jarring movements.
6. Be prepared to apply the brakes to stop the vehicle.
Jump startingDo not tow the vehicle to start the engine. Usean auxiliary battery if the start battery's chargelevel is so low that the engine cannot bestarted.
CAUTION
Attempting to tow with the engine running could result in damage to the three-waycatalytic converter.
Related information
Attaching and removing the towing eyelet (p. 439)
Hazard warning flashers (p. 159)
Recovery (p. 440)
Jump starting using another battery(p. 431)
Selecting ignition mode (p. 396)
Transmission (p. 406)
Page 447 of 661
STARTING AND DRIVING
}}
* Option/accessory.445
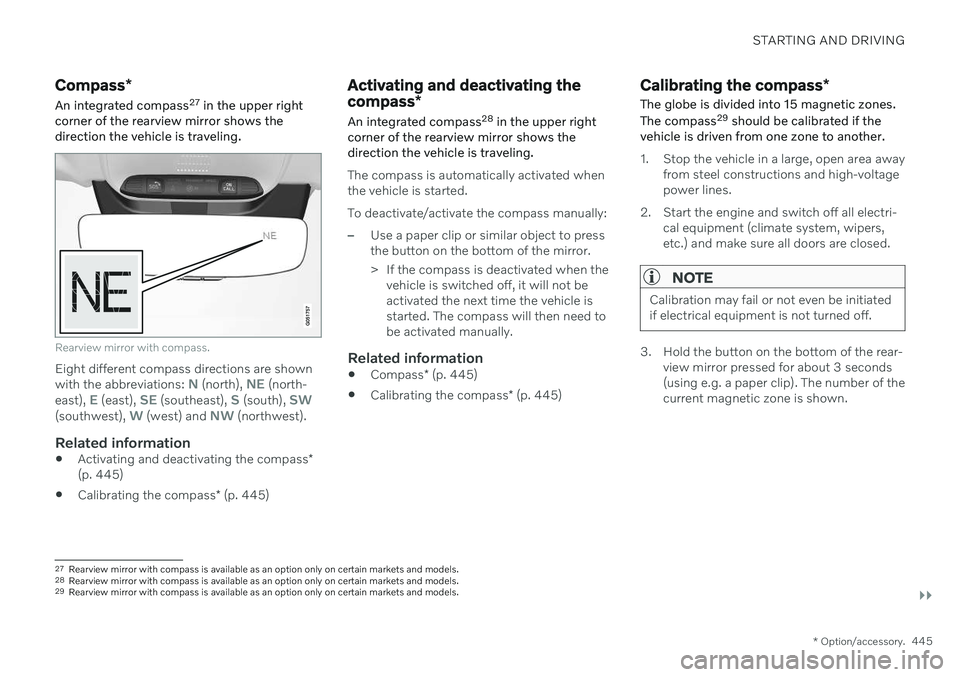
Compass*
An integrated compass 27
in the upper right
corner of the rearview mirror shows the direction the vehicle is traveling.
Rearview mirror with compass.
Eight different compass directions are shown with the abbreviations: N (north), NE (north-
east), E (east), SE (southeast), S (south), SW(southwest), W (west) and NW (northwest).
Related information
Activating and deactivating the compass
*
(p. 445)
Calibrating the compass
* (p. 445)
Activating and deactivating the compass *
An integrated compass 28
in the upper right
corner of the rearview mirror shows the direction the vehicle is traveling.
The compass is automatically activated when the vehicle is started. To deactivate/activate the compass manually:
–Use a paper clip or similar object to press the button on the bottom of the mirror.
> If the compass is deactivated when the vehicle is switched off, it will not be activated the next time the vehicle isstarted. The compass will then need tobe activated manually.
Related information
Compass
* (p. 445)
Calibrating the compass
* (p. 445)
Calibrating the compass *
The globe is divided into 15 magnetic zones. The compass 29
should be calibrated if the
vehicle is driven from one zone to another.
1. Stop the vehicle in a large, open area away from steel constructions and high-voltage power lines.
2. Start the engine and switch off all electri- cal equipment (climate system, wipers,etc.) and make sure all doors are closed.
NOTE
Calibration may fail or not even be initiated if electrical equipment is not turned off.
3. Hold the button on the bottom of the rear-view mirror pressed for about 3 seconds (using e.g. a paper clip). The number of thecurrent magnetic zone is shown.
27Rearview mirror with compass is available as an option only on certain markets and models.
28 Rearview mirror with compass is available as an option only on certain markets and models.
29 Rearview mirror with compass is available as an option only on certain markets and models.