ECU VOLVO V60 TWIN ENGINE 2020 User Guide
[x] Cancel search | Manufacturer: VOLVO, Model Year: 2020, Model line: V60 TWIN ENGINE, Model: VOLVO V60 TWIN ENGINE 2020Pages: 673, PDF Size: 14.2 MB
Page 73 of 673
SAFETY
71
NOTE
The locking retractor will automatically release when the seat belt is unbuckledand allowed to retract fully.
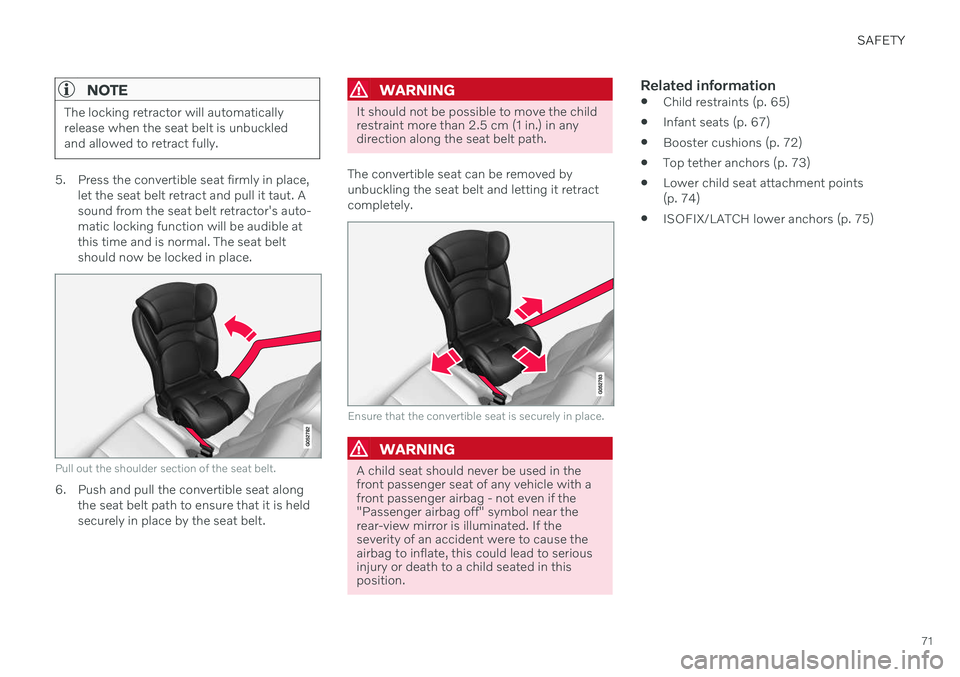
5. Press the convertible seat firmly in place,let the seat belt retract and pull it taut. A sound from the seat belt retractor's auto-matic locking function will be audible atthis time and is normal. The seat beltshould now be locked in place.
Pull out the shoulder section of the seat belt.
6. Push and pull the convertible seat alongthe seat belt path to ensure that it is held securely in place by the seat belt.
WARNING
It should not be possible to move the child restraint more than 2.5 cm (1 in.) in anydirection along the seat belt path.
The convertible seat can be removed by unbuckling the seat belt and letting it retractcompletely.
Ensure that the convertible seat is securely in place.
WARNING
A child seat should never be used in the front passenger seat of any vehicle with afront passenger airbag - not even if the"Passenger airbag off" symbol near therear-view mirror is illuminated. If theseverity of an accident were to cause theairbag to inflate, this could lead to seriousinjury or death to a child seated in thisposition.
Related information
Child restraints (p. 65)
Infant seats (p. 67)
Booster cushions (p. 72)
Top tether anchors (p. 73)
Lower child seat attachment points (p. 74)
ISOFIX/LATCH lower anchors (p. 75)
Page 74 of 673
SAFETY
72
Booster cushionsSuitable child restraints should always be used when children (depending on their age/size) are seated in the vehicle.
Securing a booster cushion
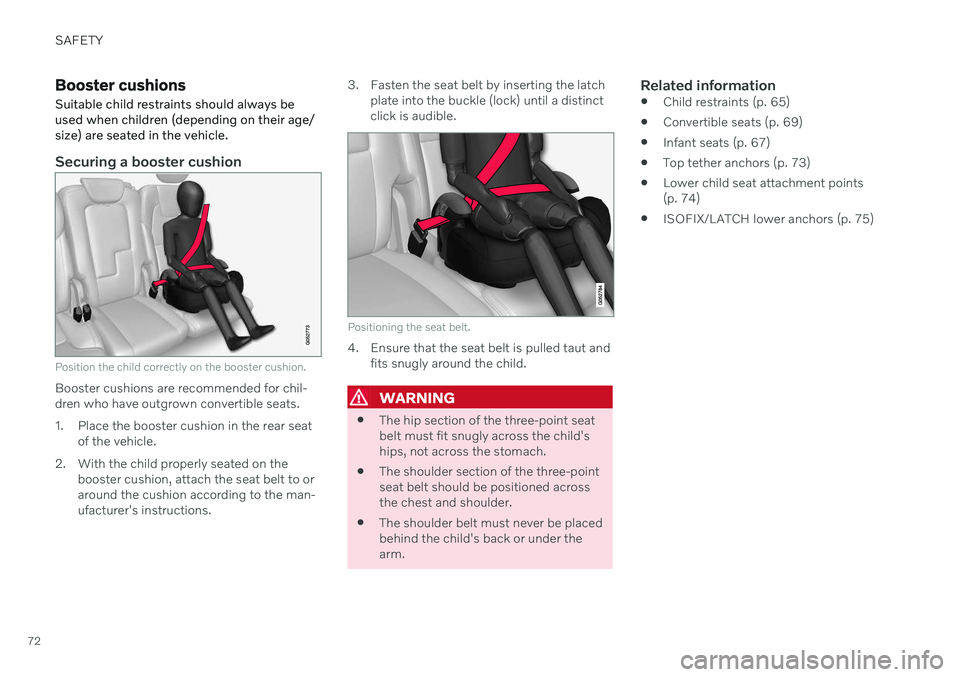
Position the child correctly on the booster cushion.
Booster cushions are recommended for chil- dren who have outgrown convertible seats.
1. Place the booster cushion in the rear seat of the vehicle.
2. With the child properly seated on the booster cushion, attach the seat belt to or around the cushion according to the man-ufacturer's instructions. 3. Fasten the seat belt by inserting the latch
plate into the buckle (lock) until a distinctclick is audible.
Positioning the seat belt.
4. Ensure that the seat belt is pulled taut andfits snugly around the child.
WARNING
The hip section of the three-point seat belt must fit snugly across the child'ships, not across the stomach.
The shoulder section of the three-pointseat belt should be positioned acrossthe chest and shoulder.
The shoulder belt must never be placedbehind the child's back or under thearm.
Related information
Child restraints (p. 65)
Convertible seats (p. 69)
Infant seats (p. 67)
Top tether anchors (p. 73)
Lower child seat attachment points(p. 74)
ISOFIX/LATCH lower anchors (p. 75)
Page 75 of 673

SAFETY
}}
73
Top tether anchors
Your Volvo is equipped with child restraint top tether anchorages for all three seatingpositions in the rear seat. They are located onthe rear side of the backrests.
Child restraint anchorages
Top tether anchors and symbols on the rear side of the rear seat backrests. There is no symbol for thecenter anchor position.
Securing a child seat
1. Place the child restraint on the rear seat.
2. Route the top tether strap under the head restraint and attach it to the anchor. 3. Attach the strap for the lower tether
anchors in the lower ISOFIX/LATCH attachment points. If the child restraint isnot equipped with straps for the lowertether anchors, or if the child restraint isused on the center seating position, followthe instructions for attaching a childrestraint using the automatic locking seatbelt.
4. Firmly tension all straps. Refer also to the child seat manufacturer's instructions for information on securing thechild seat.
NOTE
If the vehicle is equipped with a cargo compartment cover, this must be removedbefore a child seat can be attached in thetether anchors.
WARNING
Always refer to the recommendations made by the child restraint manufac-turer.
Volvo recommends that the top tetheranchors be used when installing a for-ward-facing child restraint.
Never route a top tether strap over thetop of the head restraint. The strapshould be routed beneath the headrestraint.
Child restraint anchorages aredesigned to withstand only those loadsimposed by correctly fitted childrestraints. Under no circumstances arethey to be used for adult seat belts orharnesses. The anchorages are not ableto withstand excessive forces on themin the event of collision if full harnessseat belts or adult seat belts are instal-led to them. An adult who uses a beltanchored in a child restraint anchorageruns a great risk of suffering severeinjuries should a collision occur.
Do not install rear speakers that requirethe removal of the top tether anchorsor interfere with the proper use of thetop tether strap.
Page 77 of 673
SAFETY
}}
75
ISOFIX/LATCH lower anchors
Lower anchors for ISOFIX/LATCH-equipped child seats are located in the rear, outboard seats, hidden below the backrest cushions.
Using the ISOFIX/LATCH lower child seat anchors
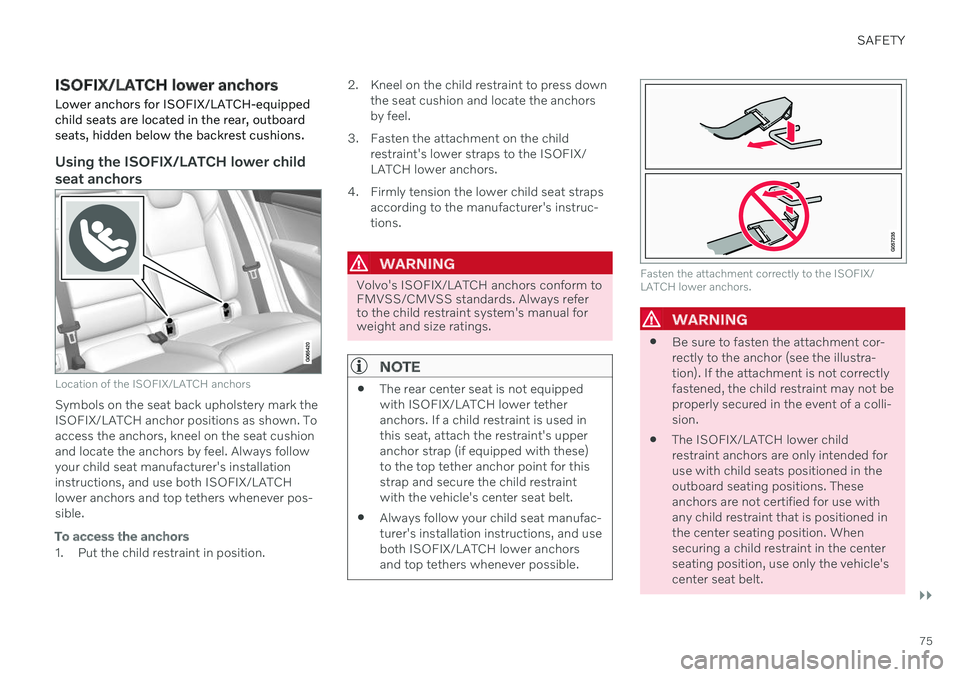
Location of the ISOFIX/LATCH anchors
Symbols on the seat back upholstery mark the ISOFIX/LATCH anchor positions as shown. Toaccess the anchors, kneel on the seat cushionand locate the anchors by feel. Always followyour child seat manufacturer's installationinstructions, and use both ISOFIX/LATCHlower anchors and top tethers whenever pos-sible.
To access the anchors
1. Put the child restraint in position. 2. Kneel on the child restraint to press down
the seat cushion and locate the anchors by feel.
3. Fasten the attachment on the child restraint's lower straps to the ISOFIX/LATCH lower anchors.
4. Firmly tension the lower child seat straps according to the manufacturer's instruc-tions.
WARNING
Volvo's ISOFIX/LATCH anchors conform to FMVSS/CMVSS standards. Always referto the child restraint system's manual forweight and size ratings.
NOTE
The rear center seat is not equipped with ISOFIX/LATCH lower tetheranchors. If a child restraint is used inthis seat, attach the restraint's upperanchor strap (if equipped with these)to the top tether anchor point for thisstrap and secure the child restraintwith the vehicle's center seat belt.
Always follow your child seat manufac-turer's installation instructions, and useboth ISOFIX/LATCH lower anchorsand top tethers whenever possible.
Fasten the attachment correctly to the ISOFIX/ LATCH lower anchors.
WARNING
Be sure to fasten the attachment cor- rectly to the anchor (see the illustra-tion). If the attachment is not correctlyfastened, the child restraint may not beproperly secured in the event of a colli-sion.
The ISOFIX/LATCH lower childrestraint anchors are only intended foruse with child seats positioned in theoutboard seating positions. Theseanchors are not certified for use withany child restraint that is positioned inthe center seating position. Whensecuring a child restraint in the centerseating position, use only the vehicle'scenter seat belt.
Page 97 of 673

DISPLAYS AND VOICE CONTROL
}}
95
Symbol Meaning
Collision risk City Safety warns the driver if there is a risk of a collision withanother vehicle, pedestrian,cyclist or large animal.
System error This symbol illuminates during driving if a fault is detected in thedrive system. An explanatorymessage will be simultaneouslydisplayed in the instrumentpanel.
High engine temperature The symbol will illuminate while driving when the engine tem-perature is too high. An explana-tory message will be simultane-ously displayed in the instrumentpanel.
ACanadian models.
B US models.
Related information
Indicator symbols in the instrument panel (p. 91)
Instrument panel (p. 80)
Instrument panel licenses
A license is an agreement on the right to con- duct a certain activity or the right to usesomeone else's right according to terms andconditions specified in the agreement. Thefollowing text is Volvo's agreement with themanufacturer or developer.
Boost Software License 1.0
Permission is hereby granted, free of charge, to any person or organization obtaining a copyof the software and accompanyingdocumentation covered by this license (the"Software") to use, reproduce, display,distribute, execute, and transmit the Software,and to prepare derivative works of theSoftware, and to permit third-parties to whomthe Software is furnished to do so, all subjectto the following: The copyright notices in theSoftware and this entire statement, includingthe above license grant, this restriction andthe following disclaimer, must be included inall copies of the Software, in whole or in part,and all derivative works of the Software,unless such copies or derivative works aresolely in the form of machine-executableobject code generated by a source languageprocessor. THE SOFTWARE IS PROVIDED "AS IS", WITHOUT WARRANTY OF ANY KIND,EXPRESS OR IMPLIED, INCLUDING BUTNOT LIMITED TO THE WARRANTIES OFMERCHANTABILITY, FITNESS FOR A PARTICULAR PURPOSE, TITLE AND NON-INFRINGEMENT. IN NO EVENT SHALL THECOPYRIGHT HOLDERS OR ANYONEDISTRIBUTING THE SOFTWARE BE LIABLEFOR ANY DAMAGES OR OTHER LIABILITY,WHETHER IN CONTRACT, TORT OROTHERWISE, ARISING FROM, OUT OF ORIN CONNECTION WITH THE SOFTWARE ORTHE USE OR OTHER DEALINGS IN THESOFTWARE.
Page 99 of 673

DISPLAYS AND VOICE CONTROL
}}
97
BSD 2-clause “Simplified” license
Copyright (c)
reserved. Redistribution and use in source and binary forms, with or without modification, arepermitted provided that the followingconditions are met:
1. Redistributions of source code must retain the above copyright notice, this list of conditions and the following disclaimer.
2. Redistributions in binary form must reproduce the above copyright notice, thislist of conditions and the followingdisclaimer in the documentation and/orother materials provided with thedistribution.
THIS SOFTWARE IS PROVIDED BY THECOPYRIGHT HOLDERS ANDCONTRIBUTORS "AS IS" AND ANY EXPRESS OR IMPLIED WARRANTIES, INCLUDING, BUT NOT LIMITED TO, THE IMPLIED WARRANTIES OF MERCHANTABILITY AND FITNESS FOR APARTICULAR PURPOSE ARE DISCLAIMED. IN NO EVENT SHALL THE COPYRIGHT OWNER OR CONTRIBUTORS BE LIABLEFOR ANY DIRECT, INDIRECT, INCIDENTAL,SPECIAL, EXEMPLARY, ORCONSEQUENTIAL DAMAGES (INCLUDING,BUT NOT LIMITED TO, PROCUREMENT OFSUBSTITUTE GOODS OR SERVICES; LOSS OF USE, DATA, OR PROFITS; OR BUSINESSINTERRUPTION) HOWEVER CAUSED ANDON ANY THEORY OF LIABILITY, WHETHERIN CONTRACT, STRICT LIABILITY, OR TORT(INCLUDING NEGLIGENCE OROTHERWISE) ARISING IN ANY WAY OUTOF THE USE OF THIS SOFTWARE, EVEN IFADVISED OF THE POSSIBILITY OF SUCHDAMAGE. The views and conclusions contained in the software and documentation are those of theauthors and should not be interpreted asrepresenting official policies, either expressedor implied, of the FreeBSD Project.
FreeType Project License
1. 1 Copyright 1996-1999 by David Turner,
Robert Wilhelm, and Werner Lemberg Introduction The FreeType Project isdistributed in several archive packages;some of them may contain, in addition tothe FreeType font engine, various toolsand contributions which rely on, or relateto, the FreeType Project. This licenseapplies to all files found in such packages,and which do not fall under their ownexplicit license. The license affects thusthe FreeType font engine, the testprograms, documentation and makefiles,at the very least. This license was inspiredby the BSD, Artistic, and IJG(Independent JPEG Group) licenses,which all encourage inclusion and use of free software in commercial and freewareproducts alike. As a consequence, its mainpoints are that: o We don't promise thatthis software works. However, we are beinterested in any kind of bug reports. (`asis' distribution) o You can use thissoftware for whatever you want, in partsor full form, without having to pay us.(`royalty-free' usage) o You may notpretend that you wrote this software. Ifyou use it, or only parts of it, in a program,you must acknowledge somewhere inyour documentation that you've used theFreeType code. (`credits') We specificallypermit and encourage the inclusion of thissoftware, with or without modifications, incommercial products, provided that allwarranty or liability claims are assumed bythe product vendor. Legal Terms 0.Definitions Throughout this license, theterms `package', `FreeType Project', and`FreeType archive' refer to the set of filesoriginally distributed by the authors (DavidTurner, Robert Wilhelm, and WernerLemberg) as the `FreeType project', bethey named as alpha, beta or final release.`You' refers to the licensee, or personusing the project, where `using' is ageneric term including compiling theproject's source code as well as linking itto form a `program' or `executable'. Thisprogram is referred to as `a program usingthe FreeType engine'. This license applies
Page 186 of 673

SEATS AND STEERING WHEEL
* Option/accessory.
184
Manual front seats
The front seats can be adjusted in a number of different ways to help enhance your seat-ing comfort.
Raise/lower the front edge of the seat cushion * by moving the control up/down. 1
Change the length of the seat cushion
* by
pulling up the lever and moving the cush- ion forward/backward.
Move the seat forward/backing by lifting the handle and moving the seat to a suita-ble distance from the steering wheel andpedals. Check to make sure the seat issecurely locked into place after its settinghas been changed.
Adjust lumbar support * by pressing the
button up/down/forward/rearward 2
.
Raise/lower the seat by moving the con- trol up/down.
Change the backrest tilt by turning the knob on the backrest.
WARNING
Do not adjust the seat while driving. The seat should be adjusted so that thebrake pedal can be depressed fully. Inaddition, position the seat as far rear-ward as comfort and control allow.
Check that the seat is securely lockedinto position after adjusting.
Related information
Power
* front seats (p. 185)
Adjusting the power
* front seats (p. 185)
Storing positions for seats, mirrors and head-up display
* (p. 186)
Using stored positions for seats, mirrorsand head-up display
* (p. 187)
Adjusting front seat massage settings
*
(p. 189)
Adjusting
* front seat cushion length
(p. 190)
Front seat massage
* settings (p. 188)
Adjusting front seat side bolster settings
*
(p. 191)
Adjusting front seat lumbar support
*
(p. 191)
Adjusting the passenger seat from thedriver's seat
* (p. 193)
1
Only applies to the driver's seat.
2 Applies for four-way lumbar support *. Two-way lumbar support * is adjusted forward/rearward.
Page 196 of 673
SEATS AND STEERING WHEEL
* Option/accessory.
194
Folding down the rear seat backrests The rear seat backrest is split into two sec- tions. The two sections can be folded forwardindividually.
WARNING
Adjust the seat and ensure it locks into position before driving. Use cautionwhen adjusting the seat. Uncontrolledor careless adjustments could lead toinjury.
Long objects must always be securelytied down to help prevent injury ordamage in the event of sudden brak-ing.
Always turn off the engine and applythe parking brake when loading orunloading the vehicle.
Put the gear selector in
P to help pre-
vent the gear selector from being inad-vertently moved.
CAUTION
When the backrest is folded down, make sure there are no objects in the rear seat,and the seat belts are not buckled. Other-wise there is a risk of damage to theupholstery.
CAUTION
The armrest * in the center seat must be
raised before the seat backrest is folded down. The ski hatch must be closed before the seat backrest is folded down.
NOTE
The front seats may need to be pushed for- ward and/or the backrest adjusted so thatthe rear seat backrests can be fully low-ered.
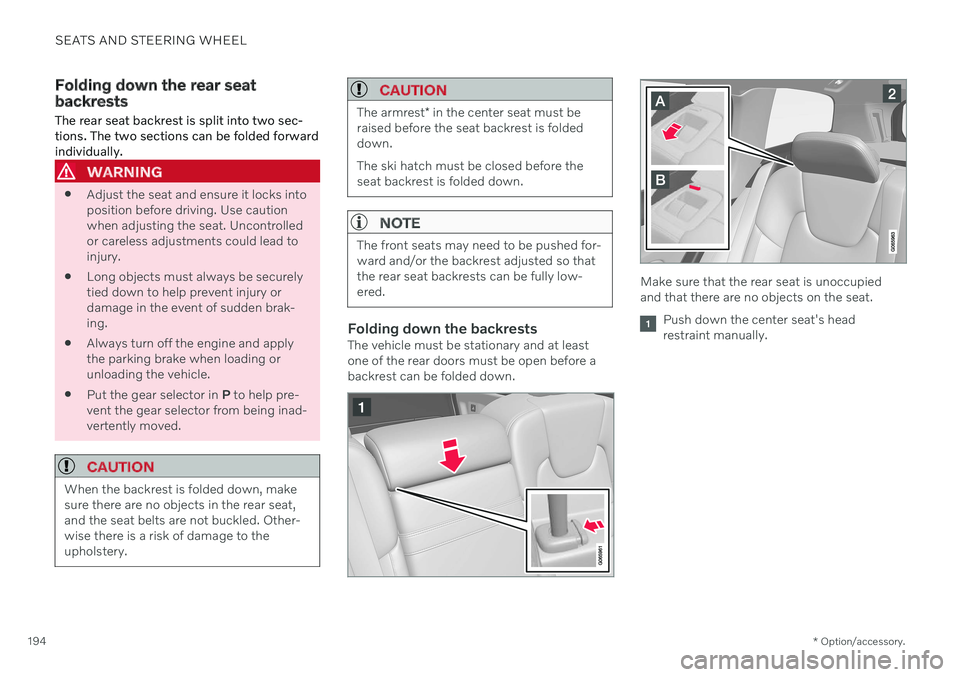
Folding down the backrestsThe vehicle must be stationary and at least one of the rear doors must be open before abackrest can be folded down.
Make sure that the rear seat is unoccupied and that there are no objects on the seat.
Push down the center seat's head restraint manually.
Page 197 of 673

SEATS AND STEERING WHEEL
}}
* Option/accessory.195
Pull up the handle on the backrest while folding down the backrest. The han- dle for the head restraint will be automati-cally pulled up when the backrest is low-ered. A red indicator light near the back- rest lock
indicates that the backrest is
no longer locked.
NOTE
When the backrest is folded down, the head restraint may come in contact withthe seat cushion of the seat being foldeddown. Adjust the head restraint of the seatbeing folded down to help prevent damageto the upholstery.
3. The backrest lock will release and the backrest will automatically fold down to the horizontal position.
Folding up the backrestTo fold up the backrest to the upright positionmanually:
1. Move the backrest upward/rearward.
2. Press the backrest until it locks into posi-tion.
3. Fold up the head restraints manually. 4. Adjust the center head restraint if neces-
sary.
WARNING
When the backrest is restored to an upright position, the red indicator shouldno longer be visible. If it is still visible, thebackrest is not locked in place.
WARNING
Make sure that the rear seat backrest and head restraint are locked securely in placeafter the seat is folded up. The head restraints at the outer seats must always be raised when there is a passengerin one of these spots of the rear seat.
Related information
Adjusting the rear seat head restraints (p. 195)
Private Locking (p. 261)
Activating and deactivating private locking(p. 262)
Adjusting the rear seat head restraints
Adjust the center head restraint in the rear seat to the seat occupant's height. Fold down the outboard head restraints * to improve rear
visibility.
Adjusting the center seat head restraint
The center head restraint should be adjusted to suit the passenger's height. The entire backof the head should be covered if possible.Manually move the restraint up or down asneeded.
Page 245 of 673
KEY, LOCKS AND ALARM
* Option/accessory.243
NOTE
Volvo recommends that you order a new or duplicate remote control key from anauthorized Volvo workshop. You can also obtain additional or duplicate remote control keys from certain independ-ent repair facilities and locksmiths that arequalified to make remote control keys.Each key must be programmed to workwith your vehicle. A list of independent repair facilities and/or locksmiths known to Volvo that can cutand code replacement keys can be found:
on Volvo's websitewww.volvocars.com/us
by calling Volvo Customer Care1-800-458-1552.
Related information
Remote key (p. 234)
Red Key - restricted remote key
*
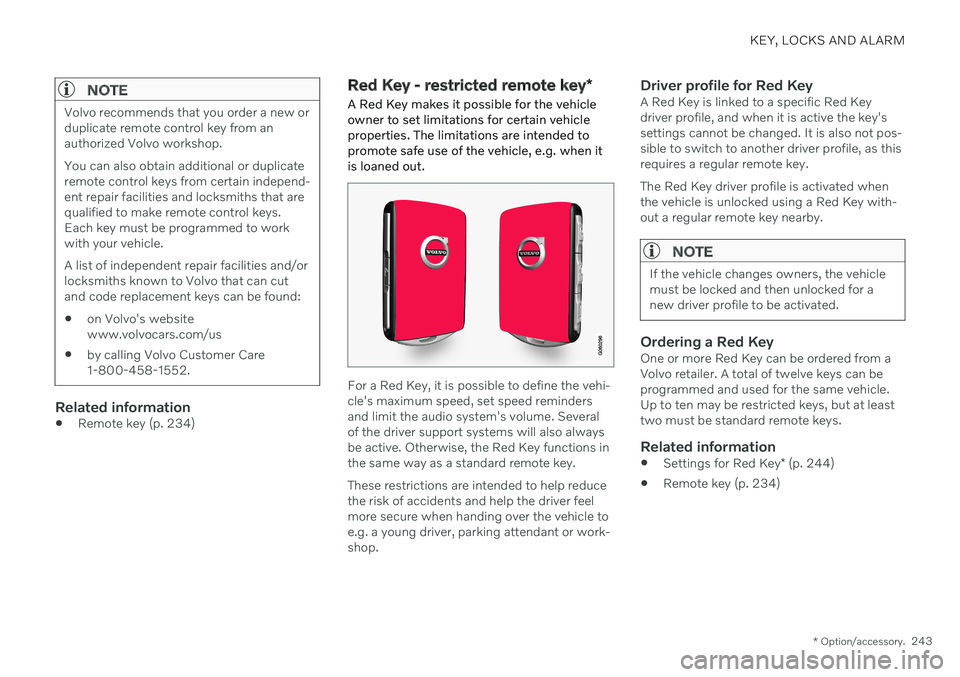
A Red Key makes it possible for the vehicle owner to set limitations for certain vehicleproperties. The limitations are intended topromote safe use of the vehicle, e.g. when itis loaned out.
For a Red Key, it is possible to define the vehi- cle's maximum speed, set speed remindersand limit the audio system's volume. Severalof the driver support systems will also alwaysbe active. Otherwise, the Red Key functions inthe same way as a standard remote key. These restrictions are intended to help reduce the risk of accidents and help the driver feelmore secure when handing over the vehicle toe.g. a young driver, parking attendant or work-shop.
Driver profile for Red KeyA Red Key is linked to a specific Red Keydriver profile, and when it is active the key'ssettings cannot be changed. It is also not pos-sible to switch to another driver profile, as thisrequires a regular remote key. The Red Key driver profile is activated when the vehicle is unlocked using a Red Key with-out a regular remote key nearby.
NOTE
If the vehicle changes owners, the vehicle must be locked and then unlocked for anew driver profile to be activated.
Ordering a Red KeyOne or more Red Key can be ordered from a Volvo retailer. A total of twelve keys can beprogrammed and used for the same vehicle.Up to ten may be restricted keys, but at leasttwo must be standard remote keys.
Related information
Settings for Red Key
* (p. 244)
Remote key (p. 234)