tow bar VOLVO V60 TWIN ENGINE 2020 Owners Manual
[x] Cancel search | Manufacturer: VOLVO, Model Year: 2020, Model line: V60 TWIN ENGINE, Model: VOLVO V60 TWIN ENGINE 2020Pages: 673, PDF Size: 14.2 MB
Page 272 of 673
||
DRIVER SUPPORT
* Option/accessory.
270 additional power from wheels that are not spinning. This function can also help prevent the wheels from spinning while the vehicle is accelerating.
Engine drag control
Engine drag control (EDC
3
) can help prevent
inadvertent wheel lock, e.g. after downshiftingor using engine braking when driving at lowspeeds on a slippery surface. Inadvertent wheel lock while driving could impair the driver's ability to steer the vehicle.
Trailer Stability Assist *4
Trailer Stability Assist (TSA
5
) is designed to
help stabilize a vehicle that is towing a trailer ifthe vehicle and trailer have begun to sway.
NOTE
Trailer Stability Assist is deactivated if ESC
Sport Mode is activated.
Related information
Driver support systems (p. 268)
Activating or deactivating Sport mode for Electronic Stability Control (p. 271)
Electronic Stability Control symbols andmessages (p. 272)
Trailer Stability Assist
* (p. 446)
Electronic Stability Control in sport mode The stability system (ESC 6
) is always acti-
vated and cannot be switched off. However, the driver can select
ESC Sport Mode,
which offers more active driving characteris- tics.
With the ESC Sport Mode sub-function
selected, intervention from the system is reduced and more lateral movement is permit-ted, giving the driver more control of the vehi-cle than usual. When
ESC Sport Mode is selected, the func-
tion may seem to be disabled even though it continues to assist the driver.
NOTE
When ESC Sport Mode is selected, the
trailer stabilizer (TSA 7
) is switched off.
ESC Sport Mode also helps provide more
traction, even if the vehicle gets stuck or is driving on a loose surface such as deep snowor loose sand.
3 Engine Drag Control4Trailer Stability Assist is included if the vehicle is equipped with a Volvo original towbar.5 Trailer Stability Assist
6 Electronic Stability Control
7 Trailer Stability Assist
Page 333 of 673
DRIVER SUPPORT
* Option/accessory.331
BLIS limitations
BLIS 67
functionality may be reduced in cer-
tain situations.
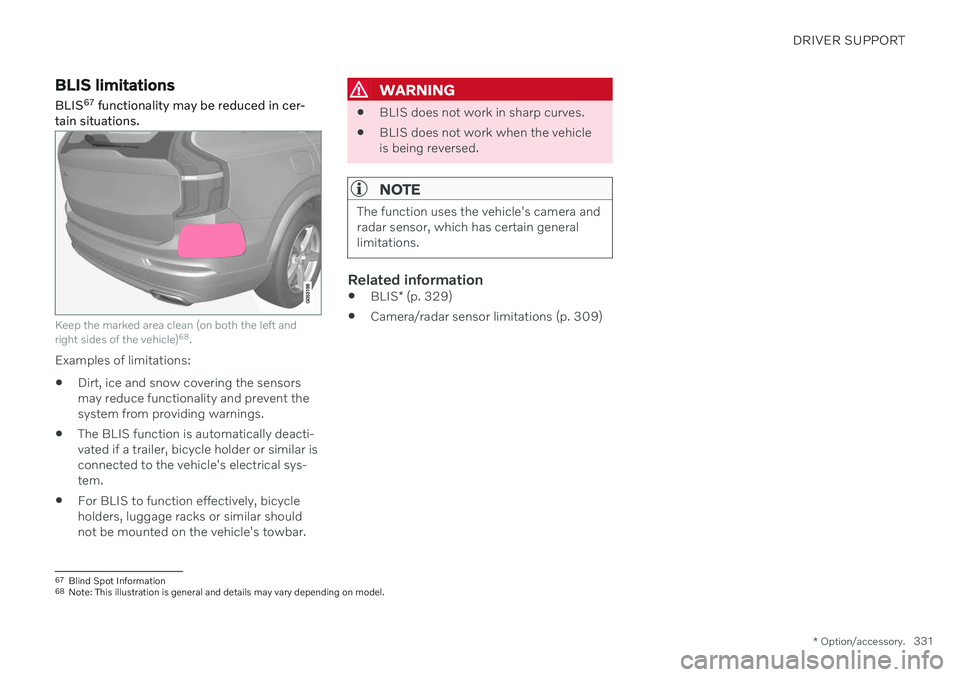
Keep the marked area clean (on both the left and right sides of the vehicle) 68
.
Examples of limitations:
Dirt, ice and snow covering the sensors may reduce functionality and prevent thesystem from providing warnings.
The BLIS function is automatically deacti-vated if a trailer, bicycle holder or similar isconnected to the vehicle's electrical sys-tem.
For BLIS to function effectively, bicycleholders, luggage racks or similar shouldnot be mounted on the vehicle's towbar.
WARNING
BLIS does not work in sharp curves.
BLIS does not work when the vehicle is being reversed.
NOTE
The function uses the vehicle's camera and radar sensor, which has certain generallimitations.
Related information
BLIS
* (p. 329)
Camera/radar sensor limitations (p. 309)
67
Blind Spot Information
68 Note: This illustration is general and details may vary depending on model.
Page 337 of 673
DRIVER SUPPORT
* Option/accessory.335
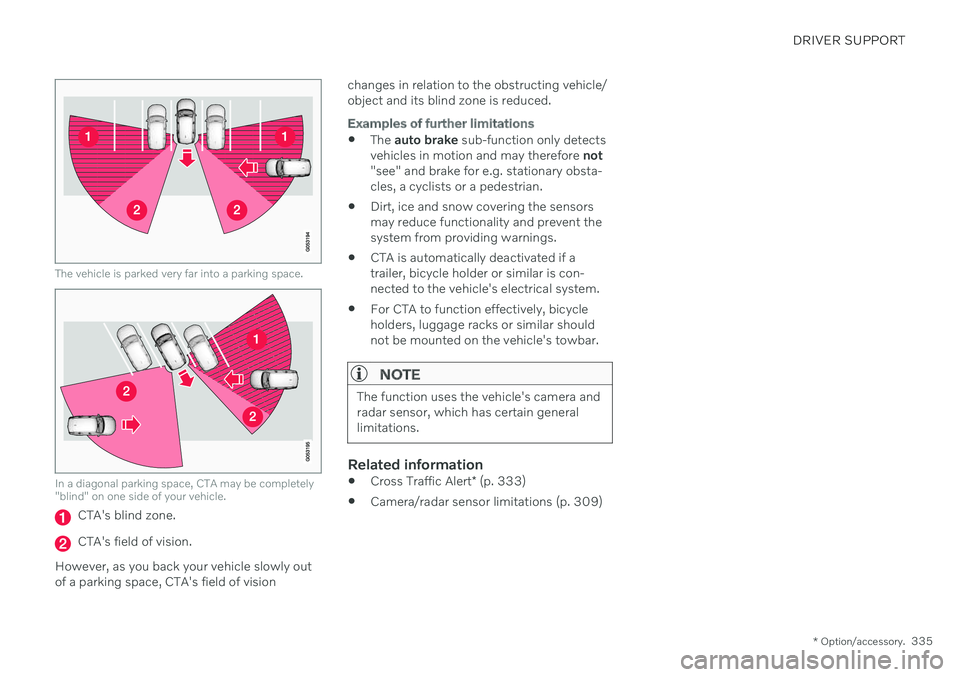
The vehicle is parked very far into a parking space.
In a diagonal parking space, CTA may be completely "blind" on one side of your vehicle.
CTA's blind zone.
CTA's field of vision.
However, as you back your vehicle slowly out of a parking space, CTA's field of vision changes in relation to the obstructing vehicle/object and its blind zone is reduced.
Examples of further limitations
The
auto brake sub-function only detects
vehicles in motion and may therefore not
"see" and brake for e.g. stationary obsta- cles, a cyclists or a pedestrian.
Dirt, ice and snow covering the sensorsmay reduce functionality and prevent thesystem from providing warnings.
CTA is automatically deactivated if atrailer, bicycle holder or similar is con-nected to the vehicle's electrical system.
For CTA to function effectively, bicycleholders, luggage racks or similar shouldnot be mounted on the vehicle's towbar.
NOTE
The function uses the vehicle's camera and radar sensor, which has certain generallimitations.
Related information
Cross Traffic Alert
* (p. 333)
Camera/radar sensor limitations (p. 309)
Page 364 of 673
DRIVER SUPPORT
* Option/accessory.
362
Park Assist Camera *
The Park Assist Camera can help provide the driver when maneuvering in tight spaces byalerting the driver to obstacles using thecamera screen and graphics in the center dis-play.
The Park Assist Camera is a support function that is automatically activated when reversegear is engaged. It can also be started man-ually from the center display.
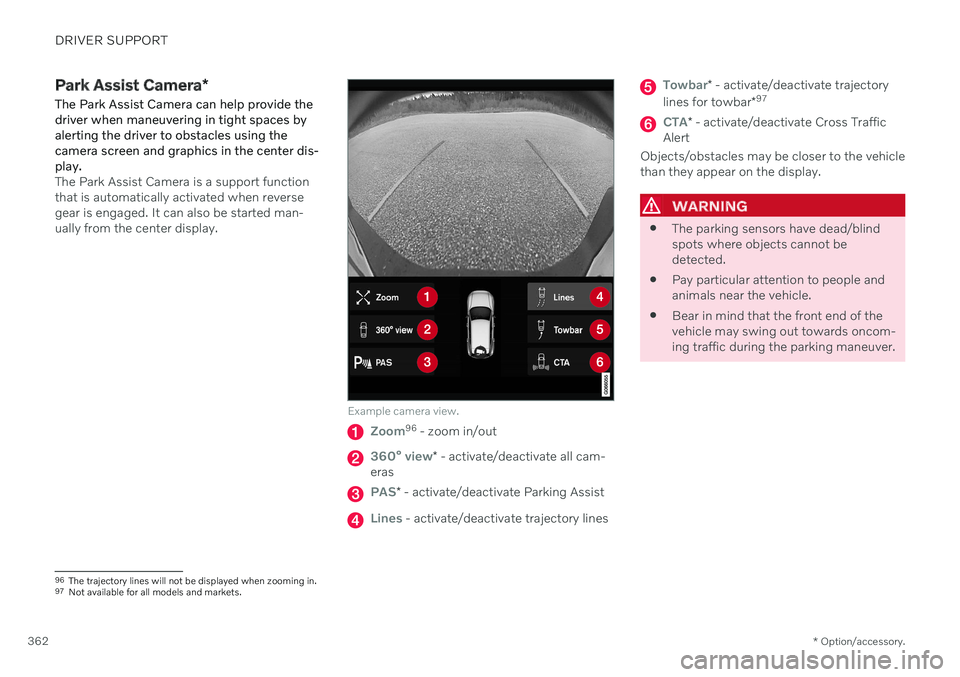
Example camera view.
Zoom96 - zoom in/out
360° view* - activate/deactivate all cam-
eras
PAS* - activate/deactivate Parking Assist
Lines - activate/deactivate trajectory lines
Towbar* - activate/deactivate trajectory
lines for towbar *97
CTA*
- activate/deactivate Cross Traffic
Alert
Objects/obstacles may be closer to the vehicle than they appear on the display.
WARNING
The parking sensors have dead/blind spots where objects cannot bedetected.
Pay particular attention to people andanimals near the vehicle.
Bear in mind that the front end of thevehicle may swing out towards oncom-ing traffic during the parking maneuver.
96
The trajectory lines will not be displayed when zooming in.
97 Not available for all models and markets.
Page 366 of 673
||
DRIVER SUPPORT
* Option/accessory.
364
360° view *
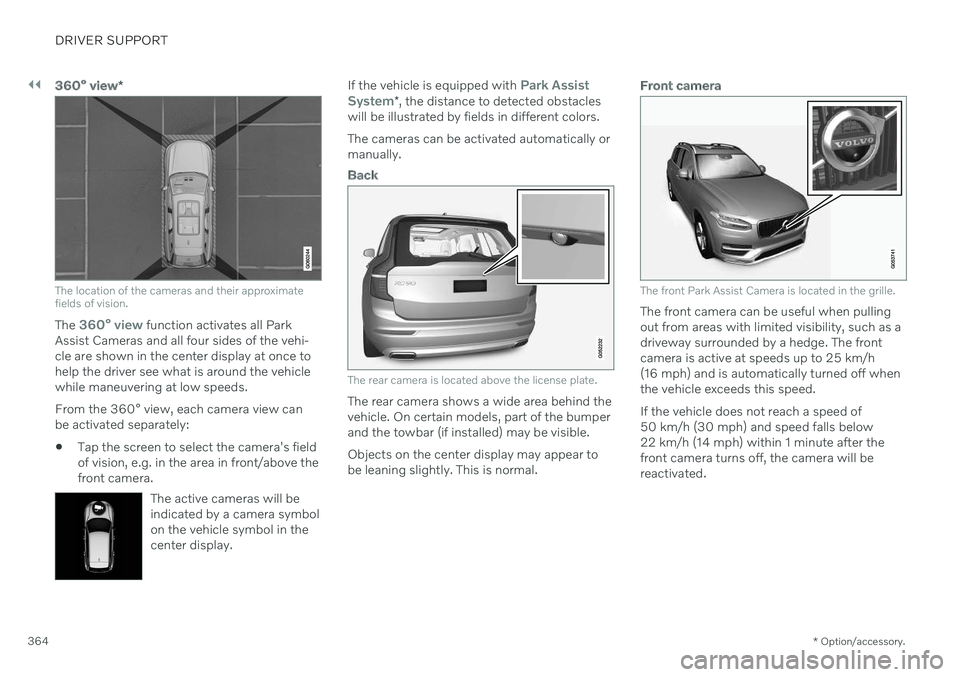
The location of the cameras and their approximate fields of vision.
The 360° view function activates all Park
Assist Cameras and all four sides of the vehi- cle are shown in the center display at once tohelp the driver see what is around the vehiclewhile maneuvering at low speeds. From the 360° view, each camera view can be activated separately:
Tap the screen to select the camera's fieldof vision, e.g. in the area in front/above thefront camera.
The active cameras will beindicated by a camera symbolon the vehicle symbol in thecenter display.
If the vehicle is equipped with Park Assist
System* , the distance to detected obstacles
will be illustrated by fields in different colors. The cameras can be activated automatically or manually.
Back
The rear camera is located above the license plate.
The rear camera shows a wide area behind the vehicle. On certain models, part of the bumperand the towbar (if installed) may be visible. Objects on the center display may appear to be leaning slightly. This is normal.
Front camera
The front Park Assist Camera is located in the grille.
The front camera can be useful when pulling out from areas with limited visibility, such as adriveway surrounded by a hedge. The frontcamera is active at speeds up to 25 km/h(16 mph) and is automatically turned off whenthe vehicle exceeds this speed. If the vehicle does not reach a speed of 50 km/h (30 mph) and speed falls below22 km/h (14 mph) within 1 minute after thefront camera turns off, the camera will bereactivated.
Page 367 of 673
DRIVER SUPPORT
}}
* Option/accessory.365
Side cameras
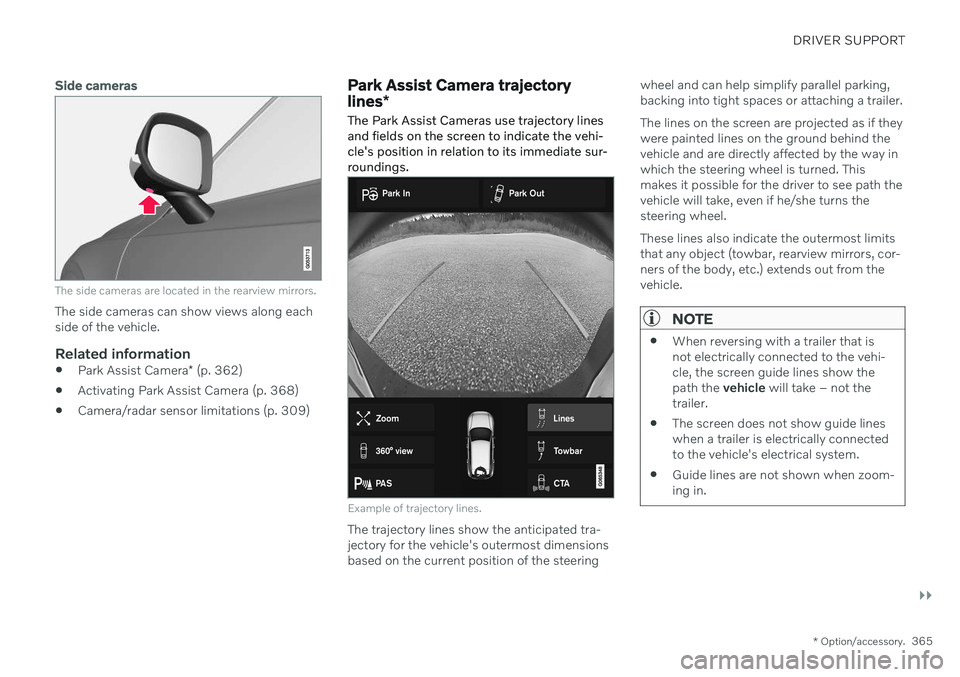
The side cameras are located in the rearview mirrors.
The side cameras can show views along each side of the vehicle.
Related information
Park Assist Camera
* (p. 362)
Activating Park Assist Camera (p. 368)
Camera/radar sensor limitations (p. 309)
Park Assist Camera trajectory lines
*
The Park Assist Cameras use trajectory lines and fields on the screen to indicate the vehi-cle's position in relation to its immediate sur-roundings.
Example of trajectory lines.
The trajectory lines show the anticipated tra- jectory for the vehicle's outermost dimensionsbased on the current position of the steering wheel and can help simplify parallel parking,backing into tight spaces or attaching a trailer. The lines on the screen are projected as if they were painted lines on the ground behind thevehicle and are directly affected by the way inwhich the steering wheel is turned. Thismakes it possible for the driver to see path thevehicle will take, even if he/she turns thesteering wheel. These lines also indicate the outermost limits that any object (towbar, rearview mirrors, cor-ners of the body, etc.) extends out from thevehicle.
NOTE
When reversing with a trailer that is not electrically connected to the vehi-cle, the screen guide lines show thepath the
vehicle will take – not the
trailer.
The screen does not show guide lineswhen a trailer is electrically connectedto the vehicle's electrical system.
Guide lines are not shown when zoom-ing in.
Page 368 of 673
||
DRIVER SUPPORT
* Option/accessory.
366
CAUTION
Bear in mind that when the rearward camera view is selected, the screenonly shows the area behind the vehicle– pay attention to the sides and frontof the vehicle when steering whilereversing.
The same applies to the reverse – payattention to what is happening withthe rear parts of the vehicle when thefront camera view is selected.
Note that the guide lines show theshortest
path – pay extra attention to
ensure that the vehicle sides do notcome in contact with/travel over any-thing when steering while driving for-ward or that the vehicle front movestoward/over anything when steeringwhile reversing.
Trajectory lines in 360° view *
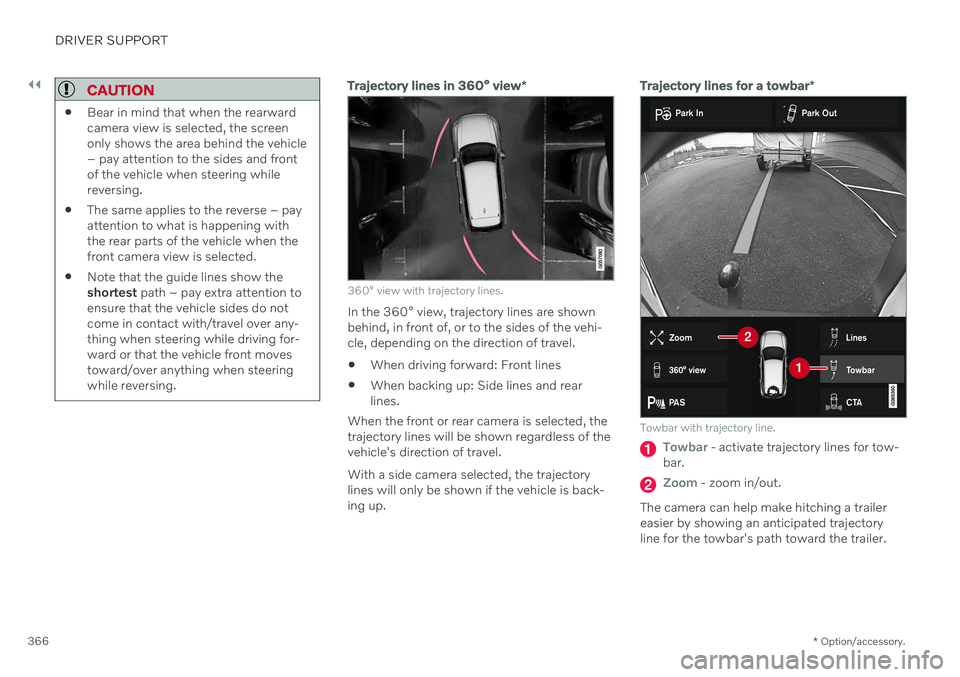
360° view with trajectory lines.
In the 360° view, trajectory lines are shown behind, in front of, or to the sides of the vehi-cle, depending on the direction of travel. When driving forward: Front lines
When backing up: Side lines and rear lines.
When the front or rear camera is selected, thetrajectory lines will be shown regardless of thevehicle's direction of travel. With a side camera selected, the trajectory lines will only be shown if the vehicle is back-ing up.
Trajectory lines for a towbar *
Towbar with trajectory line.
Towbar - activate trajectory lines for tow-
bar.
Zoom - zoom in/out.
The camera can help make hitching a trailer easier by showing an anticipated trajectoryline for the towbar's path toward the trailer.
Page 369 of 673
DRIVER SUPPORT
}}
* Option/accessory.367
1.
Tap
Towbar (1).
> The trajectory line for the towbar's anticipated path toward the vehicle will appear and the vehicle's trajectory lineswill disappear. Trajectory lines cannot be displayed for both the vehicle and the towbar at thesame time.
2. Tap
Zoom (2) for a close-up view for more
precise maneuvering.
> The camera will zoom in.
Related information
Park Assist Camera
* (p. 362)
Location and field of vision of Park Assist Cameras
* (p. 363)
Camera/radar sensor limitations (p. 309)
Park Assist sensor field
If the vehicle is equipped with Park Assist *,
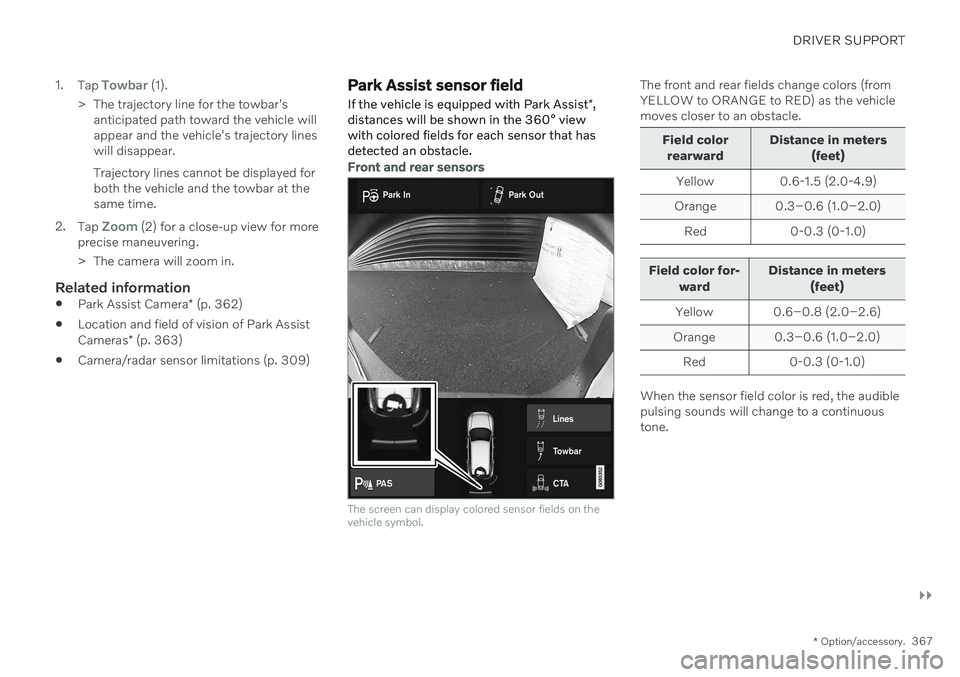
distances will be shown in the 360° view with colored fields for each sensor that hasdetected an obstacle.
Front and rear sensors
The screen can display colored sensor fields on the vehicle symbol.
The front and rear fields change colors (from YELLOW to ORANGE to RED) as the vehiclemoves closer to an obstacle.
Field color
rearward Distance in meters
(feet)
Yellow 0.6-1.5 (2.0-4.9)
Orange 0.3–0.6 (1.0–2.0) Red 0-0.3 (0-1.0)
Field color for- ward Distance in meters
(feet)
Yellow 0.6–0.8 (2.0–2.6)
Orange 0.3–0.6 (1.0–2.0)
Red 0-0.3 (0-1.0)
When the sensor field color is red, the audible pulsing sounds will change to a continuoustone.
Page 446 of 673
||
STARTING AND DRIVING
444
medical help immediately if eyes are affected.
Never expose the battery to open flameor electric spark. Do not smoke nearthe battery. Failure to follow theinstructions for jump starting can leadto injury.
NOTE
The vehicle cannot be started if the hybrid battery is discharged.
Related information
Starting the vehicle (p. 400)
Ignition modes (p. 403)
Adjusting the steering wheel (p. 197)
Selecting ignition mode (p. 404)
Driving with a trailer
There are a number of things to consider when towing a trailer, such as the towbar, thetrailer and how the load is distributed in thetrailer.
Load-carrying capacity is determined by the vehicle's curb weight. The total weight of allpassengers and any installed accessories, e.g.towbar, reduces the vehicle's load-carryingcapacity by the corresponding amount.
Towbars used on the vehicle must beapproved for the applicable use.
Distribute the load on the trailer so thatthe weight on the towbar complies withthe specified maximum towball weight.The tongue weight is calculated as part ofthe vehicle's payload.
Increase the tire pressure to the recom-mended pressure for a full load.
The engine is subjected to more load thanusual when towing a trailer.
Towing a trailer affects the vehicle's han-dling, durability and driving economy.
Do not drive with a heavy trailer when thevehicle is very new. Wait until the mileagehas reached at least 1000 km (620 miles).
On long and steep downgrades, the vehi-cle's brakes are subjected to much moreload than usual. When manually shifting, downshift and adapt speed accordingly.
Follow applicable regulations regarding permitted speed and weight.
Drive slowly when towing a trailer up along and steep incline.
The maximum trailer weights given onlyapply to altitudes up to 1000 meters(3280 feet) above sea level. At higher alti-tudes, engine power (and thus the vehi-cle's climbing ability) is decreased due tothe reduced air density, and the maximumtrailer weight must therefore be reduced.The weight of the vehicle and trailer mustbe decreased by 10% for each additional1000 m (3280 feet) or part thereof.
Avoid driving with a trailer on inclines ofmore than 12%.
Avoid overloading and other incorrect use.
The trailer's brakes must be balanced withthe vehicle's brakes to help ensure safestops (follow applicable local regulations).
Page 450 of 673
||
STARTING AND DRIVING
* Option/accessory.
448
Checking trailer lights *
Automatic check
When the trailer has been connected to the vehicle's electrical system, its lights can bechecked by automatically activating them.This function helps the driver check that thetrailer's lights are functioning correctly beforestarting to drive. In order to perform this check, the vehicle must be switched off.
1. When a trailer is connected to the towbar,
the message
Automatic Trailer Lamp
Check will appear in the instrument panel.
2. Acknowledge the message by pressing the O button on the right-side steering
wheel keypad.
> The light check will begin.
3. Get out of the vehicle to perform the check.
> All of the lights on the trailer will beginflashing, and then illuminate separately one at a time.
4. Visually check that all of the trailer's lights are functioning correctly.
5. After a short time, all of the trailer's lights will start flashing again.
> The light check is completed.
Disabling the automatic check
The automatic light check can be disabled in the center display. 1.Tap
Settings in the Top view.
2. Tap
My CarLights and Lighting.
3. Deselect
Automatic Trailer Lamp
Check.
Manual check
If the automatic check has been disabled, the check can be started manually. 1. Tap
Settings in the Top view.
2. Tap
My CarLights and Lighting.
3. Select
Manual Trailer Lamp Check.
> The light check will begin. Get out of the vehicle to perform the check.
Related information
Driving with a trailer (p. 444)
Towing using a towline
This section refers to one vehicle being towed behind another using a towline.
Never attempt to tow a Twin Engine vehicle behind another vehicle as this could damagethe electric motor. The vehicle must instead belifted onto a tow truck and transported with allfour wheels on the bed or lifting platform ofthe truck (no wheels may touch the road).
Towing another vehicleTowing another vehicle requires a lot of power - use the Constant AWD drive mode. This
helps charge the hybrid battery and improve the vehicle's driving and roadholding characte-ristics. Before towing another vehicle, check applica- ble speed limit regulations.
Jump startingNever attempt to tow the vehicle to start theengine, as this could damage the electricmotor. Use an auxiliary battery if the start bat-tery's charge level is so low that the enginecannot be started.
CAUTION
Attempts to tow-start the vehicle could cause damage to the electrical drive motorand three-way catalytic converter.