brake light VOLVO V90 2017 Owners Manual
[x] Cancel search | Manufacturer: VOLVO, Model Year: 2017, Model line: V90, Model: VOLVO V90 2017Pages: 594, PDF Size: 15.07 MB
Page 6 of 594

4
Adapting the beam pattern from the headlamps141
Front fog lamps/cornering lights *
142
Rear fog lamp 142
Brake lights 143
Hazard warning flashers 143
Using direction indicators 144
Passenger compartment lighting 145
Home safe light duration 148
Approach light duration 148
Using windscreen wipers 148
Activating/deactivating the rain sensor 149
Windscreen and headlamp washers 150
Rear window wiper and washer 151
Power windows 151
Operating power windows 152
Using the sun blind *
153
Adjusting the door mirrors 153
Interior rearview mirror 155
Compass *
156
Calibrating the compass *
157
Panorama roof *
158
Operating the panorama roof *
159
HomeLink ®
* 162
Programming HomeLink®
* 163
Trip computer 165
Show trip data in the driver display 166
Show trip statistics in the centre display 168
Settings view 169
Categories in the settings view 170
Changing system settings in the set- tings view 172
Resetting settings in the settings view 173
Driver profiles 174
Selecting driver profile 174
Editing a driver profile 175
Linking remote control key to driverprofile 176
Importing/exporting a driver profilefrom/to USB 177
Changing settings for apps 178
Resetting user data for change ofownership 179
CLIMATE CONTROL
Climate control
182
Climate control - sensors 183
Perceived temperature 183
Air quality 184
Passenger compartment filter 185
Clean Zone Interior Package *
185
Interior Air Quality System *
185
Climate controls 186
Climate controls in the centre display 187
Climate controls at the rear of the tunnel console * 188
Auto-regulating the climate 189
Activating/deactivating air conditioning 190
Regulating the temperature 190
Regulating the fan level 193
Activating/deactivating defrost of windows and door mirrors 194
Activating/deactivating air recirculation 196
Air distribution 197
Changing the air distribution 198
Opening/closing and aiming the air vents 199
Table of air distribution options 201
Activating/deactivating heating of the seats * 203
Activating/deactivating ventilation ofthe seats * 204
Page 10 of 594
8
STARTING AND DRIVING
Alcohol lock*
384
Bypass of the alcohol lock *
384
Before starting the engine with the alcohol lock 384
Ignition positions 385
Starting the car 386
Switching off the car 387
Steering lock 388
Using jump starting with another battery 388
Gearbox 389
Gear positions for automatic gearbox 390
Manual gearbox 392
Gear shift indicator *
392
Gear selector inhibitor 394
Changing gear with steering wheel paddles * 395
Start/Stop 396
Using the Start/Stop function 396
Conditions for the Start/Stop function 398
Drive modes *
400
Drive mode ECO 402
Level control * and shock absorption
405
All-wheel drive *
405
Brake functions 406
Foot brake 406
Emergency brake lights408
Brake assistance 408
Auto braking after a collision 408
Parking brake 409
Using the parking brake 410
In the event of a fault in the parking brake 411
Hill start assist 412
Automatic braking when stationary 412
Driving in water 413
Overheating in the engine and drivesystem 414
Overloading the starter battery 415
Preparations for a long trip 415
Winter driving 416
Opening/closing the fuel filler flapand refuelling 417
Handling of fuel 418
Petrol 419
Diesel 420
Empty tank and diesel engine 420
Diesel particulate filter 421
Economical driving 422
Towing bracket *
422
Extendable/retractable towing brackets *
423
Towing bracket specifications *
425
Driving with a trailer 426
Driving with a trailer under special conditions 428
Trailer Stability Assist *
428
Towing eye 430
Towing 431
Recovering the car 432
Page 71 of 594
SAFETY
}}
69
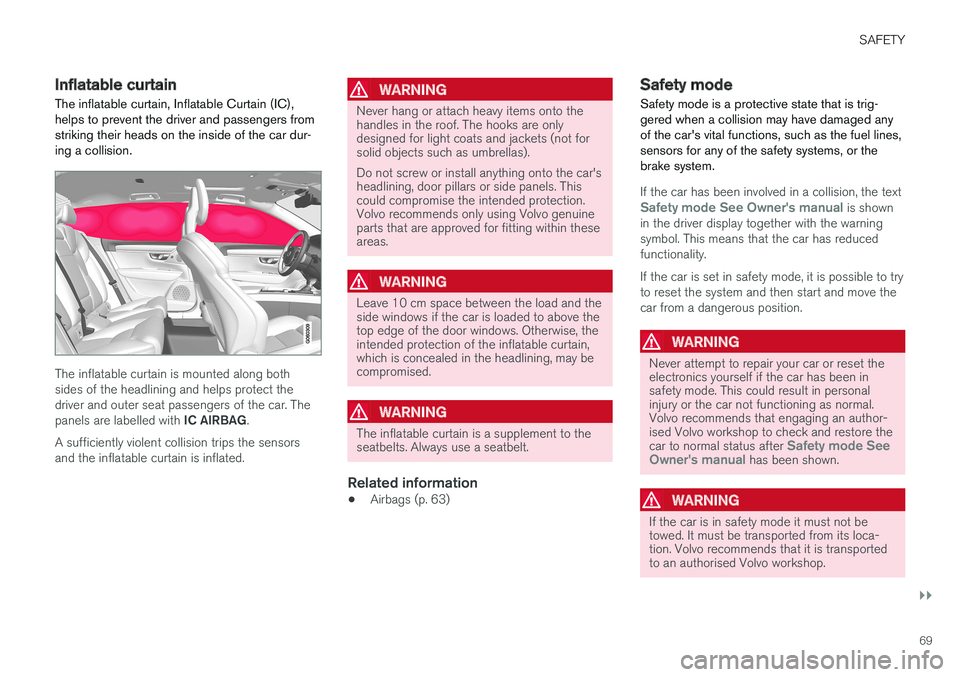
Inflatable curtain The inflatable curtain, Inflatable Curtain (IC), helps to prevent the driver and passengers fromstriking their heads on the inside of the car dur-ing a collision.
The inflatable curtain is mounted along both sides of the headlining and helps protect thedriver and outer seat passengers of the car. The panels are labelled with IC AIRBAG.
A sufficiently violent collision trips the sensors and the inflatable curtain is inflated.
WARNING
Never hang or attach heavy items onto the handles in the roof. The hooks are onlydesigned for light coats and jackets (not forsolid objects such as umbrellas). Do not screw or install anything onto the car's headlining, door pillars or side panels. Thiscould compromise the intended protection.Volvo recommends only using Volvo genuineparts that are approved for fitting within theseareas.
WARNING
Leave 10 cm space between the load and the side windows if the car is loaded to above thetop edge of the door windows. Otherwise, theintended protection of the inflatable curtain,which is concealed in the headlining, may becompromised.
WARNING
The inflatable curtain is a supplement to the seatbelts. Always use a seatbelt.
Related information
• Airbags (p. 63)
Safety mode Safety mode is a protective state that is trig- gered when a collision may have damaged anyof the car's vital functions, such as the fuel lines,sensors for any of the safety systems, or thebrake system.
If the car has been involved in a collision, the textSafety mode See Owner's manual is shown
in the driver display together with the warning symbol. This means that the car has reducedfunctionality. If the car is set in safety mode, it is possible to try to reset the system and then start and move thecar from a dangerous position.
WARNING
Never attempt to repair your car or reset the electronics yourself if the car has been insafety mode. This could result in personalinjury or the car not functioning as normal.Volvo recommends that engaging an author-ised Volvo workshop to check and restore the car to normal status after
Safety mode See
Owner's manual has been shown.
WARNING
If the car is in safety mode it must not be towed. It must be transported from its loca-tion. Volvo recommends that it is transportedto an authorised Volvo workshop.
Page 89 of 594
INSTRUMENTS AND CONTROLS
}}
* Option/accessory.87
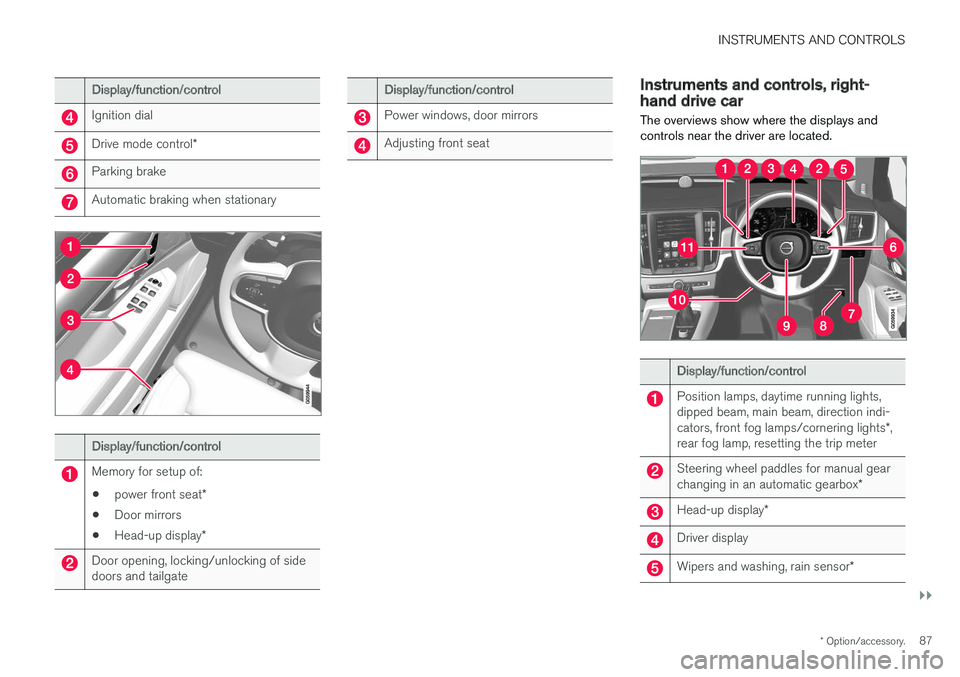
Display/function/control
Ignition dial
Drive mode control *
Parking brake
Automatic braking when stationary
Display/function/control
Memory for setup of:
• power front seat
*
• Door mirrors
• Head-up display
*
Door opening, locking/unlocking of side doors and tailgate
Display/function/control
Power windows, door mirrors
Adjusting front seat
Instruments and controls, right- hand drive car
The overviews show where the displays and controls near the driver are located.
Display/function/control
Position lamps, daytime running lights, dipped beam, main beam, direction indi- cators, front fog lamps/cornering lights *,
rear fog lamp, resetting the trip meter
Steering wheel paddles for manual gear changing in an automatic gearbox *
Head-up display*
Driver display
Wipers and washing, rain sensor *
Page 90 of 594
||
INSTRUMENTS AND CONTROLS
* Option/accessory.
88
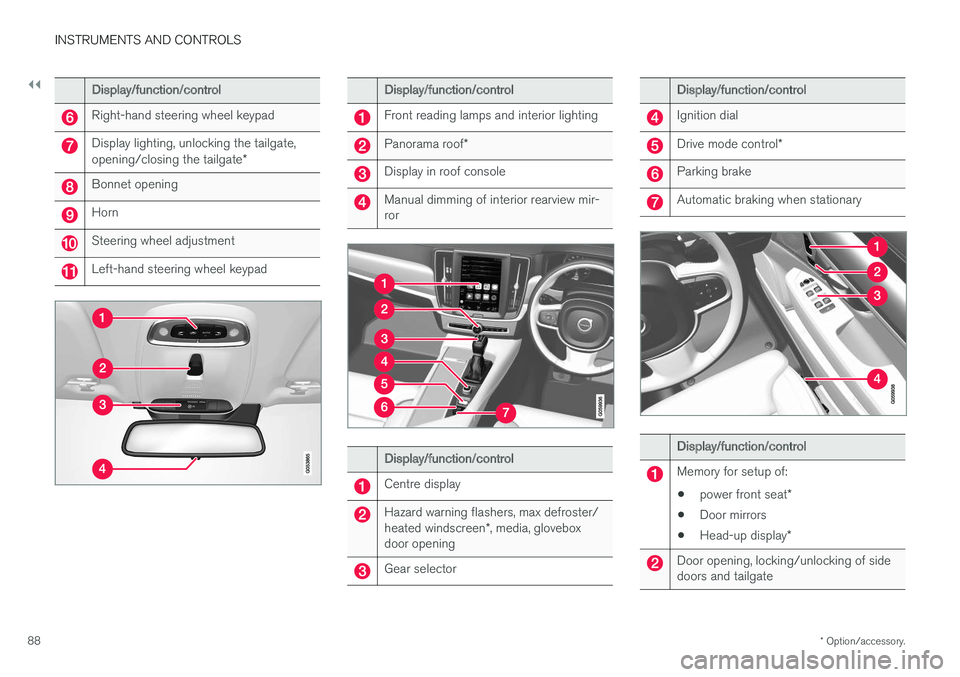
Display/function/control
Right-hand steering wheel keypad
Display lighting, unlocking the tailgate, opening/closing the tailgate *
Bonnet opening
Horn
Steering wheel adjustment
Left-hand steering wheel keypad
Display/function/control
Front reading lamps and interior lighting
Panorama roof*
Display in roof console
Manual dimming of interior rearview mir- ror
Display/function/control
Centre display
Hazard warning flashers, max defroster/ heated windscreen *, media, glovebox
door opening
Gear selector
Display/function/control
Ignition dial
Drive mode control *
Parking brake
Automatic braking when stationary
Display/function/control
Memory for setup of:
• power front seat
*
• Door mirrors
• Head-up display
*
Door opening, locking/unlocking of side doors and tailgate
Page 97 of 594
INSTRUMENTS AND CONTROLS
}}
95
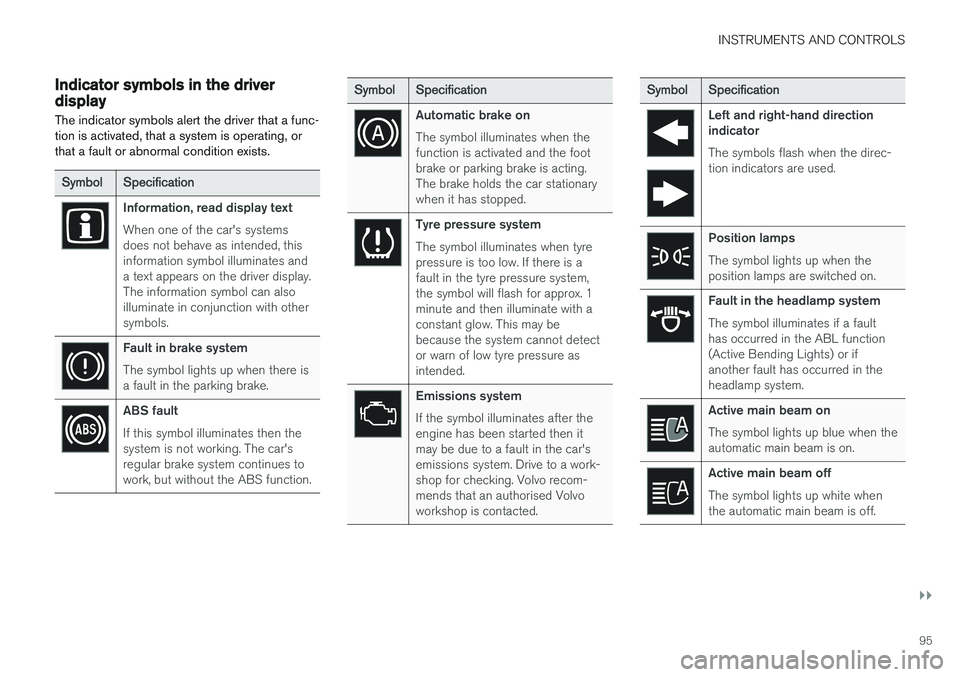
Indicator symbols in the driver display The indicator symbols alert the driver that a func- tion is activated, that a system is operating, orthat a fault or abnormal condition exists.
SymbolSpecification
Information, read display text When one of the car's systems does not behave as intended, thisinformation symbol illuminates anda text appears on the driver display.The information symbol can alsoilluminate in conjunction with othersymbols.
Fault in brake system The symbol lights up when there is a fault in the parking brake.
ABS fault If this symbol illuminates then the system is not working. The car'sregular brake system continues towork, but without the ABS function.
SymbolSpecification
Automatic brake on The symbol illuminates when the function is activated and the footbrake or parking brake is acting.The brake holds the car stationarywhen it has stopped.
Tyre pressure system The symbol illuminates when tyre pressure is too low. If there is afault in the tyre pressure system,the symbol will flash for approx. 1minute and then illuminate with aconstant glow. This may bebecause the system cannot detector warn of low tyre pressure asintended.
Emissions system If the symbol illuminates after the engine has been started then itmay be due to a fault in the car'semissions system. Drive to a work-shop for checking. Volvo recom-mends that an authorised Volvoworkshop is contacted.
Symbol Specification
Left and right-hand direction indicator The symbols flash when the direc- tion indicators are used.
Position lamps The symbol lights up when the position lamps are switched on.
Fault in the headlamp system The symbol illuminates if a fault has occurred in the ABL function(Active Bending Lights) or ifanother fault has occurred in theheadlamp system.
Active main beam on The symbol lights up blue when the automatic main beam is on.
Active main beam off The symbol lights up white when the automatic main beam is off.
Page 145 of 594
INSTRUMENTS AND CONTROLS
}}
* Option/accessory.143
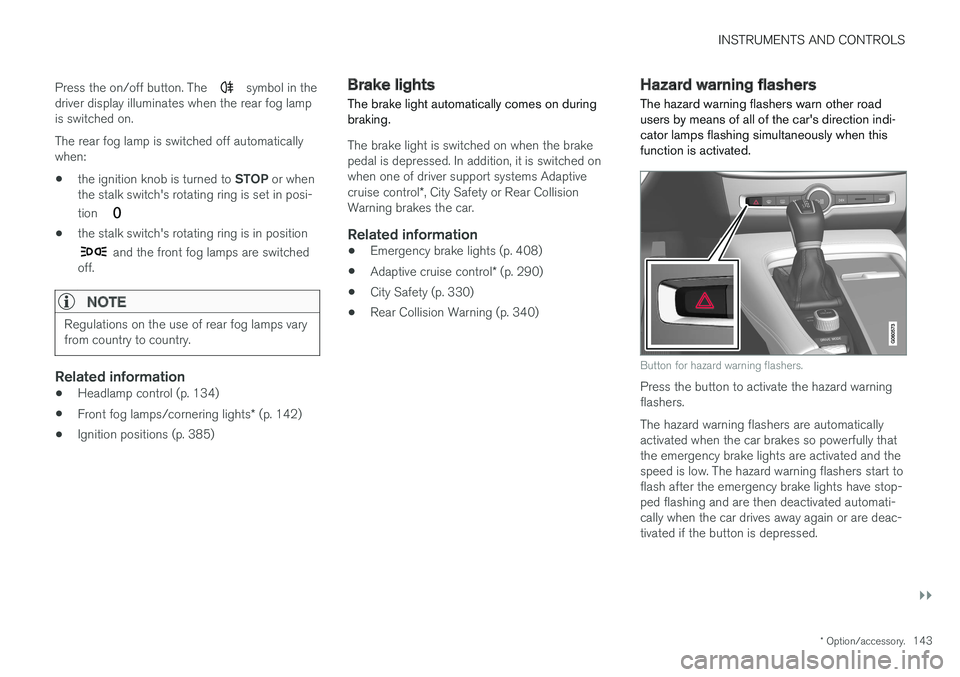
Press the on/off button. The
symbol in the
driver display illuminates when the rear fog lamp is switched on. The rear fog lamp is switched off automatically when:
• the ignition knob is turned to
STOP or when
the stalk switch's rotating ring is set in posi- tion
• the stalk switch's rotating ring is in position
and the front fog lamps are switched
off.
NOTE
Regulations on the use of rear fog lamps vary from country to country.
Related information
• Headlamp control (p. 134)
• Front fog lamps/cornering lights
* (p. 142)
• Ignition positions (p. 385)
Brake lights The brake light automatically comes on during braking.
The brake light is switched on when the brake pedal is depressed. In addition, it is switched onwhen one of driver support systems Adaptive cruise control
*, City Safety or Rear Collision
Warning brakes the car.
Related information
• Emergency brake lights (p. 408)
• Adaptive cruise control
* (p. 290)
• City Safety (p. 330)
• Rear Collision Warning (p. 340)
Hazard warning flashers
The hazard warning flashers warn other road users by means of all of the car's direction indi-cator lamps flashing simultaneously when thisfunction is activated.
Button for hazard warning flashers.
Press the button to activate the hazard warning flashers. The hazard warning flashers are automatically activated when the car brakes so powerfully thatthe emergency brake lights are activated and thespeed is low. The hazard warning flashers start toflash after the emergency brake lights have stop-ped flashing and are then deactivated automati-cally when the car drives away again or are deac-tivated if the button is depressed.
Page 146 of 594
||
INSTRUMENTS AND CONTROLS
144
Related information
•Using direction indicators (p. 144)
• Emergency brake lights (p. 408)
Using direction indicators
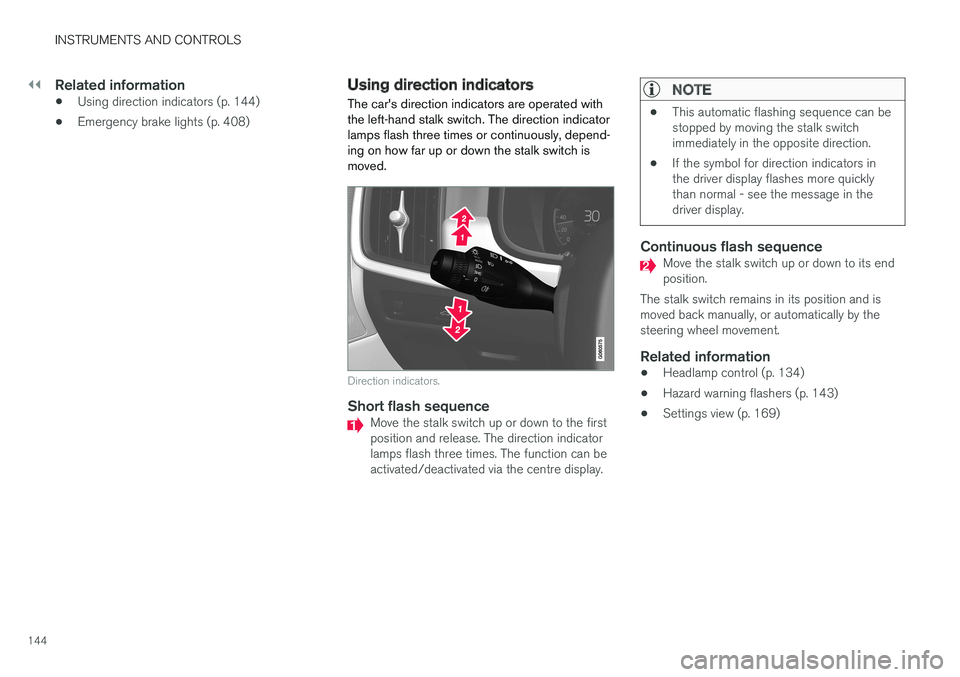
The car's direction indicators are operated with the left-hand stalk switch. The direction indicatorlamps flash three times or continuously, depend-ing on how far up or down the stalk switch ismoved.
Direction indicators.
Short flash sequenceMove the stalk switch up or down to the first position and release. The direction indicatorlamps flash three times. The function can beactivated/deactivated via the centre display.
NOTE
• This automatic flashing sequence can be stopped by moving the stalk switchimmediately in the opposite direction.
• If the symbol for direction indicators inthe driver display flashes more quicklythan normal - see the message in thedriver display.
Continuous flash sequenceMove the stalk switch up or down to its end position.
The stalk switch remains in its position and ismoved back manually, or automatically by thesteering wheel movement.
Related information
• Headlamp control (p. 134)
• Hazard warning flashers (p. 143)
• Settings view (p. 169)
Page 173 of 594
INSTRUMENTS AND CONTROLS
}}
* Option/accessory.171
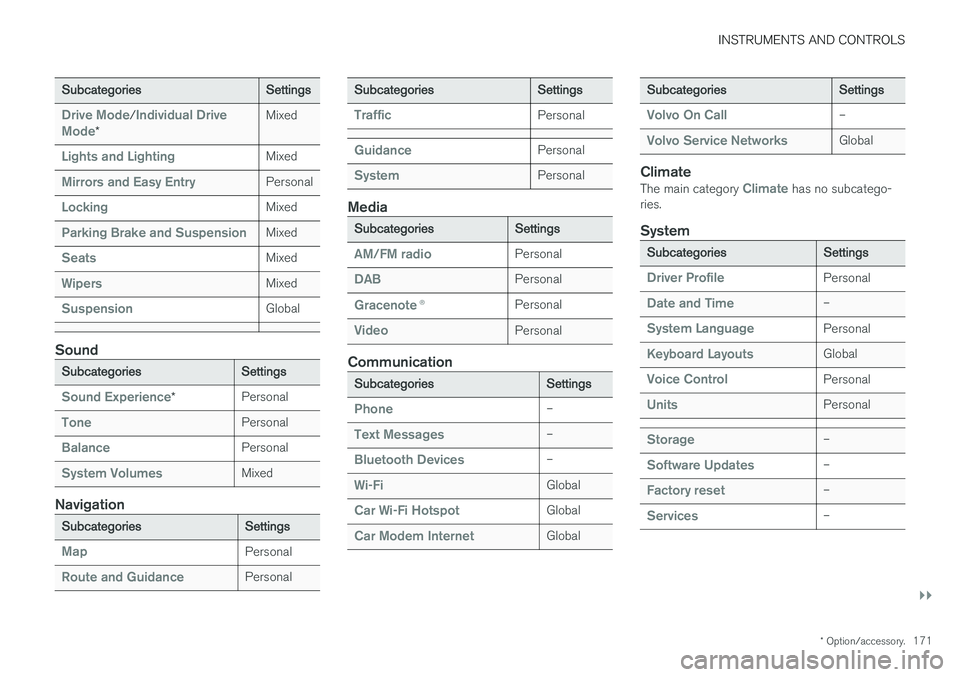
Subcategories Settings
Drive Mode/Individual Drive
Mode* Mixed
Lights and LightingMixed
Mirrors and Easy EntryPersonal
LockingMixed
Parking Brake and SuspensionMixed
SeatsMixed
WipersMixed
SuspensionGlobal
Sound
Subcategories
Settings
Sound Experience*Personal
TonePersonal
BalancePersonal
System VolumesMixed
Navigation
Subcategories
Settings
MapPersonal
Route and GuidancePersonal
SubcategoriesSettings
TrafficPersonal
GuidancePersonal
SystemPersonal
Media
SubcategoriesSettings
AM/FM radioPersonal
DABPersonal
Gracenote®Personal
VideoPersonal
Communication
Subcategories Settings
Phone–
Text Messages–
Bluetooth Devices–
Wi-FiGlobal
Car Wi-Fi HotspotGlobal
Car Modem InternetGlobal
SubcategoriesSettings
Volvo On Call–
Volvo Service NetworksGlobal
ClimateThe main category Climate has no subcatego-
ries.
System
Subcategories Settings
Driver ProfilePersonal
Date and Time–
System LanguagePersonal
Keyboard LayoutsGlobal
Voice ControlPersonal
UnitsPersonal
Storage–
Software Updates–
Factory reset–
Services–
Page 274 of 594
DRIVER SUPPORT
* Option/accessory.
272
Speed-dependent steering force Speed related power steering causes the steer- ing wheel force to increase with the speed of thecar in order to give the driver enhanced sensitiv-ity.
On motorways the steering feels firmer. When parking and at low speed steering is light andrequires only a slight effort.
NOTE
In certain situations the power steering may become too hot and then needs to be tempo-rarily cooled - during this time the powersteering operates with reduced power andturning the steering wheel may then be per-ceived to be slightly heavier. In parallel with the temporarily reduced steer- ing assistance, the driver display shows amessage.
Change the steering force level *To select the steering force level, go to the "Drive modes" section and see the description at thealternative INDIVIDUAL under the heading"Selectable drive modes". For the car models without a drive mode control with its INDIVIDUAL option, the selection ofsteering force is instead made via the centre dis-play's top view and the following search path:
SettingsMy CarDrive ModesSteering force
Selection of steering force is not accessible while turning is in progress.
Related information
•Drive modes
* (p. 400)
Roll Stability Control Roll Stability Control (RSC) is a stabiliser sys- tem that minimises the risk of overturning, forexample during sudden evasive manoeuvres or ifthe car skids.
The RSC system registers if and how much the car's lateral inclination changes. This informationis used to calculate the risk of the car overturn-ing. If the car is at risk, its electronic stability con-trol system engages, the engine torque isreduced and one or more wheels are braked untilthe car has regained its stability.
WARNING
Under normal driving conditions, the RSC sys- tem improves the car's road safety, but thismust not be taken as a reason to increasespeed. Always follow the normal precautionsfor safe driving.
Related information
• Electronic stability control (p. 273)
• Safety (p. 56)