bulb VOLVO V90 2017 Owners Manual
[x] Cancel search | Manufacturer: VOLVO, Model Year: 2017, Model line: V90, Model: VOLVO V90 2017Pages: 594, PDF Size: 15.07 MB
Page 12 of 594
10
WHEELS AND TYRES
Tyres482
Tyres' rotation direction 483
Tread wear indicators on the tyres 484
Checking the tyre pressures 484
Tyre monitoring *
485
Checking tyre pressure with the tyre monitoring system * 487
Rectifying low tyre pressure with tyremonitoring * 488
Calibrating tyre monitoring *
489
Emergency puncture repair kit 490
Using the emergency puncture repair kit 491
Inflate tyres with the compressor from the emergency puncture repair kit 494
When changing wheels 495
Removing a wheel 495
Fitting the wheels 497
Wheel bolts 498
Spare wheel *
498
Winter wheels 499
Tool kit 500
Warning triangle 500
Jack *
501
First aid kit 501
Dimension designation for wheel rim 502
Dimension designation for tyre502
MAINTENANCE AND SERVICE
Volvo service programme506
Car status 506
Book service and repair 506
Inspection and service of the system for vehicle gas * 509
Remote updates 509
System updates 510
Data transmission between car and workshop 511
Raise the car 512
Opening and closing the bonnet 514
Engine compartment overview 515
Engine oil 516
Checking and filling with engine oil 517
Topping up coolant 518
Servicing the climate control system 520
Bulb replacement 520
Replacing the dipped beam bulb 522
Replacing the main beam lamp 523
Replacing daytime running lightbulb/position lamp bulb, front 524
Replacing the front direction indica-tor bulb 524
Replacing the reversing lamp bulb 525
Replacing the rear fog lamp bulb 526
Bulb specifications 526
Page 417 of 594
STARTING AND DRIVING
}}
* Option/accessory.415
Related information
•Driving with a trailer under special conditions (p. 428)
• Preparations for a long trip (p. 415)
Overloading the starter battery
The electrical functions in the car load the starter battery to varying degrees. Avoid using the igni-tion position II when the car is switched off.
Instead, use ignition position I - which uses less
power.
Also, be aware of different accessories that load the electrical system. Do not use functions whichuse a lot of power when the car is switched off.Examples of such functions are:
• ventilation fan
• headlamps
• windscreen wiper
• audio system (high volume).
If the starter battery voltage is low, the message
12 V Battery Low charge, will soon enter
power save mode is shown in the driver display.
The energy-saving function then shuts down cer- tain functions or reduces certain functions suchas the ventilation fan and/or audio system.
–In which case, charge the starter battery by starting the car and then running it for atleast 15 minutes - starter battery charging ismore effective during driving than runningthe engine at idling speed while stationary.
Related information
• Ignition positions (p. 385)
• Starter battery (p. 530)
Preparations for a long trip
Before a driving holiday or some other type of long journey, it is important to check the car'sfunctions and equipment particularly carefully.
Check that:
• the engine is working normally and that fuel consumption is normal
• there are no leaks (fuel, oil or other fluid)
• all bulbs are working
• the tyres have sufficient tread depth andpressure
• a warning triangle and high-visibility vest arelocated in the car - legally required in certaincountries
• the wiper blades are in good condition.
Related information
•
Fuel consumption and CO2 emissions(p. 572)
• Checking the tyre pressures (p. 484)
• Filling washer fluid (p. 529)
• Winter driving (p. 416)
• Economical driving (p. 422)
• Settings for car modem
* (p. 468)
• Loading (p. 227)
• Pilot Assist
* (p. 304)
• Speed limiter
* (p. 277)
Page 428 of 594
STARTING AND DRIVING
426
Driving with a trailer
When driving with a trailer, there are a number of points that are important to think about regar-ding the towing bracket, the trailer and how theload is positioned in the trailer.
Payload depends on the car's kerb weight. The total of the weight of the passengers and allaccessories, e.g. towbar, reduces the car's pay-load by a corresponding weight. The car is supplied with the necessary equipment for towing a trailer.
• The car's towing bracket must be of anapproved type.
• Distribute the load on the trailer so that theweight on the towing bracket complies withthe specified maximum towball load. Towballload is calculated as part of the car's payload.
• Increase the tyre pressure to the recom-mended pressure for a full load. For moreinformation on tyre pressure, see the section"Approved tyre pressures".
• The engine is loaded more heavily than usualwhen driving with a trailer.
• Do not tow a heavy trailer when the car isbrand new. Wait until it has been driven atleast 1000 km.
• The brakes are loaded much more than usualon long and steep downhill slopes. Downshiftto a lower gear and adjust your speed. •
Follow the regulations in force for the permit-ted speeds and weights.
• Maintain a low speed when driving with atrailer up long, steep ascents.
• The maximum trailer weights given only applyto altitudes up to 1000 metres above sealevel. At higher altitudes, engine power andthus the car's climbing ability is decreaseddue to the reduced air density, and the maxi-mum trailer weight must therefore bereduced. The weight of the car and trailermust be decreased by 10 % for each addi-tional 1000 m (or part thereof).
• Avoid driving with a trailer on inclines of morethan 12%.
NOTE
Extreme weather conditions, driving with a trailer or driving at high altitudes in combina-tion with fuel quality are factors that consider-ably increase the car's fuel consumption.
Trailer connectorAn adapter is required if the car's towing bracket has a 13 pin connector and the trailer has a 7 pinconnector. Use an adapter approved by Volvo.Make sure the cable does not drag on theground.
IMPORTANT
When the engine is switched off, the constant battery voltage to the trailer connector can beswitched off automatically so as not to drainthe starter battery.
Trailer weightsInformation about Volvo's permitted trailer weights is available in the article "Towingcapacity and towball load".
WARNING
Follow the stated recommendations for trailer weights. Otherwise, the car and trailer may bedifficult to control in the event of suddenmovement and braking.
NOTE
The stated maximum permitted trailer weights are those permitted by Volvo. National vehicleregulations can further limit trailer weightsand speeds. Towbars can be certified forhigher towing weights than the car canactually tow.
Direction indicators and brake lights on the trailer
If one or more of the trailer's direction indicators or brake light bulbs is broken, the driver display
Page 522 of 594
MAINTENANCE AND SERVICE
520
Servicing the climate control system The air conditioning system must only be serv- iced and repaired by an authorised workshop.
Troubleshooting and repairThe air conditioning system contains fluorescent tracing agents. Ultraviolet light must be used dur-ing leak detection. Volvo recommends that you contact an author- ised Volvo workshop.
Cars with R134a refrigerant
WARNING
The air conditioning system contains pressur- ised refrigerant R134a. This system must onlybe serviced and repaired by an authorisedworkshop.
Cars with R1234yf refrigerant
WARNING
The air conditioning system contains pressur- ised refrigerant R1234yf. In accordance withSAE J2845 (Technician Training for SafeService and Containment of RefrigerantsUsed in Mobile A/C System), service andrepair of the refrigerant system must only beperformed by trained and certified techniciansin order to ensure the safety of the system.
Related information
•Volvo service programme (p. 506)
Bulb replacement
The bulb in the halogen headlamp, reversing lamp and rear fog lamp can be replaced by thedriver.
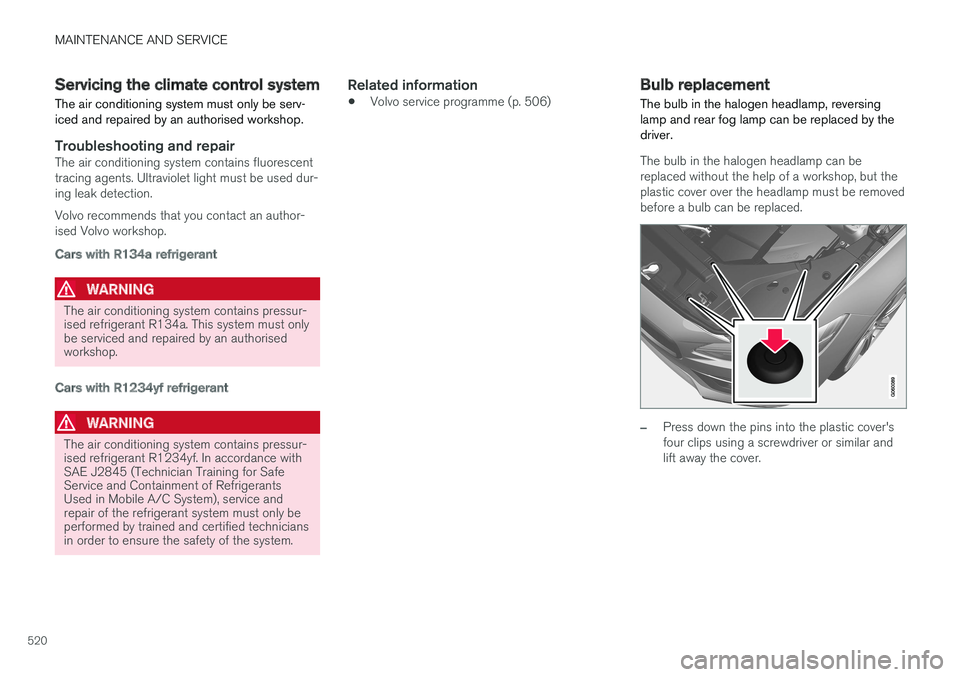
The bulb in the halogen headlamp can be replaced without the help of a workshop, but theplastic cover over the headlamp must be removedbefore a bulb can be replaced.
–Press down the pins into the plastic cover's four clips using a screwdriver or similar andlift away the cover.
Page 523 of 594
MAINTENANCE AND SERVICE
}}
* Option/accessory.521
NOTE
Points to remember when the cover is refit- ted: •The pin in the clip needs to be pressed back fully before the clip is refitted in thecover.
• When the cover is refitted, the pin mustbe pressed in until the end surface islevel with the surface of the clip.
The reversing lamp bulb and the rear fog lamp bulb can be replaced without assistance from aworkshop. Contact a workshop 9
if there is a fault in bulbs
other than the bulbs in the halogen headlamps, the reversing lamp bulb or the rear fog lamp bulb. If a fault occurs in LED 10
lamps, the entire lamp
unit usually must be replaced.
WARNING
The car's electrical system must be in ignition position 0 when replacing bulbs.
IMPORTANT
Never touch the glass part of the bulbs with your fingers. Grease from your fingers isvaporised by the heat, coating the reflectorand then causing damage.
NOTE
If an error message remains after the broken bulb has been replaced then we recommendvisiting an authorised Volvo workshop.
NOTE
Outside lighting such as headlamps and rear lamps may temporarily have condensation onthe inside of the lens. This is normal, all exte-rior lighting is designed to withstand this.Condensation is normally vented out of thelamp housing when the lamp has beenswitched on for a time.
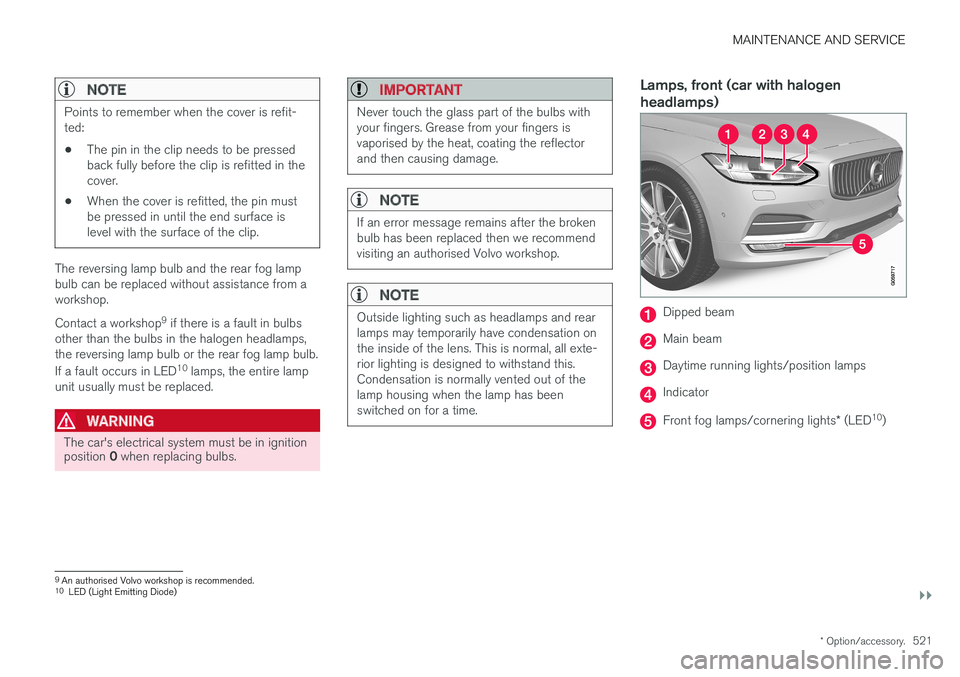
Lamps, front (car with halogen headlamps)
Dipped beam
Main beam
Daytime running lights/position lamps
Indicator
Front fog lamps/cornering lights * (LED 10
)
9An authorised Volvo workshop is recommended.
10 LED (Light Emitting Diode)
Page 524 of 594
||
MAINTENANCE AND SERVICE
522
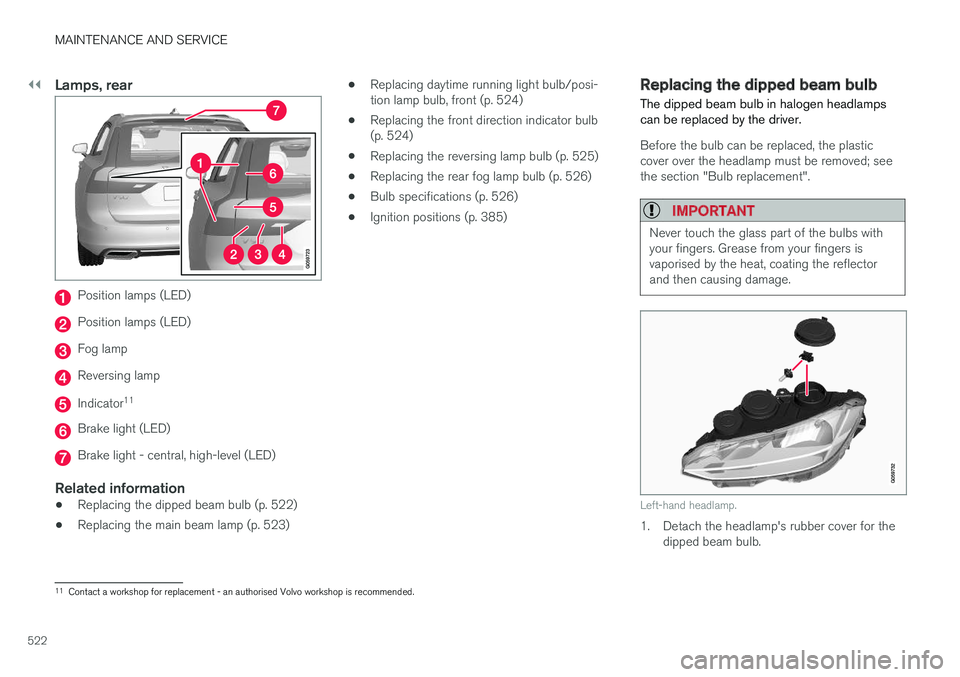
Lamps, rear
Position lamps (LED)
Position lamps (LED)
Fog lamp
Reversing lamp
Indicator11
Brake light (LED)
Brake light - central, high-level (LED)
Related information
•
Replacing the dipped beam bulb (p. 522)
• Replacing the main beam lamp (p. 523) •
Replacing daytime running light bulb/posi- tion lamp bulb, front (p. 524)
• Replacing the front direction indicator bulb(p. 524)
• Replacing the reversing lamp bulb (p. 525)
• Replacing the rear fog lamp bulb (p. 526)
• Bulb specifications (p. 526)
• Ignition positions (p. 385)
Replacing the dipped beam bulb
The dipped beam bulb in halogen headlamps can be replaced by the driver.
Before the bulb can be replaced, the plastic cover over the headlamp must be removed; seethe section "Bulb replacement".
IMPORTANT
Never touch the glass part of the bulbs with your fingers. Grease from your fingers isvaporised by the heat, coating the reflectorand then causing damage.
Left-hand headlamp.
1. Detach the headlamp's rubber cover for the dipped beam bulb.
11Contact a workshop for replacement - an authorised Volvo workshop is recommended.
Page 525 of 594

MAINTENANCE AND SERVICE
523
2. Unplug the connector from the bulb.
3. Detach the bulb by pushing it gently upwards
and pulling it straight out.
4. Fit a new bulb in the socket. The bulb's guide pin must be aimed straight upwards.
5. Press in the connector.
6. Refit the headlamp's rubber cover.
Related information
• Bulb replacement (p. 520)
• Bulb specifications (p. 526)
Replacing the main beam lamp
The main beam lamp in halogen headlamps can be replaced by the driver.
Before the bulb can be replaced, the plastic cover over the headlamp must be removed; seethe section "Bulb replacement".
IMPORTANT
Never touch the glass part of the bulbs with your fingers. Grease from your fingers isvaporised by the heat, coating the reflectorand then causing damage.
Left-hand headlamp.
1. Detach the headlamp's rubber cover for the main beam bulb.
2. Detach the bulb by turning the bulb holder upward and then pulling straight out. 3. Carefully prize the plastic cover at the con-
nector's lock lug so that the lock lug relea- ses.
4. Unplug the connector from the bulb.
5. Replace the bulb.
6. Fit the bulb in the socket and screw in.
7. Refit the headlamp's rubber cover.
Related information
• Bulb replacement (p. 520)
• Bulb specifications (p. 526)
Page 526 of 594

MAINTENANCE AND SERVICE
524
Replacing daytime running light bulb/position lamp bulb, front
The bulb for the daytime running light/position lamp in halogen headlamps can be replaced bythe driver.
Before the bulb can be replaced, the plastic
cover over the headlamp must be removed; see the section "Bulb replacement".
Left-hand headlamp.
1. Detach the headlamp's rubber cover for the daytime running light bulb/position lamp bulb.
NOTE
The bulb for the daytime running light/posi- tion lamp is easier to access if the main beambulb is detached. The main beam bulb is fitteddiagonally above the daytime running lightbulb/position lamp bulb. Detach the mainbeam bulb by rotating its bulb holder upwardsand then pulling straight out.
2. Pull the bulb holder for the daytime runninglight bulb/position lamp bulb straight out.
3. Detach the bulb by pulling it straight out.
4. Replace the bulb.
5. Fit the bulb holder into the socket and press it into place.
6. If the main beam bulb's bulb holder has been removed, fit it into the socket and screw in.
7. Refit the headlamp's rubber cover.
Related information
• Bulb replacement (p. 520)
• Bulb specifications (p. 526)
Replacing the front direction indicator bulb
The direction indicator bulb in halogen head- lamps can be replaced by the driver.
Before the bulb can be replaced, the plastic cover over the headlamp must be removed; seethe section "Bulb replacement".
Left-hand headlamp.
1. Detach the headlamp's rubber cover for the indicator bulb.
2. Press the catches together and pull the bulb holder straight out.
3. Replace with a new bulb holder with bulb.
4. Fit the bulb holder into the socket and press it into place.
5. Refit the headlamp's rubber cover.
Page 527 of 594
MAINTENANCE AND SERVICE
525
Related information
•Bulb replacement (p. 520)
• Bulb specifications (p. 526)
Replacing the reversing lamp bulb
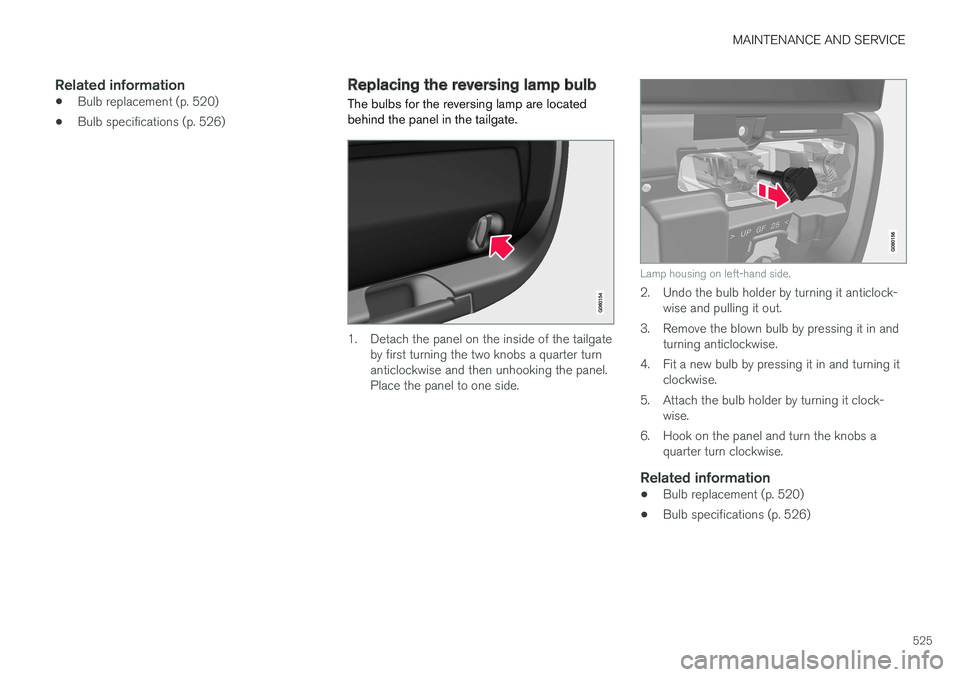
The bulbs for the reversing lamp are located behind the panel in the tailgate.
1. Detach the panel on the inside of the tailgate by first turning the two knobs a quarter turn anticlockwise and then unhooking the panel.Place the panel to one side.
Lamp housing on left-hand side.
2. Undo the bulb holder by turning it anticlock- wise and pulling it out.
3. Remove the blown bulb by pressing it in and turning anticlockwise.
4. Fit a new bulb by pressing it in and turning it clockwise.
5. Attach the bulb holder by turning it clock- wise.
6. Hook on the panel and turn the knobs a quarter turn clockwise.
Related information
• Bulb replacement (p. 520)
• Bulb specifications (p. 526)
Page 528 of 594
MAINTENANCE AND SERVICE
526
Replacing the rear fog lamp bulb The bulb for the rear fog lamp is located behind a hatch in the tailgate panel. Left-hand drive cars have the fog lamp on the left-hand side, right-hand drive cars on the right-hand side.
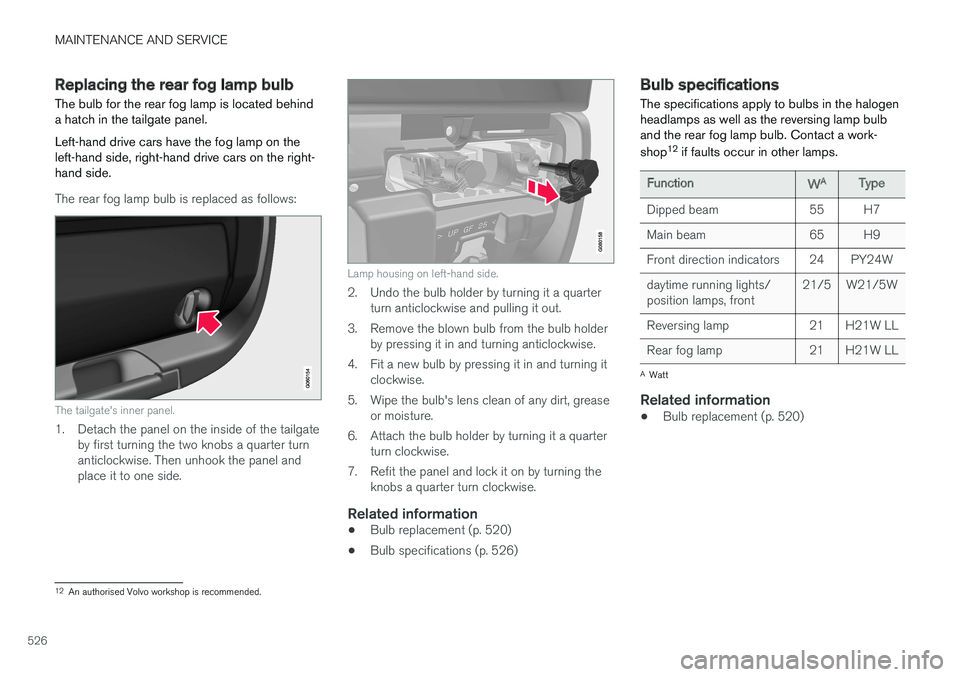
The rear fog lamp bulb is replaced as follows:
The tailgate's inner panel.
1. Detach the panel on the inside of the tailgateby first turning the two knobs a quarter turn anticlockwise. Then unhook the panel andplace it to one side.
Lamp housing on left-hand side.
2. Undo the bulb holder by turning it a quarterturn anticlockwise and pulling it out.
3. Remove the blown bulb from the bulb holder by pressing it in and turning anticlockwise.
4. Fit a new bulb by pressing it in and turning it clockwise.
5. Wipe the bulb's lens clean of any dirt, grease or moisture.
6. Attach the bulb holder by turning it a quarter turn clockwise.
7. Refit the panel and lock it on by turning the knobs a quarter turn clockwise.
Related information
• Bulb replacement (p. 520)
• Bulb specifications (p. 526)
Bulb specifications The specifications apply to bulbs in the halogen headlamps as well as the reversing lamp bulband the rear fog lamp bulb. Contact a work- shop 12
if faults occur in other lamps.
Function WA
Type
Dipped beam 55 H7
Main beam 65 H9
Front direction indicators 24 PY24Wdaytime running lights/ position lamps, front 21/5 W21/5W
Reversing lamp 21 H21W LL
Rear fog lamp 21 H21W LL
A Watt
Related information
• Bulb replacement (p. 520)
12
An authorised Volvo workshop is recommended.