warning light VOLVO V90 2017 Owners Manual
[x] Cancel search | Manufacturer: VOLVO, Model Year: 2017, Model line: V90, Model: VOLVO V90 2017Pages: 594, PDF Size: 15.07 MB
Page 5 of 594
3
Table for location of i-Size child seats81
Integrated booster cushion *
82
Folding up the integrated booster cushion * 82
Folding down the integrated boostercushion * 84
INSTRUMENTS AND CONTROLS
Instruments and controls, left-hand drive car
86
Instruments and controls, right-handdrive car 87
Driver display 90
Driver display settings 94
Indicator symbols in the driver display 95
Warning symbols in the driver display 97
Outside temperature gauge 98
Clock 99
License agreement for the driver display 99
Application menu in the driver display 105
Using the application menu in thedriver display 105
Messages in the driver display andthe centre display 106
Managing messages in the driverdisplay and the centre display 108
Managing messages saved from thedriver display and centre display 110
Head-up display *
112
Voice recognition 115
Using voice recognition 116
Settings for voice recognition 117
Voice recognition control of the phone 118
Voice recognition control of radioand media 118
Voice recognition control of climate control119
Voice recognition and map navigation 120
Manual front seat 121
Power front seat *
121
Adjusting the power front seat *
122
Using the memory function in the power front seat * 122
Multi-functional front seat *
123
Adjusting functions in the multi-func-tional front seat * 124
Adjusting the passenger seat fromthe driver's seat * 127
Rear seat 128
Adjusting the head restraints in the rear seat 128
Lowering the backrests in the rear seat 130
Steering wheel 131
Adjusting the steering wheel 132
Headlamp control 134
Headlamp levelling 135
Position lamps 136
Daytime running lights 137
Dipped beam 137
Activating/deactivating main beam 138
Active bending lights *
141
Page 6 of 594

4
Adapting the beam pattern from the headlamps141
Front fog lamps/cornering lights *
142
Rear fog lamp 142
Brake lights 143
Hazard warning flashers 143
Using direction indicators 144
Passenger compartment lighting 145
Home safe light duration 148
Approach light duration 148
Using windscreen wipers 148
Activating/deactivating the rain sensor 149
Windscreen and headlamp washers 150
Rear window wiper and washer 151
Power windows 151
Operating power windows 152
Using the sun blind *
153
Adjusting the door mirrors 153
Interior rearview mirror 155
Compass *
156
Calibrating the compass *
157
Panorama roof *
158
Operating the panorama roof *
159
HomeLink ®
* 162
Programming HomeLink®
* 163
Trip computer 165
Show trip data in the driver display 166
Show trip statistics in the centre display 168
Settings view 169
Categories in the settings view 170
Changing system settings in the set- tings view 172
Resetting settings in the settings view 173
Driver profiles 174
Selecting driver profile 174
Editing a driver profile 175
Linking remote control key to driverprofile 176
Importing/exporting a driver profilefrom/to USB 177
Changing settings for apps 178
Resetting user data for change ofownership 179
CLIMATE CONTROL
Climate control
182
Climate control - sensors 183
Perceived temperature 183
Air quality 184
Passenger compartment filter 185
Clean Zone Interior Package *
185
Interior Air Quality System *
185
Climate controls 186
Climate controls in the centre display 187
Climate controls at the rear of the tunnel console * 188
Auto-regulating the climate 189
Activating/deactivating air conditioning 190
Regulating the temperature 190
Regulating the fan level 193
Activating/deactivating defrost of windows and door mirrors 194
Activating/deactivating air recirculation 196
Air distribution 197
Changing the air distribution 198
Opening/closing and aiming the air vents 199
Table of air distribution options 201
Activating/deactivating heating of the seats * 203
Activating/deactivating ventilation ofthe seats * 204
Page 12 of 594
10
WHEELS AND TYRES
Tyres482
Tyres' rotation direction 483
Tread wear indicators on the tyres 484
Checking the tyre pressures 484
Tyre monitoring *
485
Checking tyre pressure with the tyre monitoring system * 487
Rectifying low tyre pressure with tyremonitoring * 488
Calibrating tyre monitoring *
489
Emergency puncture repair kit 490
Using the emergency puncture repair kit 491
Inflate tyres with the compressor from the emergency puncture repair kit 494
When changing wheels 495
Removing a wheel 495
Fitting the wheels 497
Wheel bolts 498
Spare wheel *
498
Winter wheels 499
Tool kit 500
Warning triangle 500
Jack *
501
First aid kit 501
Dimension designation for wheel rim 502
Dimension designation for tyre502
MAINTENANCE AND SERVICE
Volvo service programme506
Car status 506
Book service and repair 506
Inspection and service of the system for vehicle gas * 509
Remote updates 509
System updates 510
Data transmission between car and workshop 511
Raise the car 512
Opening and closing the bonnet 514
Engine compartment overview 515
Engine oil 516
Checking and filling with engine oil 517
Topping up coolant 518
Servicing the climate control system 520
Bulb replacement 520
Replacing the dipped beam bulb 522
Replacing the main beam lamp 523
Replacing daytime running lightbulb/position lamp bulb, front 524
Replacing the front direction indica-tor bulb 524
Replacing the reversing lamp bulb 525
Replacing the rear fog lamp bulb 526
Bulb specifications 526
Page 46 of 594
||
INTRODUCTION
* Option/accessory.
44 app view, such as the number of unread text messages for
Messages.
Tap on an app to open it. It then opens in the subview to which it belongs, such as
Media.
Depending on the amount of apps, it is possible to scroll downward in the app view. Do this byswiping/dragging from the bottom and up. To move an app:
1. Tap on the app and hold depressed. > The app becomes slightly transparent andlarger when it is ready to be moved.
2. Drag the app to the desired location.
NOTE
Apps and car function buttons cannot be added to locations that are already occupied.
Go back to the home view again by swiping from left to right 9
across the screen, or by pressing the
home button.
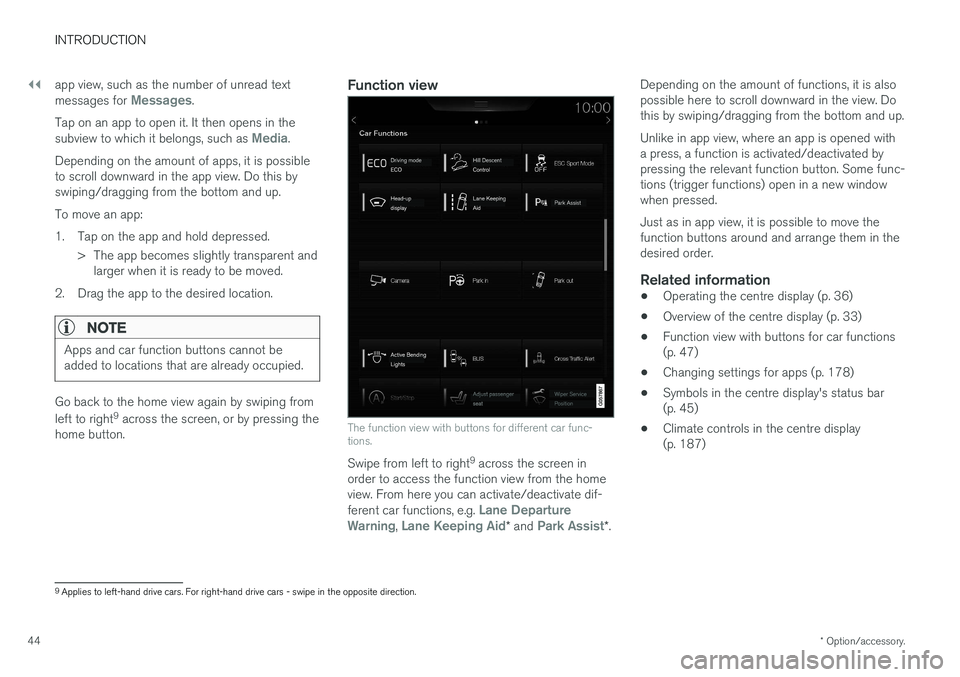
Function view
The function view with buttons for different car func- tions.
Swipe from left to right 9
across the screen in
order to access the function view from the home view. From here you can activate/deactivate dif- ferent car functions, e.g.
Lane Departure
Warning, Lane Keeping Aid* and Park Assist*. Depending on the amount of functions, it is also possible here to scroll downward in the view. Dothis by swiping/dragging from the bottom and up. Unlike in app view, where an app is opened with a press, a function is activated/deactivated bypressing the relevant function button. Some func-tions (trigger functions) open in a new windowwhen pressed. Just as in app view, it is possible to move the function buttons around and arrange them in thedesired order.
Related information
•
Operating the centre display (p. 36)
• Overview of the centre display (p. 33)
• Function view with buttons for car functions(p. 47)
• Changing settings for apps (p. 178)
• Symbols in the centre display's status bar(p. 45)
• Climate controls in the centre display(p. 187)
9
Applies to left-hand drive cars. For right-hand drive cars - swipe in the opposite direction.
Page 56 of 594
INTRODUCTION
* Option/accessory.
54
Introduction to vehicle gas (Bi- Fuel) *
Cars with Bi-Fuel engines can be driven on either vehicle gas or petrol. Vehicle gas can bebiogas or natural gas, or a mixture of the two.Vehicle gas is also called CNG (CompressedNatural Gas).
Methane is the main component in vehicle gas. In natural gas, the methane content varies between85% and 98%. In biogas, the content is almost100%. The tanks for vehicle gas are mounted under the floor in the cargo area and do not affect the nor-mal petrol tank. The system is tested in the same way as for pet- rol cars. The system is closed which means thatleaks are avoided during filling, for example. Thegas tanks are protected and are made to with-stand a collision. The gas is lighter than air, non-toxic and has a higher ignition temperature thanpetrol and diesel. The risk of fire or explosions inthe event of traffic accidents is therefore lowerthan with petrol and diesel. The tank is equipped with a safety valve that allows the gas to evacuate from the tank in theevent of abnormally high pressures. This valveensures that the tank cannot explode.
WARNING
In the event of an accident, the vehicle must be inspected and approved by an authorisedVolvo workshop before it may be used again.Always notify the emergency services on sitethat the vehicle is equipped with a CNG-sys-tem.
WARNING
Smoking and naked flames are prohibited during refuelling, service and repair work. Inthe event of a possible fire, leave the vehicleimmediately and stand a safe distance away. Do not under any circumstances disassemble or adjust the system or its component partsyourself. Carrying out such acts entails risk ofserious personal injury. All service and repairwork must therefore, for safety reasons, onlybe carried out by a trained mechanic - anauthorized Volvo workshop is recommended.
WARNING
If you smell gas in or around the vehicle, switch over to petrol immediately and havethe vehicle checked by the nearest trainedmechanics. If the car is placed in a spray/paint curing booth with a drying temperature higher than60 °C the system pressure must not exceed50 bar, check that the CNG tank is almostempty for this.
Page 71 of 594
SAFETY
}}
69
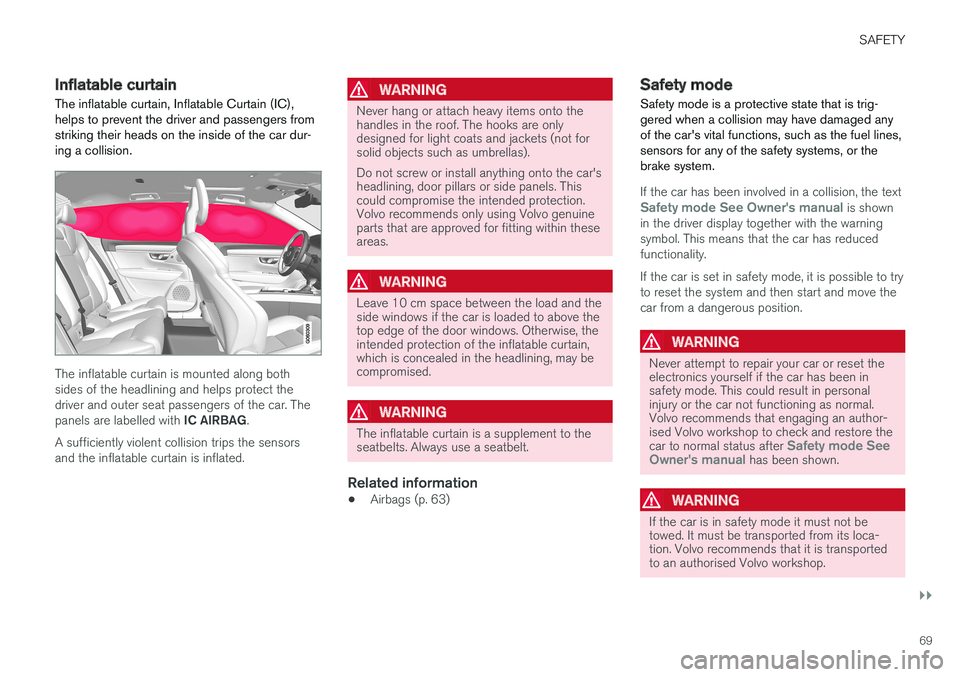
Inflatable curtain The inflatable curtain, Inflatable Curtain (IC), helps to prevent the driver and passengers fromstriking their heads on the inside of the car dur-ing a collision.
The inflatable curtain is mounted along both sides of the headlining and helps protect thedriver and outer seat passengers of the car. The panels are labelled with IC AIRBAG.
A sufficiently violent collision trips the sensors and the inflatable curtain is inflated.
WARNING
Never hang or attach heavy items onto the handles in the roof. The hooks are onlydesigned for light coats and jackets (not forsolid objects such as umbrellas). Do not screw or install anything onto the car's headlining, door pillars or side panels. Thiscould compromise the intended protection.Volvo recommends only using Volvo genuineparts that are approved for fitting within theseareas.
WARNING
Leave 10 cm space between the load and the side windows if the car is loaded to above thetop edge of the door windows. Otherwise, theintended protection of the inflatable curtain,which is concealed in the headlining, may becompromised.
WARNING
The inflatable curtain is a supplement to the seatbelts. Always use a seatbelt.
Related information
• Airbags (p. 63)
Safety mode Safety mode is a protective state that is trig- gered when a collision may have damaged anyof the car's vital functions, such as the fuel lines,sensors for any of the safety systems, or thebrake system.
If the car has been involved in a collision, the textSafety mode See Owner's manual is shown
in the driver display together with the warning symbol. This means that the car has reducedfunctionality. If the car is set in safety mode, it is possible to try to reset the system and then start and move thecar from a dangerous position.
WARNING
Never attempt to repair your car or reset the electronics yourself if the car has been insafety mode. This could result in personalinjury or the car not functioning as normal.Volvo recommends that engaging an author-ised Volvo workshop to check and restore the car to normal status after
Safety mode See
Owner's manual has been shown.
WARNING
If the car is in safety mode it must not be towed. It must be transported from its loca-tion. Volvo recommends that it is transportedto an authorised Volvo workshop.
Page 88 of 594
INSTRUMENTS AND CONTROLS
* Option/accessory.
86
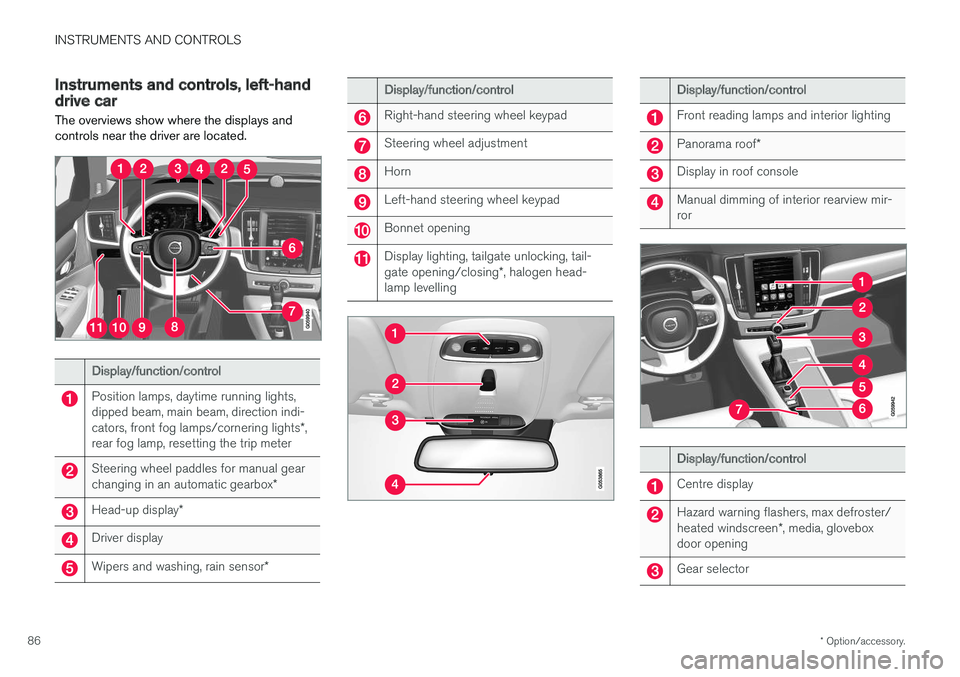
Instruments and controls, left-hand drive car The overviews show where the displays and controls near the driver are located.
Display/function/control
Position lamps, daytime running lights, dipped beam, main beam, direction indi- cators, front fog lamps/cornering lights *,
rear fog lamp, resetting the trip meter
Steering wheel paddles for manual gear changing in an automatic gearbox *
Head-up display*
Driver display
Wipers and washing, rain sensor *
Display/function/control
Right-hand steering wheel keypad
Steering wheel adjustment
Horn
Left-hand steering wheel keypad
Bonnet opening
Display lighting, tailgate unlocking, tail- gate opening/closing*, halogen head-
lamp levelling
Display/function/control
Front reading lamps and interior lighting
Panorama roof *
Display in roof console
Manual dimming of interior rearview mir- ror
Display/function/control
Centre display
Hazard warning flashers, max defroster/ heated windscreen *, media, glovebox
door opening
Gear selector
Page 90 of 594
||
INSTRUMENTS AND CONTROLS
* Option/accessory.
88
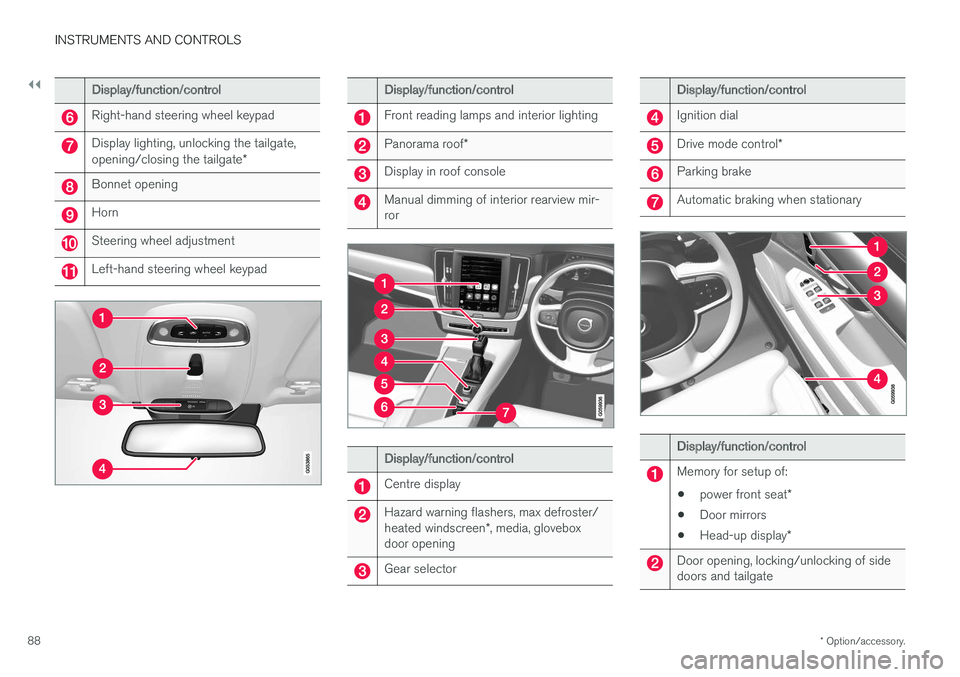
Display/function/control
Right-hand steering wheel keypad
Display lighting, unlocking the tailgate, opening/closing the tailgate *
Bonnet opening
Horn
Steering wheel adjustment
Left-hand steering wheel keypad
Display/function/control
Front reading lamps and interior lighting
Panorama roof*
Display in roof console
Manual dimming of interior rearview mir- ror
Display/function/control
Centre display
Hazard warning flashers, max defroster/ heated windscreen *, media, glovebox
door opening
Gear selector
Display/function/control
Ignition dial
Drive mode control *
Parking brake
Automatic braking when stationary
Display/function/control
Memory for setup of:
• power front seat
*
• Door mirrors
• Head-up display
*
Door opening, locking/unlocking of side doors and tailgate
Page 98 of 594
||
INSTRUMENTS AND CONTROLS
96
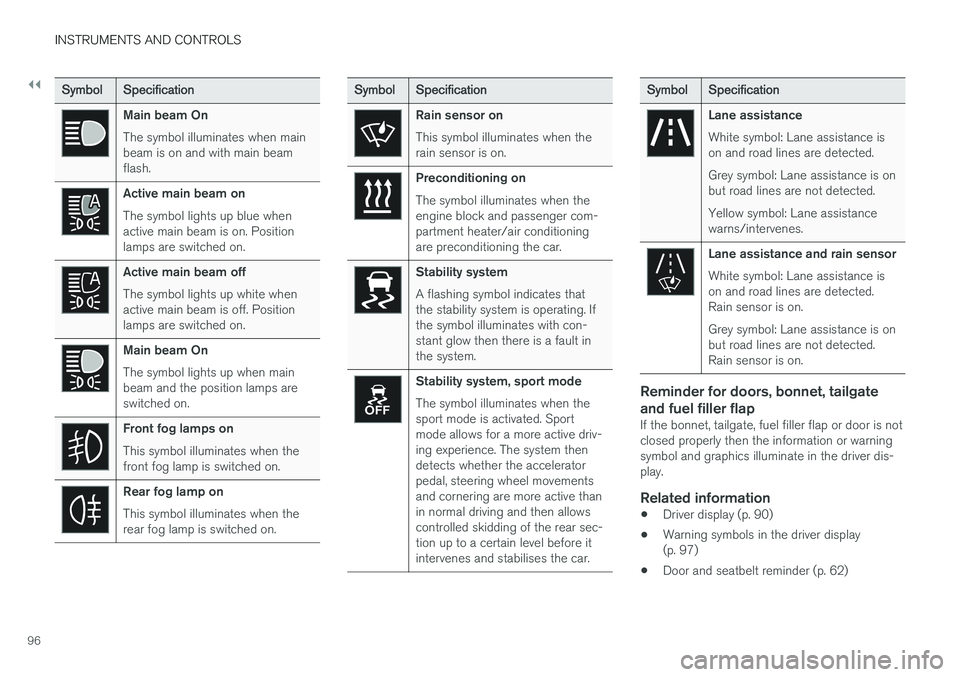
SymbolSpecification
Main beam On The symbol illuminates when main beam is on and with main beamflash.
Active main beam on The symbol lights up blue when active main beam is on. Positionlamps are switched on.
Active main beam off The symbol lights up white when active main beam is off. Positionlamps are switched on.
Main beam On The symbol lights up when main beam and the position lamps areswitched on.
Front fog lamps on This symbol illuminates when the front fog lamp is switched on.
Rear fog lamp on This symbol illuminates when the rear fog lamp is switched on.
SymbolSpecification
Rain sensor on This symbol illuminates when the rain sensor is on.
Preconditioning on The symbol illuminates when the engine block and passenger com-partment heater/air conditioningare preconditioning the car.
Stability system A flashing symbol indicates that the stability system is operating. Ifthe symbol illuminates with con-stant glow then there is a fault inthe system.
Stability system, sport mode The symbol illuminates when the sport mode is activated. Sportmode allows for a more active driv-ing experience. The system thendetects whether the acceleratorpedal, steering wheel movementsand cornering are more active thanin normal driving and then allowscontrolled skidding of the rear sec-tion up to a certain level before itintervenes and stabilises the car.
Symbol Specification
Lane assistance White symbol: Lane assistance is on and road lines are detected. Grey symbol: Lane assistance is on but road lines are not detected. Yellow symbol: Lane assistance warns/intervenes.
Lane assistance and rain sensor White symbol: Lane assistance is on and road lines are detected.Rain sensor is on. Grey symbol: Lane assistance is on but road lines are not detected.Rain sensor is on.
Reminder for doors, bonnet, tailgate and fuel filler flap
If the bonnet, tailgate, fuel filler flap or door is not closed properly then the information or warningsymbol and graphics illuminate in the driver dis-play.
Related information
•Driver display (p. 90)
• Warning symbols in the driver display(p. 97)
• Door and seatbelt reminder (p. 62)
Page 114 of 594
INSTRUMENTS AND CONTROLS
* Option/accessory.
112
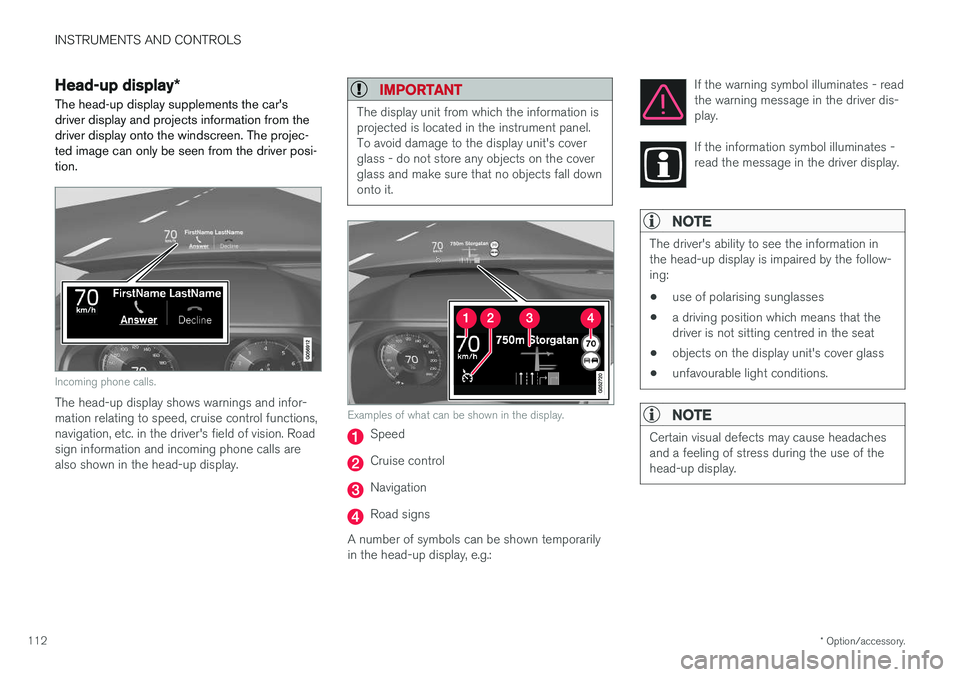
Head-up display *
The head-up display supplements the car's driver display and projects information from thedriver display onto the windscreen. The projec-ted image can only be seen from the driver posi-tion.
Incoming phone calls.
The head-up display shows warnings and infor- mation relating to speed, cruise control functions,navigation, etc. in the driver's field of vision. Roadsign information and incoming phone calls arealso shown in the head-up display.
IMPORTANT
The display unit from which the information is projected is located in the instrument panel.To avoid damage to the display unit's coverglass - do not store any objects on the coverglass and make sure that no objects fall downonto it.
Examples of what can be shown in the display.
Speed
Cruise control
Navigation
Road signs
A number of symbols can be shown temporarily in the head-up display, e.g.: If the warning symbol illuminates - readthe warning message in the driver dis-play.
If the information symbol illuminates - read the message in the driver display.
NOTE
The driver's ability to see the information in the head-up display is impaired by the follow-ing:
• use of polarising sunglasses
• a driving position which means that thedriver is not sitting centred in the seat
• objects on the display unit's cover glass
• unfavourable light conditions.
NOTE
Certain visual defects may cause headaches and a feeling of stress during the use of thehead-up display.