instrument panel VOLVO V90 2017 Owners Manual
[x] Cancel search | Manufacturer: VOLVO, Model Year: 2017, Model line: V90, Model: VOLVO V90 2017Pages: 594, PDF Size: 15.07 MB
Page 25 of 594
INTRODUCTION
}}
* Option/accessory.23
Important information on accessories, extra equipment anddiagnostic socket Incorrect connection and installation of accesso- ries, extra equipment or software/diagnostictools may have a negative effect on the car'selectronic system.
Certain accessories only function when associ- ated software is installed in the car's computersystem. Volvo therefore recommends alwaysmaking contact with an authorised Volvo work-shop before the installation of accessories orextra equipment that are connected to or affectthe electrical system.
Connection of equipment to the car's
diagnostic socket
WARNING
Volvo Cars accepts no responsibility for the consequences of cases where non-authorisedequipment is connected to the car's data linkconnector (On-Board-Diagnostics (OBD-II)).
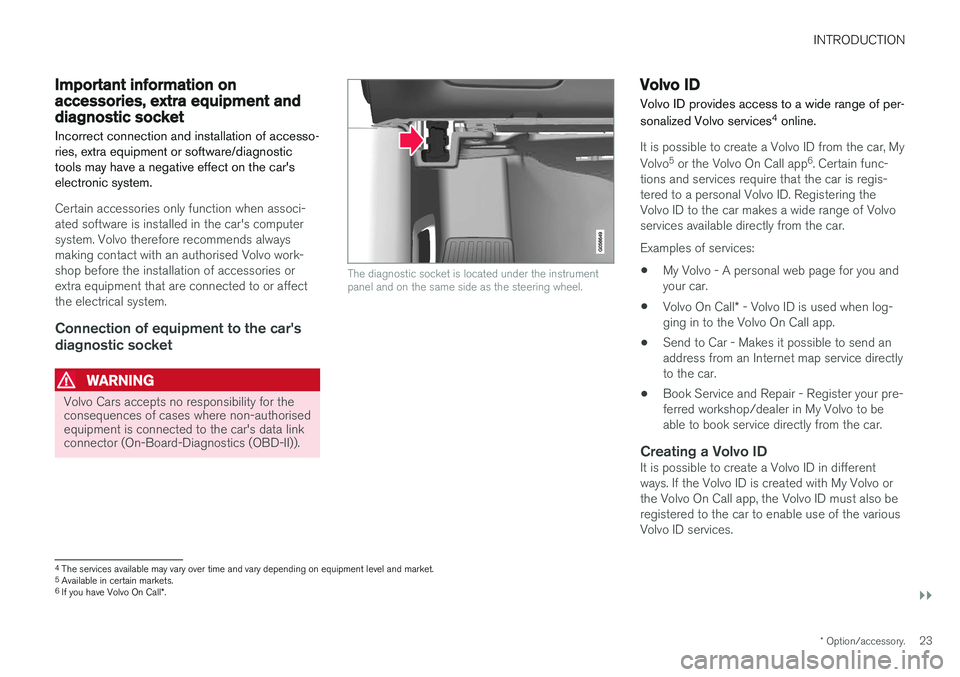
The diagnostic socket is located under the instrument panel and on the same side as the steering wheel.
Volvo ID
Volvo ID provides access to a wide range of per- sonalized Volvo services 4
online.
It is possible to create a Volvo ID from the car, My Volvo 5
or the Volvo On Call app 6
. Certain func-
tions and services require that the car is regis- tered to a personal Volvo ID. Registering theVolvo ID to the car makes a wide range of Volvoservices available directly from the car. Examples of services:
• My Volvo - A personal web page for you and your car.
• Volvo On Call
* - Volvo ID is used when log-
ging in to the Volvo On Call app.
• Send to Car - Makes it possible to send anaddress from an Internet map service directlyto the car.
• Book Service and Repair - Register your pre-ferred workshop/dealer in My Volvo to beable to book service directly from the car.
Creating a Volvo IDIt is possible to create a Volvo ID in differentways. If the Volvo ID is created with My Volvo orthe Volvo On Call app, the Volvo ID must also beregistered to the car to enable use of the variousVolvo ID services.
4
The services available may vary over time and vary depending on equipment level and market.
5 Available in certain markets.
6 If you have Volvo On Call *.
Page 66 of 594
SAFETY
64
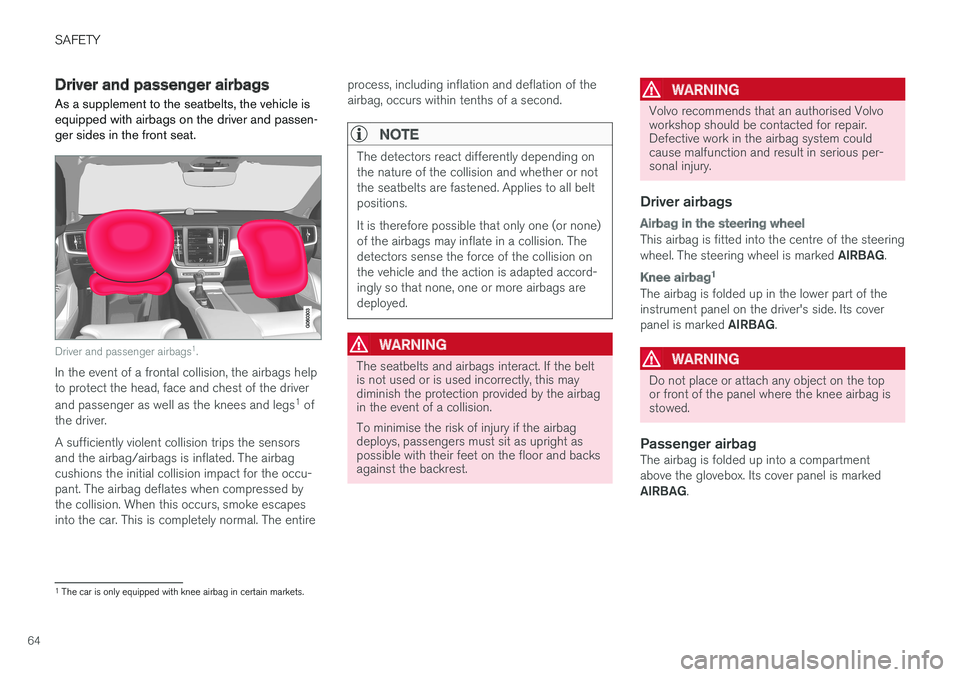
Driver and passenger airbags As a supplement to the seatbelts, the vehicle is equipped with airbags on the driver and passen-ger sides in the front seat.
Driver and passenger airbags1
.
In the event of a frontal collision, the airbags help to protect the head, face and chest of the driver and passenger as well as the knees and legs 1
of
the driver. A sufficiently violent collision trips the sensors and the airbag/airbags is inflated. The airbagcushions the initial collision impact for the occu-pant. The airbag deflates when compressed bythe collision. When this occurs, smoke escapesinto the car. This is completely normal. The entire process, including inflation and deflation of theairbag, occurs within tenths of a second.
NOTE
The detectors react differently depending on the nature of the collision and whether or notthe seatbelts are fastened. Applies to all beltpositions. It is therefore possible that only one (or none) of the airbags may inflate in a collision. Thedetectors sense the force of the collision onthe vehicle and the action is adapted accord-ingly so that none, one or more airbags aredeployed.
WARNING
The seatbelts and airbags interact. If the belt is not used or is used incorrectly, this maydiminish the protection provided by the airbagin the event of a collision. To minimise the risk of injury if the airbag deploys, passengers must sit as upright aspossible with their feet on the floor and backsagainst the backrest.
WARNING
Volvo recommends that an authorised Volvo workshop should be contacted for repair.Defective work in the airbag system couldcause malfunction and result in serious per-sonal injury.
Driver airbags
Airbag in the steering wheel
This airbag is fitted into the centre of the steering wheel. The steering wheel is marked
AIRBAG.
Knee airbag 1
The airbag is folded up in the lower part of the instrument panel on the driver's side. Its cover panel is marked
AIRBAG.
WARNING
Do not place or attach any object on the top or front of the panel where the knee airbag isstowed.
Passenger airbagThe airbag is folded up into a compartment above the glovebox. Its cover panel is marked AIRBAG.
1
The car is only equipped with knee airbag in certain markets.
Page 68 of 594
SAFETY
* Option/accessory.
66
Activating/deactivating the passenger airbag *
The passenger airbag can be deactivated if the car is equipped with a switch, Passenger AirbagCut Off Switch (PACOS).
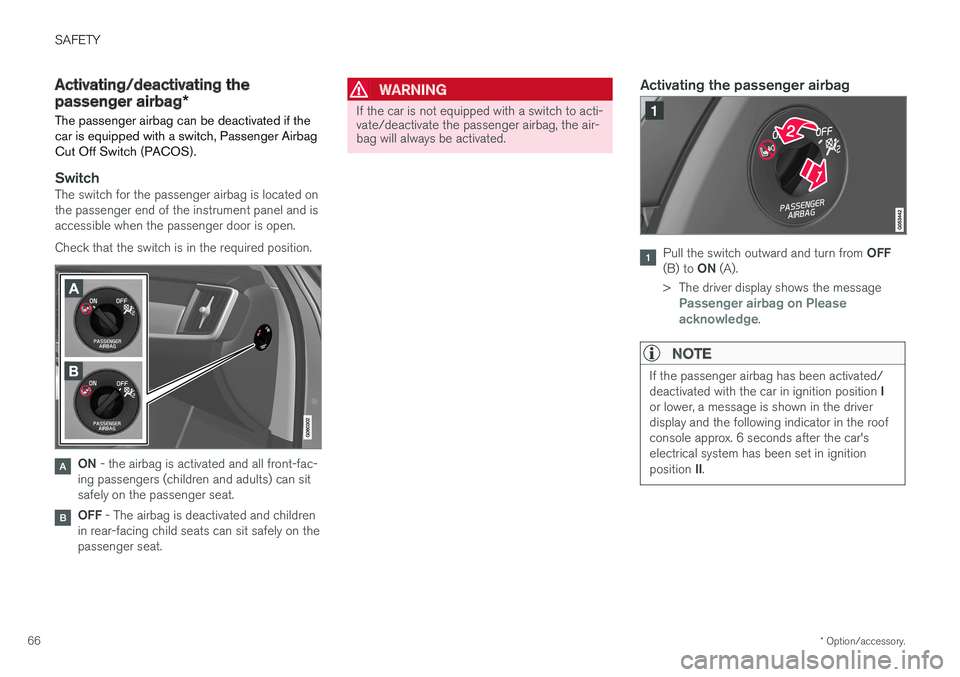
SwitchThe switch for the passenger airbag is located on the passenger end of the instrument panel and isaccessible when the passenger door is open. Check that the switch is in the required position.
ON - the airbag is activated and all front-fac-
ing passengers (children and adults) can sit safely on the passenger seat.
OFF - The airbag is deactivated and children
in rear-facing child seats can sit safely on the passenger seat.
WARNING
If the car is not equipped with a switch to acti- vate/deactivate the passenger airbag, the air-bag will always be activated.
Activating the passenger airbag
Pull the switch outward and turn from OFF
(B) to ON (A).
> The driver display shows the message
Passenger airbag on Please
acknowledge.
NOTE
If the passenger airbag has been activated/ deactivated with the car in ignition position I
or lower, a message is shown in the driver display and the following indicator in the roofconsole approx. 6 seconds after the car'selectrical system has been set in ignition position II.
Page 114 of 594
INSTRUMENTS AND CONTROLS
* Option/accessory.
112
Head-up display *
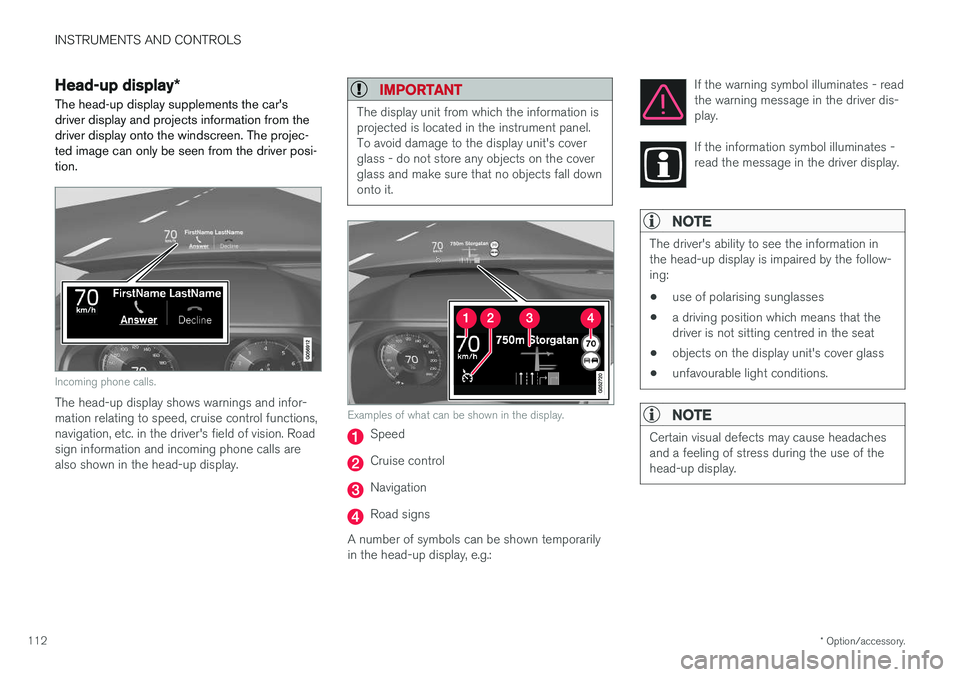
The head-up display supplements the car's driver display and projects information from thedriver display onto the windscreen. The projec-ted image can only be seen from the driver posi-tion.
Incoming phone calls.
The head-up display shows warnings and infor- mation relating to speed, cruise control functions,navigation, etc. in the driver's field of vision. Roadsign information and incoming phone calls arealso shown in the head-up display.
IMPORTANT
The display unit from which the information is projected is located in the instrument panel.To avoid damage to the display unit's coverglass - do not store any objects on the coverglass and make sure that no objects fall downonto it.
Examples of what can be shown in the display.
Speed
Cruise control
Navigation
Road signs
A number of symbols can be shown temporarily in the head-up display, e.g.: If the warning symbol illuminates - readthe warning message in the driver dis-play.
If the information symbol illuminates - read the message in the driver display.
NOTE
The driver's ability to see the information in the head-up display is impaired by the follow-ing:
• use of polarising sunglasses
• a driving position which means that thedriver is not sitting centred in the seat
• objects on the display unit's cover glass
• unfavourable light conditions.
NOTE
Certain visual defects may cause headaches and a feeling of stress during the use of thehead-up display.
Page 136 of 594
INSTRUMENTS AND CONTROLS
* Option/accessory.
134
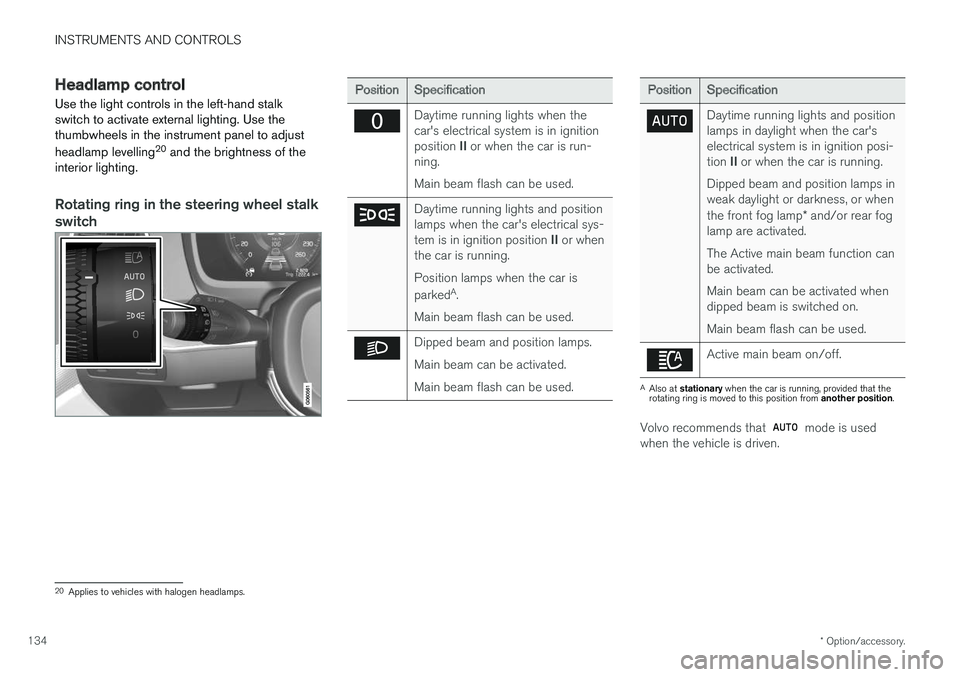
Headlamp control
Use the light controls in the left-hand stalk switch to activate external lighting. Use thethumbwheels in the instrument panel to adjust headlamp levelling 20
and the brightness of the
interior lighting.
Rotating ring in the steering wheel stalk
switch
Position Specification
Daytime running lights when the car's electrical system is in ignition position II or when the car is run-
ning. Main beam flash can be used.
Daytime running lights and position lamps when the car's electrical sys- tem is in ignition position II or when
the car is running. Position lamps when the car is parked A
.
Main beam flash can be used.
Dipped beam and position lamps. Main beam can be activated.Main beam flash can be used.
Position Specification
Daytime running lights and position lamps in daylight when the car'selectrical system is in ignition posi- tion II or when the car is running.
Dipped beam and position lamps in weak daylight or darkness, or when the front fog lamp * and/or rear fog
lamp are activated. The Active main beam function can be activated. Main beam can be activated when dipped beam is switched on. Main beam flash can be used.
Active main beam on/off.
A Also at stationary when the car is running, provided that the
rotating ring is moved to this position from another position.
Volvo recommends that mode is used
when the vehicle is driven.
20 Applies to vehicles with halogen headlamps.
Page 137 of 594
INSTRUMENTS AND CONTROLS
}}
* Option/accessory.135
WARNING
The car's audio system is not able to deter- mine when daylight is too weak or sufficientlystrong, e.g. in fog and rain, in all situations. The driver is always responsible for ensuring that the car is driven with a beam pattern suit-able for the traffic situation and in accordancewith applicable traffic regulations.
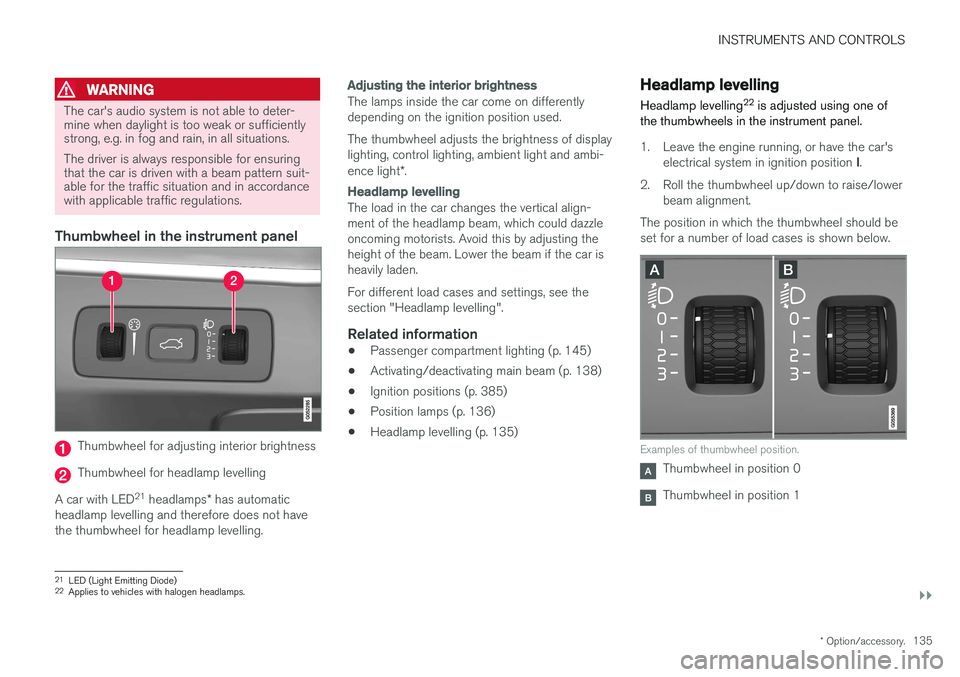
Thumbwheel in the instrument panel
Thumbwheel for adjusting interior brightness
Thumbwheel for headlamp levelling
A car with LED 21
headlamps * has automatic
headlamp levelling and therefore does not have the thumbwheel for headlamp levelling.
Adjusting the interior brightness
The lamps inside the car come on differently depending on the ignition position used. The thumbwheel adjusts the brightness of display lighting, control lighting, ambient light and ambi- ence light *.
Headlamp levelling
The load in the car changes the vertical align- ment of the headlamp beam, which could dazzleoncoming motorists. Avoid this by adjusting theheight of the beam. Lower the beam if the car isheavily laden. For different load cases and settings, see the section "Headlamp levelling".
Related information
• Passenger compartment lighting (p. 145)
• Activating/deactivating main beam (p. 138)
• Ignition positions (p. 385)
• Position lamps (p. 136)
• Headlamp levelling (p. 135)
Headlamp levelling
Headlamp levelling 22
is adjusted using one of
the thumbwheels in the instrument panel.
1. Leave the engine running, or have the car's
electrical system in ignition position I.
2. Roll the thumbwheel up/down to raise/lower beam alignment.
The position in which the thumbwheel should be set for a number of load cases is shown below.
Examples of thumbwheel position.
Thumbwheel in position 0
Thumbwheel in position 1
21 LED (Light Emitting Diode)
22 Applies to vehicles with halogen headlamps.
Page 148 of 594
||
INSTRUMENTS AND CONTROLS
* Option/accessory.
146
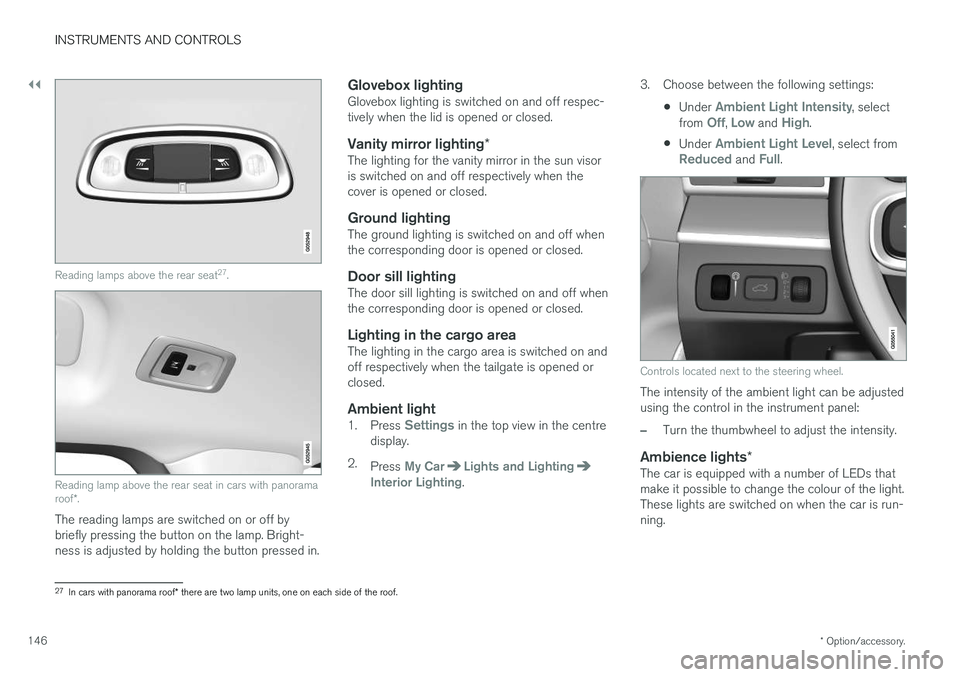
Reading lamps above the rear seat 27
.
Reading lamp above the rear seat in cars with panorama roof *.
The reading lamps are switched on or off by briefly pressing the button on the lamp. Bright-ness is adjusted by holding the button pressed in.
Glovebox lightingGlovebox lighting is switched on and off respec-tively when the lid is opened or closed.
Vanity mirror lighting *The lighting for the vanity mirror in the sun visoris switched on and off respectively when thecover is opened or closed.
Ground lightingThe ground lighting is switched on and off whenthe corresponding door is opened or closed.
Door sill lightingThe door sill lighting is switched on and off whenthe corresponding door is opened or closed.
Lighting in the cargo areaThe lighting in the cargo area is switched on andoff respectively when the tailgate is opened orclosed.
Ambient light1.
Press Settings in the top view in the centre
display.
2. Press
My CarLights and LightingInterior Lighting. 3. Choose between the following settings:
•Under
Ambient Light Intensity, select
from Off, Low and High.
• Under
Ambient Light Level, select fromReduced and Full.
Controls located next to the steering wheel.
The intensity of the ambient light can be adjusted using the control in the instrument panel:
–Turn the thumbwheel to adjust the intensity.
Ambience lights
*The car is equipped with a number of LEDs that make it possible to change the colour of the light.These lights are switched on when the car is run-ning.
27
In cars with panorama roof * there are two lamp units, one on each side of the roof.
Page 149 of 594

INSTRUMENTS AND CONTROLS
147
The ambience lights can be changed via the cen- tre display:
Changing the brightness of the lights
1.
Press Settings in the top view in the centre
display.
2. Press
My CarLights and Lighting
Interior LightingInterior Mood Lighting.
3. Under
Interior Mood Light Intensity, select
from Off, Low and High.
Changing the colour of the light
1. Press Settings in the top view in the centre
display.
2. Press
My CarLights and Lighting
Interior LightingInterior Mood Lighting.
3. Choose between
By Temperature, By
Colour and Theme Colours in order to
change the colour of the light. With colour option
By Temperature, the
colour of the light changes according to the set passenger compartment temperature.
Controls located next to the steering wheel.
The intensity of the ambience light can be adjusted using the controls in the instrumentpanel:
–Turn the thumbwheel to adjust the intensity.
Lighting in storage compartments in doors
The lighting in storage compartments in doors is switched on when the car is running. The bright-ness can be finely adjusted using the control inthe instrument panel.
Lighting in front cup holders in tunnel
console
The lighting in the front cup holders is switchedon when the car is unlocked and is switched offwhen the car is locked. The brightness can befinely adjusted using the control in the instrumentpanel.
Related information
• Headlamp control (p. 134)
• Ignition positions (p. 385)
• Settings view (p. 169)
Page 150 of 594
INSTRUMENTS AND CONTROLS
* Option/accessory.
148
Home safe light duration
Some of the exterior lighting can be kept switched on to work as home safe lighting afterthe car has been locked.
To activate the function:
1. Switch off the car.
2. Move the left-hand stalk switch forward toward the instrument panel and release.
3. Get out of the car and lock the door.When the function is activated, dipped beam, position lamps, lighting in the outside handles *
and number plate lighting are switched on. The length of time that home safe lighting remains on can be set via the centre display.
Related information
• Approach light duration (p. 148)
• Settings view (p. 169)
Approach light duration
Approach lighting is switched on when the car is unlocked and is used to switch on the car'slighting at a distance.
When the function is activated with the remote control key during unlocking, the position lamps, lighting in outer handles *, number plate lighting,
interior roof lighting and floor lighting will switch on. If a door is opened within the activation time, the time for the lighting in the outside handles *
and the interior lighting will be extended. The function can be deactivated/activated via the centre display.
Related information
• Home safe light duration (p. 148)
• Remote control key (p. 236)
• Settings view (p. 169)
Using windscreen wipers
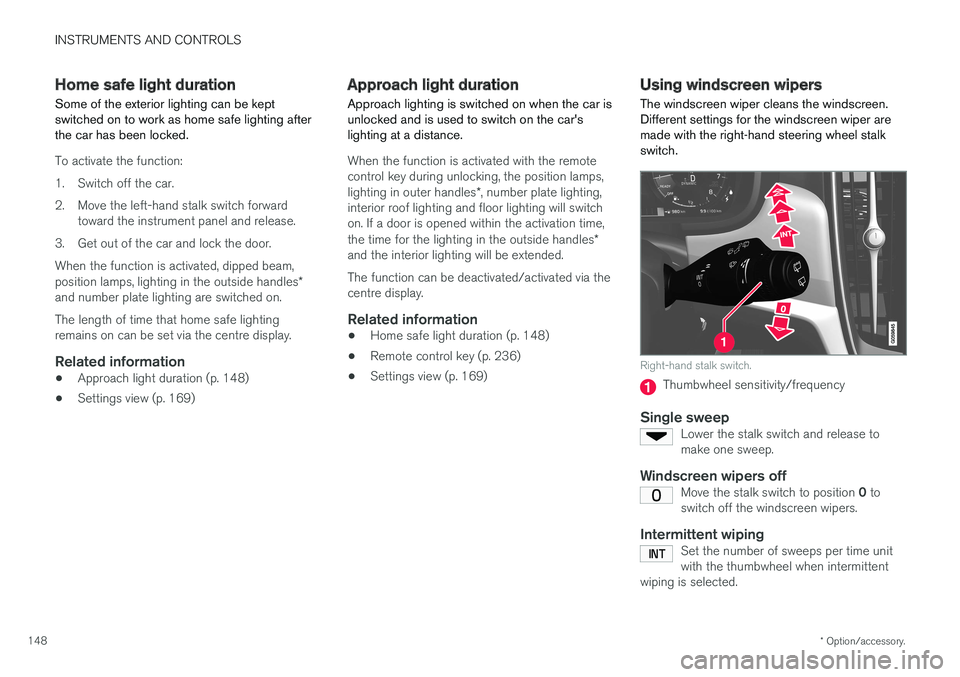
The windscreen wiper cleans the windscreen. Different settings for the windscreen wiper aremade with the right-hand steering wheel stalkswitch.
Right-hand stalk switch.
Thumbwheel sensitivity/frequency
Single sweepLower the stalk switch and release to make one sweep.
Windscreen wipers offMove the stalk switch to position 0 to
switch off the windscreen wipers.
Intermittent wipingSet the number of sweeps per time unit with the thumbwheel when intermittent
wiping is selected.
Page 153 of 594
INSTRUMENTS AND CONTROLS
* Option/accessory.151
Rear window wiper and washer
Rear window wiper and washer clean the rear window. Washing/wiping is started and settingsare changed by means of the right-hand steeringwheel stalk switch.
NOTE
The rear window wiper is equipped with over- heating protection which means that themotor is switched off if it overheats. The rearwindow wiper works again after a cooling-down period.
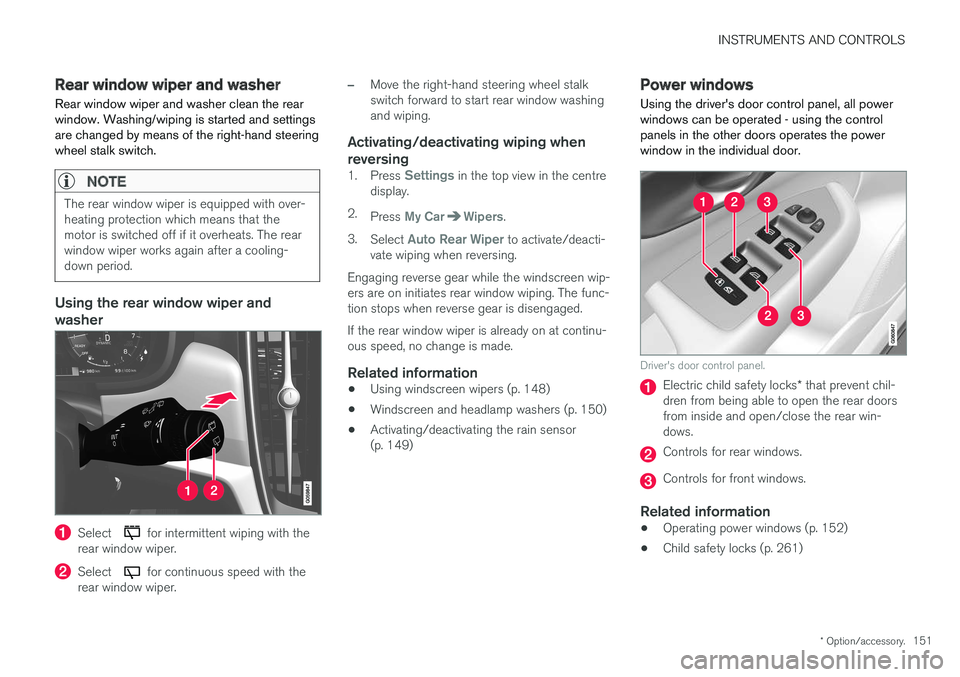
Using the rear window wiper and washer
Select for intermittent wiping with the
rear window wiper.
Select for continuous speed with the
rear window wiper.
–Move the right-hand steering wheel stalk switch forward to start rear window washingand wiping.
Activating/deactivating wiping when reversing
1. Press Settings in the top view in the centre
display.
2. Press
My CarWipers.
3. Select
Auto Rear Wiper to activate/deacti-
vate wiping when reversing.
Engaging reverse gear while the windscreen wip- ers are on initiates rear window wiping. The func- tion stops when reverse gear is disengaged. If the rear window wiper is already on at continu- ous speed, no change is made.
Related information
• Using windscreen wipers (p. 148)
• Windscreen and headlamp washers (p. 150)
• Activating/deactivating the rain sensor(p. 149)
Power windows
Using the driver's door control panel, all power windows can be operated - using the controlpanels in the other doors operates the powerwindow in the individual door.
Driver's door control panel.
Electric child safety locks * that prevent chil-
dren from being able to open the rear doors from inside and open/close the rear win-dows.
Controls for rear windows.
Controls for front windows.
Related information
• Operating power windows (p. 152)
• Child safety locks (p. 261)