VOLVO V90 2018 Owner´s Manual
Manufacturer: VOLVO, Model Year: 2018, Model line: V90, Model: VOLVO V90 2018Pages: 656, PDF Size: 11.78 MB
Page 281 of 656
DRIVER SUPPORT
* Option/accessory.279
Changing Automatic Speed Limitertolerance The Automatic Speed Limiter (ASL 23
) can be set
to different tolerance levels.
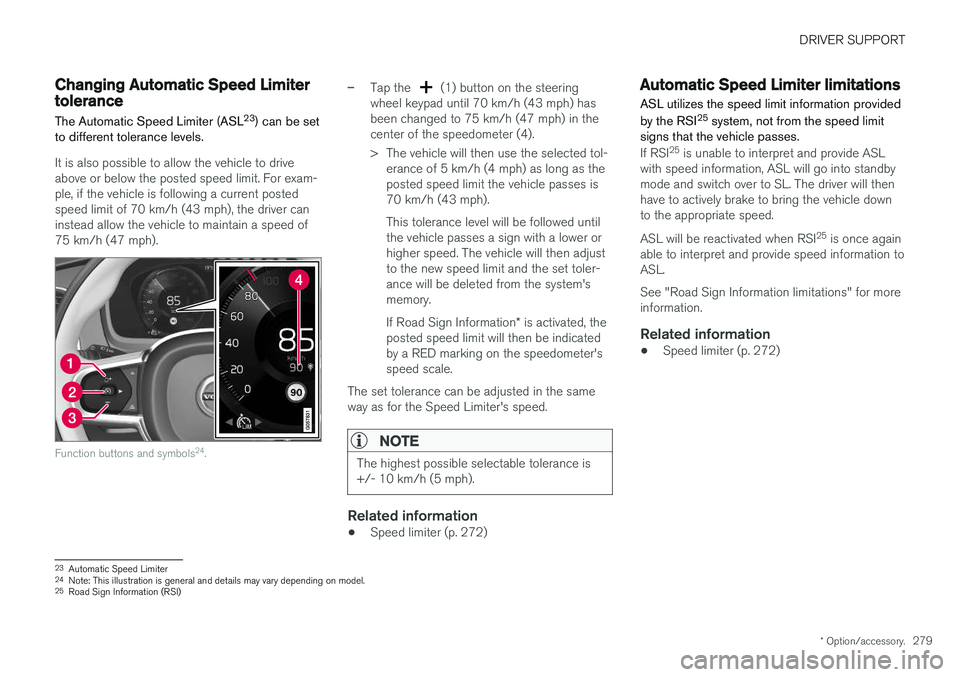
It is also possible to allow the vehicle to drive above or below the posted speed limit. For exam-ple, if the vehicle is following a current postedspeed limit of 70 km/h (43 mph), the driver caninstead allow the vehicle to maintain a speed of75 km/h (47 mph).
Function buttons and symbols 24
.
–Tap the (1) button on the steering
wheel keypad until 70 km/h (43 mph) has been changed to 75 km/h (47 mph) in thecenter of the speedometer (4).
> The vehicle will then use the selected tol- erance of 5 km/h (4 mph) as long as the posted speed limit the vehicle passes is70 km/h (43 mph). This tolerance level will be followed until the vehicle passes a sign with a lower orhigher speed. The vehicle will then adjustto the new speed limit and the set toler-ance will be deleted from the system'smemory. If Road Sign Information * is activated, the
posted speed limit will then be indicated by a RED marking on the speedometer'sspeed scale.
The set tolerance can be adjusted in the sameway as for the Speed Limiter's speed.
NOTE
The highest possible selectable tolerance is +/- 10 km/h (5 mph).
Related information
• Speed limiter (p. 272)
Automatic Speed Limiter limitations
ASL utilizes the speed limit information provided by the RSI 25
system, not from the speed limit
signs that the vehicle passes.
If RSI 25
is unable to interpret and provide ASL
with speed information, ASL will go into standby mode and switch over to SL. The driver will thenhave to actively brake to bring the vehicle downto the appropriate speed. ASL will be reactivated when RSI 25
is once again
able to interpret and provide speed information to ASL. See "Road Sign Information limitations" for more information.
Related information
• Speed limiter (p. 272)
23
Automatic Speed Limiter
24 Note: This illustration is general and details may vary depending on model.
25 Road Sign Information (RSI)
Page 282 of 656
DRIVER SUPPORT
* Option/accessory.
280
Cruise control
Cruise Control (CC 26
) helps the driver maintain
an even speed to provide a more relaxing driving experience on highways and long, straight roadswith even traffic flows.
Overview
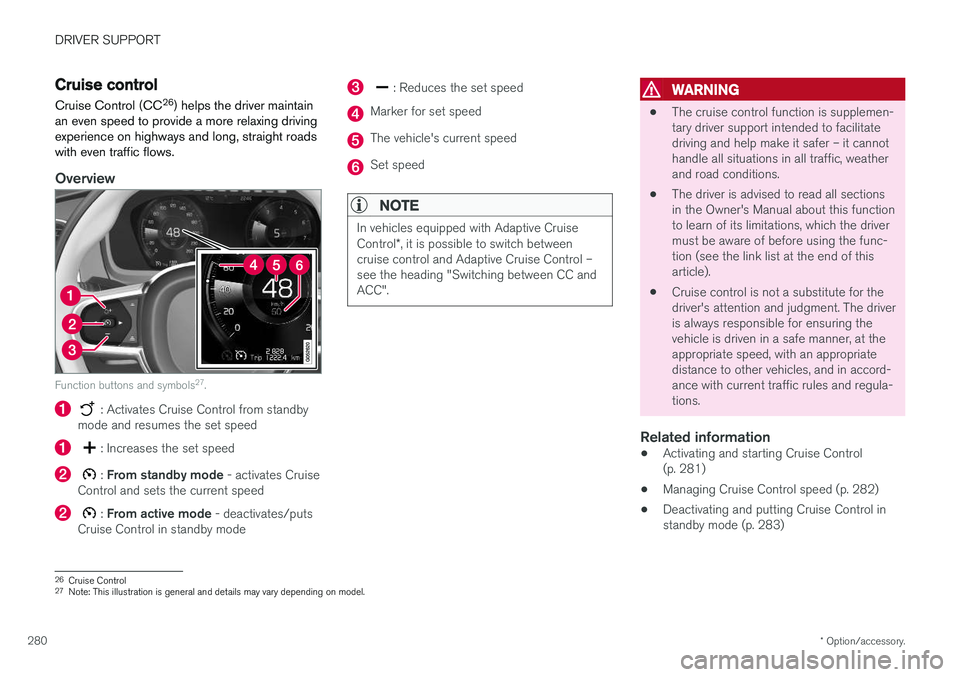
Function buttons and symbols 27
.
: Activates Cruise Control from standby
mode and resumes the set speed
: Increases the set speed
: From standby mode - activates Cruise
Control and sets the current speed
: From active mode - deactivates/puts
Cruise Control in standby mode
: Reduces the set speed
Marker for set speed
The vehicle's current speed
Set speed
NOTE
In vehicles equipped with Adaptive Cruise Control *, it is possible to switch between
cruise control and Adaptive Cruise Control – see the heading "Switching between CC andACC".
WARNING
• The cruise control function is supplemen- tary driver support intended to facilitatedriving and help make it safer – it cannothandle all situations in all traffic, weatherand road conditions.
• The driver is advised to read all sectionsin the Owner's Manual about this functionto learn of its limitations, which the drivermust be aware of before using the func-tion (see the link list at the end of thisarticle).
• Cruise control is not a substitute for thedriver's attention and judgment. The driveris always responsible for ensuring thevehicle is driven in a safe manner, at theappropriate speed, with an appropriatedistance to other vehicles, and in accord-ance with current traffic rules and regula-tions.
Related information
• Activating and starting Cruise Control(p. 281)
• Managing Cruise Control speed (p. 282)
• Deactivating and putting Cruise Control instandby mode (p. 283)
26
Cruise Control
27 Note: This illustration is general and details may vary depending on model.
Page 283 of 656
DRIVER SUPPORT
281
•
Reactivating Cruise Control from standby mode (p. 284)
• Switching off Cruise Control (p. 284)
Activating and starting CruiseControl
The Cruise Control (CC 28
) function must be
selected and activated in order to regulate speed.
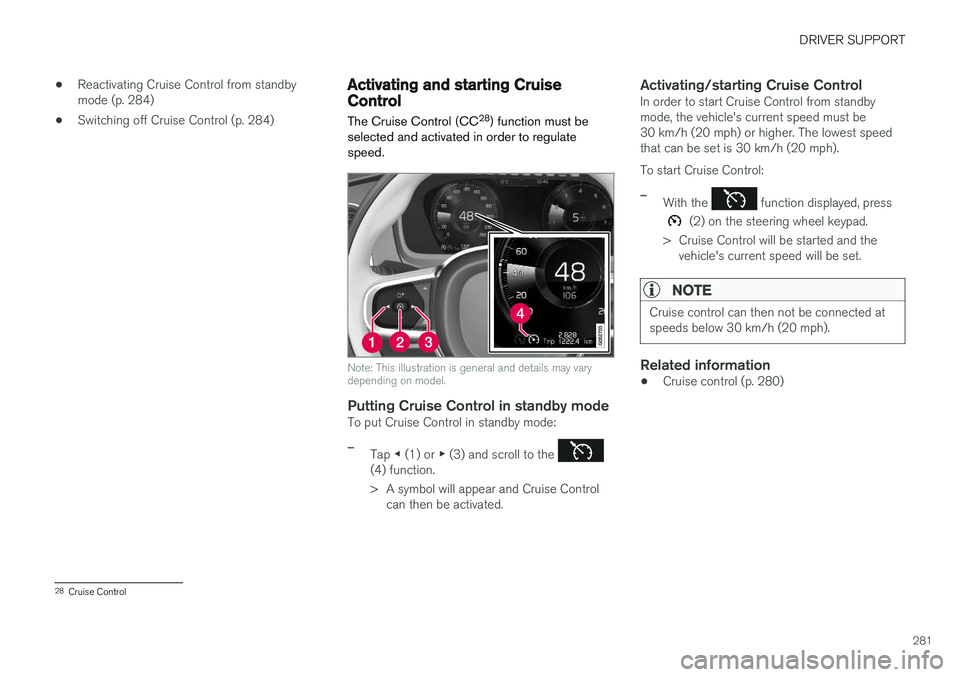
Note: This illustration is general and details may vary depending on model.
Putting Cruise Control in standby modeTo put Cruise Control in standby mode:
–Tap ◀ (1) or ▶ (3) and scroll to the (4) function.
> A symbol will appear and Cruise Control
can then be activated.
Activating/starting Cruise ControlIn order to start Cruise Control from standby mode, the vehicle's current speed must be30 km/h (20 mph) or higher. The lowest speedthat can be set is 30 km/h (20 mph). To start Cruise Control:
–With the function displayed, press
(2) on the steering wheel keypad.
> Cruise Control will be started and the vehicle's current speed will be set.
NOTE
Cruise control can then not be connected at speeds below 30 km/h (20 mph).
Related information
• Cruise control (p. 280)
28
Cruise Control
Page 284 of 656
DRIVER SUPPORT
282
Managing Cruise Control speedCruise Control (CC 29
) can be set to various
speeds.
Setting/changing set speed
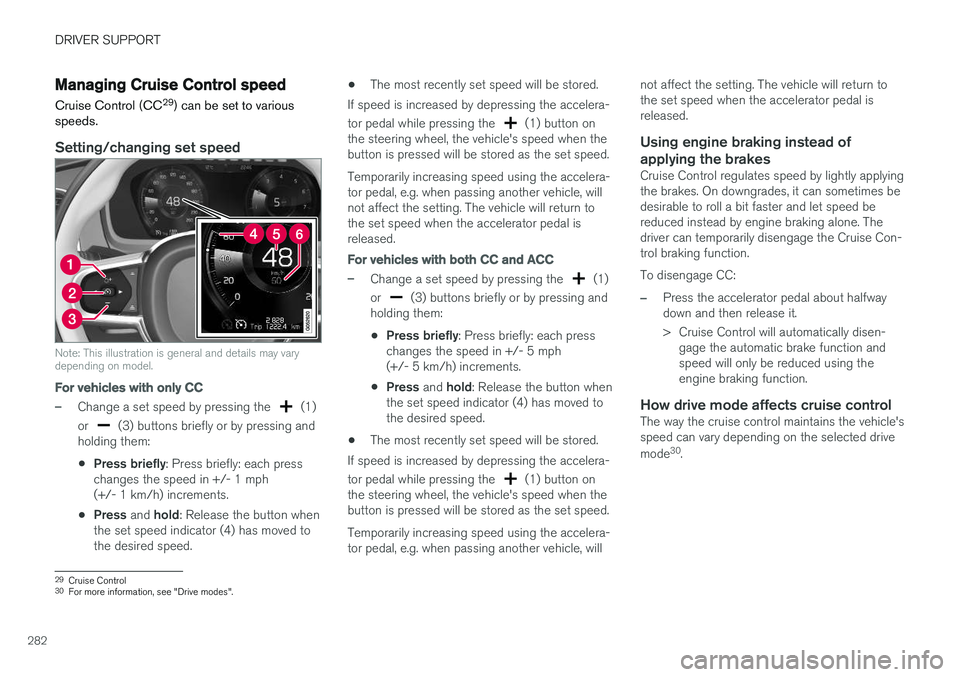
Note: This illustration is general and details may vary depending on model.
For vehicles with only CC
–Change a set speed by pressing the (1)
or
(3) buttons briefly or by pressing and
holding them:
• Press briefly
: Press briefly: each press
changes the speed in +/- 1 mph (+/- 1 km/h) increments.
• Press
and hold: Release the button when
the set speed indicator (4) has moved tothe desired speed. •
The most recently set speed will be stored.
If speed is increased by depressing the accelera- tor pedal while pressing the
(1) button on
the steering wheel, the vehicle's speed when the button is pressed will be stored as the set speed. Temporarily increasing speed using the accelera- tor pedal, e.g. when passing another vehicle, willnot affect the setting. The vehicle will return tothe set speed when the accelerator pedal isreleased.
For vehicles with both CC and ACC
–Change a set speed by pressing the (1)
or
(3) buttons briefly or by pressing and
holding them:
• Press briefly
: Press briefly: each press
changes the speed in +/- 5 mph (+/- 5 km/h) increments.
• Press
and hold: Release the button when
the set speed indicator (4) has moved tothe desired speed.
• The most recently set speed will be stored.
If speed is increased by depressing the accelera- tor pedal while pressing the
(1) button on
the steering wheel, the vehicle's speed when the button is pressed will be stored as the set speed. Temporarily increasing speed using the accelera- tor pedal, e.g. when passing another vehicle, will not affect the setting. The vehicle will return tothe set speed when the accelerator pedal isreleased.
Using engine braking instead of
applying the brakes
Cruise Control regulates speed by lightly applyingthe brakes. On downgrades, it can sometimes bedesirable to roll a bit faster and let speed bereduced instead by engine braking alone. Thedriver can temporarily disengage the Cruise Con-trol braking function. To disengage CC:
–Press the accelerator pedal about halfway down and then release it.
> Cruise Control will automatically disen- gage the automatic brake function and speed will only be reduced using theengine braking function.
How drive mode affects cruise controlThe way the cruise control maintains the vehicle'sspeed can vary depending on the selected drive mode 30
.
29 Cruise Control
30 For more information, see "Drive modes".
Page 285 of 656
DRIVER SUPPORT
283
Cruise Control Eco Cruise
In the ECO drive mode, cruise control's accelera- tion and deceleration will be smoother than inother drive modes to help provide optimal fuelefficiency and reduced environmental impact.Because of this, the vehicle's actual speed maybe slightly above or below the set speed. For more information, see "ECO drive mode" under "Eco Cruise".
Cruise Control Dynamic Cruise
With the Dynamic drive mode, cruise control's acceleration and deceleration will be faster andmore immediate than in other drive modes.
Related information
•Cruise control (p. 280)
Deactivating and putting CruiseControl in standby mode
Cruise Control (CC 31
) can be temporarily put
into standby mode and then reactivated.
Deactivating and putting Cruise Control in standby mode
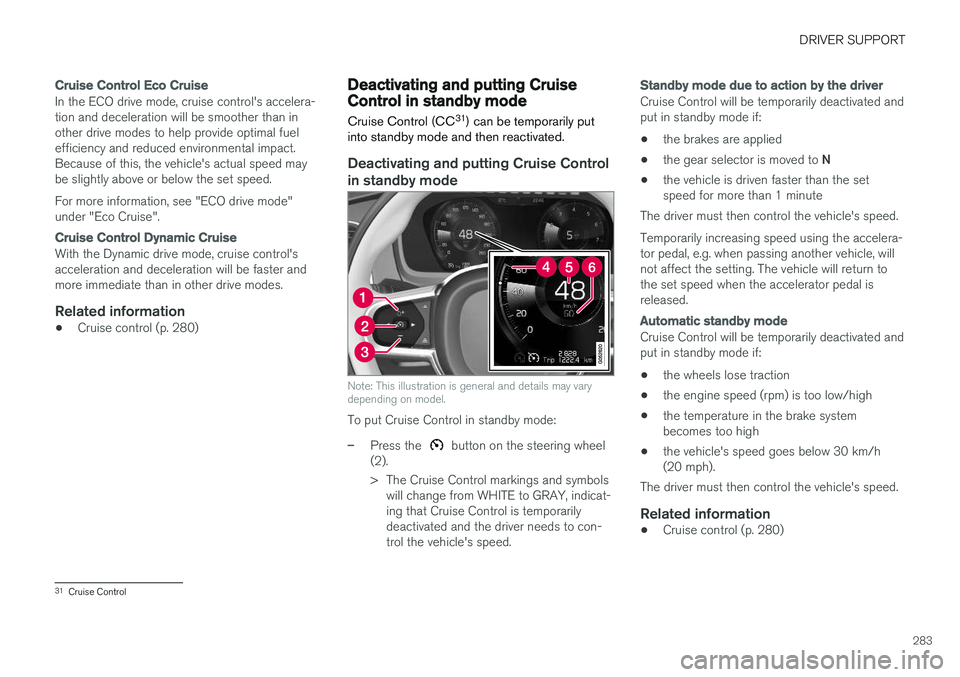
Note: This illustration is general and details may vary depending on model.
To put Cruise Control in standby mode:
–Press the button on the steering wheel
(2).
> The Cruise Control markings and symbols will change from WHITE to GRAY, indicat- ing that Cruise Control is temporarilydeactivated and the driver needs to con-trol the vehicle's speed.
Standby mode due to action by the driver
Cruise Control will be temporarily deactivated and put in standby mode if:
• the brakes are applied
• the gear selector is moved to
N
• the vehicle is driven faster than the setspeed for more than 1 minute
The driver must then control the vehicle's speed. Temporarily increasing speed using the accelera- tor pedal, e.g. when passing another vehicle, willnot affect the setting. The vehicle will return tothe set speed when the accelerator pedal isreleased.
Automatic standby mode
Cruise Control will be temporarily deactivated and put in standby mode if:
• the wheels lose traction
• the engine speed (rpm) is too low/high
• the temperature in the brake systembecomes too high
• the vehicle's speed goes below 30 km/h(20 mph).
The driver must then control the vehicle's speed.
Related information
• Cruise control (p. 280)
31
Cruise Control
Page 286 of 656
DRIVER SUPPORT
284
Reactivating Cruise Control fromstandby modeCruise Control (CC 32
) can be temporarily put
into standby mode and then reactivated.
Reactivating Cruise Control from standby mode
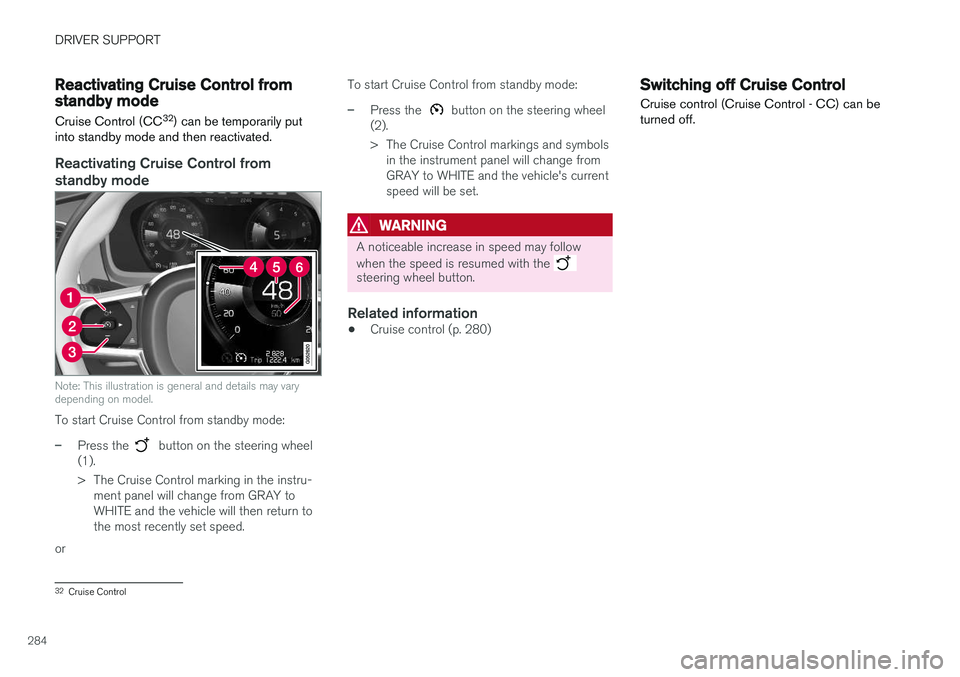
Note: This illustration is general and details may vary depending on model.
To start Cruise Control from standby mode:
–Press the button on the steering wheel
(1).
> The Cruise Control marking in the instru- ment panel will change from GRAY to WHITE and the vehicle will then return tothe most recently set speed.
or To start Cruise Control from standby mode:
–Press the button on the steering wheel
(2).
> The Cruise Control markings and symbols in the instrument panel will change from GRAY to WHITE and the vehicle's currentspeed will be set.
WARNING
A noticeable increase in speed may follow when the speed is resumed with the
steering wheel button.
Related information
• Cruise control (p. 280)
Switching off Cruise Control
Cruise control (Cruise Control - CC) can be turned off.
32 Cruise Control
Page 287 of 656
DRIVER SUPPORT
}}
* Option/accessory.285
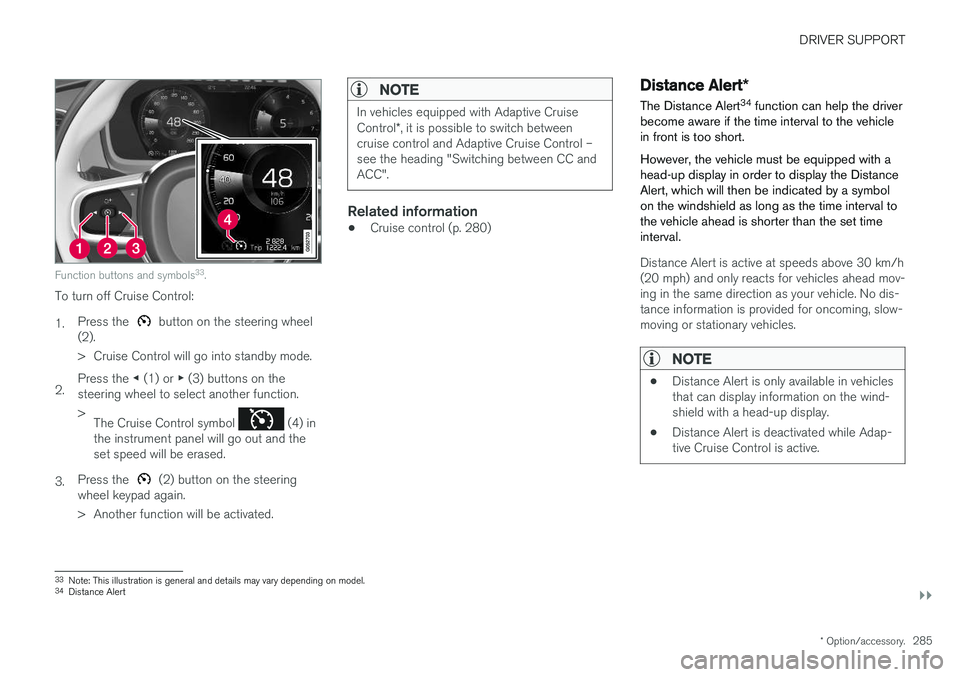
Function buttons and symbols 33
.
To turn off Cruise Control: 1. Press the
button on the steering wheel
(2).
> Cruise Control will go into standby mode.
2. Press the
◀ (1) or ▶ (3) buttons on the
steering wheel to select another function.> The Cruise Control symbol
(4) in
the instrument panel will go out and the set speed will be erased.
3. Press the
(2) button on the steering
wheel keypad again.
> Another function will be activated.
NOTE
In vehicles equipped with Adaptive Cruise Control *, it is possible to switch between
cruise control and Adaptive Cruise Control – see the heading "Switching between CC andACC".
Related information
• Cruise control (p. 280)
Distance Alert
*
The Distance Alert 34
function can help the driver
become aware if the time interval to the vehicle in front is too short. However, the vehicle must be equipped with a head-up display in order to display the DistanceAlert, which will then be indicated by a symbolon the windshield as long as the time interval tothe vehicle ahead is shorter than the set timeinterval.
Distance Alert is active at speeds above 30 km/h (20 mph) and only reacts for vehicles ahead mov-ing in the same direction as your vehicle. No dis-tance information is provided for oncoming, slow-moving or stationary vehicles.
NOTE
• Distance Alert is only available in vehicles that can display information on the wind-shield with a head-up display.
• Distance Alert is deactivated while Adap-tive Cruise Control is active.
33
Note: This illustration is general and details may vary depending on model.
34 Distance Alert
Page 288 of 656
||
DRIVER SUPPORT
* Option/accessory.
286
WARNING
Distance Alert only reacts of the time interval to the vehicle ahead is shorter than the presetvalue – vehicle speed is not affected.
NOTE
Depending on market, this function may be either Standard or Optional.
Related information
• Head-up display for Distance Alert (p. 286)
• Activating/deactivating Distance Alert (p. 287)
• Setting a time interval for Distance Alert(p. 287)
• Distance Alert limitations (p. 288)
Head-up display for Distance Alert35
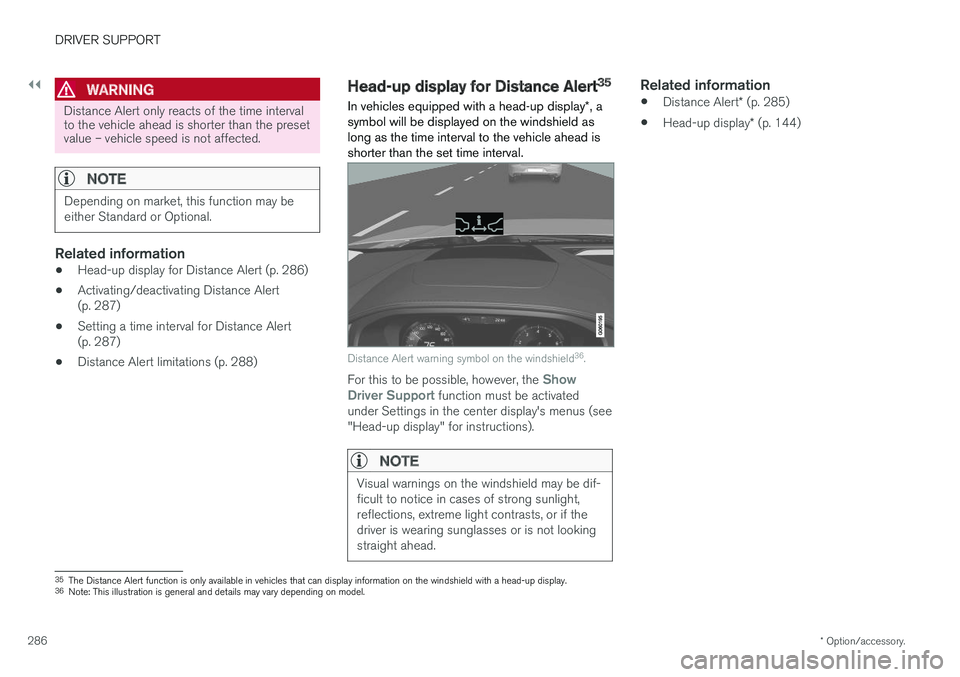
In vehicles equipped with a head-up display *, a
symbol will be displayed on the windshield as long as the time interval to the vehicle ahead isshorter than the set time interval.
Distance Alert warning symbol on the windshield 36
.
For this to be possible, however, the Show
Driver Support function must be activated
under Settings in the center display's menus (see "Head-up display" for instructions).
NOTE
Visual warnings on the windshield may be dif- ficult to notice in cases of strong sunlight,reflections, extreme light contrasts, or if thedriver is wearing sunglasses or is not lookingstraight ahead.
Related information
• Distance Alert
* (p. 285)
• Head-up display
* (p. 144)
35
The Distance Alert function is only available in vehicles that can display information on the windshield with a head-up display.
36 Note: This illustration is general and details may vary depending on model.
Page 289 of 656
DRIVER SUPPORT
}}
* Option/accessory.287
Activating/deactivating Distance
Alert37
It is possible to set time intervals for Distance Alert or to turn the function off.
On/OffPress the Distance Alert but-
ton in the center display's Function view.
• GREEN button indicator light - Distance Alert is on.
• GRAY button indicator light - Distance Alertis off.
Distance Alert is automatically activated eachtime the engine is started.
Related information
• Distance Alert
* (p. 285)
Setting a time interval for Distance
Alert38
The Distance Alert function can be set to differ- ent time intervals.
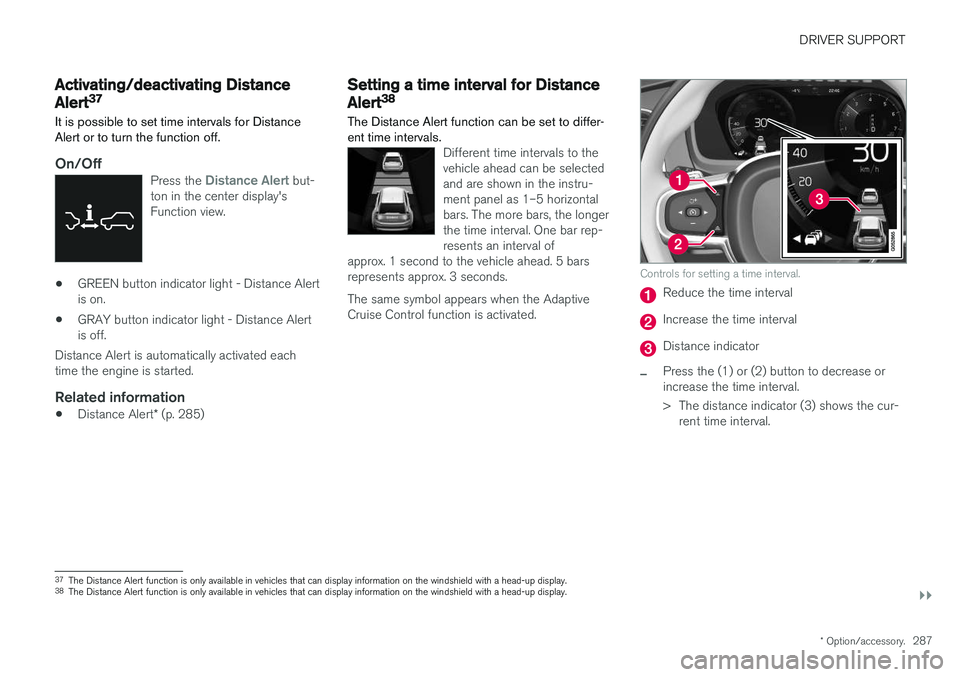
Different time intervals to the vehicle ahead can be selectedand are shown in the instru-ment panel as 1–5 horizontalbars. The more bars, the longerthe time interval. One bar rep-resents an interval of
approx. 1 second to the vehicle ahead. 5 barsrepresents approx. 3 seconds.
The same symbol appears when the Adaptive Cruise Control function is activated.
Controls for setting a time interval.
Reduce the time interval
Increase the time interval
Distance indicator
–Press the (1) or (2) button to decrease or increase the time interval.
> The distance indicator (3) shows the cur- rent time interval.
37The Distance Alert function is only available in vehicles that can display information on the windshield with a head-up display.
38 The Distance Alert function is only available in vehicles that can display information on the windshield with a head-up display.
Page 290 of 656
||
DRIVER SUPPORT
* Option/accessory.
288
NOTE
• The greater the vehicles' speed, the greater the distance between them for aset time interval.
• Only use the time intervals permitted bylocal traffic regulations.
• The set time interval is also used by theAdaptive Cruise Control and Pilot Assistfunctions.
WARNING
•Only use a time interval suitable for the current traffic conditions.
• The driver should be aware that shorttime intervals give them limited time toreact and act to any unforeseen trafficsituation.
Related information
•
Distance Alert
* (p. 285)
Distance Alert limitations39
Distance Alert functionality may be reduced in certain situations.WARNING
• The radar sensor has a limited field of vision. In some situations, it may detect avehicle later than expected or not detectother vehicles at all.
• The radar sensor cannot cover all drivingsituations and traffic, weather and roadconditions.
• The driver is responsible for maintaining asafe distance and speed and must inter-vene if the various driver support systemsdo not maintain a suitable speed or suita-ble distance to the vehicle ahead.
• Maintenance of radar sensor componentsmay only be performed by a trained andqualified Volvo technician.
• Strong sunlight, reflections from the roadsurface, strong lighting contrasts or usingsunglasses may make the warning light inthe windshield difficult to see. Poorweather or winding roads can affect theradar sensor's capacity to detect vehiclesahead.
• A vehicle's size (e.g., a motorcycle) canalso affect the radar sensor's capacity todetect another vehicle. This may result inthe warning light illuminating at a shorter
39
The Distance Alert function is only available in vehicles that can display information on the windshield with a head-up display.