key VOLVO V90 CROSS COUNTRY 2017 Owner´s Manual
[x] Cancel search | Manufacturer: VOLVO, Model Year: 2017, Model line: V90 CROSS COUNTRY, Model: VOLVO V90 CROSS COUNTRY 2017Pages: 552, PDF Size: 13.6 MB
Page 36 of 552
||
INTRODUCTION
34
Special characters
To enter language-specific characters such as é
or è (if available):
1. Press and hold a character key. > A box with available characters will open.
2. Tap the desired character. If none of the spe- cial characters is selected, the key's initial character will be entered.
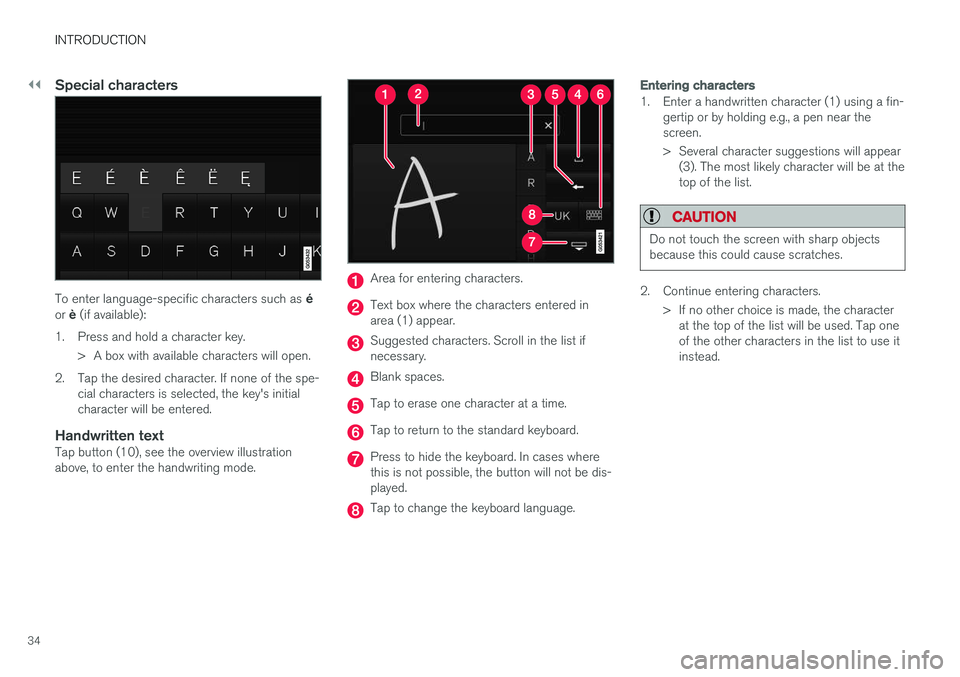
Handwritten textTap button (10), see the overview illustrationabove, to enter the handwriting mode.
Area for entering characters.
Text box where the characters entered in area (1) appear.
Suggested characters. Scroll in the list if necessary.
Blank spaces.
Tap to erase one character at a time.
Tap to return to the standard keyboard.
Press to hide the keyboard. In cases where this is not possible, the button will not be dis-played.
Tap to change the keyboard language.
Entering characters
1. Enter a handwritten character (1) using a fin-gertip or by holding e.g., a pen near the screen.
> Several character suggestions will appear(3). The most likely character will be at the top of the list.
CAUTION
Do not touch the screen with sharp objects because this could cause scratches.
2. Continue entering characters.
> If no other choice is made, the characterat the top of the list will be used. Tap one of the other characters in the list to use itinstead.
Page 49 of 552
INTRODUCTION
47
The scroll indicator on the right side of the center dis- play
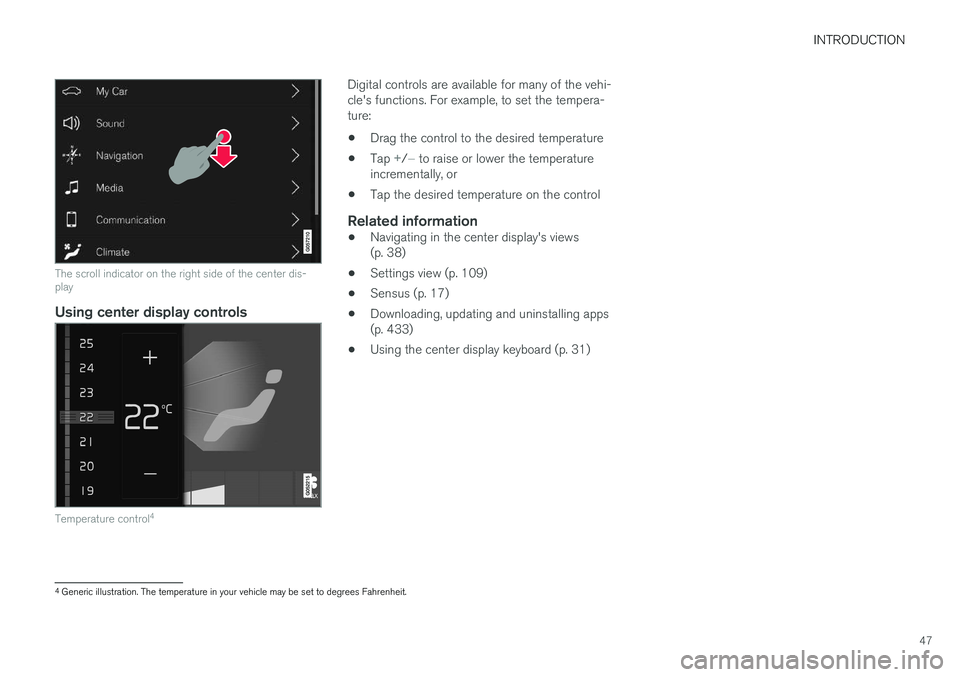
Using center display controls
Temperature control4
Digital controls are available for many of the vehi- cle's functions. For example, to set the tempera-ture:
• Drag the control to the desired temperature
• Tap
+/− to raise or lower the temperature
incrementally, or
• Tap the desired temperature on the control
Related information
• Navigating in the center display's views (p. 38)
• Settings view (p. 109)
• Sensus (p. 17)
• Downloading, updating and uninstalling apps(p. 433)
• Using the center display keyboard (p. 31)
4
Generic illustration. The temperature in your vehicle may be set to degrees Fahrenheit.
Page 55 of 552
INTRODUCTION
* Option/accessory.53
Using the search function
1.
Tap the magnifying glass icon () in the
owner's manual's upper menu. A keyboard will appear at the bottom of the screen.
2. Enter a word, e.g., "seat belt." > Suggested articles will be displayed asmore characters are entered.
3. Confirm by tapping the article. To leave search mode tap the up-arrow next to thesearch box.
Related information
• On-board digital owner's manual (p. 50)
• Using the center display keyboard (p. 31)
Glass
Laminated glass
The windshield and panoramic roof
* are made of
laminated glass, which is reinforced to help pre- vent break-ins and to provide additional sound-proofing. Laminated glass is optional for theother side windows.
Laminated glass symbol 5
Related information
•
Laminated panoramic roof
* (p. 104)
• Power windows (p. 107)
• Defrosting windows and mirrors (p. 190)
• Using sun curtains
* (p. 109)
• Rearview mirror (p. 108)
• Power windows (p. 107)
• Head-up display (HUD)
* (p. 116)
• Activating/deactivating the rain sensor (p. 157)
• Windshield and headlight washers (p. 158)
• Tailgate window wiper and washer (p. 159)
Technician certification
In addition to Volvo factory training, Volvo sup- ports certification by the National Institute forAutomotive Service Excellence (A.S.E.).
Certified technicians have demonstrated a high degree of competence in specific areas. Besidespassing exams, each technician must also haveworked in the field for two or more years before acertificate is issued. These professional techni-cians are best able to analyze vehicle problemsand perform the necessary maintenance proce-dures to keep your Volvo at peak operating con-dition.
5 This symbol is not shown on the windshield or panoramic roof.
Page 66 of 552

SAFETY
64
Door and seat belt reminders
Graphics in the instrument panel
Warning colors for doors/tailgate vary depending on the vehicle's speed (generic illustration)
The instrument panel graphic shows the seats where seat belts are not buckled. The same graphic also indicates if a door, the hood, tailgate or fuel filler door is/are open. This graphic disappears automatically after approx. 30 seconds or if the if the O button on
the steering wheel keypad is pressed.
Seat belt reminder
Seat belt reminder light in ceiling console
The seat belt reminder consists of an audible signal, an indicator light nearthe rearview mirror and a symbol in theinstrument panel that alert all occu-
pants of the vehicle to buckle their seat belts.
The audible signal is speed-dependent and will sound for several seconds. If the driver's or a passenger's seat belt is not buckled, this will be indicated in the instrumentpanel. Child seats are not included in the seat belt reminder system.
Front seats
An audible signal and an indicator light will remind the driver and front seat passenger tobuckle their seat belts.
Rear seats
The rear seat belt reminder has two functions.
• It indicates which seat belts are buckled in the rear seats. This will also be displayed inan instrument panel graphic.
• It also provides audio and visual reminders ifa rear seat belt is unbuckled while the vehi-cle is in motion. The reminders will disappearwhen the seat belt has been buckled again or can be erased by pressing the
O button
on the steering wheel keypad.
Door/hood/tailgate/fuel filler door
reminder
If a door, the hood, tailgate or fuel filler door is/are not properly closed, this will be indicated ina graphic in the instrument panel. Stop the vehi-cle safely and close the source of the reminder.
If the vehicle is moving at a speedunder approx.6 mph (10 km/h), theinformation symbol will illuminate in theinstrument panel.
At speeds above approx. 6 mph (10 km/h), the warning symbol will illu-minate in the instrument panel.
Related information
•Seat belts (p. 60)
• Buckling and unbuckling seat belts (p. 62)
• Seat belt pretensioners (p. 61)
Page 96 of 552
INSTRUMENTS AND CONTROLS
* Option/accessory.
94
Instruments and controls
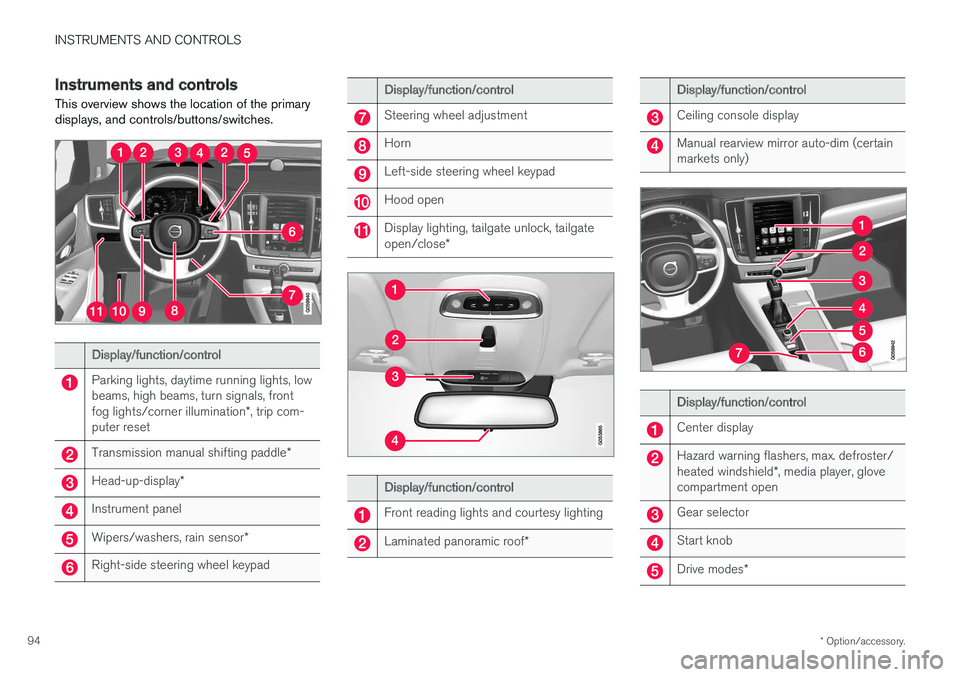
This overview shows the location of the primary displays, and controls/buttons/switches.
Display/function/control
Parking lights, daytime running lights, low beams, high beams, turn signals, front fog lights/corner illumination *, trip com-
puter reset
Transmission manual shifting paddle *
Head-up-display*
Instrument panel
Wipers/washers, rain sensor *
Right-side steering wheel keypad
Display/function/control
Steering wheel adjustment
Horn
Left-side steering wheel keypad
Hood open
Display lighting, tailgate unlock, tailgate open/close*
Display/function/control
Front reading lights and courtesy lighting
Laminated panoramic roof *
Display/function/control
Ceiling console display
Manual rearview mirror auto-dim (certain markets only)
Display/function/control
Center display
Hazard warning flashers, max. defroster/ heated windshield*, media player, glove
compartment open
Gear selector
Start knob
Drive modes *
Page 98 of 552
||
INSTRUMENTS AND CONTROLS
96•
Average speed
• Average fuel consumption
The values displayed are those since the last time the trip odometer was reset.
OdometerThe odometer registers the vehicle's total mile-age and cannot be reset.
Current fuel consumptionThis gauge shows the current fuel consumption.This reading is updated once a second.
Distance to emptyThis function shows the approximate distancethat can be driven on the fuel remaining in thetank. The calculation is based on average fuel con- sumption during the last 20 miles (30 km) ofdriving and the amount of fuel remaining in thetank. When the gauge displays "----", there is very little useable fuel remaining in the tank; refuel as soonas possible. The accuracy of this figure may vary if your driv- ing style changes. An economical driving style willgenerally increase this distance.
Tourist (alternative speedometer)This is an alternative digital speedometer can beused when driving in areas in which the speedlimit is listed in a different unit of measure. If the speedometer is in
mph, this gauge will show the
vehicle's speed in km/h and vice versa.
Related information
•Displaying trip computer information (p. 96)
• Displaying trip statistics (p. 98)
Displaying trip computer information
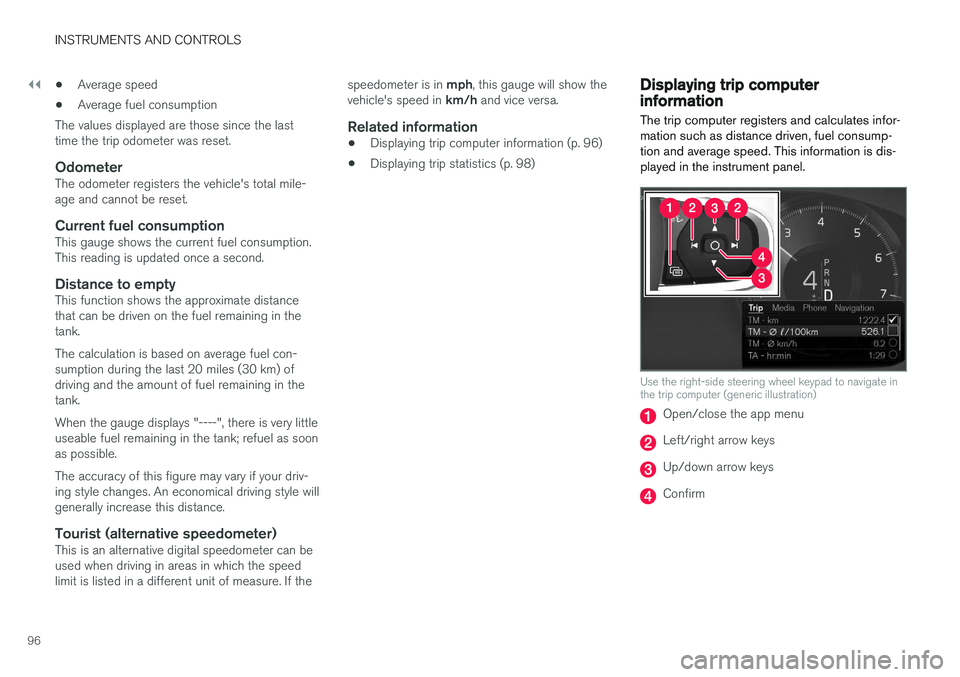
The trip computer registers and calculates infor- mation such as distance driven, fuel consump-tion and average speed. This information is dis-played in the instrument panel.
Use the right-side steering wheel keypad to navigate in the trip computer (generic illustration)
Open/close the app menu
Left/right arrow keys
Up/down arrow keys
Confirm
Page 107 of 552
INSTRUMENTS AND CONTROLS
}}
* Option/accessory.105
Operating the laminated panoramic roof*
When opened automatically, the sun shade and roof open first to the "comfort" position thathelps reduce wind noise and then open com-pletely. In the tilt (ventilation) position, the rear edge of the front section of the roof is raised.
Operation
WARNING
• During manual closing, if the laminated panoramic roof is obstructed, immediatelyopen it again.
• Never open or close the laminated panor-amic roof if it is obstructed in any way.
• Never allow a child to operate the lamina-ted panoramic roof.
• Never leave a child alone in a vehicle.
• When leaving the vehicle, ensure that the ignition is in mode
0. Never leave a
remote key in the vehicle.
• Never extend any object or body part though the open laminated panoramicroof, even if the vehicle's ignition is com-pletely switched off.
CAUTION
The optional panoramic roof should not be opened while load carriers are installed onthe vehicle.
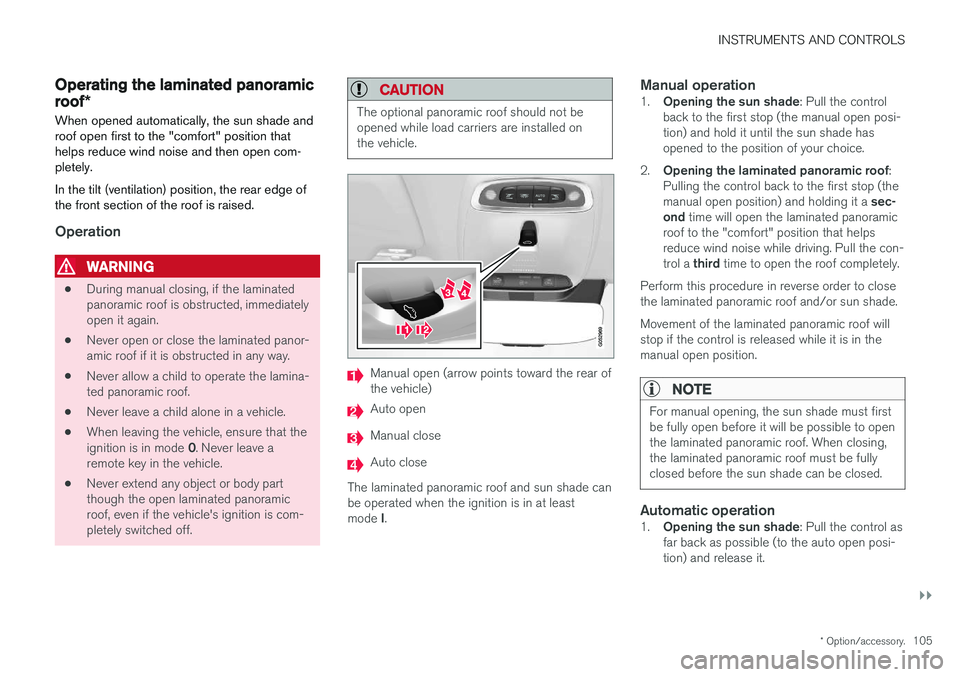
Manual open (arrow points toward the rear of the vehicle)
Auto open
Manual close
Auto close
The laminated panoramic roof and sun shade can be operated when the ignition is in at least mode I.
Manual operation1.
Opening the sun shade : Pull the control
back to the first stop (the manual open posi- tion) and hold it until the sun shade hasopened to the position of your choice.
2. Opening the laminated panoramic roof :
Pulling the control back to the first stop (the manual open position) and holding it a sec-
ond time will open the laminated panoramic
roof to the "comfort" position that helps reduce wind noise while driving. Pull the con- trol a third time to open the roof completely.
Perform this procedure in reverse order to close the laminated panoramic roof and/or sun shade. Movement of the laminated panoramic roof will stop if the control is released while it is in themanual open position.
NOTE
For manual opening, the sun shade must first be fully open before it will be possible to openthe laminated panoramic roof. When closing,the laminated panoramic roof must be fullyclosed before the sun shade can be closed.
Automatic operation1. Opening the sun shade : Pull the control as
far back as possible (to the auto open posi- tion) and release it.
Page 108 of 552
||
INSTRUMENTS AND CONTROLS
1062.
Opening the laminated panoramic roof :
Pull the control as far back as possible a second time (to the auto open position) and
release it to open the laminated panoramic roof to the "comfort" position that helpsreduce wind noise while driving. Pull the con- trol a third time (to the auto open position)
and release it to open the roof completely.
Perform this procedure in reverse order to close the laminated panoramic roof/sun shade. Theroof will not stop at the "comfort" position if it isclosed from the fully open position. The laminated panoramic roof will stop when it reaches the "comfort" position, the fully openposition or the closed position. Movement willalso stop if the control is moved in the oppositedirection to the movement of the roof. The roof will not stop at the "comfort" position if it is closed from the fully open position.
Quick open/close
The laminated panoramic roof and the sun shade can be opened/closed at the same time: • Open
: pull the control back (to the auto
open position) twice in quick succession and release it.
• Close
: push the control forward (to the auto
close position) twice in quick succession andrelease it. The laminated panoramic roof will stop when itreaches the "comfort" position or the closedposition. Movement will also stop if the control ismoved in the opposite direction to the movementof the roof. The roof will not stop at the "comfort" position if it is closed from the fully open position. The sunshade never stops when the roof reaches the"comfort" position.
Tilt (ventilation) position
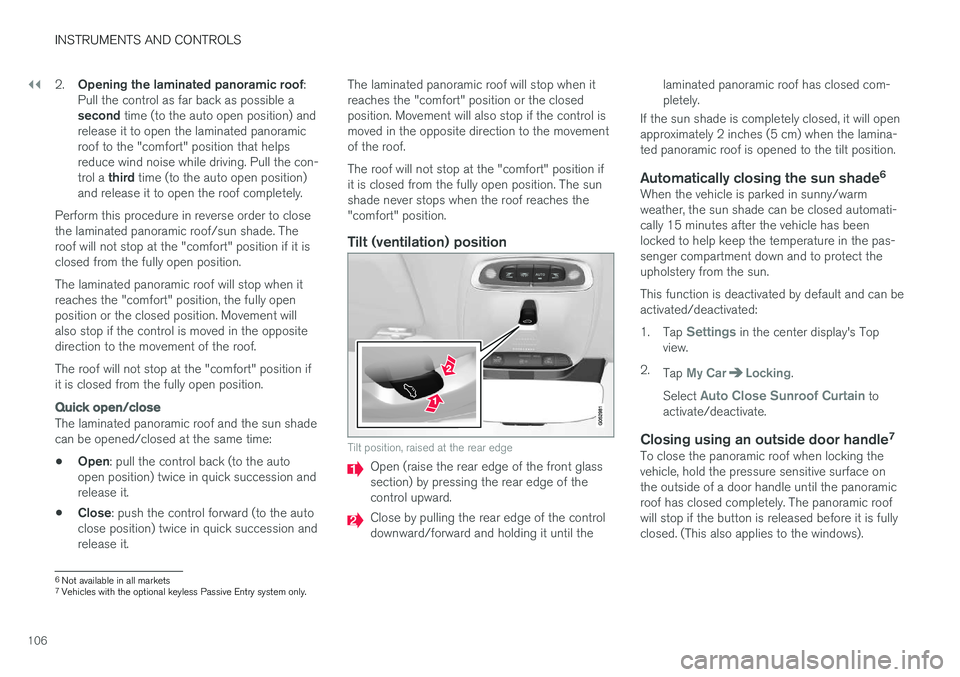
Tilt position, raised at the rear edge
Open (raise the rear edge of the front glass section) by pressing the rear edge of thecontrol upward.
Close by pulling the rear edge of the control downward/forward and holding it until the
laminated panoramic roof has closed com-pletely.
If the sun shade is completely closed, it will openapproximately 2 inches (5 cm) when the lamina-ted panoramic roof is opened to the tilt position.
Automatically closing the sun shade 6When the vehicle is parked in sunny/warmweather, the sun shade can be closed automati-cally 15 minutes after the vehicle has beenlocked to help keep the temperature in the pas-senger compartment down and to protect theupholstery from the sun. This function is deactivated by default and can be activated/deactivated: 1.
Tap
Settings in the center display's Top
view.
2. Tap
My CarLocking.
Select
Auto Close Sunroof Curtain to
activate/deactivate.
Closing using an outside door handle 7To close the panoramic roof when locking the vehicle, hold the pressure sensitive surface onthe outside of a door handle until the panoramicroof has closed completely. The panoramic roofwill stop if the button is released before it is fullyclosed. (This also applies to the windows).
6
Not available in all markets
7 Vehicles with the optional keyless Passive Entry system only.
Page 109 of 552
INSTRUMENTS AND CONTROLS
}}
* Option/accessory.107
Pinch protection (auto-stop)The laminated panoramic roof has a pinch pro- tection feature that is triggered if the glass sec-tion of the roof and/or the sun shade is blockedin any way when being closed. In this case, thelaminated panoramic roof and/or sun shade willstop and reverse automatically approximately 2 in.(5 cm) from the point at which it was blocked (orwill open fully to the tilt position). The pinch protection feature also functions when the laminated panoramic roof and/or sun shadeis being opened.
WARNING
If the pinch protection (auto-stop) feature has been triggered, the laminated panoramic roofand/or sun shade can still be operated once more within 10 seconds without pinch pro-
tection . Pinch protection can be overridden if
the closing procedure has been interrupted (e.g., due to ice around the laminated panor-amic roof) by pressing and holding the controlforward/downward until the laminated panor-amic roof and/or sun shade is closed.
Power windows
All power windows can be operated using the control panel in the driver's door. The controlpanels in the other doors only operate the win-dow in the respective doors.
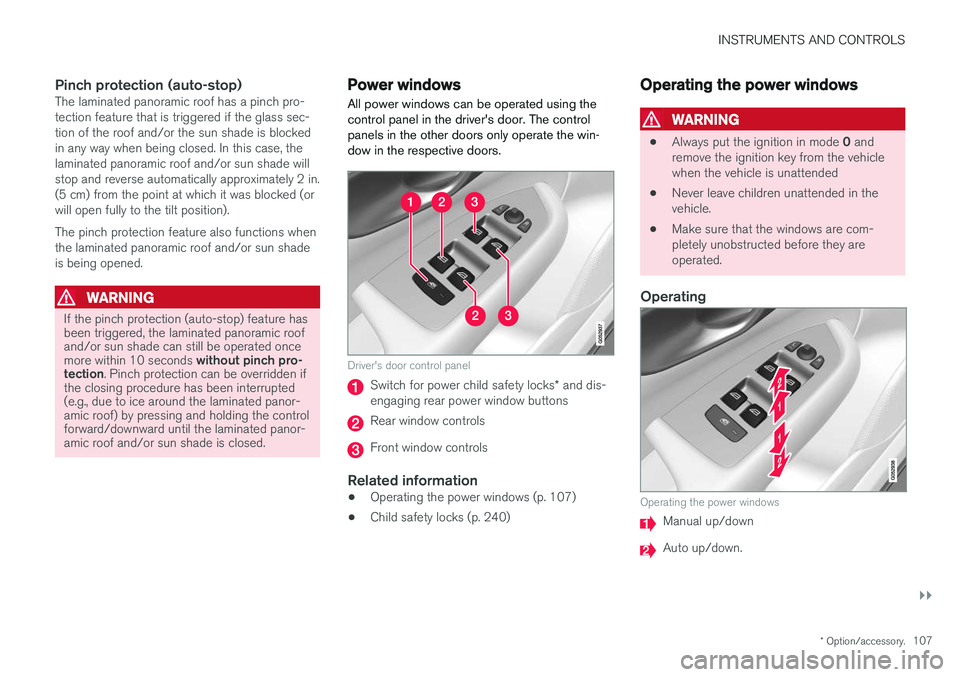
Driver's door control panel
Switch for power child safety locks * and dis-
engaging rear power window buttons
Rear window controls
Front window controls
Related information
• Operating the power windows (p. 107)
• Child safety locks (p. 240)
Operating the power windows
WARNING
•
Always put the ignition in mode
0 and
remove the ignition key from the vehicle when the vehicle is unattended
• Never leave children unattended in thevehicle.
• Make sure that the windows are com-pletely unobstructed before they areoperated.
Operating
Operating the power windows
Manual up/down
Auto up/down.
Page 113 of 552
INSTRUMENTS AND CONTROLS
* Option/accessory.111
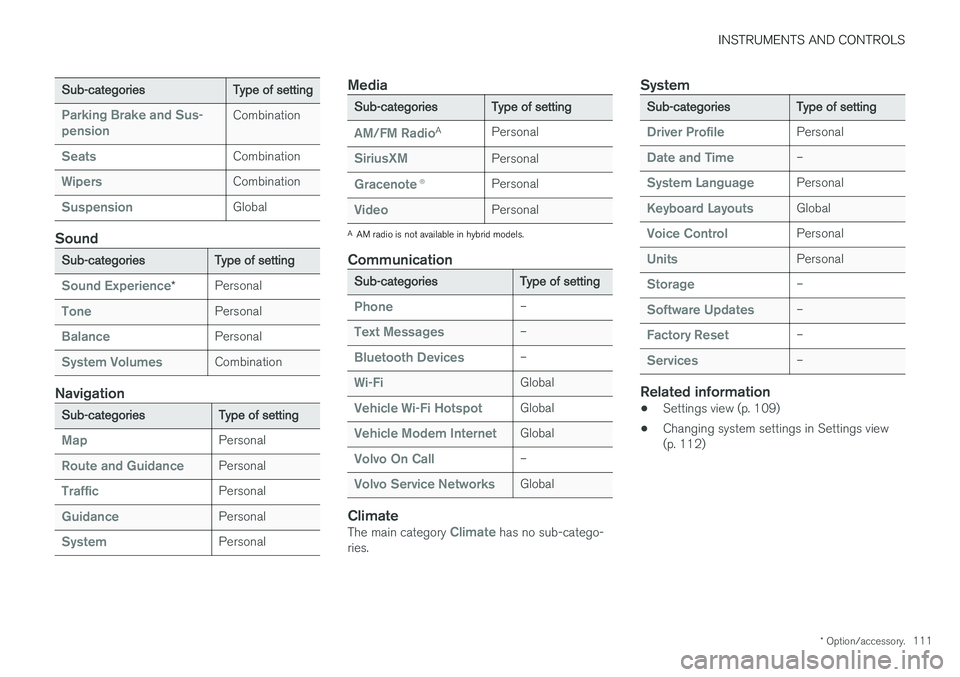
Sub-categories Type of setting
Parking Brake and Sus- pensionCombination
SeatsCombination
WipersCombination
SuspensionGlobal
Sound
Sub-categoriesType of setting
Sound Experience*Personal
TonePersonal
BalancePersonal
System VolumesCombination
Navigation
Sub-categories
Type of setting
MapPersonal
Route and GuidancePersonal
TrafficPersonal
GuidancePersonal
SystemPersonal
Media
Sub-categoriesType of setting
AM/FM RadioA
Personal
SiriusXMPersonal
Gracenote ®Personal
VideoPersonal
A
AM radio is not available in hybrid models.
Communication
Sub-categories Type of setting
Phone–
Text Messages–
Bluetooth Devices–
Wi-FiGlobal
Vehicle Wi-Fi HotspotGlobal
Vehicle Modem InternetGlobal
Volvo On Call–
Volvo Service NetworksGlobal
ClimateThe main category Climate has no sub-catego-
ries.
System
Sub-categories Type of setting
Driver ProfilePersonal
Date and Time–
System LanguagePersonal
Keyboard LayoutsGlobal
Voice ControlPersonal
UnitsPersonal
Storage–
Software Updates–
Factory Reset–
Services–
Related information
•Settings view (p. 109)
• Changing system settings in Settings view (p. 112)