parking brake VOLVO V90 CROSS COUNTRY 2021 Owners Manual
[x] Cancel search | Manufacturer: VOLVO, Model Year: 2021, Model line: V90 CROSS COUNTRY, Model: VOLVO V90 CROSS COUNTRY 2021Pages: 683, PDF Size: 14.19 MB
Page 6 of 683
4
Resetting center display settings138
Table of settings in the center display 139
Driver profiles 140
Selecting a driver profile 141
Changing a driver profile's name 141
Protecting a driver profile 142
Linking a remote key to a driver profile 142
Resetting driver profile settings 143
Messages in the center display 144
Handling messages in the center display 144
Handling messages saved fromthe center display 145
Head-up display *
146
Activating and deactivating the head-up display * 147
Head-up display settings *
148
Voice Control 149
Use voice recognition 150
Voice control for cellular phones 152
Voice control for radio and media 153
Voice control settings 154
LIGHTING
Lighting control and panel156
Adjusting light functions via the center display 157
Parking lights 158
Daytime running lights 158
Low beams 159
Using high beam 160
Active high beam 161
Using turn signals 162
Active Bending Lights *
162
Front fog lights/corner illumination *
163
Rear fog light 164
Brake lights 165
Emergency brake lights 165
Hazard warning flashers 165
Using home safe lighting 166
Welcome Light 166
Interior Lighting 166
Adjusting interior lighting 168
WINDOWS, GLASS AND MIRRORS
Windows, glass and mirrors 172
Pinch protection for windows and sun curtains 172
Reset procedure for pinch protection 173
Power windows 174
Operating the power windows 174
Using sun curtains *
176
Rearview/door mirrors 176
Adjusting the rearview mirror dim-ming function 177
Adjusting the door mirrors 177
Panoramic roof *
179
Operating the panoramic roof *
180
Auto closing the panoramic roof *
sun curtain 182
Wiper blades and washer fluid 183
Using the windshield wipers 183
Using the rain sensor 184
Activating and deactivating therain sensor's memory function 185
Using the windshield and head-light washers 186
Using the rear window wiper/washer 187
Using automatic rear windowwiping when backing up 188
Page 11 of 683
9
STARTING AND DRIVING
Starting the vehicle398
Switching off the vehicle 400
Ignition modes 401
Selecting ignition mode 402
Brake functions 403
Brakes 403
Brake Assist System 404
Braking on wet roads 405
Braking on salted roads 405
Maintenance of the brake system 405
Parking brake 406
Activating and deactivating the parking brake 406
Settings for automatically activat-ing the parking brake 408
Parking on a hill 408
Parking brake malfunction 408
Auto-hold brakes 409
Activating and deactivating Auto-hold at a standstill 410
Hill Start Assist 411
Braking assist after a collision 411
Regenerative braking *
411
Transmission 412
Automatic transmission 412
Shifting gears with automatic transmission413
Using the steering wheel paddles *
to shift 415
Shiftlock 417
Deactivating the automatic shiftlock 417
The kickdown function 418
The Launch function *
418
Automatic transmission symbolsand messages 419
All Wheel Drive (AWD) 419
Drive modes *
419
Changing drive mode *
421
Eco drive mode 422
Activating and deactivating Ecodrive mode using the function button 424
Start/Stop function 425
Driving with the Start/Stop function 425
Deactivating the Start/Stop function 426
Conditions for the Start/Stop function 427
Leveling control * and suspension
429
Leveling control settings *
432
Low Speed Control 432
Activating and deactivating LowSpeed Control using the functionbutton 433
Hill Descent Control
433
Activating and deactivating Hill Descent Control using the func-tion button 434
Economical driving 435
Preparing for a long trip 436
Winter driving 436
Driving through standing water 437
Opening/closing the fuel filler door 438
Refueling 438
Fuel 439
Octane rating 440
Emission controls 442
Overheating of engine and trans-mission 442
Battery drain 443
Jump starting using another battery 444
Driving with a trailer 446
Trailer Stability Assist *
448
Checking trailer lights 449
Towing using a towline 450
Attaching and removing the tow-ing eyelet 451
Recovery 453
HomeLink ®
* 454
Programming HomeLink ®
* 455
Page 15 of 683
13
Fuses in the engine compartment607
Fuses under the glove compartment 612
Fuses in the cargo compartment 618
Replacing bulbs 623
Removing the plastic cover to replace bulbs 624
Location of exterior lights 624
Replacing the low beam headlightbulbs 625
Replacing the high beam headlightbulbs 626
Replacing daytime running lights/front parking light bulbs 626
Replacing front turn signal bulbs 627
Bulb specifications 628
Cleaning the interior 628
Cleaning the center display 629
Cleaning the head-up display * and
instrument panel 630
Cleaning fabric upholstery andceiling liner 630
Cleaning the seat belt 631
Cleaning textile floor and inlay mats 632
Cleaning leather upholstery *
632
Cleaning the leather steering wheel 633
Cleaning interior plastic, metal andwood surfaces 634
Cleaning the exterior
634
Polishing and waxing 635
Hand washing 636
Automatic car washes 637
High-pressure washing 638
Cleaning the wiper blades 639
Cleaning exterior plastic, rubber and trim components 639
Cleaning rims 640
Corrosion protection 641
Paintwork 641
Touching up minor paint damage 642
Color codes 643
Changing rear window wipers 643
Replacing windshield wiper blades 644
Putting the wiper blades in serviceposition 645
Filling washer fluid 646
SPECIFICATIONS
Type designations650
Dimensions 653
Weights 655
Towing capacity and tongue weight 656
Engine specifications 657
Engine oil specifications 658
Transmission fluid specifications 658
Brake fluid specifications 659
Fuel tank volume 659
Air conditioning specifications 659
Approved tire pressure 661
Page 88 of 683
DISPLAYS AND VOICE CONTROL
* Option/accessory.
86
Displays and controls by the driver in a left-hand drive vehicle
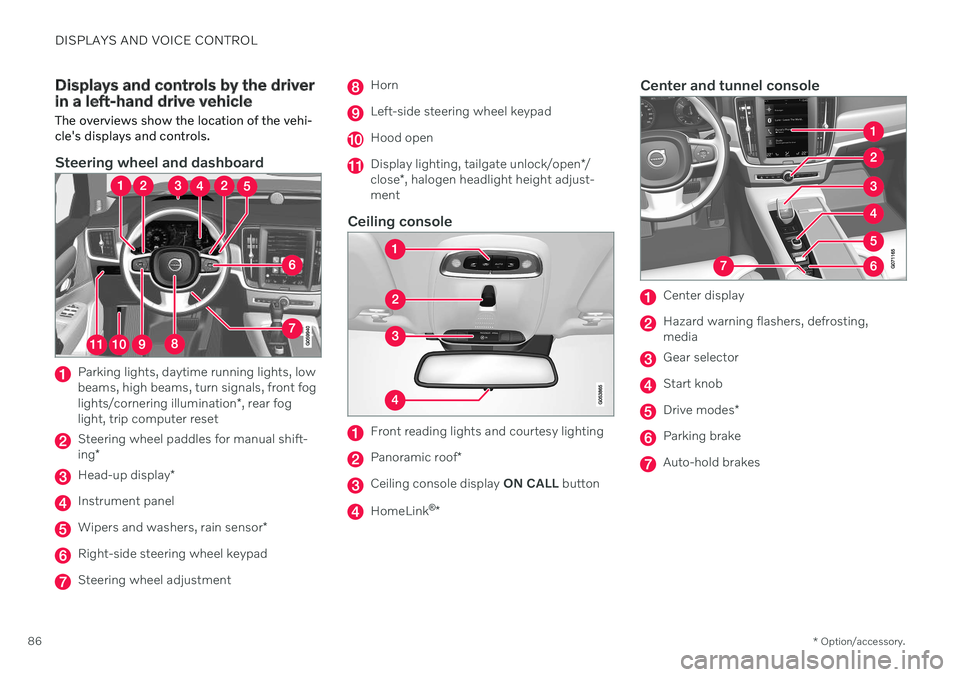
The overviews show the location of the vehi- cle's displays and controls.
Steering wheel and dashboard
Parking lights, daytime running lights, low beams, high beams, turn signals, front fog lights/cornering illumination *, rear fog
light, trip computer reset
Steering wheel paddles for manual shift- ing *
Head-up display *
Instrument panel
Wipers and washers, rain sensor *
Right-side steering wheel keypad
Steering wheel adjustment
Horn
Left-side steering wheel keypad
Hood open
Display lighting, tailgate unlock/open */
close *, halogen headlight height adjust-
ment
Ceiling console
Front reading lights and courtesy lighting
Panoramic roof *
Ceiling console display ON CALL button
HomeLink ®
*
Center and tunnel console
Center display
Hazard warning flashers, defrosting, media
Gear selector
Start knob
Drive modes *
Parking brake
Auto-hold brakes
Page 101 of 683
DISPLAYS AND VOICE CONTROL
}}
99
Change the measurement standard for the temperature sensor etc. via system settings inthe center display's Top view.
Related information
Instrument panel (p. 88)
Changing system units of measurement(p. 136)
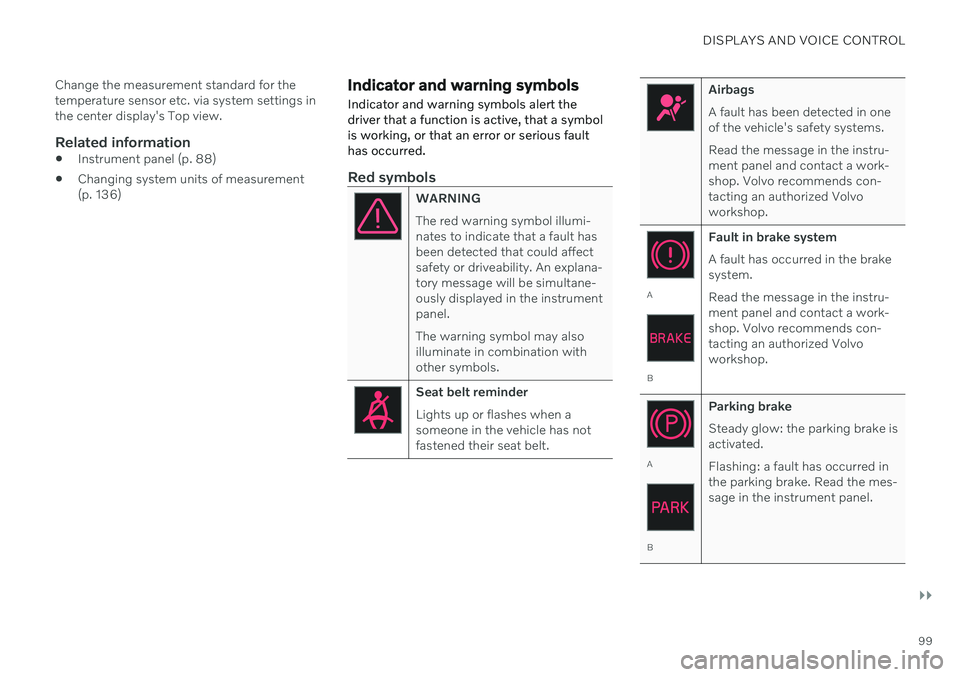
Indicator and warning symbols Indicator and warning symbols alert the driver that a function is active, that a symbolis working, or that an error or serious faulthas occurred.
Red symbols
WARNING The red warning symbol illumi- nates to indicate that a fault hasbeen detected that could affectsafety or driveability. An explana-tory message will be simultane-ously displayed in the instrumentpanel. The warning symbol may also illuminate in combination withother symbols.
Seat belt reminder Lights up or flashes when a someone in the vehicle has notfastened their seat belt.
Airbags A fault has been detected in one of the vehicle's safety systems. Read the message in the instru- ment panel and contact a work-shop. Volvo recommends con-tacting an authorized Volvoworkshop.
A
B Fault in brake system A fault has occurred in the brake system. Read the message in the instru- ment panel and contact a work-shop. Volvo recommends con-tacting an authorized Volvoworkshop.
A
B
Parking brake Steady glow: the parking brake is activated. Flashing: a fault has occurred in the parking brake. Read the mes-sage in the instrument panel.
Page 103 of 683
DISPLAYS AND VOICE CONTROL
}}
101
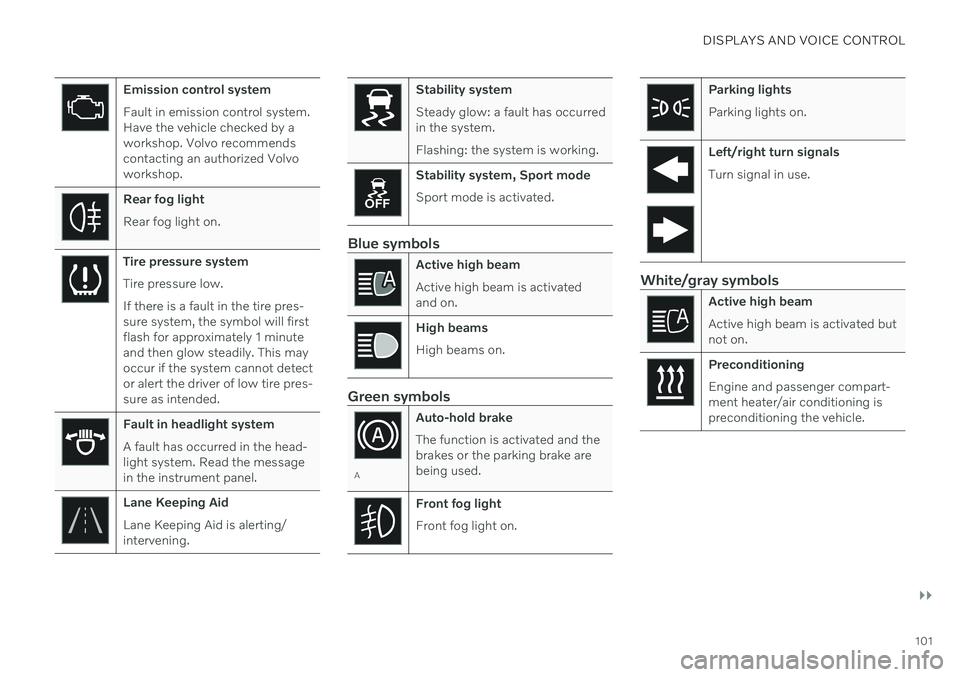
Emission control system Fault in emission control system. Have the vehicle checked by aworkshop. Volvo recommendscontacting an authorized Volvoworkshop.
Rear fog light Rear fog light on.
Tire pressure system Tire pressure low. If there is a fault in the tire pres- sure system, the symbol will firstflash for approximately 1 minuteand then glow steadily. This mayoccur if the system cannot detector alert the driver of low tire pres-sure as intended.
Fault in headlight system A fault has occurred in the head- light system. Read the messagein the instrument panel.
Lane Keeping Aid Lane Keeping Aid is alerting/ intervening.
Stability system Steady glow: a fault has occurred in the system. Flashing: the system is working.
Stability system, Sport mode Sport mode is activated.
Blue symbols
Active high beam Active high beam is activated and on.
High beams High beams on.
Green symbols
AAuto-hold brake The function is activated and the brakes or the parking brake arebeing used.
Front fog light Front fog light on.
Parking lights Parking lights on.
Left/right turn signals Turn signal in use.
White/gray symbols
Active high beam Active high beam is activated but not on.
Preconditioning Engine and passenger compart- ment heater/air conditioning ispreconditioning the vehicle.
Page 141 of 683
DISPLAYS AND VOICE CONTROL
}}
* Option/accessory.139
Table of settings in the center display
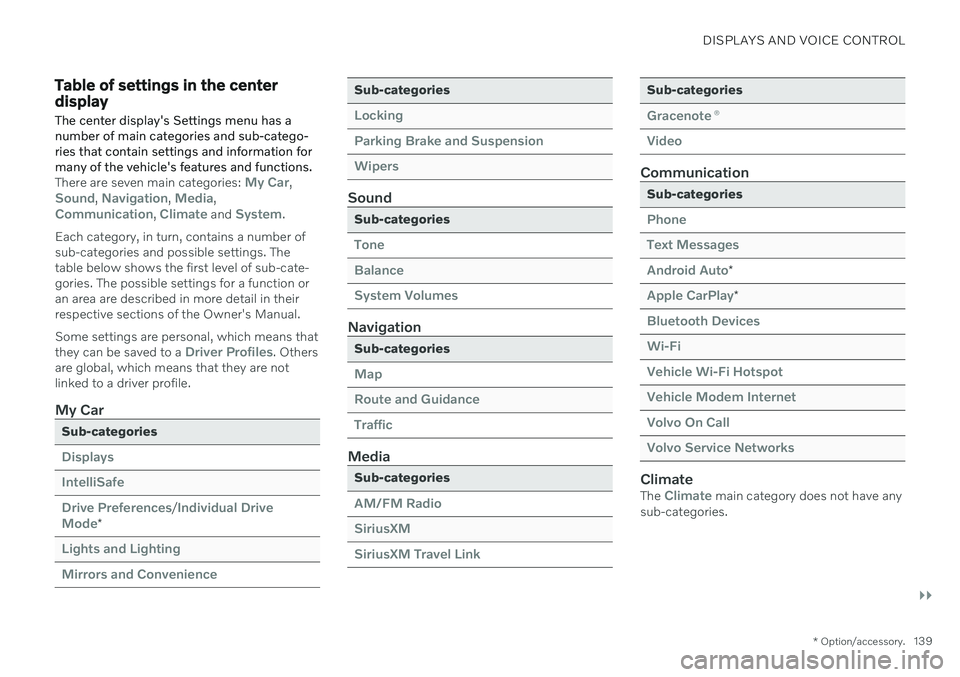
The center display's Settings menu has a number of main categories and sub-catego-ries that contain settings and information formany of the vehicle's features and functions.
There are seven main categories: My Car,Sound, Navigation, Media,Communication, Climate and System.
Each category, in turn, contains a number of sub-categories and possible settings. Thetable below shows the first level of sub-cate-gories. The possible settings for a function oran area are described in more detail in theirrespective sections of the Owner's Manual. Some settings are personal, which means that they can be saved to a
Driver Profiles. Others
are global, which means that they are not linked to a driver profile.
My Car
Sub-categories
Displays IntelliSafeDrive Preferences
/Individual Drive
Mode*
Lights and Lighting Mirrors and Convenience
Sub-categories
Locking Parking Brake and SuspensionWipers
Sound
Sub-categories
Tone BalanceSystem Volumes
Navigation
Sub-categories
Map Route and GuidanceTraffic
Media
Sub-categories
AM/FM Radio SiriusXMSiriusXM Travel Link
Sub-categories
Gracenote ®
Video
Communication
Sub-categories
Phone Text MessagesAndroid Auto
*
Apple CarPlay*
Bluetooth Devices Wi-FiVehicle Wi-Fi Hotspot Vehicle Modem Internet Volvo On Call Volvo Service Networks
ClimateThe Climate main category does not have any
sub-categories.
Page 159 of 683
LIGHTING
* Option/accessory.157
WARNING
The vehicle lighting system cannot in all sit- uations determine when the daylight is tooweak or not strong enough, e.g. whenthere is fog or rain. The driver is always responsible for driving the vehicle with lighting that is safe for thetraffic conditions and as specified by appli-cable traffic regulations.
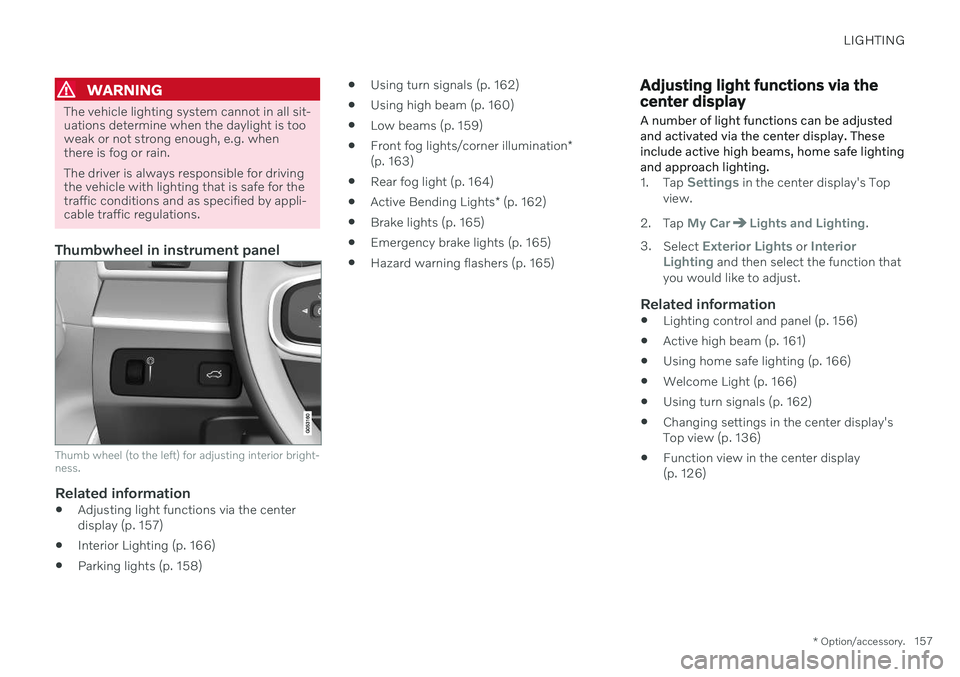
Thumbwheel in instrument panel
Thumb wheel (to the left) for adjusting interior bright- ness.
Related information
Adjusting light functions via the center display (p. 157)
Interior Lighting (p. 166)
Parking lights (p. 158)
Using turn signals (p. 162)
Using high beam (p. 160)
Low beams (p. 159)
Front fog lights/corner illumination
*
(p. 163)
Rear fog light (p. 164)
Active Bending Lights
* (p. 162)
Brake lights (p. 165)
Emergency brake lights (p. 165)
Hazard warning flashers (p. 165)
Adjusting light functions via the center display A number of light functions can be adjusted and activated via the center display. Theseinclude active high beams, home safe lightingand approach lighting.
1.
Tap Settings in the center display's Top
view.
2. Tap
My CarLights and Lighting.
3. Select
Exterior Lights or Interior
Lighting and then select the function that
you would like to adjust.
Related information
Lighting control and panel (p. 156)
Active high beam (p. 161)
Using home safe lighting (p. 166)
Welcome Light (p. 166)
Using turn signals (p. 162)
Changing settings in the center display's Top view (p. 136)
Function view in the center display(p. 126)
Page 202 of 683
SEATS AND STEERING WHEEL
* Option/accessory.
200
Folding down the rear seat backrests The rear seat backrest is split into two sec- tions. The two sections can be folded forwardindividually.
WARNING
Adjust the seat and ensure it locks into position before driving. Use cautionwhen adjusting the seat. Uncontrolledor careless adjustments could lead toinjury.
Long objects must always be securelytied down to help prevent injury ordamage in the event of sudden brak-ing.
Always turn off the engine and applythe parking brake when loading orunloading the vehicle.
Put the gear selector in
P to help pre-
vent the gear selector from being inad-vertently moved.
CAUTION
When the backrest is folded down, make sure there are no objects in the rear seat,and the seat belts are not buckled. Other-wise there is a risk of damage to theupholstery.
CAUTION
The seat cushion of the integrated child restraint * must be in the stowed position
before the rear seat backrest can be folded down. The armrest * in the center seat must be
raised before the seat backrest is folded down. The ski hatch must be closed before the seat backrest is folded down.
NOTE
The front seats may need to be pushed for- ward and/or the backrest adjusted so thatthe rear seat backrests can be fully low-ered.
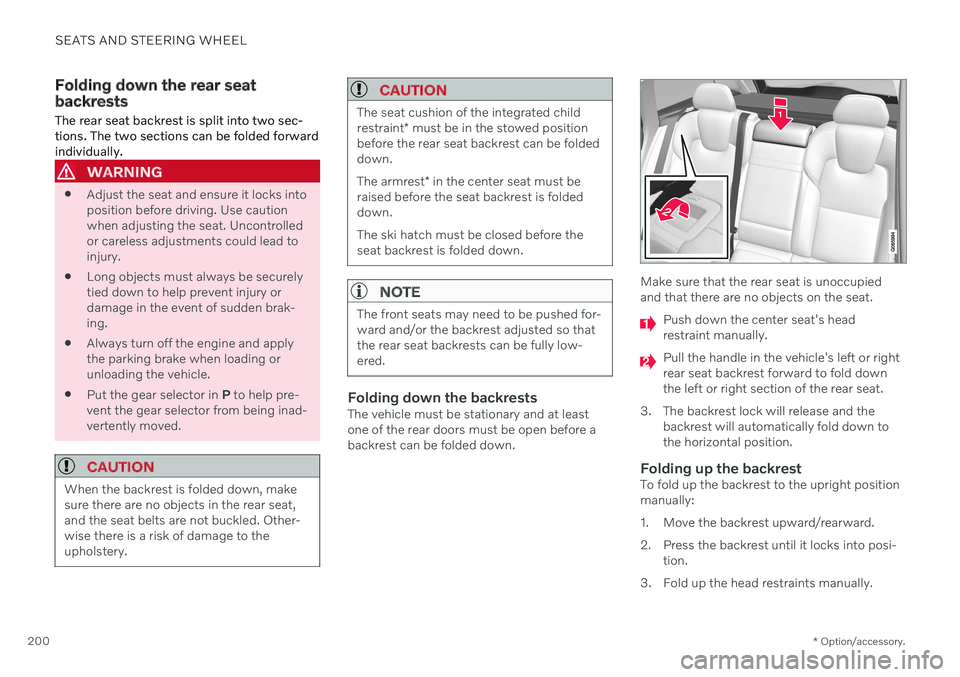
Folding down the backrestsThe vehicle must be stationary and at least one of the rear doors must be open before abackrest can be folded down.
Make sure that the rear seat is unoccupied and that there are no objects on the seat.
Push down the center seat's head restraint manually.
Pull the handle in the vehicle's left or right rear seat backrest forward to fold downthe left or right section of the rear seat.
3. The backrest lock will release and the backrest will automatically fold down tothe horizontal position.
Folding up the backrestTo fold up the backrest to the upright positionmanually:
1. Move the backrest upward/rearward.
2. Press the backrest until it locks into posi-tion.
3. Fold up the head restraints manually.
Page 280 of 683
DRIVER SUPPORT
* Option/accessory.
278
Driver support systems
The vehicle is equipped with a number of driver support systems that can provide thedriver with active or passive assistance in var-ious situations.
The systems can, for example, help the driver:
maintain a set speed
maintain a set time interval to the vehicle ahead
help prevent a collision by warning thedriver and applying the brakes
park the vehicle.
Some of the systems are standard and othersare options. This also varies from market tomarket.
Related information
IntelliSafe – driver support and safety(p. 29)
Speed-dependent steering wheel resis-tance (p. 278)
Electronic Stability Control (p. 279)
Connected Safety (p. 284)
City Safety
™ (p. 331)
Road Sign Information
* (p. 286)
Cruise control (p. 291)
Adaptive Cruise Control
* (p. 294)
Pilot Assist
* (p. 304)
Curve Speed Assist (CSA)
* (p. 316)
Passing assistance
* (p. 318)
Lane Keeping Aid (p. 324)
Steering assistance at risk of collision(p. 345)
Rear Collision Warning
* (p. 351)
BLIS
* (p. 352)
Driver Alert Control (p. 356)
Distance Alert
* (p. 358)
Cross Traffic Alert
* (p. 360)
Park Assist
* (p. 364)
Park Assist Camera
* (p. 369)
Radar sensor (p. 387)
Camera (p. 390)
Speed-dependent steering wheel resistance Speed-dependent power steering increases the steering wheel resistance in pace withthe vehicle's speed, which can help give thedriver an enhanced feeling of control and sta-bility. Steering is stiffer on highways. Whenparking and at low speeds, it will be easier tomove the steering wheel.
Reduced powerIn rare situations, the power steering may need to work at reduced power and the steer-ing wheel may then feel more difficult tomove. This may happen when the powersteering becomes too hot and needs to betemporarily cooled. It can also happen if thereis a disturbance in power supply.
If there is reduced power, the message
Power steering
Assistance temporarily reduced
and this symbol are
shown in the instrument panel.
While the power steering is working at reduced power, the driver support functionsand systems with steering assistance are notavailable.