start stop button VOLVO V90 CROSS COUNTRY 2021 Owners Manual
[x] Cancel search | Manufacturer: VOLVO, Model Year: 2021, Model line: V90 CROSS COUNTRY, Model: VOLVO V90 CROSS COUNTRY 2021Pages: 683, PDF Size: 14.19 MB
Page 8 of 683
6
Parking climate*
234
Preconditioning *
234
Starting and stopping precondi- tioning * 234
Preconditioning timer *
235
Adding and editing timer settingsfor preconditioning * 235
Activating and deactivating pre-conditioning timer * 236
Deleting preconditioning timersettings * 237
Pre-cleaning *
238
Starting and stopping pre-cleaning *
238
Climate comfort retaining function *
239
Starting and switching off the cli-mate retaining function when parking *239
Parking climate symbols and mes-sages * 241
KEY, LOCKS AND ALARM
Locking and unlocking
244
Lock indication 244
Lock confirmation settings 246
Remote key 246
Locking and unlocking using the remote key 249
Settings for remote and insidedoor unlock 250
Unlocking the tailgate using theremote key 251
Remote key range 251
Replacing the remote key's battery 252
Ordering additional remote keys 256
Care Key – restricted remote key 256
Care Key settings 257
Detachable key blade 257
Locking and unlocking withdetachable key blade 258
Electronic immobilizer 260
Start and lock system type desig-nations 260
Keyless and touch-sensitive surfaces *
262
Keyless locking and unlocking *
263
Keyless unlock settings *
264
Keyless tailgate unlock *
264
Antenna locations for the start and lock system 265
Locking and unlocking from insidethe vehicle 266
Unlocking the tailgate from insidethe vehicle 267
Activating and deactivating child locks 267
Automatic locking when driving 268
Closing and locking the tailgate using the buttons * 269
Setting maximum opening heightfor the power tailgate *271
Operating the tailgate with a footmovement * 271
Private Locking 272
Activating and deactivating pri- vate locking 273
Alarm 274
Arming and disarming the alarm 275
Page 11 of 683
9
STARTING AND DRIVING
Starting the vehicle398
Switching off the vehicle 400
Ignition modes 401
Selecting ignition mode 402
Brake functions 403
Brakes 403
Brake Assist System 404
Braking on wet roads 405
Braking on salted roads 405
Maintenance of the brake system 405
Parking brake 406
Activating and deactivating the parking brake 406
Settings for automatically activat-ing the parking brake 408
Parking on a hill 408
Parking brake malfunction 408
Auto-hold brakes 409
Activating and deactivating Auto-hold at a standstill 410
Hill Start Assist 411
Braking assist after a collision 411
Regenerative braking *
411
Transmission 412
Automatic transmission 412
Shifting gears with automatic transmission413
Using the steering wheel paddles *
to shift 415
Shiftlock 417
Deactivating the automatic shiftlock 417
The kickdown function 418
The Launch function *
418
Automatic transmission symbolsand messages 419
All Wheel Drive (AWD) 419
Drive modes *
419
Changing drive mode *
421
Eco drive mode 422
Activating and deactivating Ecodrive mode using the function button 424
Start/Stop function 425
Driving with the Start/Stop function 425
Deactivating the Start/Stop function 426
Conditions for the Start/Stop function 427
Leveling control * and suspension
429
Leveling control settings *
432
Low Speed Control 432
Activating and deactivating LowSpeed Control using the functionbutton 433
Hill Descent Control
433
Activating and deactivating Hill Descent Control using the func-tion button 434
Economical driving 435
Preparing for a long trip 436
Winter driving 436
Driving through standing water 437
Opening/closing the fuel filler door 438
Refueling 438
Fuel 439
Octane rating 440
Emission controls 442
Overheating of engine and trans-mission 442
Battery drain 443
Jump starting using another battery 444
Driving with a trailer 446
Trailer Stability Assist *
448
Checking trailer lights 449
Towing using a towline 450
Attaching and removing the tow-ing eyelet 451
Recovery 453
HomeLink ®
* 454
Programming HomeLink ®
* 455
Page 180 of 683
||
WINDOWS, GLASS AND MIRRORS
* Option/accessory.
178 3. Press the
L or R button again. The light in
the button will go out.
Automatically folding door mirrors *The door mirrors can be automatically folded when driving or parking in tight spaces.
1. Press the L and R buttons at the same
time.
2. Release the buttons after about 1 second. The mirrors will automatically stop when they are completely folded in.
Open the mirrors by pressing L and R at the
same time. The mirrors will automatically stopwhen they reach the last-used setting.
Resetting the mirrors' positionA mirror that has been moved out of positionmanually (e.g. hit or bumped into) must beelectrically returned to its original position for automatic folding * to function properly.
1. Fold in the mirrors by pressing the L and R
buttons at the same time.
2. Open them again by pressing the L and R
buttons at the same time.
3. Repeat the above procedure as needed. The mirrors return to their original positions.
Tilting when parking 3The door mirrors can be tilted down to help give the driver a better view along the sides ofthe vehicle, e.g. of the curb when parking.
–Select reverse gear and press the
L or R
mirror button.
Please note that the button may need to be pressed twice depending on settings. Whenthe door mirror is tilted down, the light in thebutton will flash. When reverse gear isengaged, the door mirrors will automaticallystart to move after 3 seconds and will reachtheir original position after about 8 seconds.
Automatically tilting when parking 3With this setting, the door mirrors will auto-matically tilt down when reverse gear isengaged. The folded position is preset andcannot be adjusted. 1.
Tap
Settings in the center display's Top
view.
2. Tap
My CarMirrors and Convenience.
3. Under
Exterior Mirror Tilt at Reverse,
select Off, Driver, Passenger or Both to
activate/deactivate and to select which mirror to tilt.
To immediately return the door mirrors to theiroriginal position, press the L or R button
twice.
Automatic folding when the vehicle is locked *
In the center display, you can set the door mir- rors to retract/extend automatically when thevehicle is locked/unlocked with the key. 1.
Tap
Settings in the center display's Top
view.
2. Tap
My CarMirrors and Convenience.
3. Select
Fold Mirror When Locked to acti-
vate/deactivate.
NOTE
If the door mirrors are folded in manually using the L and R buttons and then the
vehicle is locked, the mirrors will not auto-matically fold out when the vehicle isunlocked, even if this preference has beenset. In this case, the mirrors must be foldedout manually.
Related information
Rearview/door mirrors (p. 176)
Adjusting the rearview mirror dimming function (p. 177)
Storing positions for seats, mirrors and head-up display
* (p. 192)
Activating and deactivating the heated rear window and door mirrors (p. 227)
3
Only on models equipped with a power driver's seat with memory buttons *.
Page 236 of 683
CLIMATE CONTROL
* Option/accessory.
234
Parking climate *
Parking climate is an umbrella term for vari- ous functions that improve the passengercompartment climate when the vehicle isparked, e.g. preconditioning.
Parking climate functions are con- trolled from the Parking climate tab
in the center display's Climate view. Tap the symbol in the center of the
climate bar to open Climate view.
Related information
Climate (p. 206)
Preconditioning
* (p. 234)
Pre-cleaning
* (p. 238)
Climate comfort retaining function
*
(p. 239)
Parking climate symbols and messages
*
(p. 241)
Preconditioning *
Preconditioning is a climate function that, if possible, attempts to achieve a comfortabletemperature in the passenger compartmentbefore driving.
Preconditioning can be started immediately or started at a preset time using a timer. In warm weather, the climate system venti- lates the passenger compartment by blowingair in from outside. The function cannot heatthe passenger compartment.
NOTE
During preconditioning of the passenger compartment, the vehicle works to reach acomfortable temperature and not the tem-perature set in the climate system.
NOTE
Pre-cleaning * starts automatically when
preconditioning is complete.
Related information
Parking climate
* (p. 234)
Starting and stopping preconditioning
*
(p. 234)
Preconditioning timer
* (p. 235)
Pre-cleaning
* (p. 238)
Starting and stopping preconditioning *
Preconditioning ventilates the passenger compartment, if possible, before driving. Thefunction can be started in the center displayor from a cellular phone.
Starting and stopping from the vehicle
1. Tap the symbol in the center of the climate bar to open Climate view in the center dis- play.
2. Select the
Parking climate tab.
3. Tap
Start Pre-con. & Cleaning.
> Preconditioning starts/stops and the button lights up/goes out.
NOTE
The vehicle doors and windows should be closed during preconditioning of the pas-senger compartment.
NOTE
Pre-cleaning * starts automatically when
preconditioning is complete.
Page 261 of 683
KEY, LOCKS AND ALARM
* Option/accessory.259
NOTE
When the door is unlocked using the detachable key blade and then opened, thealarm will be triggered. The alarm must bedeactivated manually; see separate sec-tion.
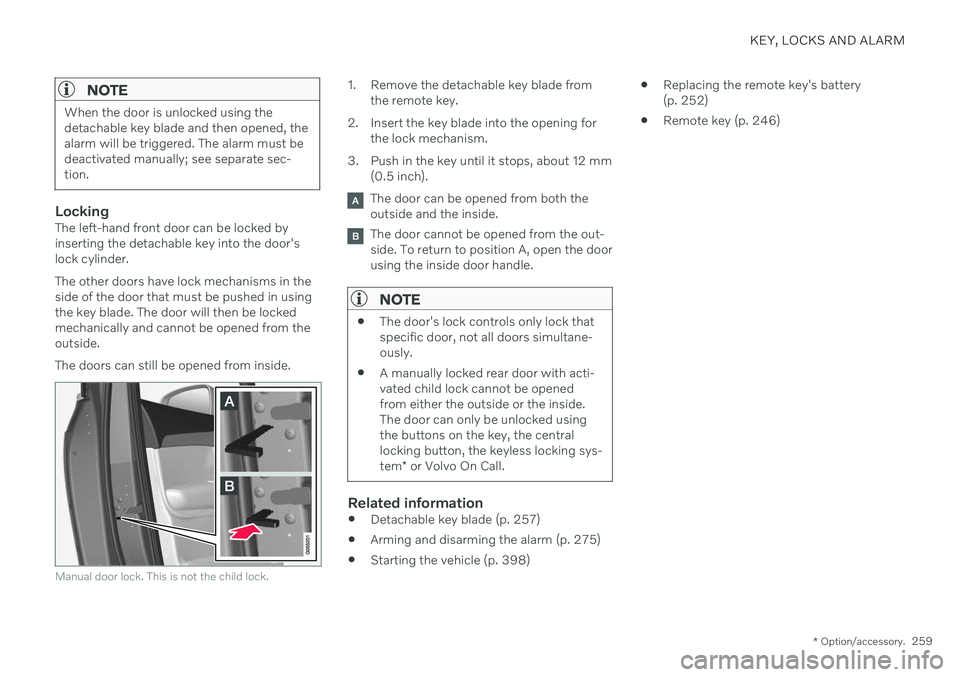
LockingThe left-hand front door can be locked by inserting the detachable key into the door'slock cylinder. The other doors have lock mechanisms in the side of the door that must be pushed in usingthe key blade. The door will then be lockedmechanically and cannot be opened from theoutside. The doors can still be opened from inside.
Manual door lock. This is not the child lock.
1. Remove the detachable key blade from
the remote key.
2. Insert the key blade into the opening for the lock mechanism.
3. Push in the key until it stops, about 12 mm (0.5 inch).
The door can be opened from both the outside and the inside.
The door cannot be opened from the out- side. To return to position A, open the doorusing the inside door handle.
NOTE
The door's lock controls only lock that specific door, not all doors simultane-ously.
A manually locked rear door with acti-vated child lock cannot be openedfrom either the outside or the inside.The door can only be unlocked usingthe buttons on the key, the centrallocking button, the keyless locking sys- tem
* or Volvo On Call.
Related information
Detachable key blade (p. 257)
Arming and disarming the alarm (p. 275)
Starting the vehicle (p. 398)
Replacing the remote key's battery (p. 252)
Remote key (p. 246)
Page 285 of 683
DRIVER SUPPORT
283
Symbol Message Meaning
ESC Temporarily offThe system's functionality has been temporarily reduced due to high brake system tempera- tures. The function will be automatically reactivated when the brakes have cooled.
ESC Service requiredThe system is not functioning properly. Stop the vehicle in a safe place, turn off the engine and then restart it.
A text message can be erased by briefly press- ing the
button in the center of the right-
side steering wheel keypad. If the message persists: Contact a workshop ‒
an authorized Volvo workshop is recom- mended.
Related information
Electronic Stability Control (p. 279)
Page 383 of 683
DRIVER SUPPORT
}}
* Option/accessory.381
Using Park Assist Pilot *
Park Assist Pilot (PAP 119
) helps the driver
park using three different steps. The function can also help the driver pull out of a parkingspace.
The function measures the space and steers the vehicle. The driver's role is to:
keep close watch of the area around thevehicle
follow the instructions on the center dis-play
change gears (reverse/forward) – an audi-ble signal indicates when the driver needsto change gears
regulating and maintaining a safe speed
applying the brakes and stopping the vehi-cle.
Information about the actions required by thedriver are provided in the center display usingsymbols, graphics and/or text. The function can be activated if the following criteria have been met after the engine isstarted:
No trailer is hitched to the vehicle
Your vehicle's speed is lower than30 km/h (20 mph).
NOTE
The distance between the vehicle and parking spots should be 0.5–1.5 meters(1.6–5.0 ft) when the function is lookingfor parking.
Parking with Park Assist PilotThe function helps park the vehicle using the following steps:
1. The system searches for and measures
potential parking spaces.
2. The vehicle is steered while it is backing into the parking space.
3. The vehicle is positioned in the parking space (the driver may be prompted to shift gears and apply the brakes).
Searching and measuring potential parking spots
The function can be activated in the center display's Func-tion view. It can also be accessed from the camera views.
GREEN button indicator light – the func- tion is activated.
GRAY button indicator light – the functionis deactivated.
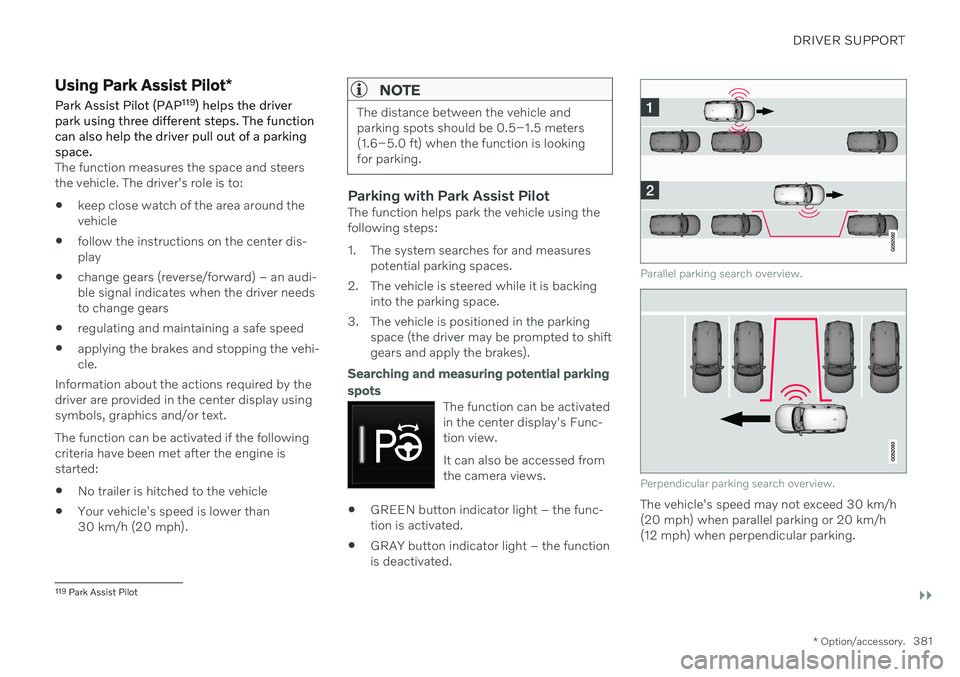
Parallel parking search overview.
Perpendicular parking search overview.
The vehicle's speed may not exceed 30 km/h (20 mph) when parallel parking or 20 km/h(12 mph) when perpendicular parking.
119
Park Assist Pilot
Page 426 of 683
||
STARTING AND DRIVING
* Option/accessory.
424 The ECO gauge indicates how economical current driving is:
A low reading in the green area of thegauge indicates economical driving.
A high reading is shown when driving isnot economical, e.g. heavy braking orrapid acceleration.
The ECO gauge also has an indicator showinghow a reference driver would drive in the samedriving situation. This is shown by the shortpointer in the gauge.
ECO ClimateIn Eco mode, ECO climate is automatically
activated in the passenger compartment to help reduce energy consumption.
NOTE
When the Eco drive mode is activated, set-
tings for certain climate system and elec- tricity consuming functions are reduced.Some of these settings can be reset man-ually, but full functionality will only be restored by switching off
Eco mode or
adapting the Individual* drive mode to full
climate system functionality.
If condensation forms on the windows, tap the max defroster button, which will function nor-mally.
Related information
Changing drive mode
* (p. 421)
Activating and deactivating Eco drivemode using the function button (p. 424)
Drive modes
* (p. 419)
Economical driving (p. 435)
Start/Stop function (p. 425)
Activating and deactivating Eco drive mode using the functionbutton There is a function button for
Eco drive mode
in the center display's Function view if the vehicle is not equipped with a drive modecontrol in the tunnel console.
When the engine is switched off, Eco mode is
deactivated and must therefore be reactivated each time the engine is started. ECO will be
displayed in the instrument panel when thefunction is activated.
Selecting Eco drive mode in the center display's Function view
–Tap the Driving Mode ECO button to
activate or deactivate the function.
> An indicator light in the button will illu- minate when the function is activated.
Related information
Eco drive mode (p. 422)
Changing drive mode
* (p. 421)
Drive modes
* (p. 419)
Page 427 of 683
STARTING AND DRIVING
}}
* Option/accessory.425
Start/Stop function Start/Stop is a function that temporarily switches off the engine when the vehicle hasstopped, e.g. at a traffic light or in heavy traf-fic, and then starts it again automaticallywhen needed.
The Start/Stop function reduces fuel con- sumption, which helps to reduce exhaustemissions. The system makes it possible to drive more economically and climate-smart by letting theengine auto-stop when appropriate.
Related information
Driving with the Start/Stop function(p. 425)
Conditions for the Start/Stop function(p. 427)
Drive modes
* (p. 419)
Driving with the Start/Stop function
Start/stop is a function that temporarily turns off the engine when the vehicle is stationaryand then automatically starts it when needed.
The Start/Stop function is available when the ignition is started and can be activated if cer-tain conditions are met. The instrument panel indicates when the func- tion is
Available
active
not available.
All of the vehicle's ordinary systems, such aslighting, radio, etc. function normally when theengine has been auto-stopped. Certain func-tions may be temporarily reduced howeversuch as the climate system's blower speed orextremely high audio system volume.
Auto-stopTo auto-stop the engine: Stop the vehicle by applying the brakes and keep the brake pedal depressed. Theengine will auto-stop.
In
Comfort or Eco drive mode, the engine
may auto-stop before the vehicle has com- pletely stopped. With Adaptive Cruise Control or Pilot Assistactivated, the engine will auto-stop aboutthree seconds after the vehicle has stopped.
Auto-startThe following conditions must be met for theengine to auto-start.
Release the brake pedal. The engine willauto-start and the vehicle can be driven.On an uphill gradient, Hill Start Assist (HSA 14
) will activate to help prevent the
vehicle from rolling backward.
When the Auto-hold function is activated, auto-start will be delayed until the acceler-ator is pressed.
When Adaptive Cruise Control or PilotAssist are activated, the engine will auto-start when the accelerator pedal is depressed or the
button on the left-
side steering wheel keypad is pressed.
Maintain pressure on the brake pedal and press the accelerator pedal. The enginewill auto-start.
On a downhill gradient: Release the brakepedal slightly so that the vehicle begins toroll. The engine will auto-start after a slightincrease in speed.
14
Hill Start Assist
Page 428 of 683

||
STARTING AND DRIVING
426
Symbols in the instrument panel
White – Displayed in the tachometer
when the function is available.
Green – Shown in the tachometer
when the function is active and the engine is auto-stopped.
Gray – When the symbol is grayed-
out with a line through it, the function is not available. If no symbol is shown, the function is switched off.
The function is active and the engine has auto-stop- ped.
On vehicles with the 8-inch instrument panel, the symbol will be shown at the bottom of thespeedometer.
Related information
Deactivating the Start/Stop function(p. 426)
Conditions for the Start/Stop function(p. 427)
Start/Stop function (p. 425)
Hill Start Assist (p. 411)
Auto-hold brakes (p. 409)
Deactivating the Start/Stop function
In certain situations, it may be advisable to turn the Start/Stop function off.
To turn off Start/Stop, tap theStart/Stop function button
in the center display's Func- tion view. The indicator lightin the button will go outwhen the function has beenturned off.
The function will remain turned off until:
it is reactivated
the drive mode is changed to
Eco.
Related information
Driving with the Start/Stop function (p. 425)
Conditions for the Start/Stop function(p. 427)