traction control VOLVO XC60 2009 Owner´s Manual
[x] Cancel search | Manufacturer: VOLVO, Model Year: 2009, Model line: XC60, Model: VOLVO XC60 2009Pages: 297, PDF Size: 21.16 MB
Page 10 of 297
IntroductionImportant warnings 8 Driver distraction
A driver has a responsibility to do everything
possible to ensure his or her own safety and
the safety of passengers in the vehicle and oth-
ers sharing the roadway. Avoiding distractions
is part of that responsibility.
Driver distraction results from driver activities
that are not directly related to controlling the
vehicle in the driving environment. Your new
Volvo is, or can be, equipped with many fea-
ture-rich entertainment and communication
systems. These include hands-free cellular tel-
ephones, navigation systems, and multipur-
pose audio systems. You may also own other
portable electronic devices for your own con-
venience. When used properly and safely, they
enrich the driving experience. Improperly used,
any of these could cause a distraction.
For all of these systems, we want to provide the
following warning that reflects the strong Volvo
concern for your safety. Never use these devi-
ces or any feature of your vehicle in a way that
distracts you from the task of driving safely.
Distraction can lead to a serious accident. In
addition to this general warning, we offer the
following guidance regarding specific newer
features that may be found in your vehicle
\b
Never use a hand-held cellular telephone
while driving. Some jurisdictions prohibit cellular telephone use by a driver while the
vehicle is moving.
\b If your vehicle is equipped with a naviga-
tion system, set and make changes to your
travel itinerary only with the vehicle parked.
\b Never program your audio system while
the vehicle is moving. Program radio pre-
sets with the vehicle parked, and use your
programmed presets to make radio use
quicker and simpler.
\b Never use portable computers or personal
digital assistants while the vehicle is mov-
ing.
Accessory installation
\b We strongly recommend that Volvo owners
install only genuine, Volvo-approved
accessories, and that accessory installa-
tions be performed only by a trained and
qualified Volvo service technician.
\b Genuine Volvo accessories are tested to
ensure compatibility with the performance,
safety, and emission systems in your vehi-
cle. Additionally, a trained and qualified
Volvo service technician knows where
accessories may and may not be safely
installed in your Volvo. In all cases, please
consult a trained and qualified Volvo serv-
ice technician before installing any acces-
sory in or on your vehicle. \b
Accessories that have not been approved
by Volvo may or may not be specifically
tested for compatibility with your vehicle.
Additionally, an inexperienced installer
may not be familiar with some of your car\fs
systems.
\b Any of your car\fs performance and safety
systems could be adversely affected if you
install accessories that Volvo has not tes-
ted, or if you allow accessories to be instal-
led by someone unfamiliar with your vehi-
cle.
\b Damage caused by unapproved or
improperly installed accessories may not
be covered by your new vehicle warranty.
See your Warranty and Service Records
Information booklet for more warranty
information. Volvo assumes no responsi-
bility for death, injury, or expenses that
may result from the installation of non-gen-
uine accessories.
Page 33 of 297
01 Safety
Rollover Protection System (ROPS)01
31
Volvo’s Rollover Protection System utilizes the
Roll Stability Control (RSC) function, which is
designed to help minimize the risk of a rollover
in emergency maneuvers or if a skid should
occur.
RSC uses a gyroscopic sensor that registers
the amount of change in the lateral angle at
which the vehicle is leaning. Using this infor-
mation, RSC calculates the likelihood of a roll-
over. If there is an imminent risk of a rollover,
the Dynamic Stability and Traction Control sys-
tem (DSTC) is activated, power to the engine is
cut and the brakes are applied to one or more
of the wheels until the vehicle regains stability.
For additional information on DSTC,
see
page 155.
WARNING The vehicle’s stability systems, including
ROPS and RSC, do not replace the driver’s
responsibility for operating the vehicle in a
safe manner. Speed and driving style
should always be adapted to the current
road, traffic and weather conditions. Posted
speed limits should always be respected.
Page 77 of 297
03 Your driving environment
Instruments and controls03
}}
* Option/accessory, for more information, see Introduction. 75Symbol Description
Left turn signal indicator
Right turn signal indicator
Trailer turn signal indicator
If you are towing a trailer, this light will flash
simultaneously with the trailer\fs turn signals. If
the light does not flash, or if they flash faster
than usual when signaling a turn, the turn sig-
nals on the trailer or on the vehicle are not
functioning properly.
Malfunction Indicator Light
As you drive, a computer called On-Board
Diagnostics II (OBDII) monitors your vehicle\fs
engine, transmission, electrical and emission
systems.
The malfunction indicator (CHECK ENGINE)
light will illuminate if the computer senses a
condition that potentially may need correcting.
When this happens, please have your vehicle
checked by a trained and qualified Volvo serv-
ice technician as soon as possible.
A malfunction indicator (CHECK ENGINE) light
may have many causes. Sometimes, you may
not notice a change in your car\fs behavior.
Even so, an uncorrected condition could hurt
fuel economy, emission controls, and drivabil-
ity. Extended driving without correcting the
cause could even damage other components
in your vehicle.
This light may illuminate if the fuel filler cap is
not closed tightly or if the engine was running
while the vehicle was refueled.
Canadian models are equipped with this sym-
bol:
Anti-lock Brake System (ABS)
warning light
If the warning light comes on, there may be a
malfunction in the ABS system (the standard
braking system will still function). Check the
system by:
1. Stopping in a safe place and switching off the ignition.
2. Restart the engine.
3. If the warning light goes off, no further action is required.
If the warning light remains on, the vehicle
should be driven to a trained and qualified
Volvo service technician for inspection,
See
page 112 for additional information.
Canadian models are equipped with this sym-
bol:
Rear fog light
This symbol indicates that the rear fog light
(located in the driver\fs side tail light cluster) is
on.
Stability system
This indicator symbol flashes when the DSTC
(Dynamic Stability and Traction Control sys-
tem) is actively working to stabilize the vehicle,
155 for more detailed information.
Tire pressure monitoring system
(TPMS)*
This symbol illuminates to indicate that tire
pressure in one or more tires is low, see
page 271 for detailed information.
Low fuel level
When this light comes on, the vehicle should
be refueled as soon as possible.
Information symbol
The information symbol illuminates and a text
message is displayed if a fault is detected in
one of the vehicle\fs systems. The message can
be erased and the symbol can be turned off by
pressing the READ button (see page 123 for
information) or this will take place automati-
cally after a short time (the length of time varies,
depending on the function affected).
Page 100 of 297
03 Your driving environmentMirrors 03
98
* Option/accessory, for more information, see Introduction.
Power door mirrors
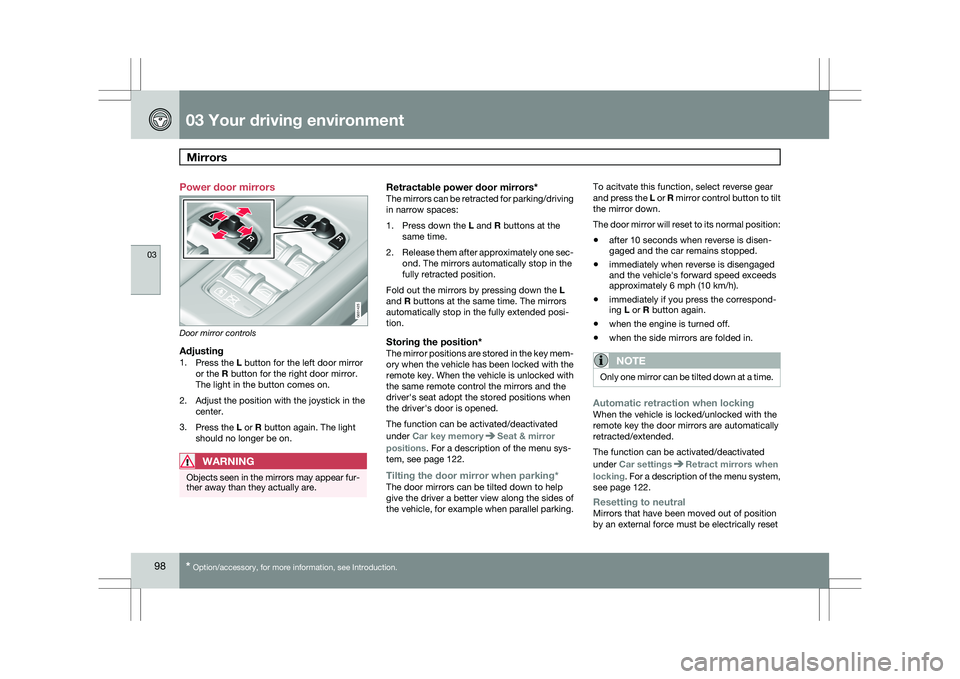
Door mirror controls
Adjusting1.
Press the L button for the left door mirror
or the R button for the right door mirror.
The light in the button comes on.
2. Adjust the position with the joystick in the center.
3. Press the L or R button again. The light
should no longer be on.
WARNING Objects seen in the mirrors may appear fur-
ther away than they actually are.
Retractable power door mirrors*The mirrors can be retracted for parking/driving
in narrow spaces:
1.
Press down the L and R buttons at the
same time.
2. Release them after approximately one sec-
ond. The mirrors automatically stop in the
fully retracted position.
Fold out the mirrors by pressing down the L
and R buttons at the same time. The mirrors
automatically stop in the fully extended posi-
tion.
Storing the position*The mirror positions are stored in the key mem-
ory when the vehicle has been locked with the
remote key. When the vehicle is unlocked with
the same remote control the mirrors and the
driver\fs seat adopt the stored positions when
the driver\fs door is opened.
The function can be activated/deactivated
under Car key memory Seat & mirror
positions. For a description of the menu sys-
tem, see page 122.
Tilting the door mirror when parking*The door mirrors can be tilted down to help
give the driver a better view along the sides of
the vehicle, for example when parallel parking. To acitvate this function, select reverse gear
and press the L or R mirror control button to tilt
the mirror down.
The door mirror will reset to its normal position:
\b
after 10 seconds when reverse is disen-
gaged and the car remains stopped.
\b immediately when reverse is disengaged
and the vehicle\fs forward speed exceeds
approximately 6 mph (10 km/h).
\b immediately if you press the correspond-
ing L or R button again.
\b when the engine is turned off.
\b when the side mirrors are folded in.
NOTE Only one mirror can be tilted down at a time.
Automatic retraction when lockingWhen the vehicle is locked/unlocked with the
remote key the door mirrors are automatically
retracted/extended.
The function can be activated/deactivated
under Car settings
Retract mirrors when
locking. For a description of the menu system,
see page 122.
Resetting to neutralMirrors that have been moved out of position
by an external force must be electrically reset G031425
Page 113 of 297
03 Your driving environment
Transmission03
111
All Wheel Drive – AWD
4Your Volvo can be equipped with permanent
All Wheel Drive, which means that power is
distributed automatically between the front
and rear wheels. Under normal driving condi-
tions, most of the engine\fs power is directed to
the front wheels. However, if there is any ten-
dency for the front wheels to spin, an electron-
ically controlled coupling distributes power to
the wheels that have the best traction.
NOTEThe message
AWD disabled Service
required will be appear in the information
display if an electrical fault should occur in
the AWD system. A warning light will also
illuminate in the instrument panel. If this
occurs, have the system checked by a
trained and qualified Volvo service techni-
cian.
4 Standard on certain models.
Page 149 of 297
04 Comfort and driving pleasure
Bluetooth® hands-free connection04
}}
147
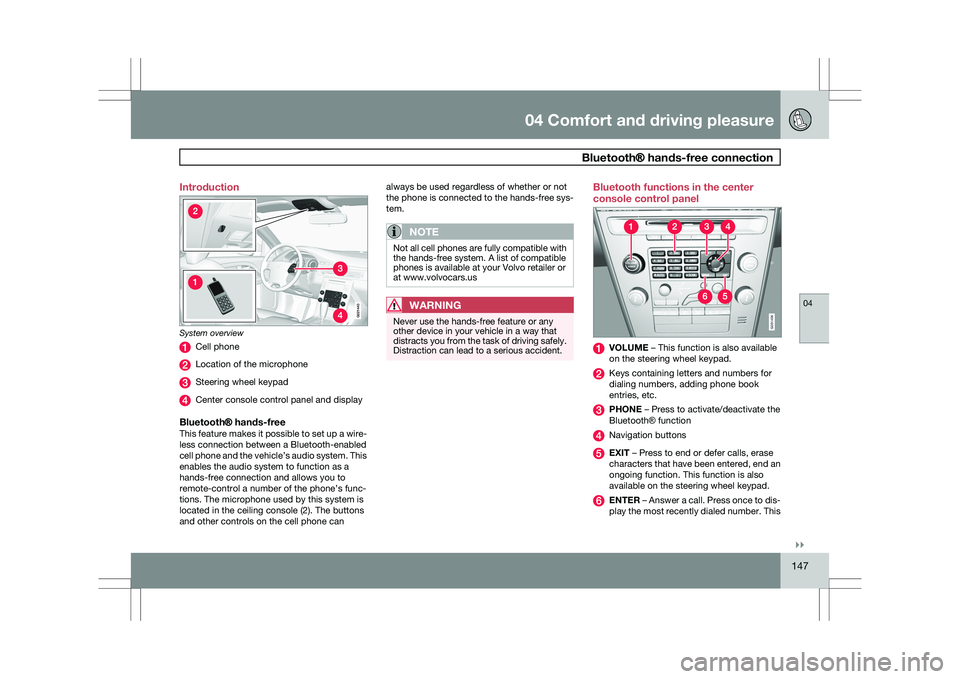
Introduction
System overview
Cell phone
Location of the microphone
Steering wheel keypad
Center console control panel and display
Bluetooth® hands-freeThis feature makes it possible to set up a wire-
less connection between a Bluetooth-enabled
cell phone and the vehicle’s audio system. This
enables the audio system to function as a
hands-free connection and allows you to
remote-control a number of the phone’s func-
tions. The microphone used by this system is
located in the ceiling console (2). The buttons
and other controls on the cell phone can always be used regardless of whether or not
the phone is connected to the hands-free sys-
tem.
NOTE
Not all cell phones are fully compatible with
the hands-free system. A list of compatible
phones is available at your Volvo retailer or
at www.volvocars.us
WARNING
Never use the hands-free feature or any
other device in your vehicle in a way that
distracts you from the task of driving safely.
Distraction can lead to a serious accident. Bluetooth functions in the center
console control panel
VOLUME – This function is also available
on the steering wheel keypad.
Keys containing letters and numbers for
dialing numbers, adding phone book
entries, etc.
PHONE – Press to activate/deactivate the
Bluetooth
® function Navigation buttons
EXIT – Press to end or defer calls, erase
characters that have been entered, end an
ongoing function. This function is also
available on the steering wheel keypad.
ENTER – Answer a call. Press once to dis-
play the most recently dialed number. This G02144
3 G031456
Page 157 of 297
04 Comfort and driving pleasure
Stability system04
}}
155
Introduction
The Dynamic Stability and Traction Control
system (DSTC) consists of a number of func-
tions designed help reduce wheel spin, coun-
teract skidding, and to generally help improve
directional stability.
CAUTION
A pulsating sound will be audible when the
system is actively operating and is normal.
Traction control (TC)This function is designed to help reduce wheel
spin by transferring power from a drive wheel
that begins to lose traction to the wheel on the
opposite side of the vehicle (on the same axle).
TC is most active at low speeds.
This is one of DSTC\fs permanent functions and
cannot be switched off.
Active Yaw Control (AYC)This function helps maintain directional stabil-
ity, for example when cornering, by braking
one or more of the wheels if the vehicle shows
a tendency to skid or slide laterally.
This is one of DSTC\fs permanent functions and
cannot be switched off.
Spin control (SC)The spin control function is designed to help
prevent the drive wheels from spinning while
the vehicle is accelerating.
Under certain circumstances, such as when
driving with snow chains, or driving in deep
snow or loose sand, it may be advisable to
temporarily switch off this function for maxi-
mum tractive force.
WARNING
The car\fs handling and stability characteris-
tics will be altered if the spin control function
has been disabled.
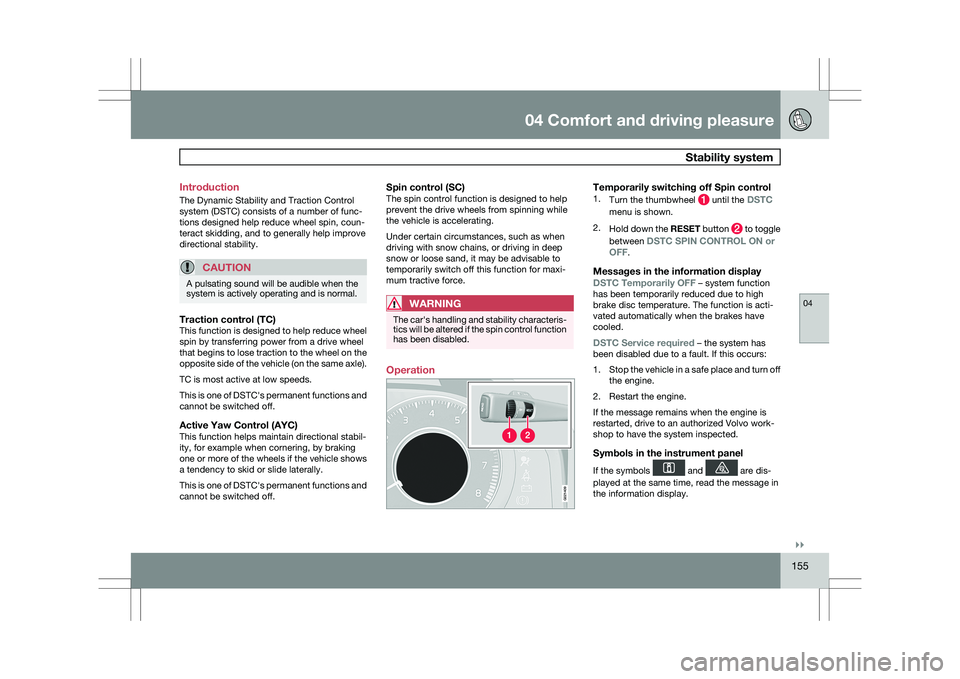
Operation
Temporarily switching off Spin control1.
Turn the thumbwheel until the DSTC
menu is shown.
2. Hold down the RESET button to toggle
between DSTC SPIN CONTROL ON or
OFF.
Messages in the information display
DSTC Temporarily OFF – system function
has been temporarily reduced due to high
brake disc temperature. The function is acti-
vated automatically when the brakes have
cooled.
DSTC Service required – the system has
been disabled due to a fault. If this occurs:
1. Stop the vehicle in a safe place and turn off
the engine.
2. Restart the engine.
If the message remains when the engine is
restarted, drive to an authorized Volvo work-
shop to have the system inspected.
Symbols in the instrument panel
If the symbols and are dis-
played at the same time, read the message in
the information display. G02140
9
Page 177 of 297
04 Comfort and driving pleasure
Adaptive Cruise Control (ACC)*04
}}
* Option/accessory, for more information, see Introduction. 175
WARNING\b
Only use a time interval that is suitable
in current traffic conditions.
\b A short time interval gives the driver lim-
ited reaction time if an unexpected sit-
uation occurs in traffic. The number of bars indicating the selected
time interval are shown while the setting is
being made and for several seconds afterward.
A smaller version of the symbol is then shown
to the right in the display. The same symbol is
also displayed when Distance Alert is acti-
vated, see page 179 .
Deactivating and resuming settingsCruise control is deactivated, either with a
short press on
, or by action taken by the
driver, such as braking, etc. The set speed, for
example 55 mph, is then shown in parenthe-
ses. Speed and time interval are resumed by
pressing .
WARNING
There may be a significant increase in speed
after the
button has been pressed.
A short press on in standby mode or a long
press in active mode deactivates cruise con- trol. The set speed is then cleared and cannot
be resumed.
When ACC is activated, the vehicle’s speed
increases by approximately 1 mph (1 km/h)
each additional time is pressed.
Deactivation due to action by the driverACC is deactivated:
\b
when the brakes are applied
\b if the gear selector is moved to
N
\b if the accelerator pedal is depressed for an
extended period.
NOTE If the accelerator pedal is only depressed for
a short time, such as when passing another
vehicle, ACC is deactivated temporarily and
is reactivated when the pedal is released.
Automatic deactivationAdaptive cruise control is linked to other sys-
tems such as ABS, the stability and traction
control system (DSTC), and the Distance Alert
System. If any of these systems are not func-
tioning properly, adaptive cruise control is
automatically deactivated.
In the event of automatic deactivation a signal
will sound and the message
Cruise Control
Canceled is shown in the display. The driver must then intervene and adapt the vehicle\fs
speed to the surrounding traffic.
Automatic deactivation may be caused if:
\b
the vehicle\fs speed falls below 20 mph
(30 km/h)
\b the wheels lose traction or if the anti-lock
brake system (ABS) is activated
\b brake temperature is high
\b engine speed (rpm) is too low
\b the radar sensor is obstructed by, for
example, wet snow or rain.
The radar sensor and its limitations
The radar sensor is used by both Adaptive
Cruise Control and the Collision Warning Sys-
tem with Auto-brake. It is designed to detect
cars or larger vehicles driving in the same
direction as your vehicle.WARNING Accessories or other objects, such as extra
headlights, must not be installed in front of
the grille.
Modification of the radar sensor could make
its use illegal.
The radar sensor\fs capacity to detect vehicles
ahead is impeded:
Page 220 of 297
05 During your tripTowing a trailer 05
218
NOTE \b
When parking the vehicle with a trailer
on a hill, apply the parking brake before
putting the gear selector in
P. Always
follow the trailer manufacturer\fs recom-
mendations for wheel chocking.
\b When starting on a hill, put the gear
selector in
D before releasing the park-
ing brake. See page 116 for more
detailed information about starting off
on a hill while towing a trailer.
\b If you use the manual (Geartronic) shift
positions while towing a trailer, make
sure the gear you select does not put
too much strain on the engine (using too
high a gear).
\b The drawbar assembly/trailer hitch may
be rated for trailers heavier than the
vehicle is designed to tow. Please
adhere to Volvo\fs recommended trailer
weights.
\b Avoid driving with a trailer on inclines of
more than 15 %.
Trailer cableAn adapter is required if the vehicle\fs trailer
hitch has a 13-pin connector and the trailer has
7 pins. Use an adapter cable approved by
Volvo. Make sure the cable does not drag on
the ground. Detachable trailer hitch (accessory)
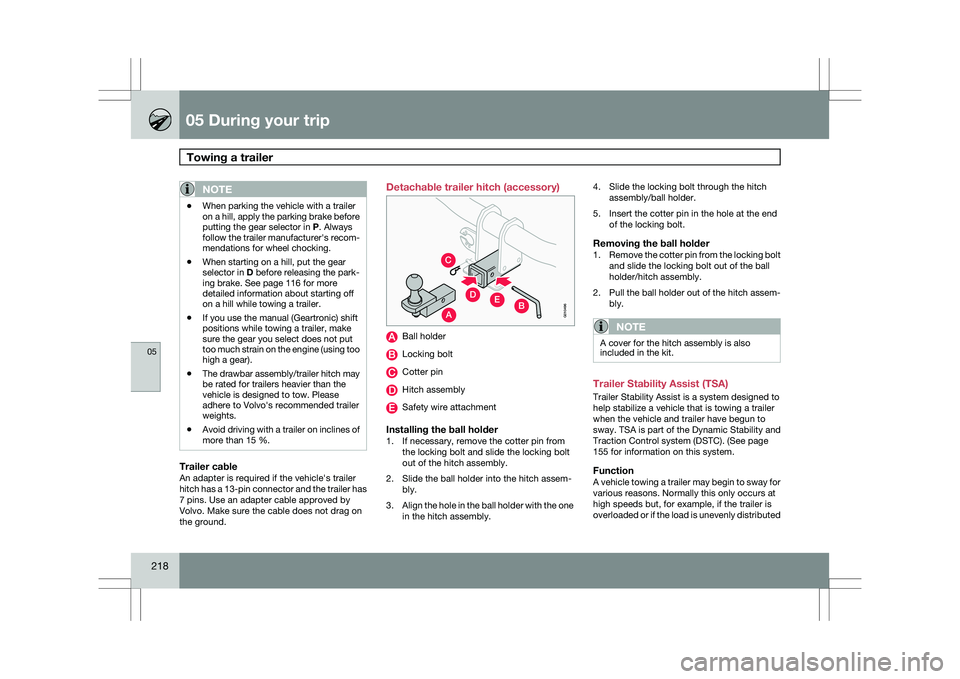
Ball holder
Locking bolt
Cotter pin
Hitch assembly
Safety wire attachment
Installing the ball holder1. If necessary, remove the cotter pin from
the locking bolt and slide the locking bolt
out of the hitch assembly.
2. Slide the ball holder into the hitch assem- bly.
3. Align the hole in the ball holder with the one
in the hitch assembly. 4. Slide the locking bolt through the hitch
assembly/ball holder.
5. Insert the cotter pin in the hole at the end of the locking bolt.
Removing the ball holder1.Remove the cotter pin from the locking bolt
and slide the locking bolt out of the ball
holder/hitch assembly.
2. Pull the ball holder out of the hitch assem-
bly.
NOTE A cover for the hitch assembly is also
included in the kit.
Trailer Stability Assist (TSA)
Trailer Stability Assist is a system designed to
help stabilize a vehicle that is towing a trailer
when the vehicle and trailer have begun to
sway.
TSA is part of the Dynamic Stability and
Traction Control system (DSTC). (See page
155 for information on this system.
FunctionA vehicle towing a trailer may begin to sway for
various reasons. Normally this only occurs at
high speeds but, for example, if the trailer is
overloaded or if the load is unevenly distributed
A
C
EDB
G010496
Page 264 of 297
06 Maintenance and specificationsWheels and tires 06
262
WARNING \b
Exceeding the permissible axle weight,
gross vehicle weight, or any other
weight rating limits can cause tire over-
heating resulting in permanent defor-
mation or catastrophic failure.
\b Do not use replacement tires with lower
load carrying capacities than the tires
that were original equipment on the
vehicle because this will lower the vehi-
cle\fs GVW rating. Replacement tires
with a higher limit than the originals do
not increase the vehicle\fs GVW rating
limitations. Uniform Tire Quality Grading
ALL PASSENGER VEHICLE TIRES MUST
CONFORM TO FEDERAL SAFETY
REQUIREMENTS IN ADDITION TO THESE
GRADES
Quality grades can be found, where appli-
cable, on the tire sidewall between the tread
shoulder and maximum section width. For
example:
Treadwear 200 Traction AA Temperature A
TREADWEARThe treadwear grade is a comparative rating
based on the wear rate of the tire when tested
under controlled conditions on a specified gov- ernment test course. For example, a tire gra-
ded 150 would wear one and one half (1 1/2)
times as well on the government course as a
tire graded 100. The relative performance of
tires depends upon the actual conditions of
their use, however, and many depart signifi-
cantly from the norm due to variation in driving
habits, maintenance practices and differences
in road characteristics and climate.
TRACTIONThe traction grades, from highest to lowest, are
AA, A, B, and C, as measured under controlled
conditions on specified government test sur-
faces of asphalt and concrete. A tire marked C
may have poor traction performance. The trac-
tion grade assigned to this tire is based on
braking (straight-ahead) traction tests and is
not a measure of cornering (turning) traction.
WARNING
The traction grade assigned to this tire is
based on braking (straight-ahead) traction
tests and is not a measure of cornering
(turning) traction.
TEMPERATUREThe temperature grades are AA (the highest),
A, B, and C, representing the tire\fs resistance
to the generation of heat and its ability to dis-
sipate heat when tested under controlled con-ditions on a specified indoor laboratory test
wheel. Sustained high temperature can cause
the material of the tire to degenerate and
reduce tire life, and excessive temperature can
lead to sudden tire failure. The grade C corre-
sponds to a minimum level of performance that
all passenger vehicle tires must meet under the
Federal Motor Safety Standard No. 109.
Grades B and A represent higher levels of per-
formance on the laboratory test wheel than the
minimum required by law.
WARNING
The temperature grade for this tire is estab-
lished for a tire that is properly inflated and
not overloaded. Excessive speed, under-
inflation, or excessive loading, either sepa-
rately or in combination, can cause heat
buildup and tire failure.
Snow chains, snow tires, studded tires
Snow chainsSnow chains can be used on your Volvo with
the following restrictions:
\b
Snow chains should be installed on front
wheels only. Use only Volvo approved
snow chains.
\b If accessory, aftermarket or "custom" tires
and wheels are installed and are of a size
different than the original tires and wheels,