battery VOLVO XC60 2015 Owner´s Manual
[x] Cancel search | Manufacturer: VOLVO, Model Year: 2015, Model line: XC60, Model: VOLVO XC60 2015Pages: 406, PDF Size: 11.03 MB
Page 122 of 406

03 Your driving environment
HomeLink®
Wireless Control System*
03
120* Option/accessory, for more information, see Introduction.
Introduction
The HomeLink 1
Wireless Control System pro-
vides a convenient way to replace up to three hand-held radio-frequency (RF) transmittersused to activate devices such as gate opera-tors, garage door openers, entry door locks,security systems, even home lighting. Addi-tional HomeLink information can be found onthe Internet at www.homelink.com or byphoning the hotline at 1–800–355–3515.
WARNING
• If you use HomeLink to open a garage door or gate, be sure no one is nearthe gate or door while it is in motion.
• When programming a garage dooropener, it is advised to park outside ofthe garage.
• Do not use HomeLink with any garagedoor opener that lacks safety stop andreverse features as required by U.S.federal safety standards (this includesany garage door opener model manu-factured before April 1, 1982). Agarage door that cannot detect anobject - signaling the door to stop andreverse - does not meet current U.S.federal safety standards. For moreinformation, contact HomeLink at:www.homelink.com.
Retain the original transmitter of the RF device you are programming for use in othervehicles as well as for future HomeLink pro-gramming. It is also suggested that upon thesale of the vehicle, the programmed Home-Link buttons be erased for security purposes.Refer to “Resetting HomeLink Buttons” onpage 122.
Programming HomeLink
NOTE
Some vehicles may require the ignition to be switched on or be in the “accessories”position for programming and/or operationof HomeLink. It is also recommended thata new battery be placed in the hand-heldtransmitter of the device being pro-grammed to HomeLink for quicker trainingand accurate transmission of the radio-fre-quency signal. The HomeLink buttonsmust be reset first. When this has beencompleted, Homelink is in learning modeso that you can perform programming.
1. Position the end of your hand-held trans-
mitter 1–3 inches (5–14 cm) away from the HomeLink button you wish to pro-gram while keeping the indicator light inview.
1HomeLink and the HomeLink house are registered trademarks of Johnson Controls, Inc.
Page 125 of 406

03 Your driving environment
Starting the engine
03
}}
* Option/accessory, for more information, see Introduction.123
Start
Ignition slot with remote key inserted ( see page 88 for more information on ignition modes)
WARNING
Before starting the engine:
• Fasten the seat belt.
• Check that the seat, steering wheel and mirrors are adjusted properly.
• Make sure the brake pedal can bedepressed completely. Adjust the seatif necessary.
WARNING
•Never use more than one floor mat at a time on the driver's floor. An extramat on the driver's floor can cause theaccelerator and/or brake pedal tocatch. Check that the movement ofthese pedals is not impeded.
• Volvo's floor mats are specially manu-factured for your car. They must befirmly secured in the clips on the floorso that they cannot slide and becometrapped under the pedals on the driv-er's side.
1. Press the remote key into the ignition slot
as far as possible, with the metallic key blade pointing outward (not inserted into the slot) 1
.
2. Depress the brake pedal 2
. 3. Press and release the
START/STOP
ENGINE button. The autostart function
will operate the starter motor until the engine starts or until its overheating func-tion stops it. The starter motor operates for a maxi- mum of 10 seconds. If the engine has notstarted, repeat the procedure.
CAUTION
If the engine does not start after the third try, wait for approximately 3 minutesbefore trying to start it again to give thebattery time to recover its startingcapacity.
NOTE
Keyless drive *
To start a vehicle equipped with the key- less drive feature, one of the remote keysmust be in the passenger compartment.Follow the instructions in steps 2 and 3 tostart the vehicle.
1 On vehicles with the optional keyless drive, it is only necessary to have a remote key in the passenger’s compartment.
2 If the vehicle is moving, it is only necessary to press the START/STOP ENGINE button to start the vehicle.
Page 127 of 406
*
IntroductionERS is a feature that makes it possible to")
03 Your driving environment
Starting the engine
03
}}
* Option/accessory, for more information, see Introduction.125
Engine Remote Start (ERS)*
IntroductionERS is a feature that makes it possible to remotely start the engine to cool or heat thepassenger compartment before driving. The climate control system will start using the same settings as when the engine wasswitched off. When the engine is started using ERS, it will run for a maximum of 15 minutes beforeautomatically switching off again. After 2 ERSstarts, the engine must be started in the nor-mal way before ERS can be used again.
NOTE
• Always adhere to applicable State, Province and/or Local laws regardingengine idling when using ERS.
• The service life of the remote key'sbattery is affected by ERS use. If thisfeature is used frequently, the batteryshould be replaced once a year, seepage 60).
WARNING
Keep the following in mind before using ERS
• The vehicle should be in view.
• The vehicle should be unoccupied.
• The vehicle must not be parked indoors or in an enclosed area.Exhaust fumes are harmful to thehealth.
Using ERS
Remote key buttons used for remote engine start
Lock
Unlock
Information 4
.
Approach lighting
Starting the engineThe maximum range for ERS is approximately 100 ft (30 meters) if the view of the vehicle isunobstructed. The vehicle must also be
locked. To start the engine:
1. Press the lock button (1 ) briefly.
2. Immediately press the approach lighting button (4) for approximately 2 seconds.
If the requirements for ERS have been met, the following will occur:
1. The turn signals will flash several times.
2. The engine will start.
3. The turn signals will illuminate for 3 seconds to indicate that the engine has started.
After the engine has started, the vehicle remains locked but the alarm is disarmed.
4 PCC keys only, see page 62
Page 129 of 406

03 Your driving environment
Starting the engine
03
127
WARNING
PROPOSITION 65 WARNING! Battery posts, terminals, and related accessories contain lead and lead com-pounds, chemicals known to the state ofCalifornia to cause cancer and reproduc-tive harm. Wash hands after handling.
Follow these instructions to jump start your vehicle's dead battery or to jump startanother vehicle's dead battery using yourvehicle. If the 12-volt auxiliary battery to beused is in another vehicle, check that thevehicles are not touching to prevent prema-ture completion of a circuit. Be sure to followjump starting instructions provided for theother vehicle. To jump start your vehicle:
1. Switch off the ignition (set the ignition tomode 0, see page 88).
2. First connect the red jumper cable to the auxiliary battery's positive (+) terminal (1).
3. Fold back the cover over the positive (+) terminal on your vehicle's battery (2), marked with a "+" sign, located under afolding cover. 4. Connect the black jumper cable to the
auxiliary battery's negative (–) terminal (3)and to the ground point in your vehicle'sengine compartment (right engine mountat the top, on the outer screw) (4).
5. Start the engine in the assisting vehicle, then start the engine in the vehicle withdead battery.
6. After the engine has started, first remove the negative (–) terminal jumper cable(black). Then remove the positive (+) ter-minal jumper cable (red).
CAUTION
Connect the jumper cables carefully to avoid short circuits with other componentsin the engine compartment.
WARNING
•Do not connect the jumper cable to any part of the fuel system or to anymoving parts. Avoid touching hotmanifolds.
• Batteries generate hydrogen gas,which is flammable and explosive.
• Battery fluid contains sulfuric acid. Donot allow battery fluid to contact eyes,skin, fabrics or painted surfaces. Ifcontact occurs, flush the affected areaimmediately with water. Obtain medi-cal help immediately if eyes are affec-ted.
• Never expose the battery to openflame or electric spark.
• Do not smoke near the battery.
• Failure to follow the instructions forjump starting can lead to injury.
Page 133 of 406

03 Your driving environment
Transmission
03
}}
131
Geartronic: starting on slippery surfaces
Selecting 3rd gear in Geartronic’s manual shifting mode can help provide better tractionwhen starting off on slippery surfaces. To doso:
1. Depress the brake pedal and move thegear selector to the side from D toward
+S– .
2. Press the gear selector forward and release it (this selects 2nd gear). Press the selector forward again and release itto select 3rd gear. The optional steeringwheel paddles can also be used; see theprevious section "Geartronic: steeringwheel paddles."
3. Release the brake pedal and press gently on the accelerator pedal.
Shiftlock override
If the vehicle cannot be driven, for example because of a dead battery, the gear selectormust be moved from the P position before
the vehicle can be moved 4
.
Lift away the rubber mat on the floor of the storage compartment behind the cen-ter console to expose the small openingfor overriding the shiftlock system.
Insert the key blade into the opening. Press the key blade down as far as possi-ble and keep it held down.
Move the gear selector from the P posi-
tion. For information on the key blade, see page 64.
All Wheel Drive: AWD 5
Your Volvo can be equipped with permanent All Wheel Drive, which means that power isdistributed automatically between the frontand rear wheels. Under normal driving condi-tions, most of the engine's power is directedto the front wheels. However, if there is anytendency for the front wheels to spin, an elec-tronically controlled coupling distributespower to the wheels that have the best trac-tion.
4
If the battery is dead, the electric parking brake cannot be applied or released. Connect an auxiliary battery if the battery voltage is too low, see page 126.5
Standard on certain models.
Page 140 of 406

03 Your driving environment
Start/Stop*
03
138* Option/accessory, for more information, see Introduction.
Introduction
Start/Stop is a function that is available with certain engines/transmissions. It temporarilyswitches off the engine when the vehicle isnot moving, for instance in heavy traffic or ata traffic light to help reduce fuel consumption.
Function and use
Start/Stop symbol in the instrument panel
Start/Stop button on the center console
Start/Stop is activated automatically each time the engine is started 1
. The symbol in the
instrument panel will be displayed for several seconds when the engine starts and the indi-cator light in the On/Off button will remainilluminated while the function is activated. All of the vehicle's systems will function while the engine is auto-stopped, although the function of certain systems may reduced atthis time. For example, blower speed andhigh infotainment system volume may bereduced to help conserve the battery'scapacity.
Auto-stopping the engineNormally, when Start/Stop is activated andthe brakes are applied until the vehicle comesto a standstill, the engine will auto-stop auto-matically
if the driver keeps the brake pedal
depressed .
To remind the driver that the enginehas been auto-stopped, theStart/Stop symbol will illuminate inthe instrument panel and remain on
until the engine restarts.
If the ECO function* (see page 135) is activated, theengine may auto-stop beforethe vehicle comes to a com-plete standstill.
Auto-starting the engineThe engine restarts as soon as the driver releases the brake pedal.
Deactivating Start/StopIn certain situations (e.g.,driving in heavy, stop-and-gotraffic), it may be preferableto deactivate Start/Stop. This is done by pressing the button in the center console.
The indicator light in the button will go out. Start/Stop will remain deactivated until the button is pressed again or until the engine isswitched off and restarted by the driver.
Hill Start Assist (HSA)When starting on steep hills, HSA (see page 128) retains pressure on the brake pedalfor several seconds after the pedal has beenreleased in order to keep the vehicle at astandstill. The brakes will be released afterseveral seconds or when the driver pressesthe accelerator pedal.
1 Not when the engine is started using the optional Engine Remote Start feature, see page 125
Page 141 of 406

03 Your driving environment
Start/Stop*
03
}}
* Option/accessory, for more information, see Introduction.139
Auto-stop exceptions
In certain situations or conditions, the engine may not auto-stop when the vehicle comes
to a standstill, such as if:
Condition/situation
The vehicle's speed has not reached a speed of approx. 5 mph (ca 8 km/h) afterthe most recent auto-start or after thedriver has started the engine.
The driver unbuckles his/her seat belt.
The main battery's charge is below the minimum level.
The engine has not reached its normal operating temperature.
The ambient temperature is below freezing or above approx. 85°F (30°C).
The windshield's heating function* is acti- vated.
The climate system cannot keep the desired settings in the passenger compart-ment; the blower will operate at highspeed.
The vehicle is backing up.
Condition/situation
The main battery's temperature is below freezing or too high.
The driver is turning the steering wheel hard.
The road's incline is very steep.
A trailer's electrical system is connected to the vehicle.
The hood has been opened A
.
The transmission has not reached its nor- mal operating temperature.
Atmospheric pressure is below a level equivalent to an altitude of approx. 4,900–8,200 ft (1500–2500 m) above sea level.The actual pressure is also affected by cur-rent weather conditions.
The Adaptive Cruise Control's* Queue Assist feature is activated.
The gear selector is in the SB
or " +/–" posi-
tion.
A Certain engines only
B Sport mode (where applicable)
Auto-start exceptions
In certain situations or conditions, the engine may auto-start even though the driver is still
pressing the brake pedal, such as if:
Condition/situation
Condensation forms on the windows.
The climate system cannot keep the desired settings in the passenger compart-ment.
Electrical current consumption is tempo- rarily high or the main battery's charge isbelow the minimum level.
The brake pedal is pumped repeatedly.
The hood has been opened A
.
The vehicle begins to move or increases speed slightly (if the engine auto-stoppedbefore the vehicle was at a standstill (seepage 135)).
The driver unbuckles his/her seat belt while the gear selector is in the D or N positions.
The steering wheel is turned A
.
Page 147 of 406
03 Your driving environment
Parking brake
03
}}
145
Electric parking brake
An electric parking brake has the same func- tion as a manual parking brake.
NOTE
•A faint sound from the parking brake's electric motor can be heard when theparking brake is being applied. Thissound can also be heard during theautomatic function check of the park-ing brake.
• The brake pedal will move slightlywhen the electric parking brake isapplied or released.
Low battery voltageIf the battery voltage is too low, the park- ing brake cannot be applied or released. Connect an auxiliary battery if the battery voltage is too low, see page 126.
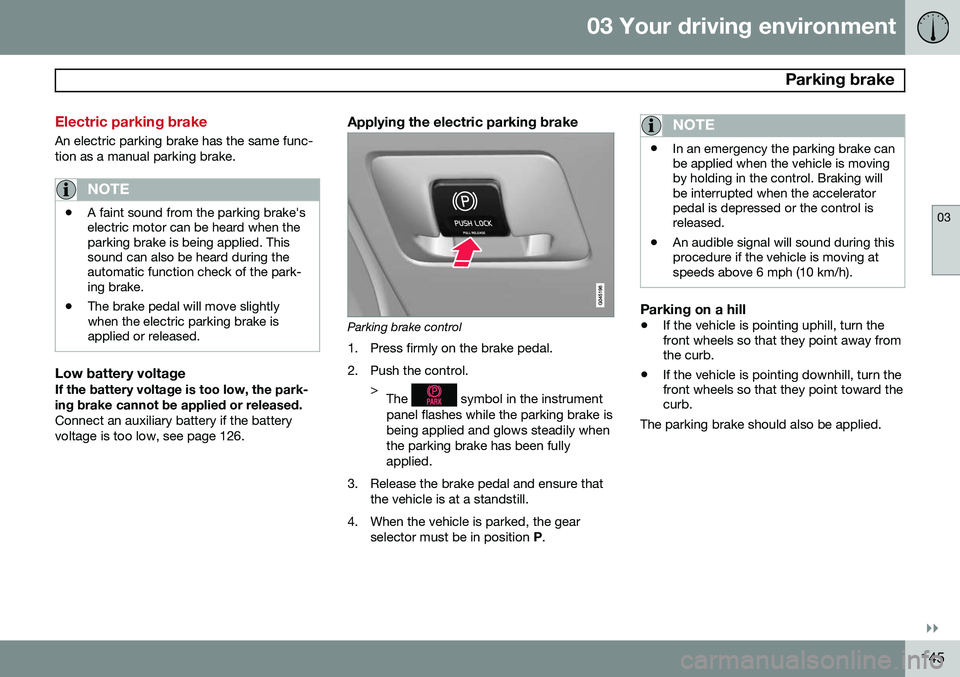
Applying the electric parking brake
Parking brake control
1. Press firmly on the brake pedal.
2. Push the control. >The
symbol in the instrument
panel flashes while the parking brake is being applied and glows steadily whenthe parking brake has been fullyapplied.
3. Release the brake pedal and ensure that the vehicle is at a standstill.
4. When the vehicle is parked, the gear selector must be in position P.
NOTE
• In an emergency the parking brake can be applied when the vehicle is movingby holding in the control. Braking willbe interrupted when the acceleratorpedal is depressed or the control isreleased.
• An audible signal will sound during thisprocedure if the vehicle is moving atspeeds above 6 mph (10 km/h).
Parking on a hill
•
If the vehicle is pointing uphill, turn the front wheels so that they point away fromthe curb.
• If the vehicle is pointing downhill, turn thefront wheels so that they point toward thecurb.
The parking brake should also be applied.
Page 210 of 406

05 Comfort and driving pleasure
Menus and messages
05
208
Messages
When a warning, information or indicator symbol comes on, a corresponding messageappears in the information panel. An errormessage is stored in a memory list until thefault is rectified. Press OK to acknowledge and scroll among
the messages.
NOTE
If a warning message appears while you are using the trip computer, the messagemust be read and confirmed by pressingOK before the previous activity can be
resumed.
MessageDescription
Stop engineAStop and switch off the engine as soon as possi-ble. Serious risk of dam-age. Contact an author-ized Volvo workshop.
Stop safelyAStop and switch off the engine. Serious risk ofdamage. Contact anauthorized Volvo work-shop.
MessageDescription
Service urgentAHave the vehicle checked by an authorized Volvoworkshop immediately.
Service requiredAHave the vehicle checked by an authorized Volvoworkshop as soon as pos-sible.
See man- ualARead the owner's manual.
Book time for mainte-nanceTime to book service at an authorized Volvo retailer.
Time for regularmainte-nanceTime for regular service at an authorized Volvo work-shop. The timing is deter-mined by the number ofmiles driven, number ofmonths since the lastservice, engine runningtime.
MessageDescription
Mainte- nance over-dueIf the service intervals are not followed, the warrantydoes not cover any dam-aged parts. Contact anauthorized Volvo work-shop for service.
Temporarily OFFAA function has been tem- porarily switched off andis reset automatically whiledriving or after startingagain.
Low battery Power savemodeThe audio system is switched off to save cur-rent. Charge the battery.
A There will also be a system-specific part of this message
Page 240 of 406

06 Infotainment
Introduction
06
238* Option/accessory, for more information, see Introduction.
General information
The infotainment system consists of radio and media player features and also makes itpossible to communicate via a cell phone.The information is displayed on a 7" screen inthe center console. Infotainment functionscan be controlled from the center console orvia the buttons on the steering wheel keypad.On models equipped with the navigation sys-tem*, voice commands can also be used toe.g., set destinations, make calls from a Bluetooth ®
-connected cell phone, etc.
If the infotainment system was on when the ignition was switched off, the most recently used source (
FM1, etc.) will restart the next
time the ignition is put in mode I or higher.
The driver's door must also be closed on vehicles with keyless drive*. The infotainment system can be operated for 15 minutes at a time while the engine isswitched off by pressing the On/Off button. While the engine is being started, the infotain- ment system will be temporarily interruptedand will resume when the engine has started.
NOTE
To help avoid excessive battery drain, remove the remote key from the ignitionslot if the infotainment system is usedwhile the engine is switched off.
Dolby Digital, Dolby Pro Logic
The system is manufactured under license from Dolby Laboratories LicensingCorporation. Dolby Digital, Dolby Pro Logic and the
symbol are trademarks of Dolby Laboratories Licensing Corporation.
Audyssey MultEQ 1
The Audyssey MultEQ system has been used to optimize sound quality to help ensure aworld-class listening experience.
1
Applies only to models with Premium Sound Multimedia.