door lock VOLVO XC60 T8 2018 Owner´s Manual
[x] Cancel search | Manufacturer: VOLVO, Model Year: 2018, Model line: XC60 T8, Model: VOLVO XC60 T8 2018Pages: 674, PDF Size: 11.93 MB
Page 8 of 674
6
Preconditioning timer settings223
Adding and editing timer setting for preconditioning 223
Activating and deactivating precondi-tioning timer settings 224
Deleting preconditioning timer settings 224
Climate comfort retaining function 225
Switching on and off the climateretaining function when parking 225
Parking climate symbols and messages 226
KEY, LOCKS AND ALARM
Lock indication228
Lock confirmation settings 229
Remote key 229
Locking and unlocking using the remote key 231
Settings for remote and inside doorunlock 232
Unlocking the tailgate using theremote key 233
Remote key range 233
Replacing the remote key's battery 234
Ordering additional remote keys 238
Red Key - restricted remote key *
238
Red Key * settings
239
Detachable key blade 240
Locking and unlocking with detacha-ble key blade 241
Electronic immobilizer 242
Start and lock system type designations 242
Keyless and touch-sensitive surfaces *
243
Keyless locking and unlocking *
244
Keyless unlock settings *
246
Keyless tailgate unlock *
246
Antenna locations for the start andlock system 247
Locking and unlocking from inside the vehicle247
Unlocking the tailgate from insidethe vehicle 249
Activating and deactivating childsafety locks 249
Automatic locking when driving 251
Opening and closing the power tailgate *
251
Setting a maximum height for the power tailgate * 254
Foot movement tailgate operation *
255
Private Locking 256
Activating and deactivating private locking 257
Alarm 258
Arming and disarming the alarm 259
Foreign Component Detection *
260
Page 12 of 674
10
STARTING AND DRIVING
Starting the vehicle414
Switching off the vehicle 416
Ignition modes 417
Selecting ignition mode 418
Brake functions 419
Brakes 419
Brake Assist System 421
Braking on wet roads 421
Braking on salted roads 421
Maintenance of the brake system 422
Parking brake 422
Activating and deactivating the park- ing brake 423
Settings for automatically activatingthe parking brake 424
Parking on a hill 424
Parking brake malfunction 425
Auto-hold brakes 426
Activating and deactivating Auto-hold at a standstill 426
Hill Start Assist 427
Braking assist after a collision 427
Transmission 428
Gear selector positions for automatictransmissions 429
Using the steering wheel paddles
* to
shift 431
Shiftlock 432
The kickdown function 432
Gear indicator *
432
All Wheel Drive (AWD) 433
Drive systems 433
Starting and stopping the combus- tion engine in Twin Engine vehicles 434
Drive modes 435
Changing drive mode 439
Leveling control * and suspension
440
Leveling control settings *
443
Low Speed Control 443
Activating and deactivating LowSpeed Control using the function button 444
Hill Descent Control 444
Activating and deactivating HillDescent Control using the functionbutton 445
Economical driving 446
Using the electric motor only 447
Factors affecting electric motor range 448
"Hold" and "Charge" functions 449
Preparing for a long trip 450
Winter driving 451
Driving through standing water452
Opening/closing the fuel filler door 452
Refueling 453
Fuel 454
Octane rating 455
Emission controls 457
Overheating of engine and transmission 458
Battery drain 459
Jump starting using another battery 459
Detachable towbar *
461
Driving with a trailer 462
Trailer Stability Assist *
464
Checking trailer lights 465
Towing using a towline 466
Attaching and removing the towing eyelet 466
Recovery 467
HomeLink ®
* 468
Programming HomeLink ®
* 469
Using HomeLink 470
Type approval for HomeLink ®
* 471
Compass 471
Activating and deactivating the compass 472
Calibrating the compass 472
Page 50 of 674

||
SAFETY
48
WARNING
•Never repair the belt yourself. Repairs should only be performed by a trainedand qualified Volvo service technician.
• Any device used to induce slack into theshoulder belt portion of the three-pointbelt system will have a detrimental effecton the amount of protection available inthe event of a collision.
• The seat back should not be tilted too farback. The shoulder belt must be taut inorder to function properly.
• Do not use any type of child restraint inthe front passenger seat. We recommendthat children who have outgrown thesedevices sit in the rear seat with the seatbelt properly fastened.
Related information
• Safety (p. 42)
• Seat belt tensioners (p. 50)
• Buckling and unbuckling seat belts (p. 48)
• Door and seat belt reminders (p. 51)
Buckling and unbuckling seat belts
Make sure that all passengers have buckled their seat belts before starting to drive.
Buckling seat belts1. Pull out the belt slowly and make sure it is not twisted or damaged.
NOTE
Each seat belt is equipped with a retractor that will lock up in the following situations:
• if the belt is pulled out rapidly
• during braking and acceleration
• if the vehicle is leaning excessively
• when driving in turns
• if the automatic locking retractor/emer-gency locking retractor (ALR/ELR) is acti-vated. Each seat belt (except for the driv-er's) is equipped with an ALR function,which is designed to keep the seat belttaut when installing a child restraint. ALRis activated when the seat belt is pulledout as far as possible. If this is done, asound from the seat belt retractor will beaudible, which is normal. The seat belt cannow only be fed into the retractor, notpulled out. This function is automaticallydisabled when the seat belt is unbuckledand fully retracted.
2. Buckle the seat belt by pushing the latch
plate into the receptacle.
> A distinct "click" indicates that the belt islocked into place.
WARNING
Always insert the seat belt latch plate into the belt buckle on the correct side. Failure to doso could cause the seat belts and belt buck-les to malfunction in a collision. There is a riskof serious injury.
Page 54 of 674
||
SAFETY
52
Rear seat
The rear seat belt reminder has two functions:• To indicate which seat belts are buckled in the rear seats. This will also be displayed inan instrument panel graphic.
• To provide audio and visual reminders if anyseat belt in the rear seat is removed whilethe vehicle is in motion. The reminder willstop when the seat belt has been rebuckled.
Door/hood/tailgate and fuel filler door
reminder
If the hood, tailgate, fuel filler door or any door isnot properly closed, this will be indicated by agraphic in the instrument panel. Stop the vehiclesafely and close the open door, hood, etc.
If the vehicle is moving at a speedunder approx. 10 km/h (6 mph), theinformation symbol will illuminate in theinstrument panel.
If the vehicle is moving at a speed above approx. 10 km/h (6 mph), thewarning symbol will illuminate in theinstrument panel.
Related information
•Seat belts (p. 47)
• Buckling and unbuckling seat belts (p. 48)
Airbags
The vehicle is equipped with airbags and inflat- able curtains for the driver and passengers.
WARNING
• If the airbag warning light stays on after the engine has started or if it illuminateswhile you are driving, have the vehicleinspected by a trained and qualified Volvoservice technician as soon as possible.
• Never attempt to alter or repair any of thevehicle's safety systems yourself. Incor-rectly performed repairs to any systemcould impair function and lead to seriousinjury. All work on these systems shouldbe performed by a trained and qualifiedVolvo service technician.
WARNING
If your vehicle has become water-damaged in any way (e.g., soaked floor mats/standingwater on the floor of the vehicle), do notattempt to start the engine. This may causeairbag deployment, which could result in seri-ous injury. Volvo recommends towing thevehicle directly to an authorized Volvo work-shop. Before attempting to tow the vehicle:
1. Switch off the ignition for at least 10
minutes and disconnect the battery.
2. Follow the instructions for manually over- riding the shiftlock system.
Deployed airbags
WARNING
If any of the airbags have deployed:
• Do not attempt to drive the vehicle. Have it towed to an authorized workshop.
• If necessary, seek medical attention.
Related information
•
Safety (p. 42)
• Driver/passenger-side airbags (p. 53)
• Side airbags (p. 59)
• Inflatable curtain (p. 60)
Page 61 of 674
SAFETY
}}
59
WARNING
•Keep the following points in mind with respect to the OWS system. Failure tofollow these instructions could adverselyaffect the system's function and result inserious injury to the occupant of the frontpassenger's seat:
• The full weight of the front seat passen-ger should always be on the seat cushion.The passenger should never lift him/herself off the seat cushion using thearmrest in the door or the center console,by pressing the feet on the floor, by sit-ting on the edge of the seat cushion, orby pressing against the backrest in a waythat reduces pressure on the seat cush-ion. This could cause OWS to disable thefront, passenger's side airbag.
WARNING
•Do not place any type of object on the front passenger's seat in such a way thatjamming, pressing, or squeezing occursbetween the object and the front seat,other than as a direct result of the correctuse of the Automatic Locking Retractor/Emergency Locking Retractor (ALR/ELR)seat belt.
• No objects should be placed under thefront passenger's seat. This could inter-fere with the OWS system's function.
Related information
• Driver/passenger-side airbags (p. 53)
Side airbags
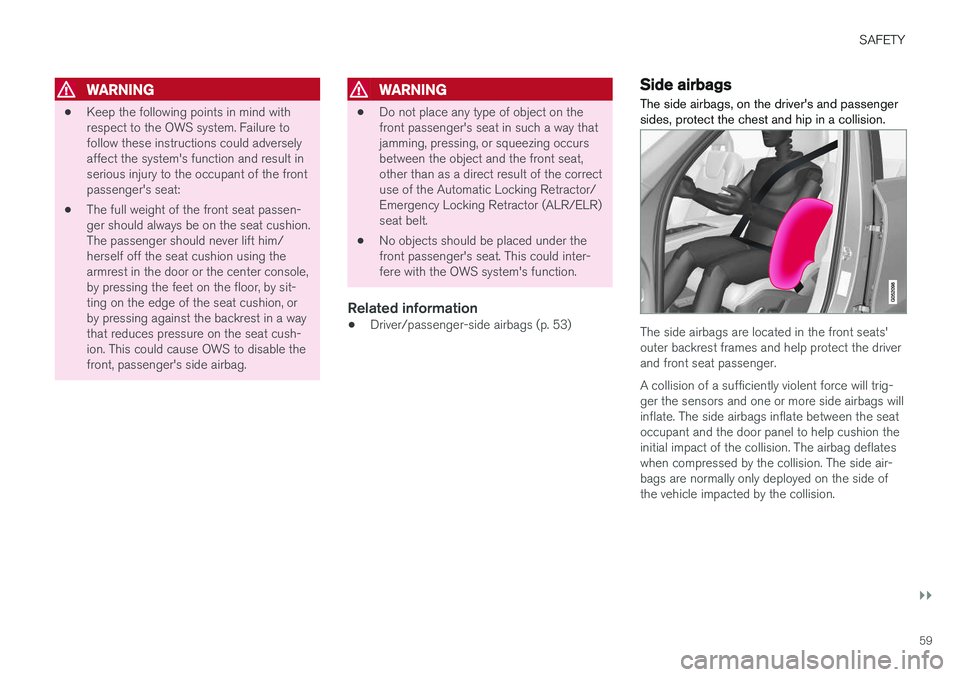
The side airbags, on the driver's and passenger sides, protect the chest and hip in a collision.
The side airbags are located in the front seats' outer backrest frames and help protect the driverand front seat passenger. A collision of a sufficiently violent force will trig- ger the sensors and one or more side airbags willinflate. The side airbags inflate between the seatoccupant and the door panel to help cushion theinitial impact of the collision. The airbag deflateswhen compressed by the collision. The side air-bags are normally only deployed on the side ofthe vehicle impacted by the collision.
Page 80 of 674
DISPLAYS AND VOICE CONTROL
* Option/accessory.
78
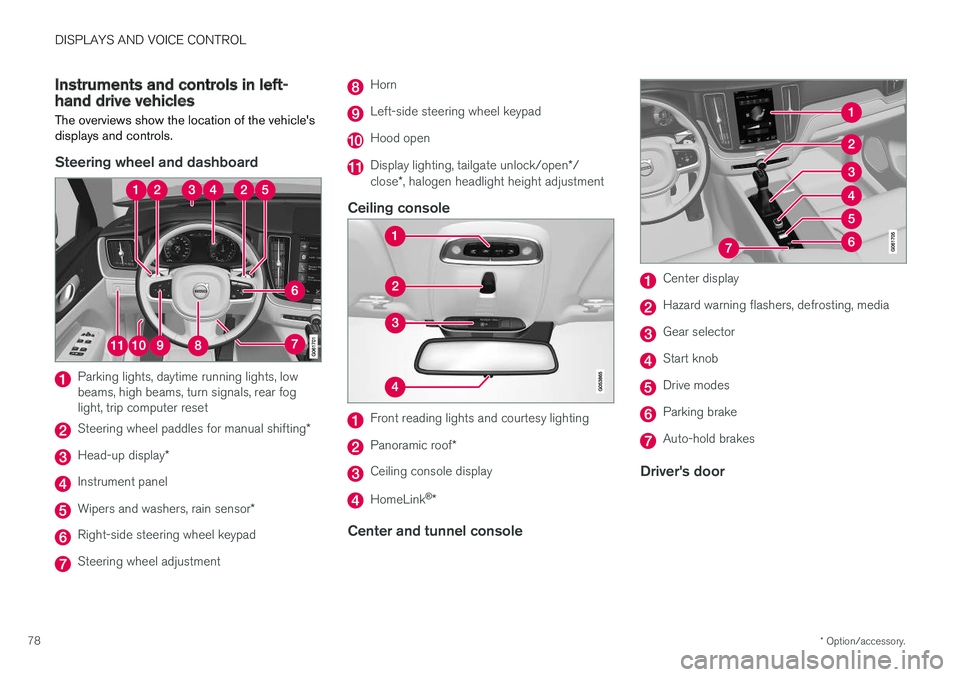
Instruments and controls in left-hand drive vehicles
The overviews show the location of the vehicle's
displays and controls.
Steering wheel and dashboard
Parking lights, daytime running lights, low beams, high beams, turn signals, rear foglight, trip computer reset
Steering wheel paddles for manual shifting *
Head-up display*
Instrument panel
Wipers and washers, rain sensor *
Right-side steering wheel keypad
Steering wheel adjustment
Horn
Left-side steering wheel keypad
Hood open
Display lighting, tailgate unlock/open */
close *, halogen headlight height adjustment
Ceiling console
Front reading lights and courtesy lighting
Panoramic roof *
Ceiling console display
HomeLink®
*
Center and tunnel console
Center display
Hazard warning flashers, defrosting, media
Gear selector
Start knob
Drive modes
Parking brake
Auto-hold brakes
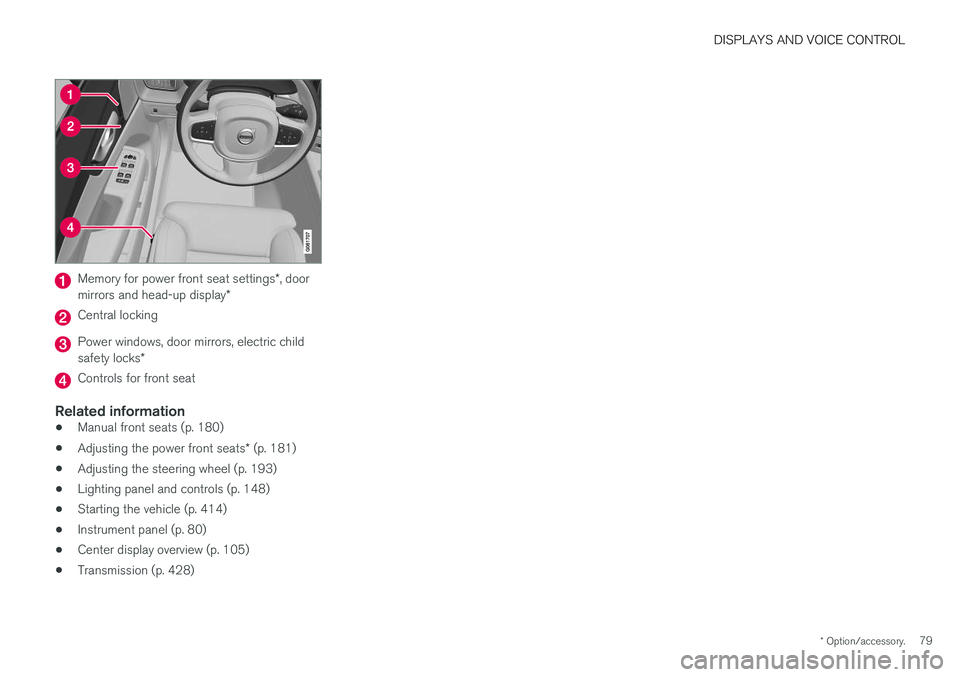
Driver's door
Page 81 of 674
DISPLAYS AND VOICE CONTROL
* Option/accessory.79
Memory for power front seat settings *, door
mirrors and head-up display *
Central locking
Power windows, door mirrors, electric child safety locks*
Controls for front seat
Related information
•Manual front seats (p. 180)
• Adjusting the power front seats
* (p. 181)
• Adjusting the steering wheel (p. 193)
• Lighting panel and controls (p. 148)
• Starting the vehicle (p. 414)
• Instrument panel (p. 80)
• Center display overview (p. 105)
• Transmission (p. 428)
Page 82 of 674
DISPLAYS AND VOICE CONTROL
* Option/accessory.
80
Instrument panel
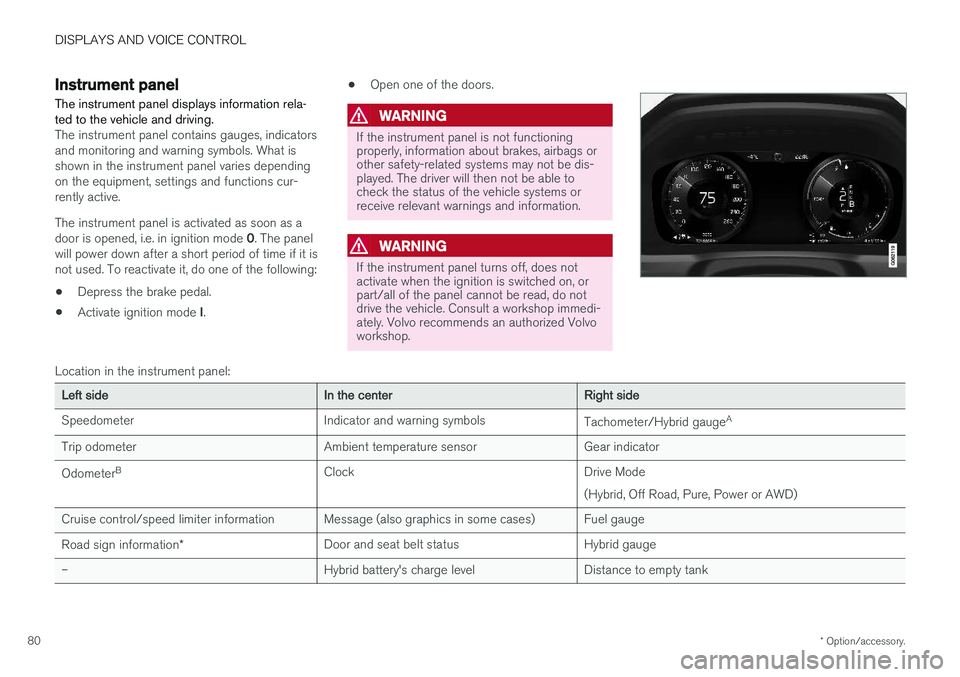
The instrument panel displays information rela- ted to the vehicle and driving.
The instrument panel contains gauges, indicators and monitoring and warning symbols. What isshown in the instrument panel varies dependingon the equipment, settings and functions cur-rently active. The instrument panel is activated as soon as a door is opened, i.e. in ignition mode 0. The panel
will power down after a short period of time if it is not used. To reactivate it, do one of the following:
• Depress the brake pedal.
• Activate ignition mode
I. •
Open one of the doors.
WARNING
If the instrument panel is not functioning properly, information about brakes, airbags orother safety-related systems may not be dis-played. The driver will then not be able tocheck the status of the vehicle systems orreceive relevant warnings and information.
WARNING
If the instrument panel turns off, does not activate when the ignition is switched on, orpart/all of the panel cannot be read, do notdrive the vehicle. Consult a workshop immedi-ately. Volvo recommends an authorized Volvoworkshop.
Location in the instrument panel:
Left sideIn the centerRight side
Speedometer Indicator and warning symbols Tachometer/Hybrid gaugeA
Trip odometer Ambient temperature sensor Gear indicator Odometer B
Clock Drive Mode
(Hybrid, Off Road, Pure, Power or AWD)
Cruise control/speed limiter information Message (also graphics in some cases) Fuel gauge Road sign information * Door and seat belt status Hybrid gauge
– Hybrid battery's charge level Distance to empty tank
Page 159 of 674

LIGHTING
* Option/accessory.157
Hazard warning flashers
Hazard warning flashers warn other road users by all of the vehicle's turn signals being activatedat the same time. The function can be used towarn about a traffic hazard.
Hazard warning flashers button.
Press the button to activate the hazard warning flashers.
NOTE
Regulations concerning the use of hazard warning flashers may vary from country tocountry.
Related information
• Emergency brake lights (p. 156)
• Using turn signals (p. 154)
Using home safe lighting
Some of the exterior lights remain on to illumi- nate the area around the vehicle. This is calledhome safe lighting.
To activate home safe lighting:
1. Switch off the ignition.
2. Push the left-side steering wheel lever toward the dashboard and release.
3. Exit the vehicle and lock the doors.When the function is activated, a symbol will be shown in the instrument panel and the parking lights, outer door handle lights * and the license
plate lights will be illuminated. The length of time home safe lighting remains illuminated can be set in the center display.
Related information
• Adjusting light functions via the center dis-play (p. 149)
• Welcome Light (p. 157)
Welcome Light Approach lighting is activated when the vehicle is unlocked and can be used to provide light asyou walk toward the vehicle.
The function is activated when the remote key is used for unlocking. The parking lights, outer door handle lights
*, license plate lights, interior ceiling
lights, footwell lighting and trunk/cargo compart- ment lighting will be illuminated. If a door isopened while the function is activated, the light- ing in the outer door handle * and the interior
lighting will remain illuminated for a longer period of time. This function can be activated and deactivated in the center display.
Related information
• Adjusting light functions via the center dis-play (p. 149)
• Using home safe lighting (p. 157)
• Remote key (p. 229)
Page 160 of 674
LIGHTING
* Option/accessory.
158
Interior Lighting
The interior is equipped with several different types of lighting to improve the experience. Thisincludes reading lamps, glove box lighting andground lighting.
All lighting in the passenger compartment can be turned on and off manually within 5 minutesafter:
• the engine has been switched off and the ignition is in mode
0.
• the vehicle is unlocked but the engine has not been started.
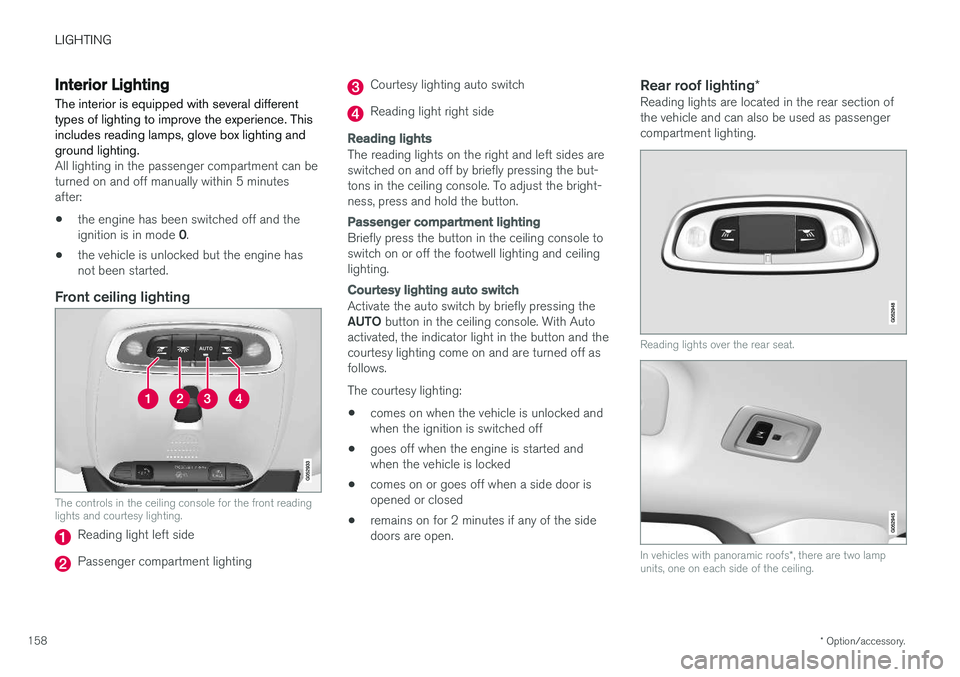
Front ceiling lighting
The controls in the ceiling console for the front reading lights and courtesy lighting.
Reading light left side
Passenger compartment lighting
Courtesy lighting auto switch
Reading light right side
Reading lights
The reading lights on the right and left sides are switched on and off by briefly pressing the but-tons in the ceiling console. To adjust the bright-ness, press and hold the button.
Passenger compartment lighting
Briefly press the button in the ceiling console to switch on or off the footwell lighting and ceilinglighting.
Courtesy lighting auto switch
Activate the auto switch by briefly pressing the AUTO
button in the ceiling console. With Auto
activated, the indicator light in the button and the courtesy lighting come on and are turned off asfollows. The courtesy lighting: • comes on when the vehicle is unlocked and when the ignition is switched off
• goes off when the engine is started andwhen the vehicle is locked
• comes on or goes off when a side door isopened or closed
• remains on for 2 minutes if any of the sidedoors are open.
Rear roof lighting
*Reading lights are located in the rear section ofthe vehicle and can also be used as passengercompartment lighting.
Reading lights over the rear seat.
In vehicles with panoramic roofs *, there are two lamp
units, one on each side of the ceiling.