display VOLVO XC70 2013 Owner´s Manual
[x] Cancel search | Manufacturer: VOLVO, Model Year: 2013, Model line: XC70, Model: VOLVO XC70 2013Pages: 382, PDF Size: 6.78 MB
Page 123 of 382
03 Your driving environment
Brakes
03
* Option/accessory, for more information, see Introduction.121 Brake system
The brake system is a hydraulic system con-
sisting of two separate brake circuits. If a prob-
lem should occur in one of these circuits, it is
still possible to stop the vehicle with the other
brake circuit.
If the brake pedal must be depressed farther
than normal and requires greater foot pressure,
the stopping distance will be longer.
A warning light in the instrument panel will light
up to warn the driver that a fault has occurred.
If this light comes on while driving or braking,
stop immediately and check the brake fluid
level in the reservoir.
NOTE
Press the brake pedal hard and maintain
pressure on the pedal – do not pump the
brakes.
WARNING
If the fluid level is below the MIN mark in the
reservoir or if a brake system message is
shown in the information display: DO NOT
DRIVE. Have the vehicle towed to a trained
and qualified Volvo service technician and
have the brake system inspected.
Brake pad inspectionOn vehicles equipped with a jack*, the condi-
tion of the brake pads can be checked by rais-
ing the vehicle (see page 314 for information
about using the jack and removing a wheel)
and performing a visual inspection of the brake
pads.
WARNING
•If the vehicle has been driven immedi-
ately prior to a brake pad inspection, the
wheel hub, brake components, etc., will
be very hot. Allow time for these com-
ponents to cool before carrying out the
inspection.
•Apply the parking brake and put the
gear selector in the Park (P) position.
•Block the wheels standing on the
ground, use rigid wooden blocks or
large stones.
WARNING
•Use the jack intended for the vehicle
when changing a tire. For any other job,
use stands to support the vehicle.
•The jack should be kept well-greased
and clean, and should not be damaged.
•Be sure the jack is on a firm, level, non-
slippery surface.
•No objects should be placed between
the base of jack and the ground, or
between the jack and the attachment
bar on the vehicle.
•The jack must correctly engage the jack
attachment.
•Never allow any part of your body to be
extended under a vehicle supported by
a jack.
Brake lightsThe brake lights come on automatically when
the brakes are applied.
Adaptive brake lightsThe adaptive brake lights activate in the event
of sudden braking or if the ABS system is acti-
vated. This function causes an additional tail-
light on each side of the vehicle to illuminate to
help alert vehicles traveling behind.
The adaptive brake lights activate if:
Page 127 of 382

03 Your driving environment
Parking brake
03
125
Releasing the electric parking brake
Parking brake control
Manual release1. Fasten the seat belt.
2. Insert the remote key in the ignition slot and
press the START/STOP ENGINE button
(or press the START/STOP ENGINE but-
ton with a valid remote key in the passen-
ger compartment on vehicles with the
optional keyless drive).
3. Press firmly on the brake pedal.
4. Pull the parking brake control.
Automatic release1. Start the engine.
NOTE
•For safety reasons, the parking brake is
only released automatically if the engine
is running and the driver is wearing a seat
belt.
•The electric parking brake will be
released immediately when the acceler-
ator pedal is pressed and the gear selec-
tor is in position D or R.
2. Fasten the seat belt.
3.
Move the gear selector to position D or R
and press the accelerator pedal. The park-
ing brake will release when the vehicle
begins to move.
Heavy load uphillA heavy load, such as a trailer, can cause the
vehicle to roll backward when the parking
brake is released automatically on a steep
incline. To help avoid this:
1. Keep the electric parking brake lever
pushed in with the left hand while shifting
into Drive with the right.
2. While pressing the throttle pedal to pull
away, release the parking brake lever only
after the vehicle begins to move.
Symbols
SymbolSpecification
Read the message in the infor-
mation display
A flashing symbol indicates that
the parking brake is being
applied. If the symbol flashes in
any other situation then this
means that a fault has arisen.
Read the message on the infor-
mation display.
Messages
Park brake not fully released – A fault is pre-
venting the parking brake from being released.
Try to apply the parking brake and release it
several times. If the problem persists, contact
Page 129 of 382
03 Your driving environment
Hill Descent Control (HDC)*
03
* Option/accessory, for more information, see Introduction.127 Introduction
Normally, when the accelerator pedal is
released while driving down hills, the vehicle's
speed slows as the engine runs at lower rpm
(the normal engine braking effect). However, if
the downhill gradient becomes steeper and if
the vehicle is carrying a load, speed increases
despite the engine braking effect. In this situa-
tion, the brakes must be applied to reduce the
vehicle's speed.
HDC is a type of automatic engine brake and
makes it possible to increase or decrease the
vehicle's speed on downhill gradients using
only the accelerator pedal, without applying
the brakes. The brake system functions auto-
matically to maintain a low and steady speed.
HDC is particularly useful when driving down
steep hills with rough surfaces, and where the
road may have slippery patches.
WARNING
HDC does not function in all situations, and
is a supplementary braking aid. The driver
has full responsibility for driving in a safe
manner.
Function
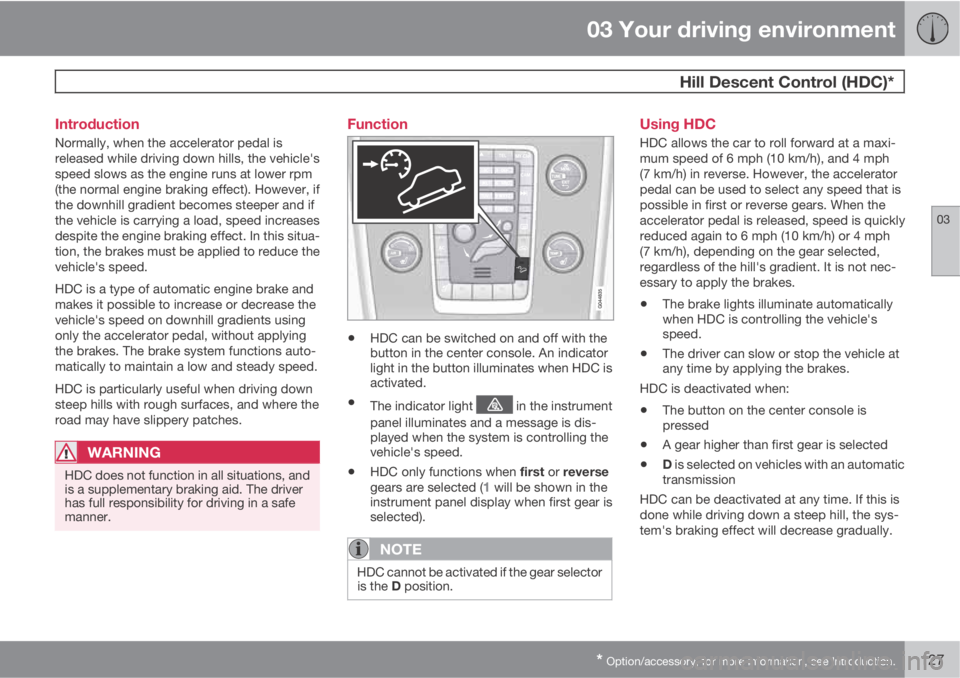
•HDC can be switched on and off with the
button in the center console. An indicator
light in the button illuminates when HDC is
activated.
•The indicator light in the instrument
panel illuminates and a message is dis-
played when the system is controlling the
vehicle's speed.
•HDC only functions when first or reverse
gears are selected (1 will be shown in the
instrument panel display when first gear is
selected).
NOTE
HDC cannot be activated if the gear selector
is the D position.
Using HDC
HDC allows the car to roll forward at a maxi-
mum speed of 6 mph (10 km/h), and 4 mph
(7 km/h) in reverse. However, the accelerator
pedal can be used to select any speed that is
possible in first or reverse gears. When the
accelerator pedal is released, speed is quickly
reduced again to 6 mph (10 km/h) or 4 mph
(7 km/h), depending on the gear selected,
regardless of the hill's gradient. It is not nec-
essary to apply the brakes.
•The brake lights illuminate automatically
when HDC is controlling the vehicle's
speed.
•The driver can slow or stop the vehicle at
any time by applying the brakes.
HDC is deactivated when:
•The button on the center console is
pressed
•A gear higher than first gear is selected
•D is selected on vehicles with an automatic
transmission
HDC can be deactivated at any time. If this is
done while driving down a steep hill, the sys-
tem's braking effect will decrease gradually.
Page 135 of 382
04 Driver support
Stability system
04
133
Symbols and messages in the main instrument panel
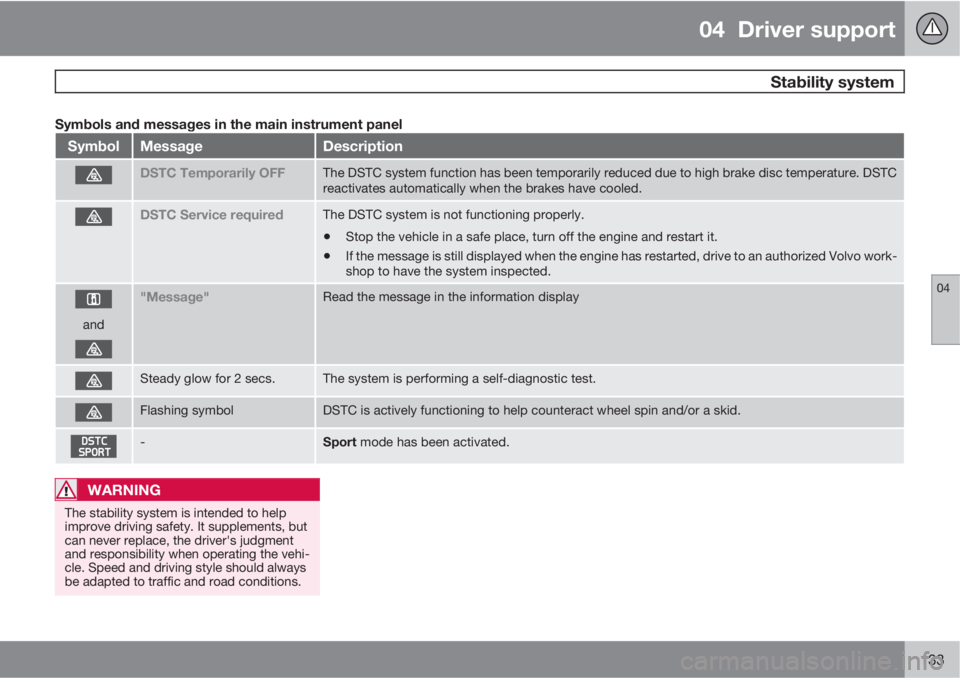
SymbolMessageDescription
DSTC Temporarily OFFThe DSTC system function has been temporarily reduced due to high brake disc temperature. DSTC
reactivates automatically when the brakes have cooled.
DSTC Service requiredThe DSTC system is not functioning properly.
•Stop the vehicle in a safe place, turn off the engine and restart it.
•If the message is still displayed when the engine has restarted, drive to an authorized Volvo work-
shop to have the system inspected.
and
"Message"Read the message in the information display
Steady glow for 2 secs.The system is performing a self-diagnostic test.
Flashing symbolDSTC is actively functioning to help counteract wheel spin and/or a skid.
-Sport mode has been activated.
WARNING
The stability system is intended to help
improve driving safety. It supplements, but
can never replace, the driver's judgment
and responsibility when operating the vehi-
cle. Speed and driving style should always
be adapted to traffic and road conditions.
Page 136 of 382
04 Driver support
Road sign information (RSI)
04
134
Introduction
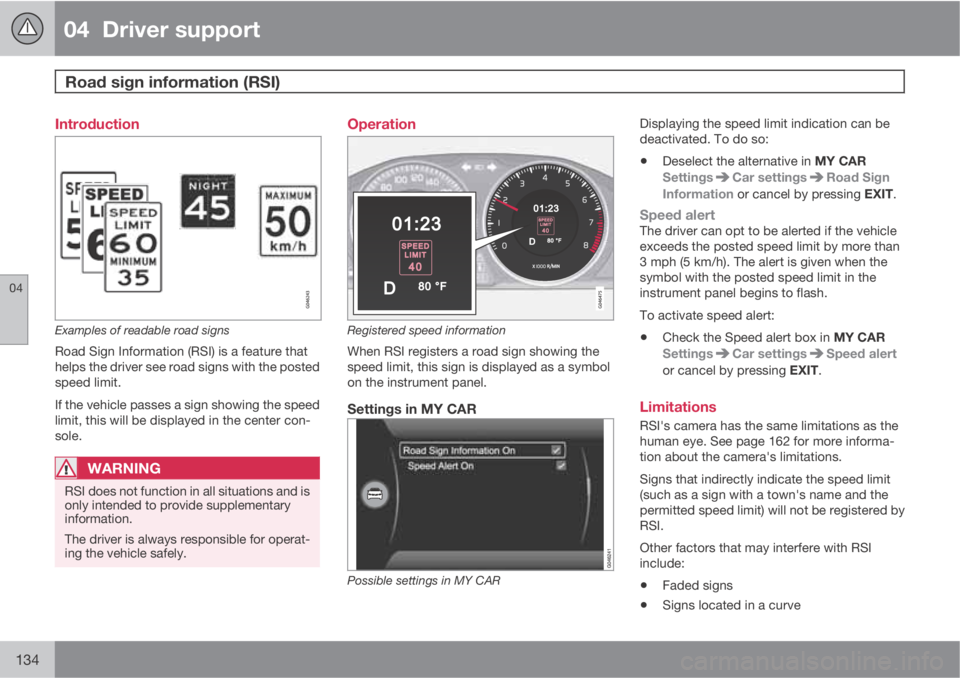
Examples of readable road signs
Road Sign Information (RSI) is a feature that
helps the driver see road signs with the posted
speed limit.
If the vehicle passes a sign showing the speed
limit, this will be displayed in the center con-
sole.
WARNING
RSI does not function in all situations and is
only intended to provide supplementary
information.
The driver is always responsible for operat-
ing the vehicle safely.
Operation
Registered speed information
When RSI registers a road sign showing the
speed limit, this sign is displayed as a symbol
on the instrument panel.
Settings in MY CAR
Possible settings in MY CAR
Displaying the speed limit indication can be
deactivated. To do so:
•Deselect the alternative in MY CAR
Settings
Car settingsRoad Sign
Information or cancel by pressing EXIT.
Speed alertThe driver can opt to be alerted if the vehicle
exceeds the posted speed limit by more than
3 mph (5 km/h). The alert is given when the
symbol with the posted speed limit in the
instrument panel begins to flash.
To activate speed alert:
•Check the Speed alert box in MY CAR
Settings
Car settingsSpeed alert
or cancel by pressing EXIT.
Limitations
RSI's camera has the same limitations as the
human eye. See page 162 for more informa-
tion about the camera's limitations.
Signs that indirectly indicate the speed limit
(such as a sign with a town's name and the
permitted speed limit) will not be registered by
RSI.
Other factors that may interfere with RSI
include:
•Faded signs
•Signs located in a curve
Page 138 of 382
04 Driver support
Cruise control
04
136
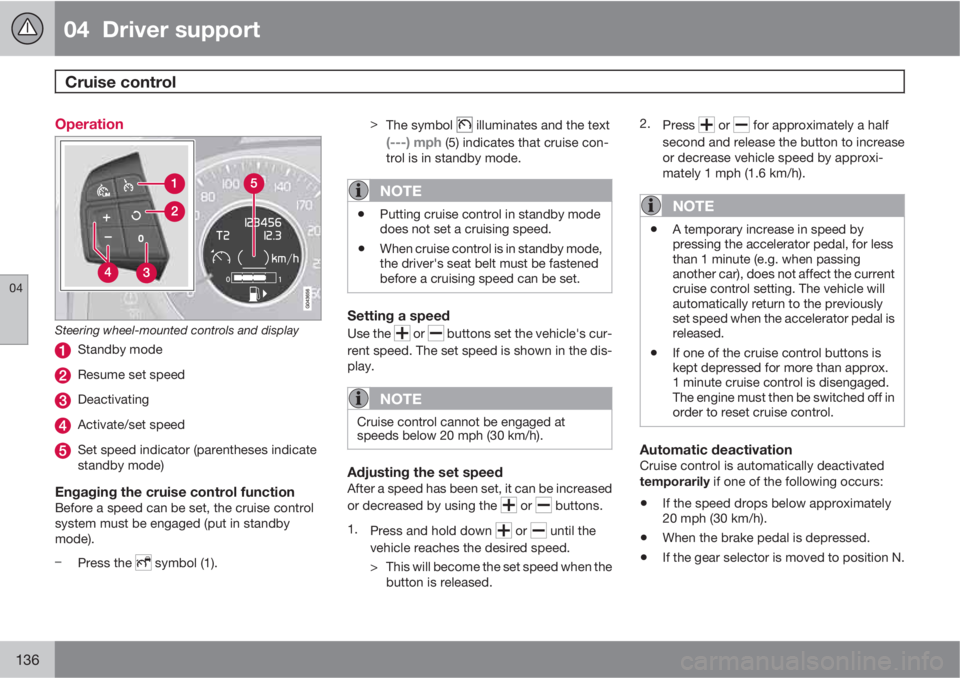
Operation
Steering wheel-mounted controls and display
Standby mode
Resume set speed
Deactivating
Activate/set speed
Set speed indicator (parentheses indicate
standby mode)
Engaging the cruise control functionBefore a speed can be set, the cruise control
system must be engaged (put in standby
mode).
–
Press the
symbol (1).>
The symbol
illuminates and the text
(---) mph (5) indicates that cruise con-
trol is in standby mode.
NOTE
•Putting cruise control in standby mode
does not set a cruising speed.
•When cruise control is in standby mode,
the driver's seat belt must be fastened
before a cruising speed can be set.
Setting a speed
Use the or buttons set the vehicle's cur-
rent speed. The set speed is shown in the dis-
play.
NOTE
Cruise control cannot be engaged at
speeds below 20 mph (30 km/h).
Adjusting the set speedAfter a speed has been set, it can be increased
or decreased by using the
or buttons.
1.
Press and hold down
or until the
vehicle reaches the desired speed.
> This will become the set speed when the
button is released.2.
Press
or for approximately a half
second and release the button to increase
or decrease vehicle speed by approxi-
mately 1 mph (1.6 km/h).
NOTE
•A temporary increase in speed by
pressing the accelerator pedal, for less
than 1 minute (e.g. when passing
another car), does not affect the current
cruise control setting. The vehicle will
automatically return to the previously
set speed when the accelerator pedal is
released.
•If one of the cruise control buttons is
kept depressed for more than approx.
1 minute cruise control is disengaged.
The engine must then be switched off in
order to reset cruise control.
Automatic deactivationCruise control is automatically deactivated
temporarily if one of the following occurs:
•If the speed drops below approximately
20 mph (30 km/h).
•When the brake pedal is depressed.
•If the gear selector is moved to position N.
Page 139 of 382
04 Driver support
Cruise control
04
137
•During wheel spin or wheel lock-up.
•If the vehicle's speed is increased by using
the accelerator pedal for more than
1 minute.
The currently set speed will be saved in the
system's memory.
Temporary deactivationThe driver can temporarily deactivate cruise
control by pressing 0. The saved speed is
shown in brackets in the information display.
Resume set speedIf cruise control has been deactivated tempo-
rarily, it can be reactivated by pressing
. The
vehicle's speed returns to the most recently set
speed.
WARNING
There may be a significant increase in speed
after the button has been pressed.
Deactivation
Cruise control is disengaged by pressing or
by switching off the engine. The set speed is
cleared.
WARNING
Cruise control should not be used in heavy
traffic or when driving on wet or slippery
roads. Cruise control may not maintain set
speed on steep downgrades.
Page 142 of 382
04 Driver support
Adaptive Cruise Control (ACC)*
04
140* Option/accessory, for more information, see Introduction.
WARNING
Adaptive Cruise Control only warns of vehi-
cles detected by the radar sensor, see
page 144. In some cases there may be no
warning or the warning may be delayed. The
driver should always apply the brakes when
necessary.
Steep inclines and/or heavy loadsACC is primarily intended for use on fairly level
roads. The system may have difficulty main-
taining the correct distance to a vehicle ahead
on steep inclines, if the vehicle is carrying a
heavy load or is towing a trailer. In these situa-
tions, the driver should always be prepared to
apply the brakes if necessary.
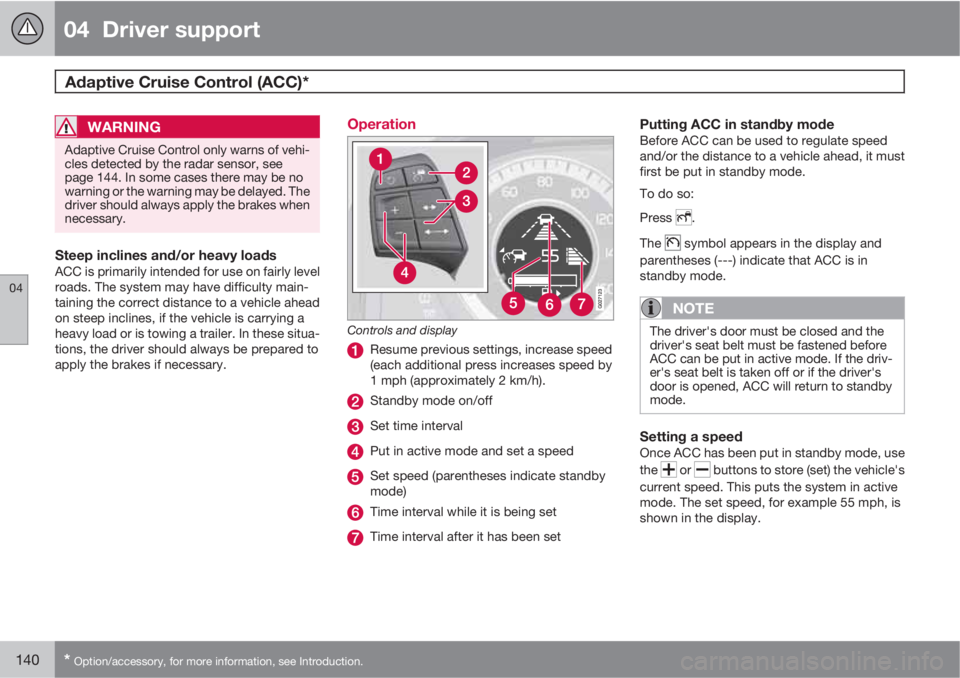
Operation
Controls and display
Resume previous settings, increase speed
(each additional press increases speed by
1 mph (approximately 2 km/h).
Standby mode on/off
Set time interval
Put in active mode and set a speed
Set speed (parentheses indicate standby
mode)
Time interval while it is being set
Time interval after it has been set
Putting ACC in standby modeBefore ACC can be used to regulate speed
and/or the distance to a vehicle ahead, it must
first be put in standby mode.
To do so:
Press
.
The
symbol appears in the display and
parentheses (---) indicate that ACC is in
standby mode.
NOTE
The driver's door must be closed and the
driver's seat belt must be fastened before
ACC can be put in active mode. If the driv-
er's seat belt is taken off or if the driver's
door is opened, ACC will return to standby
mode.
Setting a speedOnce ACC has been put in standby mode, use
the
or buttons to store (set) the vehicle's
current speed. This puts the system in active
mode. The set speed, for example 55 mph, is
shown in the display.
Page 143 of 382
04 Driver support
Adaptive Cruise Control (ACC)*
04
* Option/accessory, for more information, see Introduction.141
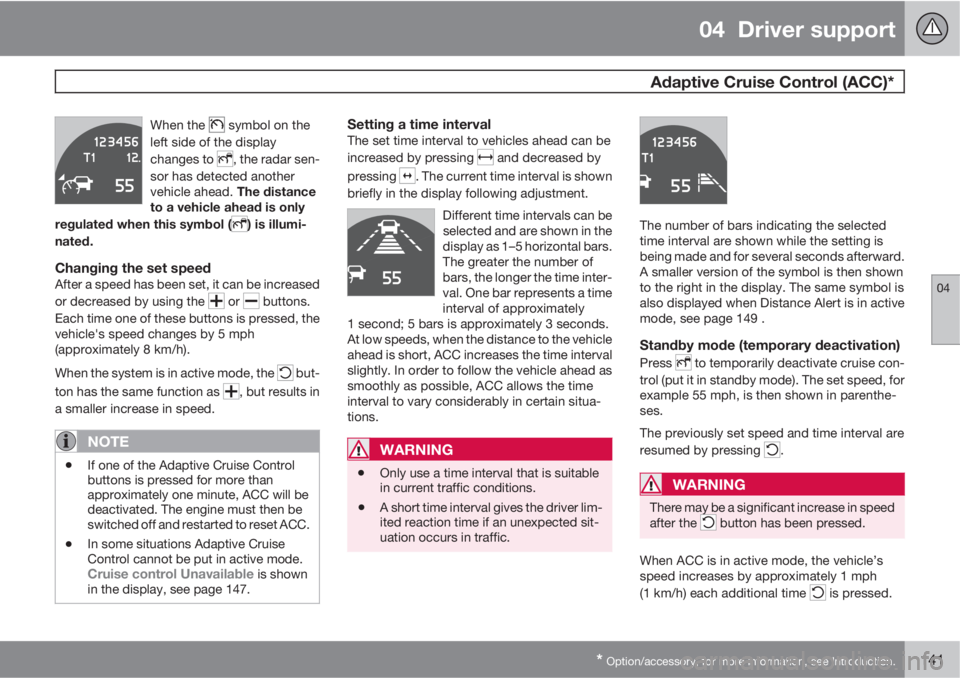
When the symbol on the
left side of the display
changes to
, the radar sen-
sor has detected another
vehicle ahead. The distance
to a vehicle ahead is only
regulated when this symbol (
) is illumi-
nated.
Changing the set speedAfter a speed has been set, it can be increased
or decreased by using the
or buttons.
Each time one of these buttons is pressed, the
vehicle's speed changes by 5 mph
(approximately 8 km/h).
When the system is in active mode, the
but-
ton has the same function as
, but results in
a smaller increase in speed.
NOTE
•If one of the Adaptive Cruise Control
buttons is pressed for more than
approximately one minute, ACC will be
deactivated. The engine must then be
switched off and restarted to reset ACC.
•In some situations Adaptive Cruise
Control cannot be put in active mode.
Cruise control Unavailable is shown
in the display, see page 147.
Setting a time intervalThe set time interval to vehicles ahead can be
increased by pressing
and decreased by
pressing
. The current time interval is shown
briefly in the display following adjustment.
Different time intervals can be
selected and are shown in the
display as 1–5 horizontal bars.
The greater the number of
bars, the longer the time inter-
val. One bar represents a time
interval of approximately
1 second; 5 bars is approximately 3 seconds.
At low speeds, when the distance to the vehicle
ahead is short, ACC increases the time interval
slightly. In order to follow the vehicle ahead as
smoothly as possible, ACC allows the time
interval to vary considerably in certain situa-
tions.
WARNING
•Only use a time interval that is suitable
in current traffic conditions.
•A short time interval gives the driver lim-
ited reaction time if an unexpected sit-
uation occurs in traffic.
The number of bars indicating the selected
time interval are shown while the setting is
being made and for several seconds afterward.
A smaller version of the symbol is then shown
to the right in the display. The same symbol is
also displayed when Distance Alert is in active
mode, see page 149 .
Standby mode (temporary deactivation)
Press to temporarily deactivate cruise con-
trol (put it in standby mode). The set speed, for
example 55 mph, is then shown in parenthe-
ses.
The previously set speed and time interval are
resumed by pressing
.
WARNING
There may be a significant increase in speed
after the button has been pressed.
When ACC is in active mode, the vehicle’s
speed increases by approximately 1 mph
(1 km/h) each additional time
is pressed.
Page 144 of 382
04 Driver support
Adaptive Cruise Control (ACC)*
04
142* Option/accessory, for more information, see Introduction.
Standby mode due to action by the driverACC is temporarily deactivated and put in
standby mode:
•if the brakes are applied
•if the gear selector is moved to N
•if the driver drives at a speed higher than
the set speed for more than 1 minute.
In this happens, the driver will have to regulate
the vehicle's speed.
NOTE
If the accelerator pedal is only depressed for
a short time, such as when passing another
vehicle, ACC is deactivated temporarily and
is reactivated when the pedal is released.
Automatic standby modeAdaptive cruise control is linked to other sys-
tems such as the stability and traction control
system (DSTC). If this system is not functioning
properly, adaptive cruise control is automati-
cally deactivated and will go into standby
mode.
In the event of automatic deactivation, an audi-
ble signal will sound and the message
Cruise
control Cancelled is shown in the display.
The driver must then intervene and adapt thevehicle's speed to the surrounding traffic and
regulate the distance to the vehicle ahead.
An automatic switch to standby mode may be
caused if:
•engine speed (rpm) is too high/low
•the vehicle's speed goes below 18 mph
(30 km/h)3
•the wheels lose traction
•brake temperature is high
•the radar sensor is obstructed by, for
example, wet snow or rain.
Resuming the set speedIf ACC is in standby mode, it can be reactivated
by pressing the
button on the steering
wheel keypad. The vehicle will return to the
most recently set speed.
WARNING
The vehicle may accelerate quickly after has been pressed if its current speed is
considerably lower than the set speed.
Passing another vehicleIf your vehicle’s speed is being regulated by
ACC and the driver indicates that he/she would
like to pass the vehicle ahead by using theleft turn signal, ACC can assist by accelerating
briefly.
This function is active at speeds above approx-
imately 45 mph (70 km/h).
WARNING
Please be aware that this function will also
cause the vehicle to accelerate briefly in
certain situations other than passing
another vehicle, for example using the left
turn signal to indicate a lane change or a
turn toward a highway exit at speeds above
approximately 45 mph (70 km/h).
Queue AssistQueue Assist is an added ACC feature that is
linked to your vehicle's automatic transmis-
sion.
Queue Assist consists of the following func-
tions:
•Enhanced speed interval (including when
the vehicle is at a complete stop or is mov-
ing at speed below 18 mph (30 km/h))
•Automatic standby mode when ACC
changes target vehicles
•No automatic braking when at a standstill
•The parking brake is applied automatically
3Does not apply to vehicles equipped with the optional Queue Assist