check engine light VOLVO XC70 2014 Owner´s Manual
[x] Cancel search | Manufacturer: VOLVO, Model Year: 2014, Model line: XC70, Model: VOLVO XC70 2014Pages: 394, PDF Size: 11.55 MB
Page 278 of 394

07 During your trip
Driving recommendations
07
276
WARNING
The cooling fan may start or continue to operate (for up to 6 minutes) after theengine has been switched off.
•Remove any auxiliary lights from in front of the grille when driving in hot weatherconditions.
• Do not exceed engine speeds of4500 rpm if driving with a trailer in hillyterrain. The oil temperature could becometoo high.
Conserving electrical currentKeep the following in mind to help minimize battery drain:
• When the engine is not running, avoid using ignition mode
II. Many electrical
systems (the audio system, the optionalnavigation system, power windows, etc)will function in ignition modes 0 and I.
These modes reduce drain on the battery.
• Please keep in mind that using systems,accessories, etc., that consume a greatdeal of current when the engine is notrunning could result in the battery beingcompletely drained. Driving or having theengine running for approximately15 minutes will help keep the batterycharged. •
The optional 12 volt socket in the cargoarea provides electrical current even withthe ignition switched off, which drains thebattery.
Before a long distance tripIt is always worthwhile to have your vehicle checked by a trained and qualified Volvoservice technician before driving long dis-tances. Your retailer will also be able to sup-ply you with bulbs, fuses, spark plugs andwiper blades for your use in the event thatproblems occur. As a minimum, the following items should be checked before any long trip:
• Check that engine runs smoothly and that fuel consumption is normal.
• Check for fuel, oil, and fluid leakage.
• Have the transmission oil level checked.
• Check condition of drive belts.
• Check state of the battery's charge.
• Examine tires carefully (the spare tire aswell), and replace those that are worn.Check tire pressures.
• The brakes, front wheel alignment, andsteering gear should be checked by atrained and qualified Volvo service techni-cian only.
• Check all lights, including high beams. •
Reflective warning triangles are legallyrequired in some states/provinces.
• Have a word with a trained and qualifiedVolvo service technician if you intend todrive in countries where it may be difficultto obtain the correct fuel.
• Consider your destination. If you will bedriving through an area where snow or iceare likely to occur, consider snow tires.
Cold weather precautionsIf you wish to check your vehicle before the approach of cold weather, the followingadvice is worth noting:
• Make sure that the engine coolant con- tains 50 percent antifreeze. Any othermixture will reduce freeze protection. Thisgives protection against freezing down to–31 °F (–35 °C). The use of "recycled"antifreeze is not approved by Volvo. Dif-ferent types of antifreeze must not bemixed.
• Volvo recommends using only genuineVolvo antifreeze in your vehicle's radiator.
• Try to keep the fuel tank well filled – thishelps prevent the formation of condensa-tion in the tank. In addition, in extremelycold weather conditions it is worthwhileto add fuel line de-icer before refueling.
• The viscosity of the engine oil is impor-tant. Oil with low viscosity (thinner oil)
Page 279 of 394
07 During your trip
Driving recommendations
07
277
improves cold-weather starting as well as decreasing fuel consumption while theengine is warming up. Full synthetic0W-30 oil is recommended for driving inareas with sustained low temperatures.
• The load placed on the battery is greaterduring the winter since the windshieldwipers, lighting, etc., are used moreoften. Moreover, the capacity of the bat-tery decreases as the temperature drops.In very cold weather, a poorly chargedbattery can freeze and be damaged. It istherefore advisable to check the state ofcharge more frequently and spray an anti-rust oil on the battery posts.
• Volvo recommends the use of snow tireson all four wheels for winter driving, seepage 314.
• To prevent the washer fluid reservoir fromfreezing, add washer solvents containingantifreeze. This is important since dirt isoften splashed on the windshield duringwinter driving, requiring the frequent useof the washers and wipers. Volvo WasherSolvent should be diluted as follows:Down to 14 °F (–10 °C): 1 part washersolvent and 4 parts water Down to 5 °F(–15 °C): 1 part washer solvent and3 parts water Down to 0 °F (–18 °C):1 part washer solvent and 2 parts waterDown to –18 °F (–28 °C): 1 part washersolvent and 1 part water. •
Use Volvo Teflon Lock Spray in the locks.
• Avoid using de-icing sprays as they cancause damage to the locks.
Page 280 of 394
07 During your trip
Refueling
07
278
Fuel requirements
Deposit control gasoline (detergentadditives)
Volvo recommends the use of detergent gas- oline to control engine deposits. Detergentgasoline is effective in keeping injectors andintake valves clean. Consistent use of depositcontrol gasolines will help ensure good driva-bility and fuel economy. If you are not surewhether the gasoline contains deposit controladditives, check with the service station oper-ator.
NOTE
Volvo does not recommend the use of external fuel injector cleaning systems.
Unleaded fuelEach Volvo has a three-way catalytic con- verter and must use only unleaded gasoline.U.S. and Canadian regulations require thatpumps delivering unleaded gasoline belabeled "UNLEADED". Only these pumpshave nozzles which fit your vehicle's fillerinlet. It is unlawful to dispense leaded fuelinto a vehicle labelled "unleaded gasolineonly". Leaded gasoline damages the three-way catalytic converter and the heated oxy-gen sensor system. Repeated use of leaded gasoline will lessen the effectiveness of theemission control system and could result inloss of emission warranty coverage. Stateand local vehicle inspection programs willmake detection of misfueling easier, possiblyresulting in emission test failure for misfueledvehicles.
NOTE
Some U.S. and Canadian gasolines con- tain an octane enhancing additive calledmethyl-cyclopentadienyl manganese tri-carbonyl (MMT). If such fuels are used,your Emission Control System perform-ance may be affected, and the CheckEngine Light (malfunction indicator light)located on your instrument panel maylight. If this occurs, please return yourvehicle to a trained and qualified Volvoservice technician for service.
Gasoline containing alcohol and ethers, "Oxygenated fuels"
Some fuel suppliers sell gasoline containing "oxygenates" which are usually alcohols orethers. In some areas, state or local lawsrequire that the service pump be marked indi- cating use of alcohols or ethers. However,there are areas in which the pumps areunmarked. If you are not sure whether there isalcohol or ethers in the gasoline you buy,check with the service station operator. Tomeet seasonal air quality standards, someareas require the use of "oxygenated" fuel. Volvo allows the use of the following "oxy- genated" fuels; however, the octane ratingslisted on page 279 must still be met.
Alcohol – EthanolFuels containing up to 10% ethanol by vol- ume may be used. Ethanol may also be refer-red to as Ethyl alcohol, or "Gasohol". Ethers – MTBE: Fuels containing up to 15% MTBE may be used.
MethanolDo not use gasolines containing methanol(methyl alcohol, wood alcohol). This practicecan result in vehicle performance deteriora-tion and can damage critical parts in the fuelsystem. Such damage may not be coveredunder the New Vehicle Limited Warranty.
Page 283 of 394
07 During your trip
Refueling
07
281
Opening/closing the fuel cap
G022915
Fuel vapor expands in hot weather. Open the filler cap slowly. After refueling, close the fuel filler cap by turning it clockwise until it clicks into place.
CAUTION
•Do not refuel with the engine running 2
.
Turn the ignition off or to position I. If
the ignition is on, an incorrect reading could occur in the fuel gauge.
• Avoid overfilling the fuel tank. Do notpress the handle on the filler nozzlemore than one extra time. Too muchfuel in the tank in hot weather condi-tions can cause the fuel to overflow.Overfilling could also cause damage tothe emission control systems.
Emission controls
Three-way catalytic converter
•
Keep your engine properly tuned. Certain engine malfunctions, particularly involvingthe electrical, fuel or distributor ignitionsystems, may cause unusually high three-way catalytic converter temperatures. Donot continue to operate your vehicle ifyou detect engine misfire, noticeable lossof power or other unusual operating con-ditions, such as engine overheating orbackfiring. A properly tuned engine will help avoid malfunctions that could dam-age the three-way catalytic converter.
• Do not park your vehicle over combusti-ble materials, such as grass or leaves,which can come into contact with the hotexhaust system and cause such materialsto ignite under certain wind and weatherconditions.
• Excessive starter cranking (in excess ofone minute), or an intermittently firing orflooded engine can cause three-way cat-alytic converter or exhaust system over-heating.
• Remember that tampering or unauthor-ized modifications to the engine, theEngine Control Module, or the vehiclemay be illegal and can cause three-waycatalytic converter or exhaust systemoverheating. This includes: altering fuelinjection settings or components, alteringemission system components or locationor removing components, and/or repea-ted use of leaded fuel.
NOTE
Unleaded fuel is required for vehicles with three-way catalytic converters.
2
If the fuel filler cap is not closed tightly or if the engine is running when the vehicle is refueled, the Check Engine Light (malfunction indicator lamp) may indicate a fault. However, your vehicle's performance will not be affected. Use only Volvo original or approved fuel filler caps.
Page 295 of 394
07 During your trip
Towing a trailer
07
293
Introduction
Volvo recommends the use of Volvo trailer hitches that are specially designed for thevehicle.
NOTE
See page 373 for the maximum trailer and tongue weights recommended by Volvo.
•Observe the legal requirements of the state/province in which the vehicles are
• All Volvo models are equipped withenergy-absorbing shock-mounted bump-ers. Trailer hitch installation should notinterfere with the proper operation of thisbumper system.
Trailer towing does not normally present any particular problems, but take into considera-tion: • Increase tire pressure to recommended full pressure. See the tire inflation tableon page 307.
• When your vehicle is new, avoid towingheavy trailers during the first 620 miles(1,000 km).
• Maximum speed when towing a trailer:50 mph (80 km/h).
• Engine and transmission are subject toincreased loads. Therefore, engine cool-ant temperature should be closely watched when driving in hot climates orhilly terrain. Use a lower gear and turn offthe air conditioner if the temperaturegauge needle enters the red range.
• If the automatic transmission begins tooverheat, a message will be displayed inthe text window.
• Avoid overload and other abusive opera-tion.
• Hauling a trailer affects handling, durabil-ity, and economy.
• It is necessary to balance trailer brakeswith the towing vehicle brakes to providea safe stop (check and observe state/local regulations).
• Do not connect the trailer's brake systemdirectly to the vehicle's brake system.
• More frequent vehicle maintenance isrequired.
• Remove the ball holder when the hitch isnot being used.
WARNING
• Bumper-attached trailer hitches must not be used on Volvos, nor shouldsafety chains be attached to thebumper.
• Trailer hitches attaching to the vehiclerear axle must not be used.
• Never connect a trailer's hydraulicbrake system directly to the vehiclebrake system, nor a trailer's lightingsystem directly to the vehicle lightingsystem. Consult your nearest author-ized Volvo retailer for correct installa-tion.
• When towing a trailer, the trailer'ssafety wire must be correctly fastenedto the hole or hook provided in thetrailer hitch on the vehicle. The safetywire should never be fastened to orwound around the drawbar ball.
Page 299 of 394
07 During your trip
Emergency towing
07
297
Towing the vehicle
1. With the remote key fully pressed into theignition slot 1
, press START/STOP
ENGINE for approximately 2 seconds to
activate ignition mode II.
2. The remote key must remain in the igni- tion slot 2
for the entire time that the vehi-
cle is being towed.
3. Keep the tow rope taut when the towing vehicle slows down by applying light pressure on the brake pedal. This willhelp prevent jarring movements of thevehicle being towed.
4. Be prepared to apply the brakes to stop the vehicle being towed.CAUTION
General towing precautions:
• Please check with state and local authorities before attempting this typeof towing, as vehicles being towed aresubject to regulations regarding maxi-mum towing speed, length and type oftowing device, lighting, etc.
• If the vehicle's battery is dead, attachjumper cables (see page 123) to pro-vide current for releasing the electricparking brake and to move the gearselector from the
P position to N. If
this is not possible, see page 128 forinformation about manually overridingthe shiftlock system to move the gearselector from P to N.
• Maximum speed: 50 mph (80 km/h).Do not exceed the maximum allowabletowing speed.
• Maximum distance with front wheelson ground: 50 miles (80 km).
• The vehicle should only be towed inthe forward direction.
Having the vehicle towed by a tow truck
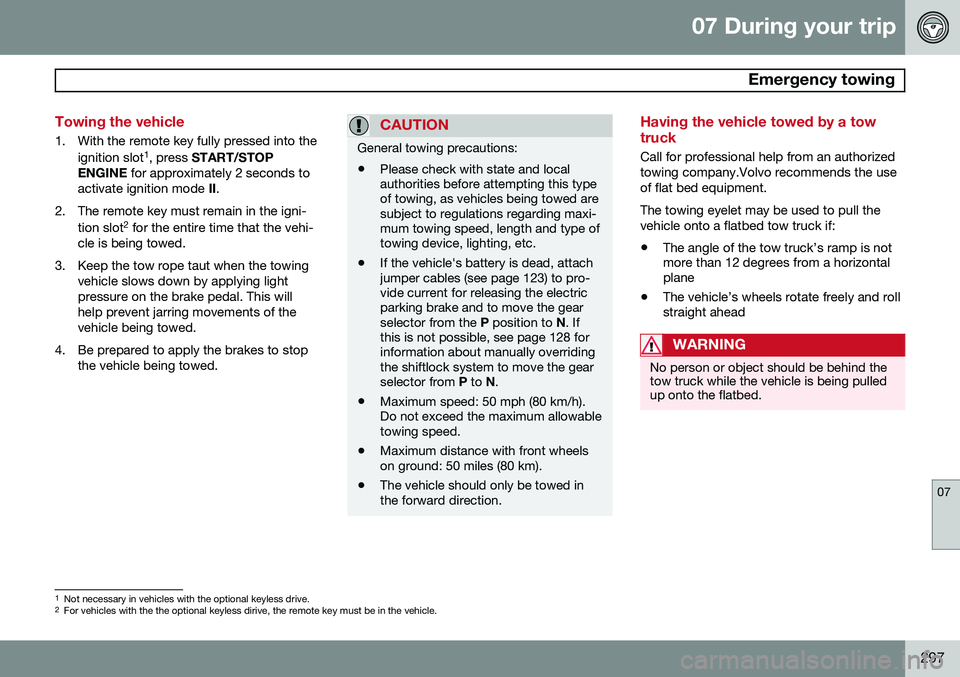
Call for professional help from an authorized towing company.Volvo recommends the useof flat bed equipment. The towing eyelet may be used to pull the vehicle onto a flatbed tow truck if:
• The angle of the tow truck’s ramp is not more than 12 degrees from a horizontalplane
• The vehicle’s wheels rotate freely and rollstraight ahead
WARNING
No person or object should be behind the tow truck while the vehicle is being pulledup onto the flatbed.
1
Not necessary in vehicles with the optional keyless drive.
2 For vehicles with the the optional keyless dirive, the remote key must be in the vehicle.
Page 335 of 394

09 Maintenance and specifications
Maintaining your car09
333
Owner maintenance
Periodic maintenance requirements and inter- vals are described in your vehicle's Warrantyand Service Records Information booklet. The following points can be carried out between the normally scheduled maintenanceservices.
Each time the car is refueled:
•Check the engine oil level.
• Clean the windshield, windshield wipers, headlights, and taillights.
Monthly:
• Check cold tire pressure in all tires.Inspect the tires for wear.
• Check that engine coolant and other fluidlevels are between the indicated "min"and "max" markings.
• Clean interior glass surfaces with a glasscleaner and soft paper towels.
• Wipe driver information displays with asoft cloth.
• Visually inspect battery terminals for cor-rosion. Corrosion may indicate a looseterminal connector, or a battery near theend of its useful service life. Consult yourVolvo retailer for additional information.
As needed:Wash the car, including the undercarriage, to reduce wear that can be caused by a buildupof dirt, and corrosion that can be caused bysalt residues. Clean leaves and twigs from air intake vents at the base of the windshield, and from otherplaces where they may collect.
NOTE
Complete service information for qualified technicians is available online for purchaseor subscription at www.volvotechinfo.com.
Hoisting the vehicle
If a garage jack is used to lift the vehicle, the two jack attachments points should be used. They are specially reinforced to bear theweight of the vehicle. A garage jack can alsobe placed under the front of the engine sup-port frame. Take care not to damage thesplash guard under the engine. Ensure thatthe jack is positioned so that the vehicle can-not slide off it. Always use axle stands or sim-ilar structures. If a two-post hoist is used to lift the vehicle, the front and rear lift arm pads should becentered under the reinforced lift plates onthe inboard edge of the sill rail (see illustra-tion).
Emission inspection readiness
What is an Onboard Diagnostic System
(OBD II)?
OBD II is part of your vehicle's computerized engine management system. It stores diag-nostic information about your vehicle's emis-sion controls. It can light the Check Enginelight (MIL) if it detects an emission control"fault." A "fault" is a component or systemthat is not performing within an expectedrange. A fault may be permanent or tempo-rary. OBD II will store a message about anyfault.
Page 336 of 394
09 Maintenance and specifications
Maintaining your car 09
334
How do states use OBD II for emission
inspections?
Many states connect a computer directly to a vehicle's OBD II system. The inspector canthen read "faults." In some states, this type ofinspection has replaced the tailpipe emissiontest.
How can my vehicle fail OBD II emission inspection?
Your vehicle can fail OBD II emission inspec-tion for any of the following reasons.
• If your Check Engine (MIL) light is lit, your vehicle may fail inspection.
• If your vehicle's Check Engine light waslit, but went out without any action onyour part, OBD II will still have a recordedfault. Your vehicle may pass or fail,depending on the inspection practices inyour area.
• If you had recent service that requireddisconnecting the battery, OBD II diag-nostic information may be incompleteand "not ready" for inspection. A vehiclethat is not ready may fail inspection.
How can I prepare for my next OBD II
emission inspection?
• If your Check Engine (MIL) light is lit – orwas lit but went out without service, have your vehicle diagnosed and, if necessary,serviced by a qualified Volvo technician.
• If you recently had service for a lit CheckEngine light, or if you had service thatrequired disconnecting the battery, aperiod of driving is necessary to bring theOBD II system to "ready" for inspection.A half-hour trip of mixed stop-and-go/highway driving is typically needed toallow OBD II to reach readiness. YourVolvo retailer can provide you with moreinformation on planning a trip.
• Maintain your vehicle in accordance withyour vehicle's maintenance schedule.
Page 337 of 394
09 Maintenance and specifications
Hood and engine compartment09
335
Opening and closing the hood
G010951
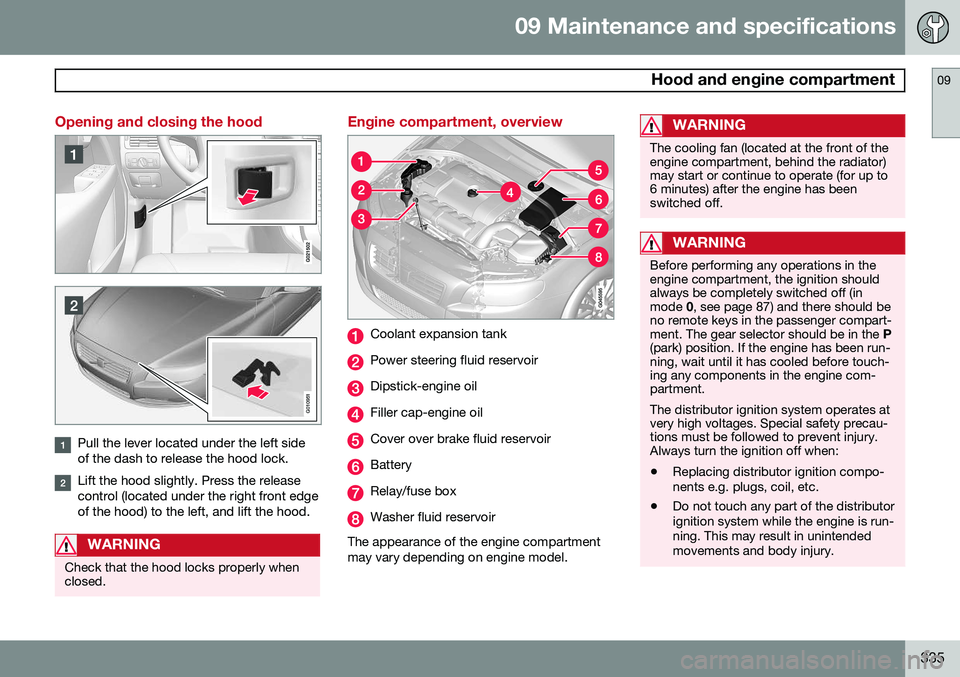
Pull the lever located under the left side of the dash to release the hood lock.
Lift the hood slightly. Press the release control (located under the right front edgeof the hood) to the left, and lift the hood.
WARNING
Check that the hood locks properly when closed.
Engine compartment, overview
Coolant expansion tank
Power steering fluid reservoir
Dipstick-engine oil
Filler cap-engine oil
Cover over brake fluid reservoir
Battery
Relay/fuse box
Washer fluid reservoir
The appearance of the engine compartment may vary depending on engine model.
WARNING
The cooling fan (located at the front of the engine compartment, behind the radiator)may start or continue to operate (for up to6 minutes) after the engine has beenswitched off.
WARNING
Before performing any operations in the engine compartment, the ignition shouldalways be completely switched off (inmode 0, see page 87) and there should be
no remote keys in the passenger compart-ment. The gear selector should be in the P
(park) position. If the engine has been run-ning, wait until it has cooled before touch-ing any components in the engine com-partment. The distributor ignition system operates at very high voltages. Special safety precau-tions must be followed to prevent injury.Always turn the ignition off when:
• Replacing distributor ignition compo- nents e.g. plugs, coil, etc.
• Do not touch any part of the distributorignition system while the engine is run-ning. This may result in unintendedmovements and body injury.
Page 350 of 394
09 Maintenance and specifications
Wiper blades and washer fluid 09
348
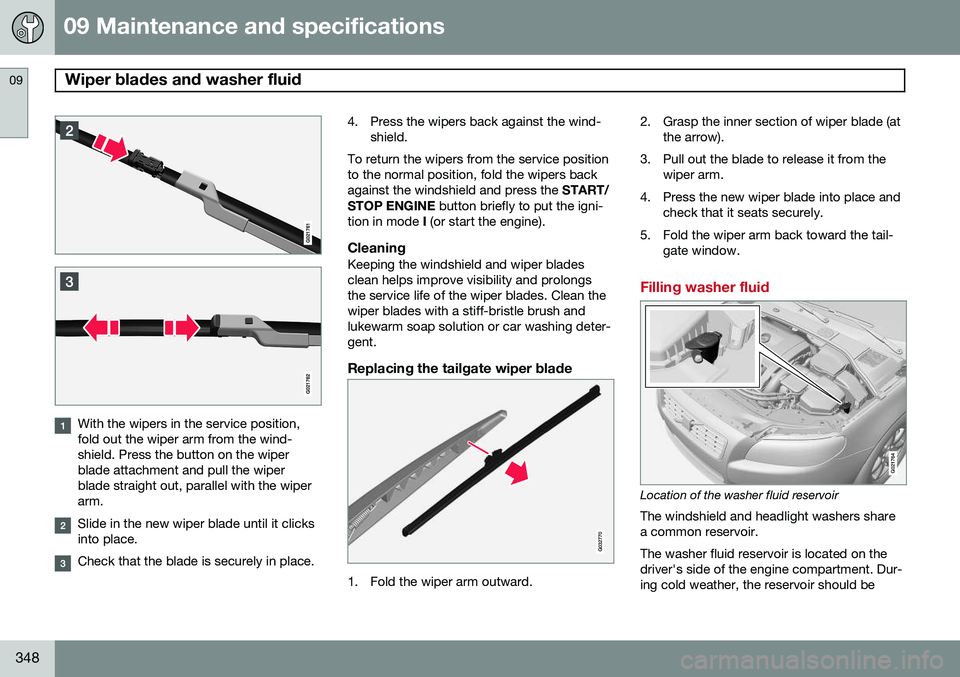
With the wipers in the service position, fold out the wiper arm from the wind-shield. Press the button on the wiperblade attachment and pull the wiperblade straight out, parallel with the wiperarm.
Slide in the new wiper blade until it clicks into place.
Check that the blade is securely in place.4. Press the wipers back against the wind-
shield.
To return the wipers from the service position to the normal position, fold the wipers backagainst the windshield and press the START/
STOP ENGINE button briefly to put the igni-
tion in mode I (or start the engine).
CleaningKeeping the windshield and wiper bladesclean helps improve visibility and prolongsthe service life of the wiper blades. Clean thewiper blades with a stiff-bristle brush andlukewarm soap solution or car washing deter-gent.
Replacing the tailgate wiper blade
G032770
1. Fold the wiper arm outward. 2. Grasp the inner section of wiper blade (at
the arrow).
3. Pull out the blade to release it from the wiper arm.
4. Press the new wiper blade into place and check that it seats securely.
5. Fold the wiper arm back toward the tail- gate window.
Filling washer fluid
G021764
Location of the washer fluid reservoir
The windshield and headlight washers share a common reservoir. The washer fluid reservoir is located on the driver's side of the engine compartment. Dur-ing cold weather, the reservoir should be