remote control VOLVO XC70 2014 Owner´s Manual
[x] Cancel search | Manufacturer: VOLVO, Model Year: 2014, Model line: XC70, Model: VOLVO XC70 2014Pages: 394, PDF Size: 11.55 MB
Page 110 of 394
03 Your driving environment
Windows
03
108
Power windows
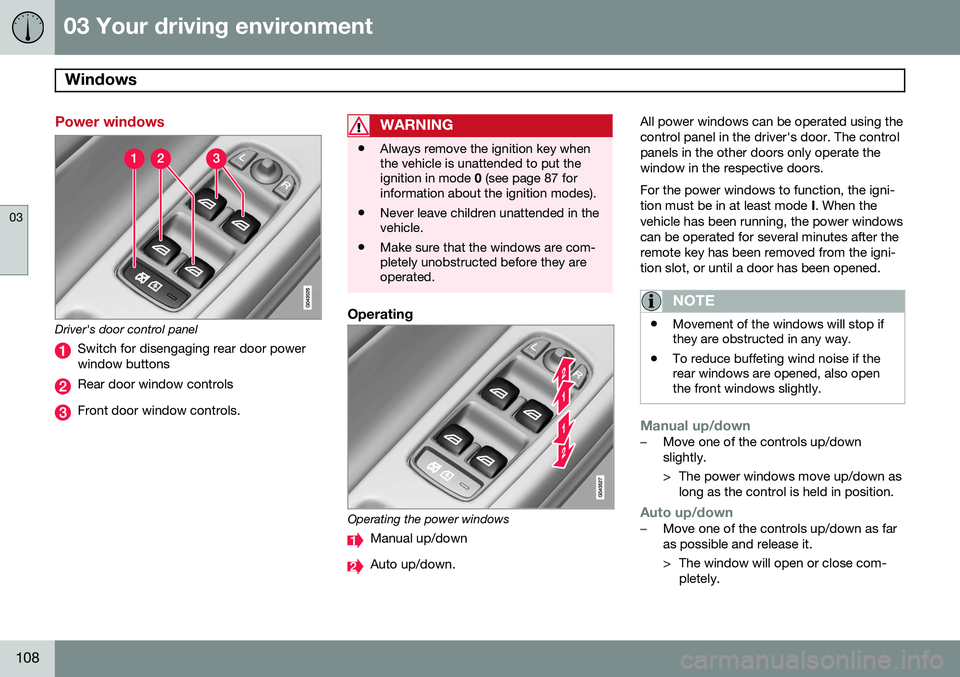
Driver's door control panel
Switch for disengaging rear door power window buttons
Rear door window controls
Front door window controls.
WARNING
•Always remove the ignition key when the vehicle is unattended to put theignition in mode
0 (see page 87 for
information about the ignition modes).
• Never leave children unattended in thevehicle.
• Make sure that the windows are com-pletely unobstructed before they areoperated.
Operating
Operating the power windows
Manual up/down
Auto up/down. All power windows can be operated using the control panel in the driver's door. The controlpanels in the other doors only operate thewindow in the respective doors. For the power windows to function, the igni- tion must be in at least mode
I. When the
vehicle has been running, the power windowscan be operated for several minutes after theremote key has been removed from the igni-tion slot, or until a door has been opened.
NOTE
• Movement of the windows will stop if they are obstructed in any way.
• To reduce buffeting wind noise if therear windows are opened, also openthe front windows slightly.
Manual up/down–Move one of the controls up/down slightly.
> The power windows move up/down as
long as the control is held in position.
Auto up/down–Move one of the controls up/down as far as possible and release it.
> The window will open or close com-pletely.
Page 112 of 394
03 Your driving environment
Mirrors
03
110* Option/accessory, for more information, see Introduction.
Power door mirrors
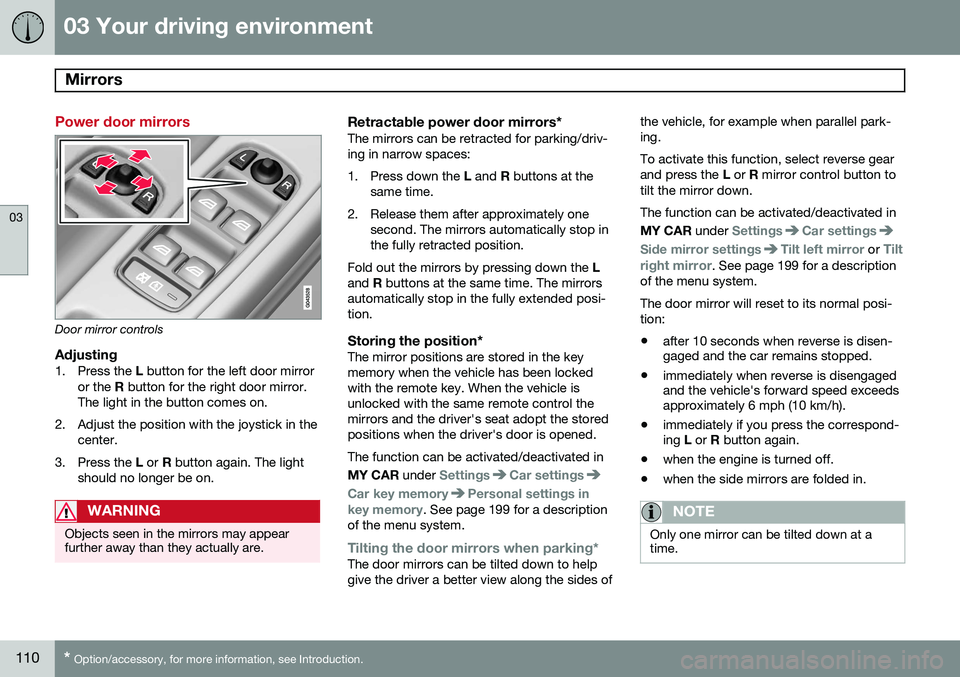
Door mirror controls
Adjusting1. Press the L button for the left door mirror
or the R button for the right door mirror.
The light in the button comes on.
2. Adjust the position with the joystick in the center.
3. Press the L or R button again. The light
should no longer be on.
WARNING
Objects seen in the mirrors may appear further away than they actually are.
Retractable power door mirrors*The mirrors can be retracted for parking/driv- ing in narrow spaces:
1. Press down the L and R buttons at the
same time.
2. Release them after approximately one second. The mirrors automatically stop in the fully retracted position.
Fold out the mirrors by pressing down the L
and R buttons at the same time. The mirrors
automatically stop in the fully extended posi-tion.
Storing the position*The mirror positions are stored in the keymemory when the vehicle has been lockedwith the remote key. When the vehicle isunlocked with the same remote control themirrors and the driver's seat adopt the storedpositions when the driver's door is opened. The function can be activated/deactivated in MY CAR under
SettingsCar settings
Car key memoryPersonal settings in
key memory. See page 199 for a description
of the menu system.
Tilting the door mirrors when parking*The door mirrors can be tilted down to help give the driver a better view along the sides of the vehicle, for example when parallel park-ing. To activate this function, select reverse gear and press the
L or R mirror control button to
tilt the mirror down. The function can be activated/deactivated in MY CAR under
SettingsCar settings
Side mirror settingsTilt left mirror or Tilt
right mirror
. See page 199 for a description
of the menu system. The door mirror will reset to its normal posi- tion: • after 10 seconds when reverse is disen- gaged and the car remains stopped.
• immediately when reverse is disengagedand the vehicle's forward speed exceedsapproximately 6 mph (10 km/h).
• immediately if you press the correspond-ing
L or R button again.
• when the engine is turned off.
• when the side mirrors are folded in.
NOTE
Only one mirror can be tilted down at a time.
Page 113 of 394

03 Your driving environment
Mirrors
03
}}
* Option/accessory, for more information, see Introduction.111
Automatically tilting the door mirrors when parking
The door mirrors can tilt down automatically to help give the driver a better view along thesides of the vehicle, for example when paral-lel parking. When the transmission is nolonger in reverse, the mirrors will automati-cally return to their original position. This function can be activated/deactivated in MY CAR under
SettingsCar settings
Side mirror settingsIn reverse gear tilt
left mirror
or In reverse gear tilt right
mirror. See page 199 for information about
the MY CAR menu system.
Automatic retraction when lockingWhen the vehicle is locked/unlocked with the remote key the door mirrors are automaticallyretracted/extended. The function can be activated/deactivated in MY CAR under
SettingsCar settings
Side mirror settingsRetract side mirrors
when locking. See page 199 for a descrip-
tion of the menu system.
Resetting to neutralMirrors that have been moved out of position by an external force must be electrically resetto the neutral position for electric retracting/extending to work. •
Retract the mirrors with the
L and R but-
tons.
• Fold them out again with the
L and R but-
tons.
The mirrors are now reset in neutral position.
Home safe and approach lightingThe light on the door mirrors comes on whenapproach lighting or home safe lighting isselected, see page 103.
Heated windshield*, rear window and door mirror defrosters
Max. defroster/heated windshield (1), rear win- dow and door mirror defroster (2)
Press button (1) to defrost/de-ice the wind- shield and/or button (2) to defrost the rearwindow and door mirrors. The indicator lights in the respective buttons indicate that thefunction is active. Switch the function offwhen then windshield/rear window/mirrorshave cleared to help avoid battery drain.Theheating function will also switch off automati-cally after a certain amount of time. Auto-defrosting for the rear window and door mirrors (if the vehicle is started when theambient temperature is below 45 °F (7 °C)can be selected in
MY CAR under
Settings
Climate settingsAutomatic rear
defroster. See page 199 for a description of
the menu system.
Interior rearview mirror
Auto-dim functionThe interior rearview mirror’s auto-dim func- tion is controlled by two sensors: one point-ing forward (located on the forward-facingside of the mirror, which monitors the amountof ambient light) and one pointing rearward(located on the side of the mirror facing thedriver at the upper edge, which senses thestrength of following vehicles' headlights),and work together to help eliminate glare.
Page 118 of 394
03 Your driving environment
Power moonroof*
03
116* Option/accessory, for more information, see Introduction.
WARNING
• During manual closing, if the moonroof is obstructed, immediately open itagain.
• Never open or close the moonroof if itis obstructed in any way.
• Never allow a child to operate themoonroof.
• Never leave a child alone in a vehicle.
• When leaving the vehicle, ensure thatthe ignition is in mode
0 (see page 86
for information about the various igni-tion modes) to disable the moonroof.Never leave the remote key/PCC* inthe vehicle.
• Never extend any object or body partthough the open moonroof, even if thevehicle's ignition is completelyswitched off.
Tilt position
G028900
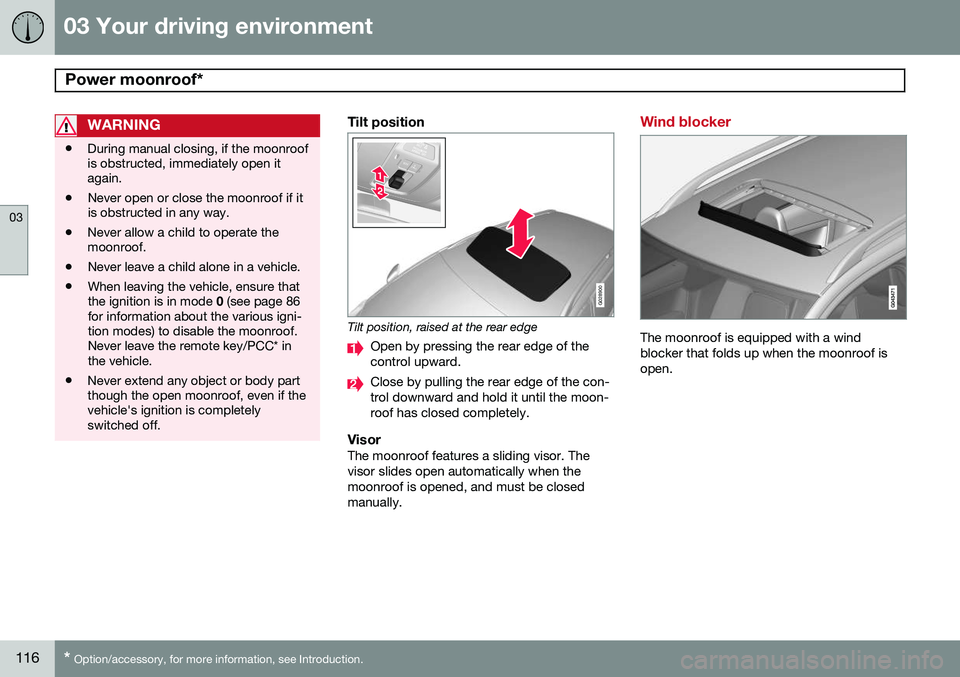
Tilt position, raised at the rear edge
Open by pressing the rear edge of the control upward.
Close by pulling the rear edge of the con- trol downward and hold it until the moon-roof has closed completely.
VisorThe moonroof features a sliding visor. Thevisor slides open automatically when themoonroof is opened, and must be closedmanually.
Wind blocker
The moonroof is equipped with a wind blocker that folds up when the moonroof isopen.
Page 123 of 394
03 Your driving environment
Starting the engine
03
121
WARNING
•Always remove the remote key from the ignition slot when leaving the vehi-cle and ensure that the ignition inmode
0 (see page 87 for information
about the ignition modes), especially ifthere are children in the vehicle.
• On vehicles with the optional keylessdrive, never remove the remote keyfrom the vehicle while it is being drivenor towed.
• Always place the gear selector in Parkand apply the parking brake beforeleaving the vehicle. Never leave thevehicle unattended with the enginerunning.
• Always open garage doors fully beforestarting the engine inside a garage toensure adequate ventilation. Theexhaust gases contain carbon monox-ide, which is invisible and odorless butvery poisonous.
NOTE
•After a cold start, idle speed may be noticeably higher than normal for ashort period. This is done to help bringcomponents in the emission controlsystem to their normal operating tem-perature as quickly as possible, whichenables them to control emissions andhelp reduce the vehicle's impact on the environment 3
.
CAUTION
• When starting in cold weather, the automatic transmission may shift up atslightly higher engine speeds than nor-mal until the automatic transmissionfluid reaches normal operating tem-perature.
• Do not race a cold engine immediatelyafter starting. Oil flow may not reachsome lubrication points fast enough toprevent engine damage.
• The engine should be idling when youmove the gear selector. Never acceler-ate until after you feel the transmissionengage. Accelerating immediately afterselecting a gear will cause harshengagement and premature transmis-sion wear.
• Selecting
P or N when idling at a
standstill for prolonged periods of timewill help prevent overheating of theautomatic transmission fluid.
3 If the gear selector is in the D or R positions and the car is not moving, engine speed (rpm) will be lower and it will take longer for the engine to reach normal operating temperature.
Page 124 of 394
03 Your driving environment
Starting the engine
03
122* Option/accessory, for more information, see Introduction.
Engine Remote Start (ERS)*
IntroductionERS is a feature that makes it possible to remotely start the engine to cool or heat thepassenger compartment before driving. The climate control system will start using the same settings as when the engine wasswitched off. When the engine is started using ERS, it will run for a maximum of 15 minutes beforeautomatically switching off again. After 2 ERSstarts, the engine must be started in the nor-mal way before ERS can be used again.
NOTE
• Always adhere to applicable State, Province and/or Local laws regardingengine idling when using ERS.
• The service life of the remote key'sbattery is affected by ERS use. If thisfeature is used frequently, the batteryshould be replaced once a year, seepage 58).
WARNING
Keep the following in mind before using ERS
• The vehicle should be in view.
• The vehicle should be unoccupied.
• The vehicle must not be parked indoors or in an enclosed area.Exhaust fumes are harmful to thehealth.
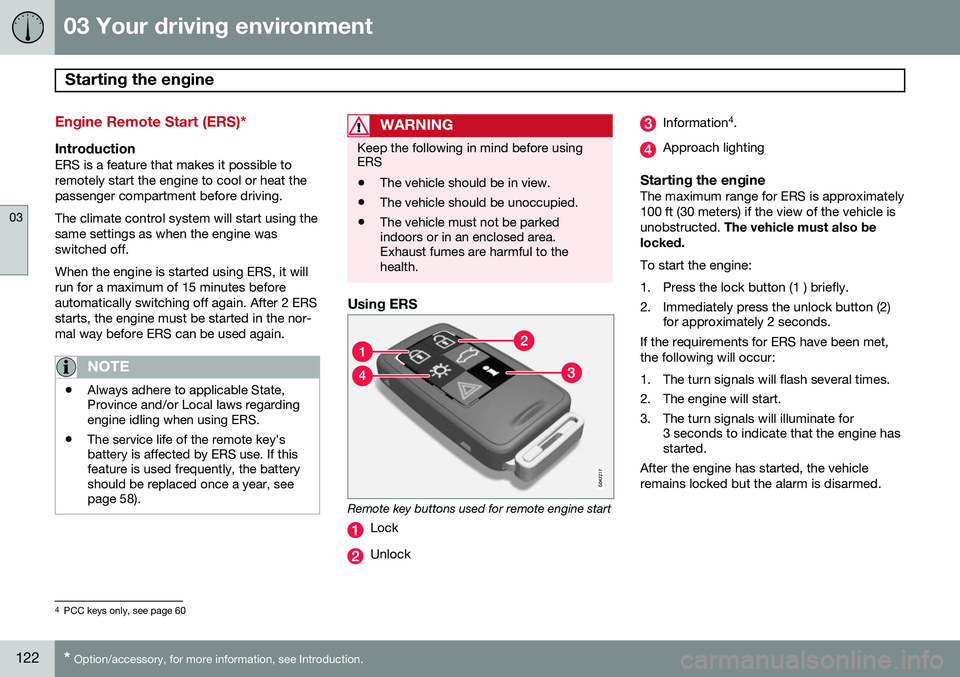
Using ERS
Remote key buttons used for remote engine start
Lock
Unlock
Information 4
.
Approach lighting
Starting the engineThe maximum range for ERS is approximately 100 ft (30 meters) if the view of the vehicle isunobstructed. The vehicle must also be
locked. To start the engine:
1. Press the lock button (1 ) briefly.
2. Immediately press the unlock button (2) for approximately 2 seconds.
If the requirements for ERS have been met, the following will occur:
1. The turn signals will flash several times.
2. The engine will start.
3. The turn signals will illuminate for 3 seconds to indicate that the engine has started.
After the engine has started, the vehicle remains locked but the alarm is disarmed.
4 PCC keys only, see page 60
Page 125 of 394

03 Your driving environment
Starting the engine
03
}}
* Option/accessory, for more information, see Introduction.123
Models with a Personal Car
Communicator (PCC) remote key* (seepage 60)
The indicator light for approach lighting will flash several times andthen glow continuously if all of therequirements for ERS have been
met. However, this does not indicate thatERS has started the engine. To check if ERS has started the engine, press the information button (3). If the engine hasstarted, the indicator light for buttons(1) och (4) will illuminate.
Active functionsWhen the engine is started with ERS, the fol- lowing functions are activated: • The climate control system
• The infotainment system.
Deactivated functionsWhen the engine is started with ERS, the fol- lowing functions are deactivated: •Headlights
• Parking lights
• License plate lights
• Windshield wipers
Switching off an engine started with ERS
Any of the following will switch off the engine if it has been started with ERS:
• Pressing the lock button (1) or the unlock button (2) on the remote key
• Unlocking the vehicle
• Opening a door
• Depressing the accelerator or brake pedal
• Moving the gear selector from the
P posi-
tion
• If there are less than approx. 2.5 gallons(10 liters) of fuel in the tank
• More than 15 minutes have elapsed.
If the engine has been started with ERS and switches off, the turn signals will illuminate for3 seconds.
Message in the instrument panel
display
If ERS is interrupted, a text message will bedisplayed in the instrument panel.
Switching off the engine
With the engine running, press the START/
STOP ENGINE button.
If the gear selector is not in the P position or
if the vehicle is moving, press the START/
STOP ENGINE button twice or press and
hold it in until the engine switches off.
Jump starting
G021347
Connecting the jumper cables
Follow these instructions to jump start your vehicle's dead battery or to jump startanother vehicle's dead battery using yourvehicle. If the 12-volt auxiliary battery to beused is in another vehicle, check that thevehicles are not touching to prevent prema-ture completion of a circuit. Be sure to follow
Page 137 of 394

03 Your driving environment
Parking brake
03
135
Releasing the electric parking brake
Parking brake control
Manual release1. Fasten the seat belt.
2. Insert the remote key in the ignition slotand press the START/STOP ENGINE
button (or press the START/STOP
ENGINE button with a valid remote key in the passenger compartment on vehicles with the optional keyless drive).
3. Press firmly on the brake pedal.
4. Pull the parking brake control.
Automatic release1. Start the engine.
NOTE
• For safety reasons, the parking brake is only released automatically if the engineis running and the driver is wearing aseat belt.
• The electric parking brake will bereleased immediately when the acceler-ator pedal is pressed and the gearselector is in position
D or R.
2. Fasten the seat belt.
3. Move the gear selector to position D or R
and press the accelerator pedal. The parking brake will release when the vehi cle begins to move.
Heavy load uphillA heavy load, such as a trailer, can cause the vehicle to roll backward when the parkingbrake is released automatically on a steepincline. To help avoid this:
1. Keep the electric parking brake lever
pushed in with the left hand while shifting into Drive with the right.
2. While pressing the accelerator pedal to pull away, release the parking brake leveronly after the vehicle begins to move.
Symbol and messages in the instrument panel
See page 197 for information about display- ing or erasing messages.
SymbolMessageDescription/action
"Message"Read the message in the information display
A flashing symbol indicates that the parking brake is being applied. If the symbol flashes in any other situation then this means that a fault has arisen. Read the message on the information display.
Page 232 of 394
06 Infotainment
Introduction
06
230* Option/accessory, for more information, see Introduction.
General information
The infotainment system consists of radio and media player features and also makes itpossible to communicate via a cell phone.The information is displayed on a 7" screen inthe center console. Infotainment functionscan be controlled from the center console orvia the buttons on the steering wheel keypad.On models equipped with the navigation sys-tem*, voice commands can also be used toe.g., set destinations, make calls from a Bluetooth ®
-connected cell phone, etc.
If the infotainment system was on when the ignition was switched off, the most recently used source (
FM1, etc.) will restart the next
time the ignition is put in mode I or higher.
The driver's door must also be closed on vehicles with keyless drive*. The infotainment system can be operated for 15 minutes at a time while the engine isswitched off by pressing the On/Off button. While the engine is being started, the infotain- ment system will be temporarily interruptedand will resume when the engine has started.
NOTE
To help avoid excessive battery drain, remove the remote key from the ignitionslot if the infotainment system is usedwhile the engine is switched off.
Dolby Pro Logic
The system is manufactured under license from Dolby Laboratories LicensingCorporation. Dolby Pro Logic II and the
symbol are
trademarks of Dolby Laboratories Licensing Corporation.
Audyssey MultEQ 1
The Audyssey MultEQ system has been used to optimize sound quality to help ensure aworld-class listening experience.
1
Applies only to models with Premium Sound Multimedia.
Page 259 of 394
06 Infotainment
Bluetooth® media
06
257
Introduction
The vehicle's media player is equipped with Bluetooth ®
and can play streaming audio files
from a Bluetooth ®
device such as a cell
phone or mp3 player. Navigation and control of the device can be done through the vehi-cle's center console control panel or thesteering wheel keypad. On certain externaldevices, it is also possible to change tracksfrom the device.
NOTE
Any Bluetooth cell phones used must sup- port Audio/Video Remote Control Profile(AVRCP) and Advanced Audio DistributionProfile (A2DP). The phone must useAVRCP version 1.3 and A2DP 1.2. If olderversions of these standards are used, cer-tain features (e.g., scan or random) maynot function. Not all cell phones are fully compatible with the vehicle's Bluetooth system. A listof compatible phones is available at youVolvo retailer or at www.volvocars.us.
Menu navigation
Choices can be made in the Bluetoothmenus from the center console control panel or the steering wheel keypad. For additionalinformation about navigating the variousmenus, see page 231. The vehicle's media player can only play audio files through the Bluetooth
®
function.
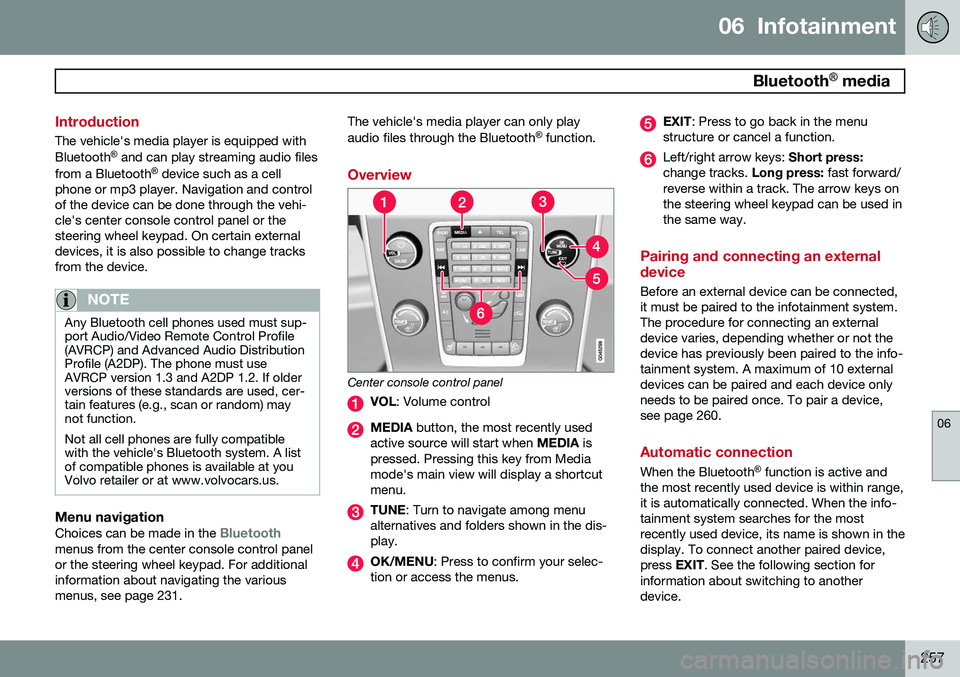
Overview
Center console control panel
VOL : Volume control
MEDIA button, the most recently used
active source will start when MEDIA is
pressed. Pressing this key from Media mode's main view will display a shortcutmenu.
TUNE : Turn to navigate among menu
alternatives and folders shown in the dis- play.
OK/MENU : Press to confirm your selec-
tion or access the menus.
EXIT : Press to go back in the menu
structure or cancel a function.
Left/right arrow keys: Short press:
change tracks. Long press: fast forward/
reverse within a track. The arrow keys on the steering wheel keypad can be used inthe same way.
Pairing and connecting an external device
Before an external device can be connected, it must be paired to the infotainment system.The procedure for connecting an externaldevice varies, depending whether or not thedevice has previously been paired to the info-tainment system. A maximum of 10 externaldevices can be paired and each device onlyneeds to be paired once. To pair a device,see page 260.
Automatic connection
When the Bluetooth ®
function is active and
the most recently used device is within range, it is automatically connected. When the info-tainment system searches for the mostrecently used device, its name is shown in thedisplay. To connect another paired device,press EXIT. See the following section for
information about switching to anotherdevice.