tailgate VOLVO XC70 2014 Owner´s Manual
[x] Cancel search | Manufacturer: VOLVO, Model Year: 2014, Model line: XC70, Model: VOLVO XC70 2014Pages: 394, PDF Size: 11.55 MB
Page 191 of 394
04 Driver support
Rear Park Assist Camera (PAC)*
04
* Option/accessory, for more information, see Introduction.189
These lines are affected by movements of the steering wheel. The vehicle's approxi-mate outer dimension are shown by twodashed lines.
• The graphic lines will not be displayedwhen backing up with a trailer that is con-nected to the vehicle's electrical system.
• Objects on the ground that are closerthan 1 ft (30 centimeters) cannot bedetected by the camera.
• The camera is active for approx.5 seconds after the gear selector ismoved to
R or until the vehicle's speed
exceeds 6 mph (10 km/h).
• The optional Park Assist sensors and theparking camera work together and infor-mation from the sensors is shown graphi-cally on the display.
• The graphic lines shown on the screenwhen the vehicle backs up can be disa-bled in the settings menu.
• The system can be switched off by press-ing
CAM . By default, the system is acti-
vated when the gear selector is moved toR . This setting can be changed in the MY
CAR menu.
• If there are two cameras installed on thevehicle*, to switch between cameras, turnTUNE
(at least one of the cameras has to
be active), press CAM repeatedly or use
the center console controls. If the front camera is on, it overrides the optionalpark assist system's visual indicator butthere will still be an audible signal.
Limitations
Even if a fairly small section of the screen image appears to be obstructed, this maymean that a relatively large area behind thevehicle is hidden and objects there may notbe detected until they are very near the vehi-cle.
NOTE
Bicycle carriers or other accessories mounted on the tailgate may obstruct thecamera's field of view.
Keep in mind
•
Keep the camera's lens free of dirt, ice and snow. Remove ice and snow care-fully to avoid scratching the lens.
• Clean the lens regularly with warm waterand a suitable car washing detergent.
Page 276 of 394

07 During your trip
Driving recommendations
07
274
General information
Economical driving conserves natural
resources
Better driving economy may be obtained by thinking ahead, avoiding rapid starts andstops and adjusting the speed of your vehicleto immediate traffic conditions. Observe the following rules:
• Bring the engine to normal operating tem- perature as soon as possible by drivingwith a light foot on the accelerator pedalfor the first few minutes of operation. Acold engine uses more fuel and is subjectto increased wear.
• Whenever possible, avoid using the vehi-cle for driving short distances. This doesnot allow the engine to reach normaloperating temperature.
• Drive carefully and avoid rapid accelera-tion and hard braking.
• Use the transmission's Drive (
D) position
as often as possible and avoid using kick-down.
• Using the transmission's Sport mode 1
may increase fuel consumption some-what. Use the transmission's Drive ( D)
position as often as possible. See page 127 for additional information about Sportmode.
• Do not exceed posted speed limits.
• Avoid carrying unnecessary items (extraload) in the vehicle.
• Maintain correct tire pressure. Check tirepressure regularly (when tires are cold).
• Remove snow tires when threat of snowor ice has ended.
• Note that roof racks, ski racks, etc,increase air resistance and also fuel con-sumption.
• At highway driving speeds, fuel consump-tion will be lower with the air conditioningon and the windows closed than with theair conditioning off and the windowsopen.
• Using the onboard trip computer's fuelconsumption modes can help you learnhow to drive more economically.
Other factors that decrease gas mileage are: • Dirty air cleaner
• Dirty engine oil and clogged oil filter
• Dragging brakes
• Incorrect front end alignment Some of the above mentioned items and oth- ers are checked at the standard maintenanceintervals.WARNING
Driving with the tailgate open:
Driving
with the tailgate open could lead to poi- sonous exhaust gases entering the pas-senger compartment. If the tailgate mustbe kept open for any reason, proceed asfollows: • Close the windows
• Set the ventilation system control to air flow to floor, windshield and side win-dows and the blower control to itshighest setting.
Weight distribution affects handlingAt the specified curb weight your vehicle has a tendency to understeer, which means thatthe steering wheel has to be turned morethan might seem appropriate for the curva-ture of a bend. This ensures good stabilityand reduces the risk of rear wheel skid.Remember that these properties can alterwith the vehicle load. The heavier the load inthe cargo area, the less the tendency toundersteer.
1
Models with the T6 turbo engine only.
Page 282 of 394
07 During your trip
Refueling
07
280
Opening/closing the fuel filler door
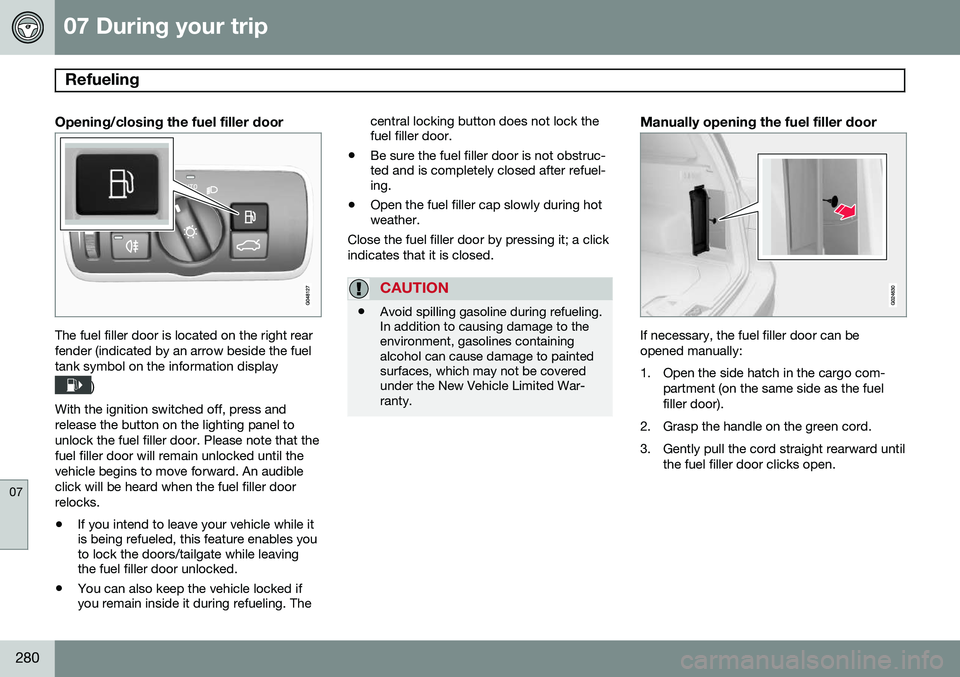
The fuel filler door is located on the right rear fender (indicated by an arrow beside the fueltank symbol on the information display
)
With the ignition switched off, press and release the button on the lighting panel tounlock the fuel filler door. Please note that thefuel filler door will remain unlocked until thevehicle begins to move forward. An audibleclick will be heard when the fuel filler doorrelocks. • If you intend to leave your vehicle while it is being refueled, this feature enables youto lock the doors/tailgate while leavingthe fuel filler door unlocked.
• You can also keep the vehicle locked ifyou remain inside it during refueling. The central locking button does not lock thefuel filler door.
• Be sure the fuel filler door is not obstruc-ted and is completely closed after refuel-ing.
• Open the fuel filler cap slowly during hotweather.
Close the fuel filler door by pressing it; a click indicates that it is closed.
CAUTION
• Avoid spilling gasoline during refueling. In addition to causing damage to theenvironment, gasolines containingalcohol can cause damage to paintedsurfaces, which may not be coveredunder the New Vehicle Limited War-ranty.
Manually opening the fuel filler door
If necessary, the fuel filler door can be opened manually:
1. Open the side hatch in the cargo com-
partment (on the same side as the fuel filler door).
2. Grasp the handle on the green cord.
3. Gently pull the cord straight rearward until the fuel filler door clicks open.
Page 285 of 394
07 During your trip
Loading
07
}}
* Option/accessory, for more information, see Introduction.283
Introduction
The load carrying capacity of your vehicle is determined by factors such as the number ofpassengers, the amount of cargo, the weightof any accessories that may be installed, etc. To increase loading space, the rear seat backrests can be folded down, see page 91. When loading the cargo area, keep the fol- lowing in mind:
• Load objects in the cargo area against the backrest whenever possible.
• Unstable loads can be secured to theload anchoring eyelets with straps or weblashings to help keep them from shifting.
• Stop the engine and apply the parkingbrake when loading or unloading longobjects. The gear selector can beknocked out of position by long loads,which could set the vehicle in motion.WARNING
•Stop the engine, put the gear selector in
P, and apply the parking brake
when loading or unloading longobjects.
• The vehicle's driving characteristicsmay change depending on the weightand distribution of the load.
• A 44-pound (20 kg) object produces aforce of 2,200 pounds (1,000 kg) in ahead-on collision at 30 mph (50 km/h).
• The cargo area and rear seat shouldnot be loaded to a level higher than2 in. (5 cm) below the upper edge ofthe rear side windows. Objects placedhigher than this level could impede thefunction of the Inflatable Curtain.
Power tailgate*
G017876
Power tailgate closing button
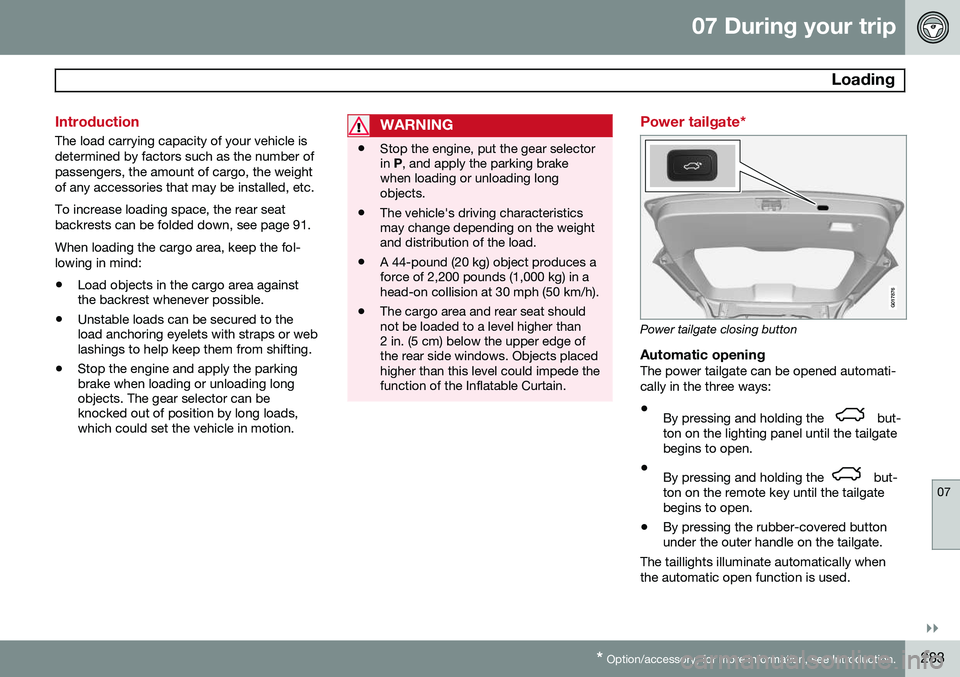
Automatic openingThe power tailgate can be opened automati- cally in the three ways:
• By pressing and holding the
but-
ton on the lighting panel until the tailgate begins to open.
• By pressing and holding the
but-
ton on the remote key until the tailgate begins to open.
• By pressing the rubber-covered buttonunder the outer handle on the tailgate.
The taillights illuminate automatically when the automatic open function is used.
Page 286 of 394
07 During your trip
Loading
07
284
CAUTION
Be sure that there is adequate space above and behind the vehicle before open-ing the tailgate automatically. The vehicle should not be driven or moved with the tailgate in the open position. How-ever, if the vehicle is moved with the tail-gate in the open position, the automaticclosing function will be inoperative untilone of the following occurs:• The tailgate is closed manually
• The ignition is switched off and the key is removed for approximately 10minutes (the tailgate will function againafter restart).
NOTE
If the tailgate has been opened and closed continuously too long, the automatic func-tion will be deactivated to avoid overload-ing the electrical system. The automaticfunction can be used again after approxi-mately 2 minutes. If the vehicle's battery has been dis- charged or disconnected, the tailgate mustbe opened and closed once manually toreset the system.
Programming the tailgate opening angle
The tailgate's maximum opening angle can be programmed, which can be useful, forexample, if the tailgate has to be opened in agarage with a low ceiling. To do so:
• Open the tailgate manually, hold it at the desired maximum opening angle andpress the tailgate's closing button for atleast 3 seconds. When the tailgate isreleased, programming is complete.
• To remove this programming, open thetailgate manually to a higher openingangle.
Automatic closingThe power tailgate can be closed by pressing the
button on the tailgate (see the
illustration) or by pressing it down.
NOTE
If the tailgate is pressed down e.g., by the weight of snow or strong wind, it will closeautomatically.
WARNING
Be sure that no one is near the tailgate when it is opened or closed automatically.The tailgate should never be obstructed inany way when it is operated.
Interrupting automatic opening/closingAutomatic opening or closing the tailgate can be interrupted in four ways:
• By pressing the
button on the
lighting panel.
• By pressing the
button on the
remote key.
• By pressing the button on the lower edge of the tailgate.
• By pressing the rubber-covered buttonunder the outer handle on the tailgate.
If one of these actions is taken, the tailgate will stop moving.
Pinch protectionIf the tailgate is obstructed while it is being operated, the pinch protection function isactivated.
• If the tailgate is being
opened, the electri-
cal function will be switched off and the
Page 287 of 394
07 During your trip
Loading
07
285
tailgate will be released from the electrical system.
• If the tailgate is being
closed, it will stop
and move slightly in the opposite direc-tion.
Operating the tailgate manuallyThe power tailgate can be disconnected from the vehicle’s electrical system by quickly pull-ing the outer handle twice. The tailgate canthen be opened/closed manually.
Folding down the rear seat backrests
The rear seat backrests can be folded down for additional loading space, see page 93.
Load anchoring eyelets
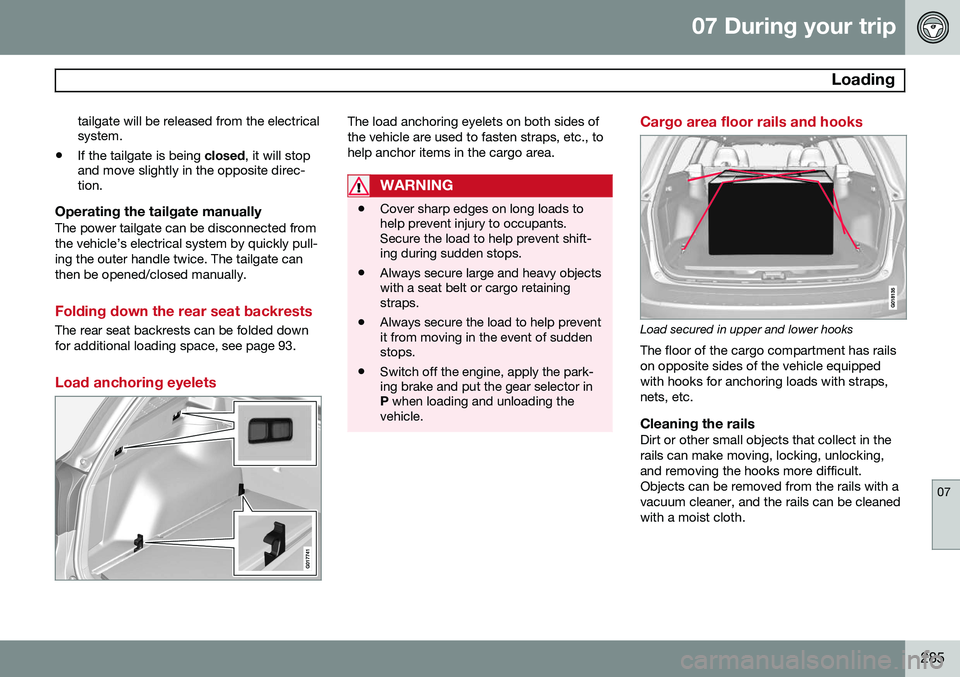
The load anchoring eyelets on both sides of the vehicle are used to fasten straps, etc., tohelp anchor items in the cargo area.
WARNING
• Cover sharp edges on long loads to help prevent injury to occupants.Secure the load to help prevent shift-ing during sudden stops.
• Always secure large and heavy objectswith a seat belt or cargo retainingstraps.
• Always secure the load to help preventit from moving in the event of suddenstops.
• Switch off the engine, apply the park-ing brake and put the gear selector inP
when loading and unloading the
vehicle.
Cargo area floor rails and hooks
Load secured in upper and lower hooks The floor of the cargo compartment has rails on opposite sides of the vehicle equippedwith hooks for anchoring loads with straps,nets, etc.
Cleaning the railsDirt or other small objects that collect in therails can make moving, locking, unlocking,and removing the hooks more difficult.Objects can be removed from the rails with avacuum cleaner, and the rails can be cleanedwith a moist cloth.
Page 288 of 394
07 During your trip
Loading
07
286
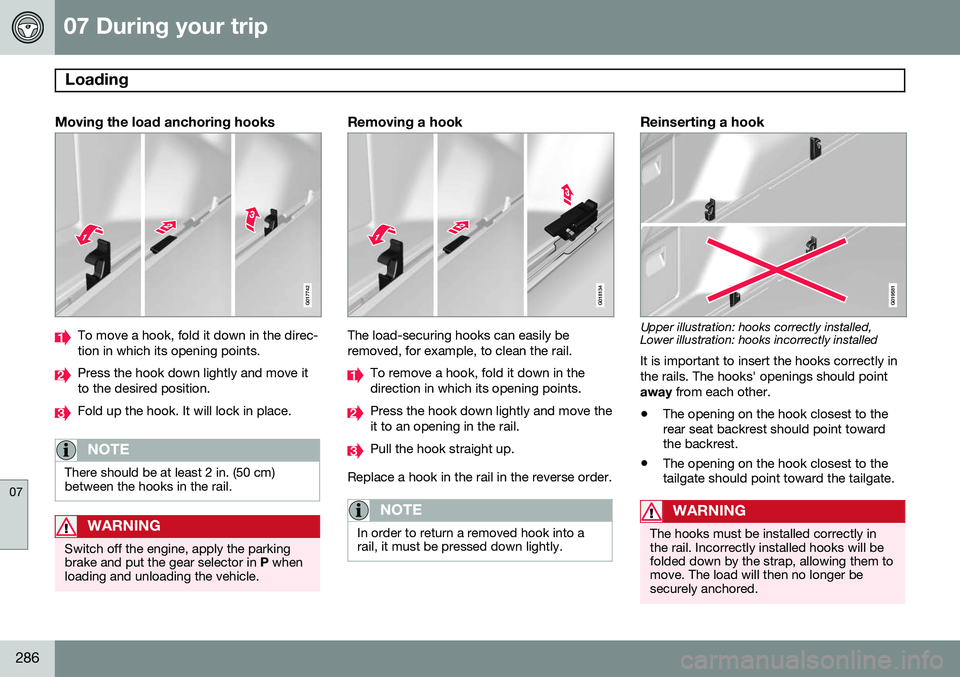
Moving the load anchoring hooks
G017742
To move a hook, fold it down in the direc- tion in which its opening points.
Press the hook down lightly and move it to the desired position.
Fold up the hook. It will lock in place.
NOTE
There should be at least 2 in. (50 cm) between the hooks in the rail.
WARNING
Switch off the engine, apply the parking brake and put the gear selector in P when
loading and unloading the vehicle.
Removing a hook
G018134
The load-securing hooks can easily be removed, for example, to clean the rail.
To remove a hook, fold it down in the direction in which its opening points.
Press the hook down lightly and move the it to an opening in the rail.
Pull the hook straight up.
Replace a hook in the rail in the reverse order.
NOTE
In order to return a removed hook into a rail, it must be pressed down lightly.
Reinserting a hook
G019581
Upper illustration: hooks correctly installed, Lower illustration: hooks incorrectly installed
It is important to insert the hooks correctly in the rails. The hooks' openings should pointaway from each other.
• The opening on the hook closest to the rear seat backrest should point towardthe backrest.
• The opening on the hook closest to thetailgate should point toward the tailgate.
WARNING
The hooks must be installed correctly in the rail. Incorrectly installed hooks will befolded down by the strap, allowing them tomove. The load will then no longer besecurely anchored.
Page 350 of 394
09 Maintenance and specifications
Wiper blades and washer fluid 09
348
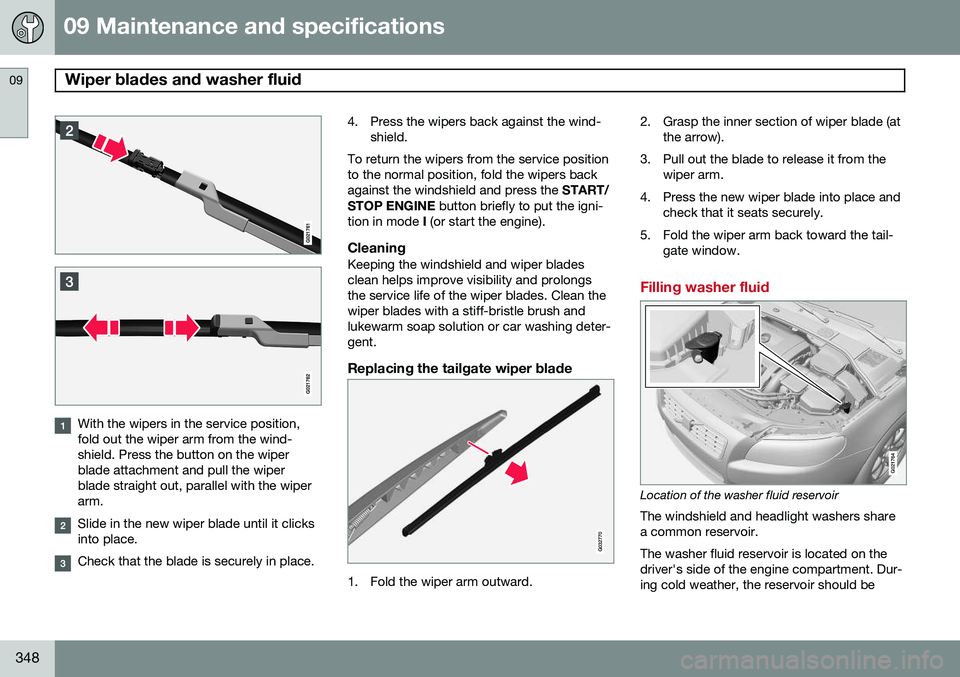
With the wipers in the service position, fold out the wiper arm from the wind-shield. Press the button on the wiperblade attachment and pull the wiperblade straight out, parallel with the wiperarm.
Slide in the new wiper blade until it clicks into place.
Check that the blade is securely in place.4. Press the wipers back against the wind-
shield.
To return the wipers from the service position to the normal position, fold the wipers backagainst the windshield and press the START/
STOP ENGINE button briefly to put the igni-
tion in mode I (or start the engine).
CleaningKeeping the windshield and wiper bladesclean helps improve visibility and prolongsthe service life of the wiper blades. Clean thewiper blades with a stiff-bristle brush andlukewarm soap solution or car washing deter-gent.
Replacing the tailgate wiper blade
G032770
1. Fold the wiper arm outward. 2. Grasp the inner section of wiper blade (at
the arrow).
3. Pull out the blade to release it from the wiper arm.
4. Press the new wiper blade into place and check that it seats securely.
5. Fold the wiper arm back toward the tail- gate window.
Filling washer fluid
G021764
Location of the washer fluid reservoir
The windshield and headlight washers share a common reservoir. The washer fluid reservoir is located on the driver's side of the engine compartment. Dur-ing cold weather, the reservoir should be
Page 361 of 394

09 Maintenance and specifications
Fuses09
}}
* Option/accessory, for more information, see Introduction.359
PosFunctionA
Keyless drive*20
Power driver's seat*20
Power front passenger's seat*20
-
Infotainment control module5
Infotainment system, Sir- iusXM ™ satellite radio*10
Infotainment system15
Bluetooth hands-free system5
Rear Seat Entertainment sys- tem (RSE)*7.5
Power moonroof* Courtesy lighting, climate sys- tem sensor5
12-volt sockets15
Heated rear seat* (passeng- er's side)15
Heated rear seat* (driver's side)15
PosFunctionA
-
Heated front passenger's seat*15
Heated driver's seat*15
Park assist*, trailer hitch con- trol module*, park assist cam-era*5
All Wheel Drive* control mod- ule5
Active chassis system*10
Positions: fuse box B
PosFunctionA
Tailgate wiper15
-
Front courtesy lighting, driv- er's door power window con-trols, power seat(s)*, Home- LInk ®
Wireless Control Sys-
tem*7.5
Instrument panel5
PosFunctionA
Adaptive cruise control/colli- sion warning*10
Courtesy lighting, rain sensor*7.5
Steering wheel module7.5
Cental locking: fuel filler door10
Tailgate window washer15
Windshield washers15
Tailgate unlock10
Electrical folding rear seat outboard head restraints*10
Fuel pump20
Climate system control panel5
-
Alarm, On-board diagnostic system5
-
Airbag system, occupant weight sensor10
Page 363 of 394
09 Maintenance and specifications
Fuses09
* Option/accessory, for more information, see Introduction.361
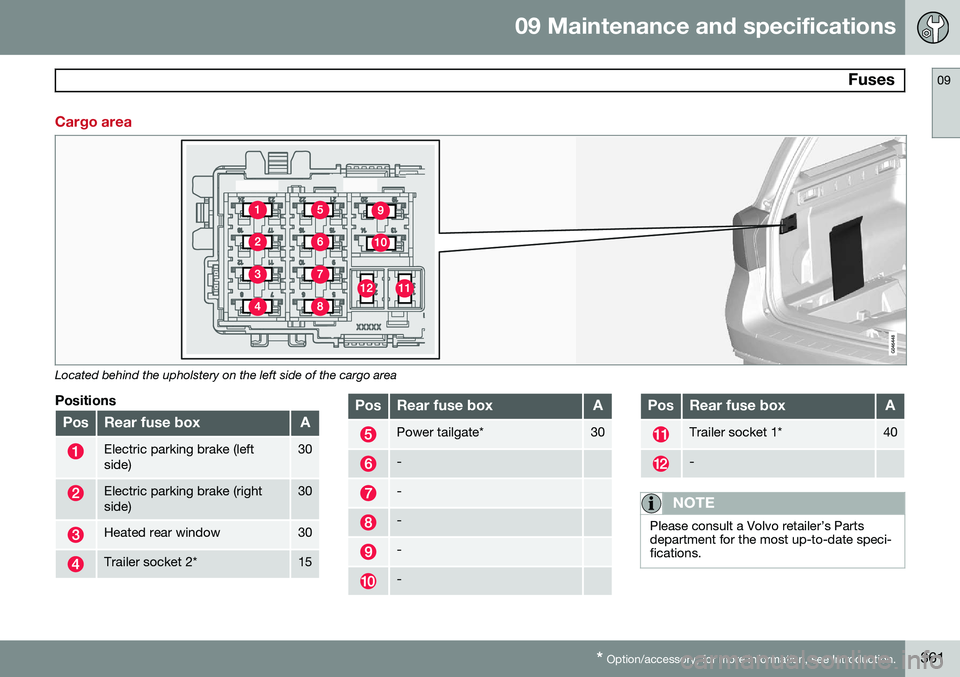
Cargo area
Located behind the upholstery on the left side of the cargo area
Positions
PosRear fuse boxA
Electric parking brake (left side)30
Electric parking brake (right side)30
Heated rear window30
Trailer socket 2*15
PosRear fuse boxA
Power tailgate*30
-
-
-
-
-
PosRear fuse boxA
Trailer socket 1*40
-
NOTE
Please consult a Volvo retailer’s Parts department for the most up-to-date speci-fications.