warning light VOLVO XC70 2014 Owner´s Manual
[x] Cancel search | Manufacturer: VOLVO, Model Year: 2014, Model line: XC70, Model: VOLVO XC70 2014Pages: 394, PDF Size: 11.55 MB
Page 123 of 394
03 Your driving environment
Starting the engine
03
121
WARNING
•Always remove the remote key from the ignition slot when leaving the vehi-cle and ensure that the ignition inmode
0 (see page 87 for information
about the ignition modes), especially ifthere are children in the vehicle.
• On vehicles with the optional keylessdrive, never remove the remote keyfrom the vehicle while it is being drivenor towed.
• Always place the gear selector in Parkand apply the parking brake beforeleaving the vehicle. Never leave thevehicle unattended with the enginerunning.
• Always open garage doors fully beforestarting the engine inside a garage toensure adequate ventilation. Theexhaust gases contain carbon monox-ide, which is invisible and odorless butvery poisonous.
NOTE
•After a cold start, idle speed may be noticeably higher than normal for ashort period. This is done to help bringcomponents in the emission controlsystem to their normal operating tem-perature as quickly as possible, whichenables them to control emissions andhelp reduce the vehicle's impact on the environment 3
.
CAUTION
• When starting in cold weather, the automatic transmission may shift up atslightly higher engine speeds than nor-mal until the automatic transmissionfluid reaches normal operating tem-perature.
• Do not race a cold engine immediatelyafter starting. Oil flow may not reachsome lubrication points fast enough toprevent engine damage.
• The engine should be idling when youmove the gear selector. Never acceler-ate until after you feel the transmissionengage. Accelerating immediately afterselecting a gear will cause harshengagement and premature transmis-sion wear.
• Selecting
P or N when idling at a
standstill for prolonged periods of timewill help prevent overheating of theautomatic transmission fluid.
3 If the gear selector is in the D or R positions and the car is not moving, engine speed (rpm) will be lower and it will take longer for the engine to reach normal operating temperature.
Page 124 of 394
03 Your driving environment
Starting the engine
03
122* Option/accessory, for more information, see Introduction.
Engine Remote Start (ERS)*
IntroductionERS is a feature that makes it possible to remotely start the engine to cool or heat thepassenger compartment before driving. The climate control system will start using the same settings as when the engine wasswitched off. When the engine is started using ERS, it will run for a maximum of 15 minutes beforeautomatically switching off again. After 2 ERSstarts, the engine must be started in the nor-mal way before ERS can be used again.
NOTE
• Always adhere to applicable State, Province and/or Local laws regardingengine idling when using ERS.
• The service life of the remote key'sbattery is affected by ERS use. If thisfeature is used frequently, the batteryshould be replaced once a year, seepage 58).
WARNING
Keep the following in mind before using ERS
• The vehicle should be in view.
• The vehicle should be unoccupied.
• The vehicle must not be parked indoors or in an enclosed area.Exhaust fumes are harmful to thehealth.
Using ERS
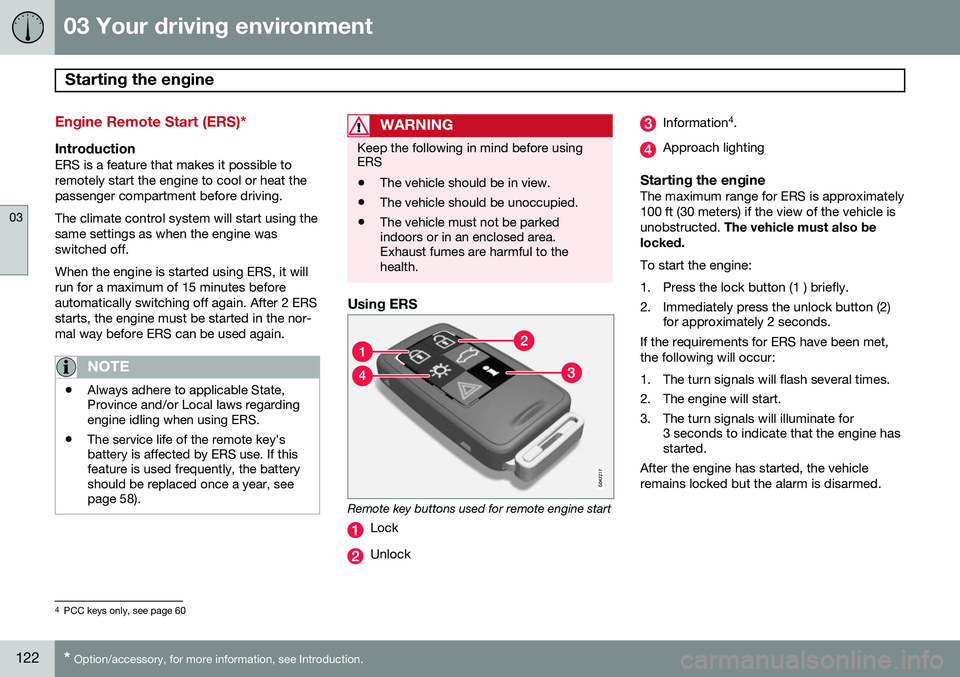
Remote key buttons used for remote engine start
Lock
Unlock
Information 4
.
Approach lighting
Starting the engineThe maximum range for ERS is approximately 100 ft (30 meters) if the view of the vehicle isunobstructed. The vehicle must also be
locked. To start the engine:
1. Press the lock button (1 ) briefly.
2. Immediately press the unlock button (2) for approximately 2 seconds.
If the requirements for ERS have been met, the following will occur:
1. The turn signals will flash several times.
2. The engine will start.
3. The turn signals will illuminate for 3 seconds to indicate that the engine has started.
After the engine has started, the vehicle remains locked but the alarm is disarmed.
4 PCC keys only, see page 60
Page 130 of 394
03 Your driving environment
Transmission
03
128
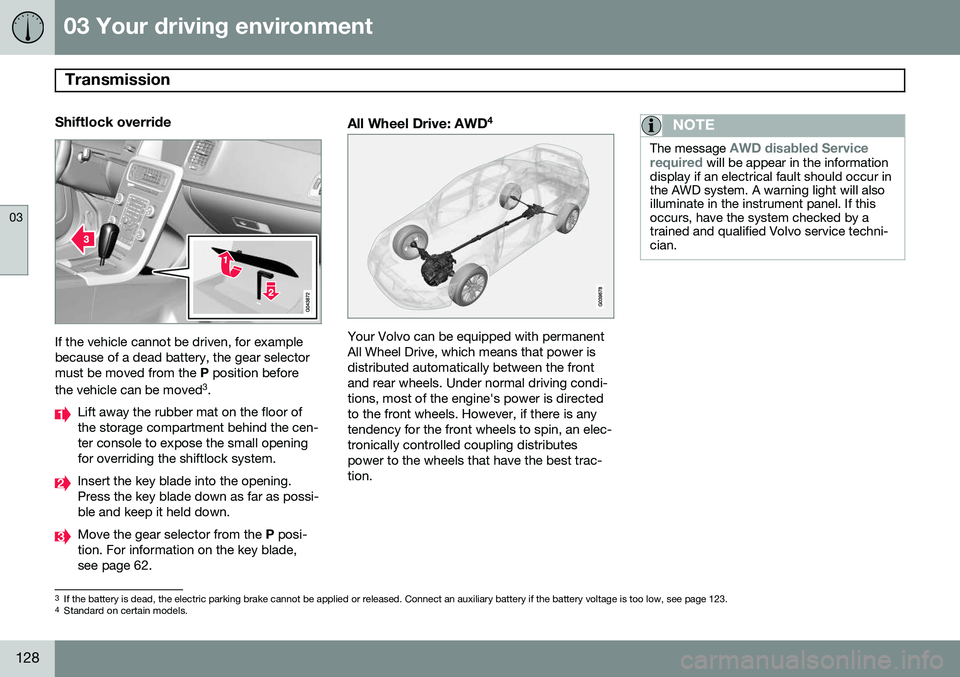
Shiftlock override
If the vehicle cannot be driven, for example because of a dead battery, the gear selectormust be moved from the P position before
the vehicle can be moved 3
.
Lift away the rubber mat on the floor of the storage compartment behind the cen-ter console to expose the small openingfor overriding the shiftlock system.
Insert the key blade into the opening. Press the key blade down as far as possi-ble and keep it held down.
Move the gear selector from the P posi-
tion. For information on the key blade, see page 62.
All Wheel Drive: AWD 4
Your Volvo can be equipped with permanent All Wheel Drive, which means that power isdistributed automatically between the frontand rear wheels. Under normal driving condi-tions, most of the engine's power is directedto the front wheels. However, if there is anytendency for the front wheels to spin, an elec-tronically controlled coupling distributespower to the wheels that have the best trac-tion.
NOTE
The message AWD disabled Service
required will be appear in the information
display if an electrical fault should occur in the AWD system. A warning light will alsoilluminate in the instrument panel. If thisoccurs, have the system checked by atrained and qualified Volvo service techni-cian.
3 If the battery is dead, the electric parking brake cannot be applied or released. Connect an auxiliary battery if the battery voltage is too low, see page 123.4
Standard on certain models.
Page 133 of 394
03 Your driving environment
Brakes
03
* Option/accessory, for more information, see Introduction.131
Brake system
The brake system is a hydraulic system con- sisting of two separate brake circuits. If aproblem should occur in one of these circuits,it is still possible to stop the vehicle with theother brake circuit. If the brake pedal must be depressed farther than normal and requires greater foot pres-sure, the stopping distance will be longer. A warning light in the instrument panel will light up to warn the driver that a fault hasoccurred. If this light comes on while driving or braking, stop immediately and check the brake fluidlevel in the reservoir.
NOTE
Press the brake pedal hard and maintain pressure on the pedal – do not pump thebrakes.
WARNING
If the fluid level is below the MIN mark in
the reservoir or if a brake system message is shown in the information display: DO
NOT DRIVE . Have the vehicle towed to a
trained and qualified Volvo service techni-cian and have the brake system inspected.
Brake pad inspectionOn vehicles equipped with a jack*, the condi- tion of the brake pads can be checked byraising the vehicle (see page 322 for informa-tion about using the jack and removing awheel) and performing a visual inspection ofthe brake pads.
WARNING
• If the vehicle has been driven immedi- ately prior to a brake pad inspection,the wheel hub, brake components,etc., will be very hot. Allow time forthese components to cool before car-rying out the inspection.
• Apply the parking brake and put thegear selector in the Park (
P) position.
• Block the wheels standing on theground, use rigid wooden blocks orlarge stones.
WARNING
•Use the jack intended for the vehicle when changing a tire. For any otherjob, use stands to support the vehicle.
• The jack should be kept well-greasedand clean, and should not be dam-aged.
• Be sure the jack is on a firm, level,non-slippery surface.
• No objects should be placed betweenthe base of jack and the ground, orbetween the jack and the attachmentbar on the vehicle.
• The jack must correctly engage thejack attachment.
• Never allow any part of your body tobe extended under a vehicle suppor-ted by a jack.
Brake lightsThe brake lights come on automatically when the brakes are applied.
Adaptive brake lightsThe adaptive brake lights activate in the event of sudden braking or if the ABS system isactivated. This function causes an additionaltaillight on each side of the vehicle to illumi-nate to help alert vehicles traveling behind.
Page 139 of 394

03 Your driving environment
Hill Descent Control (HDC)*
03
* Option/accessory, for more information, see Introduction.137
Introduction
Normally, when the accelerator pedal is released while driving down hills, the vehicle'sspeed slows as the engine runs at lower rpm(the normal engine braking effect). However, ifthe downhill gradient becomes steeper and ifthe vehicle is carrying a load, speed increasesdespite the engine braking effect. In this sit-uation, the brakes must be applied to reducethe vehicle's speed. HDC is a type of automatic engine brake and makes it possible to increase or decrease thevehicle's speed on downhill gradients usingonly the accelerator pedal, without applyingthe brakes. The brake system functions auto-matically to maintain a low and steady speed. HDC is particularly useful when driving down steep hills with rough surfaces, and where theroad may have slippery patches.
WARNING
HDC does not function in all situations, and is a supplementary braking aid. Thedriver has full responsibility for driving in asafe manner.
Function
• HDC can be switched on and off with the button in the center console. An indicatorlight in the button illuminates when HDCis activated.
• The indicator light
in the instru-
ment panel illuminates and a message is displayed when the system is controllingthe vehicle's speed.
• HDC only functions when
first or reverse
gears are selected (
1 will be shown in the
instrument panel display when first gear is selected).
NOTE
HDC cannot be activated if the gear selec- tor is the D position.
Using HDC
HDC allows the car to roll forward at a maxi- mum speed of 6 mph (10 km/h), and 4 mph(7 km/h) in reverse. However, the acceleratorpedal can be used to select any speed that ispossible in first or reverse gears. When theaccelerator pedal is released, speed isquickly reduced again to 6 mph (10 km/h) or4 mph (7 km/h), depending on the gearselected, regardless of the hill's gradient. It isnot necessary to apply the brakes.
• The brake lights illuminate automatically when HDC is controlling the vehicle'sspeed.
• The driver can slow or stop the vehicle atany time by applying the brakes.
HDC is deactivated when:
• The button on the center console ispressed
• A gear higher than first gear is selected
• D
is selected on vehicles with an auto-
matic transmission
HDC can be deactivated at any time. If this is done while driving down a steep hill, the sys-tem's braking effect will decrease gradually.
Page 150 of 394
04 Driver support
Adaptive Cruise Control (ACC)*
04
148* Option/accessory, for more information, see Introduction.
Introduction
Adaptive Cruise Control (ACC) is an optional system designed to assist the driver by main-taining a set speed or a set time interval tothe vehicle ahead. It is primarily intended foruse on long straight roads in steady traffic,such as on highways and other main roads. When the driver has set the desired speed and the time interval to the vehicle ahead,ACC functions as follows:
• If there are no other vehicles in the lane ahead of you, your vehicle will travel atthe set speed.
• If ACC's radar sensor detects a slowermoving vehicle in the lane ahead, the sys-tem will adapt your vehicle's speed tohelp maintain the set time interval to thevehicle ahead. When there are no longerslower moving vehicles ahead, your vehi-cle will accelerate to resume the setspeed.
If ACC is switched off completely or in standby mode and your vehicle comes tooclose to another vehicle ahead, the driver willbe warned by the Distance Alert system (seepage 159).WARNING
• Adaptive Cruise Control cannot cover all driving situations and traffic,weather and road conditions. The"Function" section provides informa-tion about limitations that the drivermust be aware of before using thisfeature.
• This system is designed to be a sup-plementary driving aid. It is not, how-ever, intended to replace the driver'sattention and judgement. The driver isresponsible for maintaining a safe dis-tance and speed and must intervene ifAdaptive Cruise Control does notmaintain a suitable speed or suitabledistance to the vehicle ahead.
• Maintenance of ACC components mayonly be performed by a trained andqualified Volvo technician.
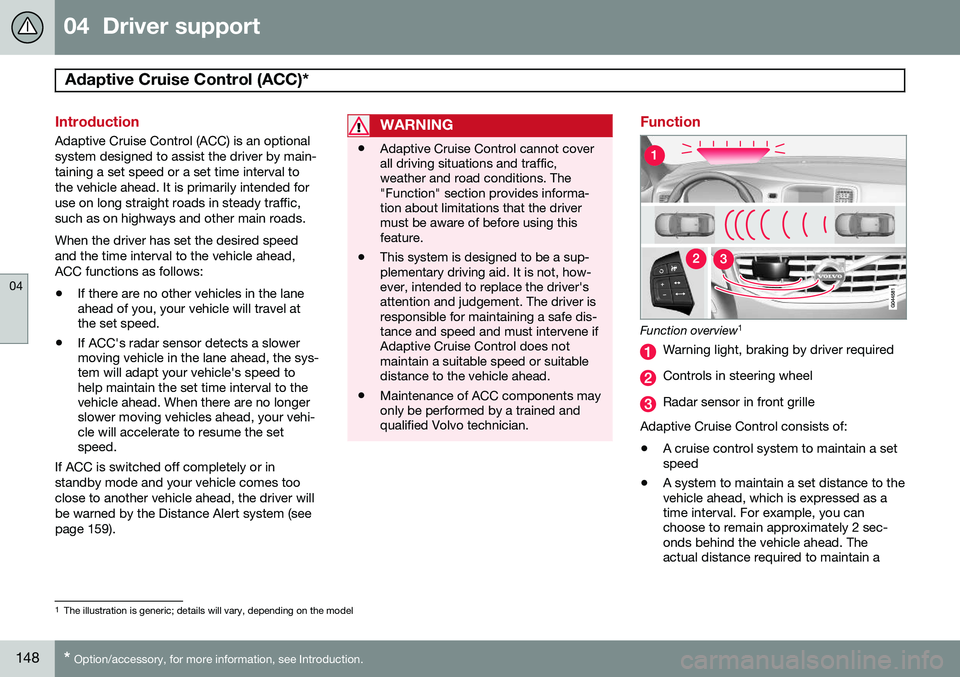
Function
Function overview 1
Warning light, braking by driver required
Controls in steering wheel
Radar sensor in front grille
Adaptive Cruise Control consists of: • A cruise control system to maintain a set speed
• A system to maintain a set distance to thevehicle ahead, which is expressed as atime interval. For example, you canchoose to remain approximately 2 sec-onds behind the vehicle ahead. Theactual distance required to maintain a
1
The illustration is generic; details will vary, depending on the model
Page 151 of 394
04 Driver support
Adaptive Cruise Control (ACC)*
04
* Option/accessory, for more information, see Introduction.149
2-second interval will vary according the speed of the vehicles.
WARNING
•
Adaptive Cruise Control is not a colli- sion avoidance system. The driver isalways responsible for applying thebrakes if the system does not detectanother vehicle.
• Adaptive Cruise Control does not reactto people or animals, or small vehiclessuch as bicycles and motorcycles. Italso does not react to slow moving,parked or approaching vehicles, orstationary objects.
• Do not use Adaptive Cruise Control indemanding driving conditions such ascity driving or other heavy traffic situa-tions, in slippery conditions, whenthere is a great deal of water or slushon the road, during heavy rain orsnow, in poor visibility, on windingroads or on highway on- or off-ramps.
The distance to the vehicle ahead (in the same lane) is monitored by a radar sensor.Your vehicle's speed is regulated by acceler-ating and braking. The brakes may emit asound when they are being modulated by the adaptive cruise control system. This is nor-mal.
WARNING
The brake pedal moves when the adaptive cruise control system modulates thebrakes. Do not rest your foot under thebrake pedal.
The ACC system is designed to smoothly regulate speed. However, the driver mustapply the brakes in situations that requireimmediate braking. This applies when thereare great differences in speed between vehi-cles, or if the vehicle ahead brakes suddenly.
WARNING
Due to limitations in the radar sensor, braking may occur unexpectedly or not atall, see page 155.
Adaptive Cruise Control can be put in active mode at any permitted speed. However, if thevehicle's speed falls below 18 mph (30 km/h)or if engine speed (rpm) becomes too low,ACC disengages (goes into standby mode) and will no longer modulate the brakes
2
. The driver will then have to maintain a safe dis- tance to the vehicle ahead.
WARNING
When Adaptive Cruise Control is in standby mode or is switched off com-pletely, the brakes will not be modulatedautomatically. The driver must assume fullcontrol over the vehicle.
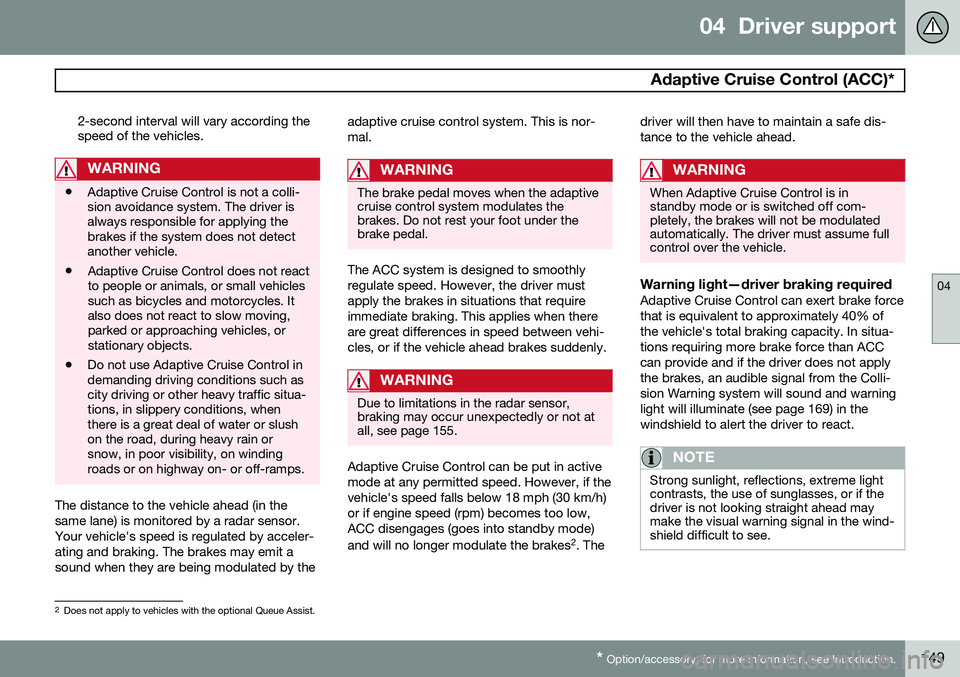
Warning light—driver braking requiredAdaptive Cruise Control can exert brake force that is equivalent to approximately 40% ofthe vehicle's total braking capacity. In situa-tions requiring more brake force than ACCcan provide and if the driver does not applythe brakes, an audible signal from the Colli-sion Warning system will sound and warninglight will illuminate (see page 169) in thewindshield to alert the driver to react.
NOTE
Strong sunlight, reflections, extreme light contrasts, the use of sunglasses, or if thedriver is not looking straight ahead maymake the visual warning signal in the wind-shield difficult to see.
2
Does not apply to vehicles with the optional Queue Assist.
Page 153 of 394
04 Driver support
Adaptive Cruise Control (ACC)*
04
* Option/accessory, for more information, see Introduction.151
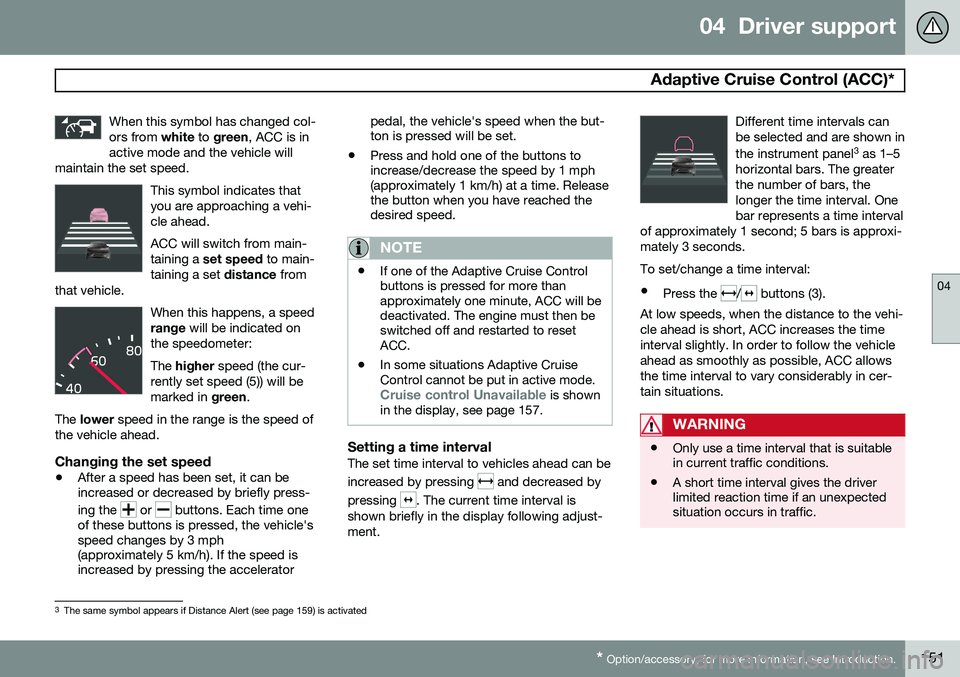
When this symbol has changed col- ors from
white to green , ACC is in
active mode and the vehicle will
maintain the set speed.
This symbol indicates that you are approaching a vehi-cle ahead. ACC will switch from main- taining a set speed to main-
taining a set distance from
that vehicle.
When this happens, a speed range will be indicated on
the speedometer: The higher speed (the cur-
rently set speed (5)) will be marked in green.
The lower speed in the range is the speed of
the vehicle ahead.
Changing the set speed
• After a speed has been set, it can be increased or decreased by briefly press- ing the
or buttons. Each time one
of these buttons is pressed, the vehicle's speed changes by 3 mph(approximately 5 km/h). If the speed isincreased by pressing the accelerator pedal, the vehicle's speed when the but-ton is pressed will be set.
• Press and hold one of the buttons toincrease/decrease the speed by 1 mph(approximately 1 km/h) at a time. Releasethe button when you have reached thedesired speed.
NOTE
•If one of the Adaptive Cruise Control buttons is pressed for more thanapproximately one minute, ACC will bedeactivated. The engine must then beswitched off and restarted to resetACC.
• In some situations Adaptive CruiseControl cannot be put in active mode.
Cruise control Unavailable is shown
in the display, see page 157.
Setting a time intervalThe set time interval to vehicles ahead can be increased by pressing
and decreased by
pressing
. The current time interval is
shown briefly in the display following adjust- ment. Different time intervals canbe selected and are shown in the instrument panel
3
as 1–5
horizontal bars. The greater the number of bars, thelonger the time interval. Onebar represents a time interval
of approximately 1 second; 5 bars is approxi-mately 3 seconds.
To set/change a time interval:
• Press the
/ buttons (3).
At low speeds, when the distance to the vehi- cle ahead is short, ACC increases the timeinterval slightly. In order to follow the vehicleahead as smoothly as possible, ACC allowsthe time interval to vary considerably in cer-tain situations.
WARNING
• Only use a time interval that is suitable in current traffic conditions.
• A short time interval gives the driverlimited reaction time if an unexpectedsituation occurs in traffic.
3
The same symbol appears if Distance Alert (see page 159) is activated
Page 157 of 394

04 Driver support
Adaptive Cruise Control (ACC)*
04
* Option/accessory, for more information, see Introduction.155
•
The gear selected is moved to
P,N or R
• The driver presses the
button to put
ACC in standby mode
The parking brake is applied
automatically
In certain situations, ACC will apply the park- ing brake in order to continue keeping thevehicle at a standstill. This happens if:
• The driver opens the door or takes off his/her seat belt
• DSTC is put in Sport mode (seepage 142)
• ACC has kept the vehicle at a standstillfor more than 2 minutes
• The engine has been switched off
• The brakes have overheated
The radar sensor and its limitations
In addition to being used by ACC, the radar sensor is also used by Distance Alert (seepage 159) and Collision Warning with FullAuto-brake and Pedestrian Detection (seepage 168). This sensor is designed to detectcars or larger vehicles driving in the samedirection as your vehicle, in the same lane.
WARNING
• If there is visible damage to the front grille or you suspect that the radarsensor may be damaged in any way,contact a trained and qualified Volvoservice technician as soon as possible.The radar sensor may only functionpartially (or not at all) if it is damagedor is not securely fastened in place.
• Accessories or other objects, such asextra headlights, must not be installedin front of the grille.
• Modification of the radar sensor couldmake its use illegal.
The radar sensor's capacity to detect vehi- cles ahead is impeded:
• if the radar sensor is obstructed and can- not detect other vehicles, for example inheavy rain, or if snow or other objects areobscuring the radar sensor.
NOTE
Keep the area in front of the radar sensor clean.
• if the speed of vehicles ahead is signifi- cantly different from your own speed.
Situations where ACC may not function optimally
WARNING
•The radar sensor has a limited field of vision. In some situations it may detecta vehicle later than expected or notdetect other vehicles at all.
• If ACC is not functioning properly,cruise control will also be disabled.
Page 161 of 394
04 Driver support
Distance Alert*
04
* Option/accessory, for more information, see Introduction.159
Introduction
Distance Alert is part of Adaptive Cruise Con- trol and is a function that provides informa-tion about the time interval to the vehicleahead. Distance Alert is active at speeds above approximately 18 mph (30 km/h). Time inter-val information is only given for a vehicle thatis driving ahead of your vehicle in the samedirection. No information is provided for vehi-cles driving toward you, moving very slowly,or at a standstill.
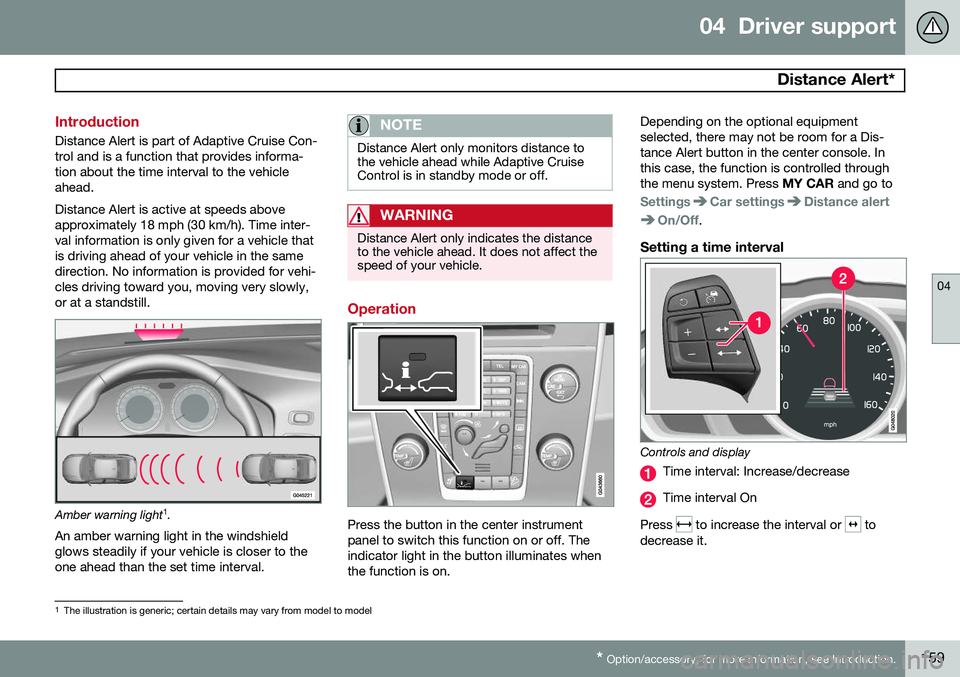
Amber warning light 1
.
An amber warning light in the windshield glows steadily if your vehicle is closer to theone ahead than the set time interval.
NOTE
Distance Alert only monitors distance to the vehicle ahead while Adaptive CruiseControl is in standby mode or off.
WARNING
Distance Alert only indicates the distance to the vehicle ahead. It does not affect thespeed of your vehicle.
Operation
Press the button in the center instrument panel to switch this function on or off. Theindicator light in the button illuminates whenthe function is on. Depending on the optional equipmentselected, there may not be room for a Dis-tance Alert button in the center console. Inthis case, the function is controlled throughthe menu system. Press
MY CAR and go to
SettingsCar settingsDistance alert
On/Off.
Setting a time interval
Controls and display
Time interval: Increase/decrease
Time interval On
Press
to increase the interval or to
decrease it.
1 The illustration is generic; certain details may vary from model to model