Motor VOLVO XC70 2014 Owner´s Manual
[x] Cancel search | Manufacturer: VOLVO, Model Year: 2014, Model line: XC70, Model: VOLVO XC70 2014Pages: 394, PDF Size: 11.55 MB
Page 14 of 394
Introduction
Environment
12
Volvo and the environment
Volvo is committed to the well being of its customers. As a natural part of this commit-ment, we care about the environment inwhich we all live. Caring for the environmentmeans an everyday involvement in reducingour environmental impact. Volvo's environ-mental activities are based on a holistic view,which means we consider the overall environ-mental impact of a product throughout itscomplete life cycle. In this context, design,production, product use, and recycling are allimportant considerations. In production,Volvo has partly or completely phased outseveral chemicals including CFCs, lead chro-mates, asbestos, and cadmium; and reducedthe number of chemicals used in ourplants 50% since 1991. Volvo was the first in the world to introduce into production a three-way catalytic con-verter with a Lambda sond, now called theheated oxygen sensor, in 1976. The currentversion of this highly efficient system reducesemissions of harmful substances (CO, HC,NOx) from the exhaust pipe by approximately95 – 99% and the search to eliminate theremaining emissions continues. Volvo is theonly automobile manufacturer to offer CFC-free retrofit kits for the air conditioning systemof all models as far back as the 1975model 240. Advanced electronic engine con-trols and cleaner fuels are bringing us closerto our goal. In addition to continuous environ-mental refinement of conventional gasoline-powered internal combustion engines, Volvois actively looking at advanced technologyalternative-fuel vehicles. When you drive a Volvo, you become our partner in the work to lessen the car's impacton the environment. To reduce your vehicle'senvironmental impact, you can: •
Maintain proper air pressure in your tires. Tests have shown decreased fuel econ-omy with improperly inflated tires.
• Follow the recommended maintenanceschedule in your Warranty and ServiceRecords Information booklet.
• Drive at a constant speed whenever pos-sible.
• See a trained and qualified Volvo servicetechnician as soon as possible forinspection if the check engine (malfunc-tion indicator) light illuminates, or stayson after the vehicle has started.
• Properly dispose of any vehicle-relatedwaste such as used motor oil, used bat-teries, brake pads, etc.
• When cleaning your vehicle, please usegenuine Volvo car care products. AllVolvo car care products are formulated tobe environmentally friendly.
FSC®
The FSC ®
(Forest Stewardship Council ®
)
symbol indicates that the wood pulp used in this publication comes from FSC ®
certified
forests and other responsible sources.
Page 19 of 394
01 Safety
Reporting safety defects01
17
Reporting safety defects in the U.S.
If you believe that your vehicle has a defect which could cause a crash orcould cause injury or death, youshould immediately inform theNational Highway Traffic SafetyAdministration (NHTSA) in additionto notifying Volvo Cars of NorthAmerica, LLC. If NHTSA receivessimilar complaints, it may open aninvestigation, and if it finds that asafety defect exists in a group ofvehicles, it may order a recall andremedy campaign. However, NHTSAcannot become involved in individ-ual problems between you, yourretailer, or Volvo Cars of NorthAmerica, LLC. To contact NHTSA,you may either call the Auto SafetyHotline toll-free at 1-888-327-4236(TTY: 1-800-424-9153) or write to: NHTSA, U.S. Department of Trans-portation, Washington D.C. 20590.You can also obtain other informa-tion about motor vehicle safety from: http://www.safercar.govVolvo strongly recommends that if your vehicle is covered under aservice campaign, safety or emis-sion recall or similar action, it shouldbe completed as soon as possible.Please check with your local retaileror Volvo Cars of North America, LLCif your vehicle is covered underthese conditions. NHTSA can be reached at:Internet:http://www.nhtsa.govTelephone:1-888-DASH-2-DOT (1-888-327-4236).
Reporting safety defects in Canada
If you believe your vehicle has a defect that could cause a crash or could cause injury ordeath, you should immediately inform Trans-port Canada in addition to notifying VolvoCars of Canada Corp. Transport Canada can be contacted at: 1-800-333-0510 Teletypewriter (TTY): 613 990-4500Fax: 1-819-994-3372Mailing Address: Transport Canada - Road Safety, 80 rue Noël, Gatineau, (Quebec) J8Z0A1
Page 28 of 394
01 Safety
Occupant Weight Sensor 01
26
General information
2
2
G017724
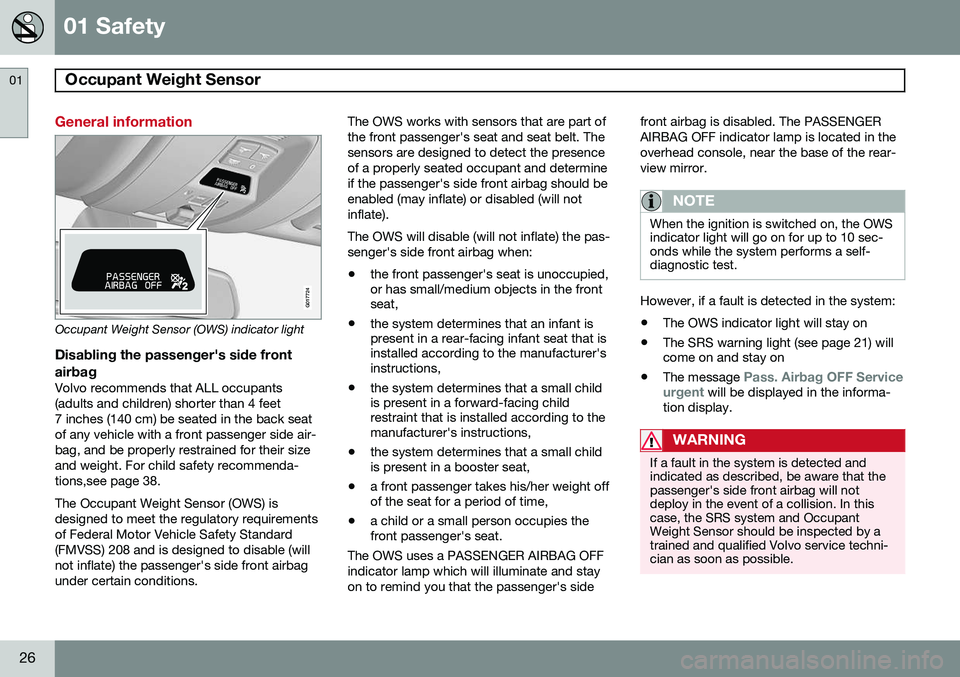
Occupant Weight Sensor (OWS) indicator light
Disabling the passenger's side frontairbag
Volvo recommends that ALL occupants (adults and children) shorter than 4 feet7 inches (140 cm) be seated in the back seatof any vehicle with a front passenger side air-bag, and be properly restrained for their sizeand weight. For child safety recommenda-tions,see page 38. The Occupant Weight Sensor (OWS) is designed to meet the regulatory requirementsof Federal Motor Vehicle Safety Standard(FMVSS) 208 and is designed to disable (willnot inflate) the passenger's side front airbagunder certain conditions. The OWS works with sensors that are part ofthe front passenger's seat and seat belt. Thesensors are designed to detect the presenceof a properly seated occupant and determineif the passenger's side front airbag should beenabled (may inflate) or disabled (will notinflate). The OWS will disable (will not inflate) the pas- senger's side front airbag when:
• the front passenger's seat is unoccupied, or has small/medium objects in the frontseat,
• the system determines that an infant ispresent in a rear-facing infant seat that isinstalled according to the manufacturer'sinstructions,
• the system determines that a small childis present in a forward-facing childrestraint that is installed according to themanufacturer's instructions,
• the system determines that a small childis present in a booster seat,
• a front passenger takes his/her weight offof the seat for a period of time,
• a child or a small person occupies thefront passenger's seat.
The OWS uses a PASSENGER AIRBAG OFF indicator lamp which will illuminate and stayon to remind you that the passenger's side front airbag is disabled. The PASSENGERAIRBAG OFF indicator lamp is located in theoverhead console, near the base of the rear-view mirror.
NOTE
When the ignition is switched on, the OWS indicator light will go on for up to 10 sec-onds while the system performs a self-diagnostic test.
However, if a fault is detected in the system:
• The OWS indicator light will stay on
• The SRS warning light (see page 21) will come on and stay on
• The message
Pass. Airbag OFF Service
urgent will be displayed in the informa-
tion display.
WARNING
If a fault in the system is detected and indicated as described, be aware that thepassenger's side front airbag will notdeploy in the event of a collision. In thiscase, the SRS system and OccupantWeight Sensor should be inspected by atrained and qualified Volvo service techni-cian as soon as possible.
Page 39 of 394
01 Safety
Child safety01
}}
37
Children should be seated safely
Volvo recommends the proper use of restraint systems for all occupants including children.Remember that, regardless of age and size, achild should always be properly restrained ina vehicle. Your vehicle is also equipped with ISOFIX/ LATCH attachments, which make it moreconvenient to install child seats. Some restraint systems for children are designed to be secured in the vehicle by lapbelts or the lap portion of a lap-shoulder belt.Such child restraint systems can help protectchildren in vehicles in the event of an acci-dent only if they are used properly. However,children could be endangered in a crash if thechild restraints are not properly secured in thevehicle. Failure to follow the installationinstructions for your child restraint can resultin your child striking the vehicle's interior in asudden stop. Holding a child in your arms is NOT a suitable substitute for a child restraint system. In anaccident, a child held in a person's arms canbe crushed between the vehicle's interior andan unrestrained person. The child could alsobe injured by striking the interior, or by beingejected from the vehicle during a suddenmaneuver or impact. The same can also hap-pen if the infant or child rides unrestrained onthe seat. Other occupants should also beproperly restrained to help reduce the chanceof injuring or increasing the injury of a child. All states and provinces have legislation gov- erning how and where children should be car-ried in a vehicle. Find out the regulationsexisting in your state or province. Recentaccident statistics have shown that childrenare safer in rear seating positions than frontseating positions when properly restrained. Achild restraint system can help protect a childin a vehicle. Here's what to look for whenselecting a child restraint system: It should have a label certifying that it meets applicable Federal Motor Vehicle SafetyStandards (FMVSS 213) – or in Canada,CMVSS 213. Make sure the child restraint system is approved for the child's height, weight anddevelopment – the label required by thestandard or regulation, or instructions forinfant restraints, typically provide this infor-mation. In using any child restraint system, we urge you to carefully look over the instructions thatare provided with the restraint. Be sure youunderstand them and can use the deviceproperly and safely in this vehicle. A misusedchild restraint system can result in increased
injuries for both the infant or child and otheroccupants in the vehicle. When a child has outgrown the child safety seat, you should use the rear seat with thestandard seat belt fastened. The best way tohelp protect the child here is to place thechild on a cushion so that the seat belt isproperly located on the hips (see the illustra-tion on page 46). Legislation in your state orprovince may mandate the use of a child seator cushion in combination with the seat belt,depending on the child's age and/or size.Please check local regulations. A specially designed and tested booster cushion and backrest can be obtained fromyour Volvo retailer. USA
: for children weighing 33 – 80 lbs. (15 –
36 kg) and 38 – 54 inches (97 – 137 cm) in height Canada : for children weighing 40 – 80 lbs.
(18 – 36 kg) and 40 – 54 inches (102 – 137 cm) in height
Page 70 of 394
02 Locks and alarm
Keyless drive
02
68
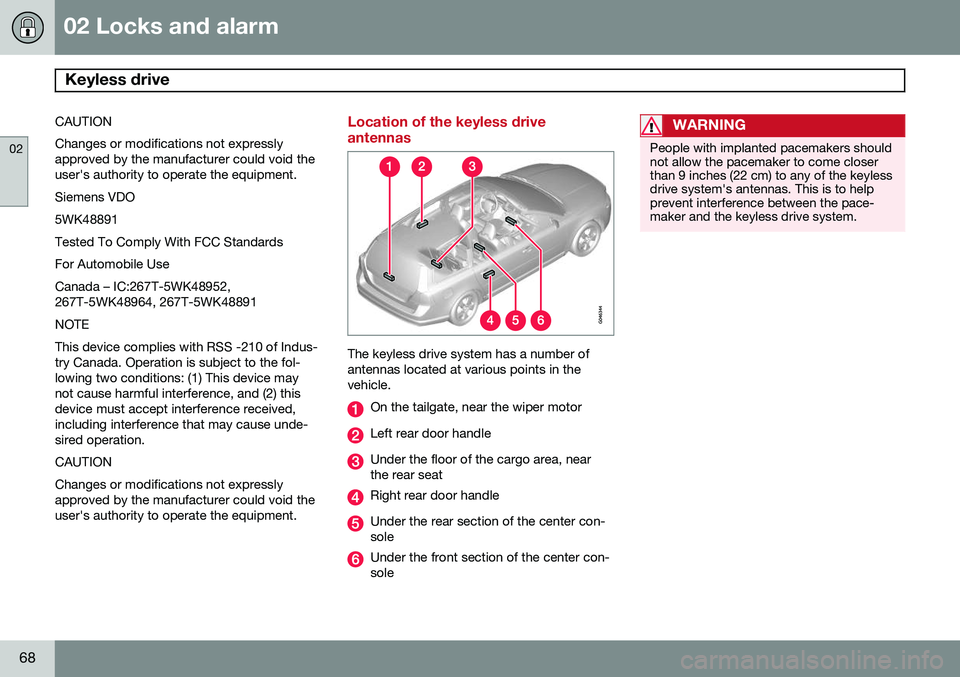
CAUTION Changes or modifications not expressly approved by the manufacturer could void theuser's authority to operate the equipment. Siemens VDO5WK48891Tested To Comply With FCC StandardsFor Automobile UseCanada – IC:267T-5WK48952, 267T-5WK48964, 267T-5WK48891 NOTEThis device complies with RSS -210 of Indus- try Canada. Operation is subject to the fol-lowing two conditions: (1) This device maynot cause harmful interference, and (2) thisdevice must accept interference received,including interference that may cause unde-sired operation. CAUTIONChanges or modifications not expressly approved by the manufacturer could void theuser's authority to operate the equipment.Location of the keyless drive antennas
The keyless drive system has a number of antennas located at various points in thevehicle.
On the tailgate, near the wiper motor
Left rear door handle
Under the floor of the cargo area, near the rear seat
Right rear door handle
Under the rear section of the center con- sole
Under the front section of the center con- sole
WARNING
People with implanted pacemakers should not allow the pacemaker to come closerthan 9 inches (22 cm) to any of the keylessdrive system's antennas. This is to helpprevent interference between the pace-maker and the keyless drive system.
Page 109 of 394

03 Your driving environment
Wipers and washers
03
107
NOTE
The rear wiper is equipped with cut-off function, which means that it will not oper-ate if its electric motor overheats. Thewiper will function again after a cool-downperiod (30 seconds or longer, dependingon the heat of the motor and ambient tem-perature conditions).
Tailgate wiper and reverse gearIf the windshield wipers are on and the trans- mission is put into reverse gear, the tailgatewiper will go into intermittent wiping func- tion1
. This function is deactivated when a dif-
ferent gear is selected.
NOTE
On vehicles with the optional rain sensor, the tailgate wiper will be activated whenreverse is selected, if the rain sensor isactivated and it is raining.
If the tailgate wiper is in the normal (continu- ous) wiping mode, selecting different gearswill not affect its function.
1 Consult your Volvo retailer if you would like to have this function deactivated.
Page 120 of 394
03 Your driving environment
HomeLink®
Wireless Control System*
03
118* Option/accessory, for more information, see Introduction.
NOTE
Some devices may require you to replace this Programming Step 2 with proceduresnoted in the “Gate Operator / CanadianProgramming” section. If the HomeLinkindicator light does not change to a rapidlyblinking light after performing these steps,contact HomeLink at www.homelink.comor by phoning the hotline at1–800–355–3515.
3. Firmly press, hold for five seconds and
release the programmed HomeLink but-
ton up to two separate times to activate the door. If the door does not activate,press and hold the just-trained HomeLinkbutton and observe the indicator light.
• If the indicator light
stays on con-
stantly, programming is complete and your device should activate when the HomeLink button is pressed andreleased.
• If the indicator light blinks
rapidly for
two seconds and then turns to aconstant light continue with “Pro- gramming” steps 4-6 to complete the
programming of a rolling code equip- ped device (most commonly a garagedoor opener). 4. At the garage door opener receiver
(motor-head unit) in the garage, locate the “learn” or “smart” button. This canusually be found where the hangingantenna wire is attached to the motor-head unit.
5. Firmly press and release the “learn” or “smart” button. (The name and color ofthe button may vary by manufacturer.)There are 30 seconds to initiate step 6.
6. Return to the vehicle and firmly press, hold for two seconds and release the pro-grammed HomeLink button. Repeat the“press/hold/release” sequence a secondtime, and, depending on the brand of thegarage door opener (or other rolling codeequipped device), repeat this sequence athird time to complete the programmingprocess.
HomeLink should now activate your rollingcode equipped device.
Gate Operator/Canadian ProgrammingCanadian radio-frequency laws require trans-mitter signals to “time-out” (or quit) after sev-eral seconds of transmission – which may notbe long enough for HomeLink to pick up thesignal during programming. Similar to thisCanadian law, some U.S. gate operators aredesigned to “time-out” in the same manner. If you live in Canada or you are having diffi-culties programming a gate operator orgarage door opener by using the “Program-ming” procedures,
replace “Programming
HomeLink” step 2 with the following :
• Continue to press and hold the HomeLink button while you
press and release -
every two seconds (“cycle”) your hand-
held transmitter until the HomeLink indi-cator light changes from a slow to a rap-idly blinking light. Now you may releaseboth the HomeLink and hand-held trans-mitter buttons.
Proceed with “Programming” step 3 to com- plete.
Using HomeLink
To operate, simply press and hold the pro- grammed HomeLink button until the traineddevice begins to operate (this may take sev-eral seconds). Activation will now occur forthe trained device (i.e., garage door opener,gate operator, security system, entry doorlock, home/office lighting, etc.). For conven-ience, the hand-held transmitter of the devicemay also be used at any time. In the eventthat there are still programming difficulties orquestions, contact HomeLink at:www.homelink.com or by phoning the hotlineat 1–800–355–3515.
Page 122 of 394
03 Your driving environment
Starting the engine
03
120* Option/accessory, for more information, see Introduction.
Start
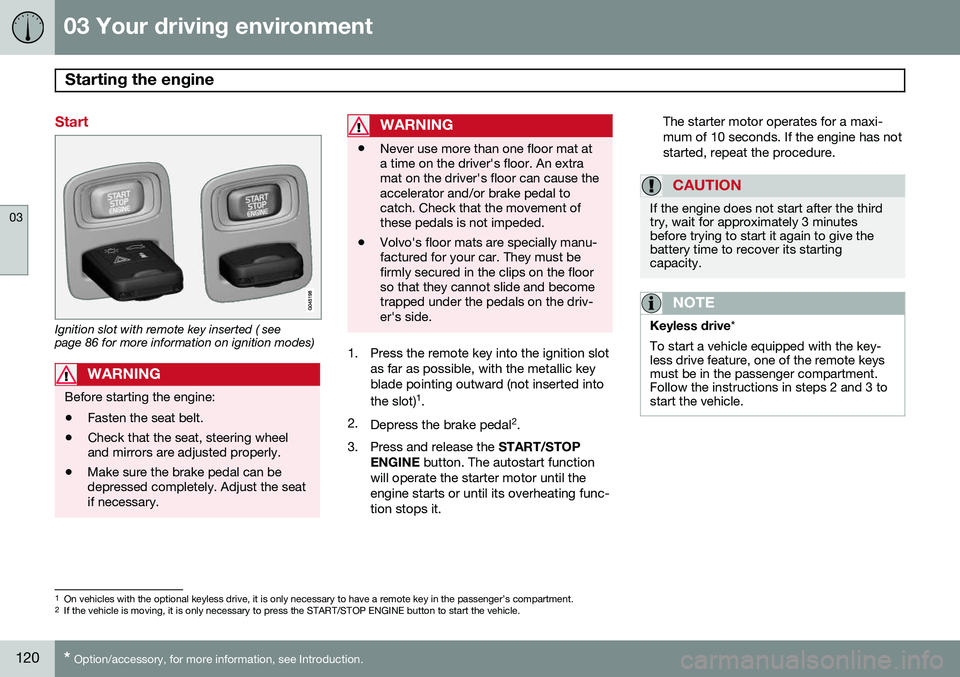
Ignition slot with remote key inserted ( see page 86 for more information on ignition modes)
WARNING
Before starting the engine:
• Fasten the seat belt.
• Check that the seat, steering wheel and mirrors are adjusted properly.
• Make sure the brake pedal can bedepressed completely. Adjust the seatif necessary.
WARNING
•Never use more than one floor mat at a time on the driver's floor. An extramat on the driver's floor can cause theaccelerator and/or brake pedal tocatch. Check that the movement ofthese pedals is not impeded.
• Volvo's floor mats are specially manu-factured for your car. They must befirmly secured in the clips on the floorso that they cannot slide and becometrapped under the pedals on the driv-er's side.
1. Press the remote key into the ignition slot
as far as possible, with the metallic key blade pointing outward (not inserted into the slot) 1
.
2. Depress the brake pedal 2
.
3. Press and release the START/STOP
ENGINE button. The autostart function
will operate the starter motor until the engine starts or until its overheating func-tion stops it. The starter motor operates for a maxi-mum of 10 seconds. If the engine has notstarted, repeat the procedure.
CAUTION
If the engine does not start after the third try, wait for approximately 3 minutesbefore trying to start it again to give thebattery time to recover its startingcapacity.
NOTE
Keyless drive
*
To start a vehicle equipped with the key- less drive feature, one of the remote keysmust be in the passenger compartment.Follow the instructions in steps 2 and 3 tostart the vehicle.
1 On vehicles with the optional keyless drive, it is only necessary to have a remote key in the passenger’s compartment.
2 If the vehicle is moving, it is only necessary to press the START/STOP ENGINE button to start the vehicle.
Page 136 of 394
03 Your driving environment
Parking brake
03
134
Electric parking brake
An electric parking brake has the same func- tion as a manual parking brake.
NOTE
•A faint sound from the parking brake's electric motor can be heard when theparking brake is being applied. Thissound can also be heard during theautomatic function check of the park-ing brake.
• The brake pedal will move slightlywhen the electric parking brake isapplied or released.
Low battery voltageIf the battery voltage is too low, the park- ing brake cannot be applied or released. Connect an auxiliary battery if the battery voltage is too low, see page 123.
Applying the electric parking brake
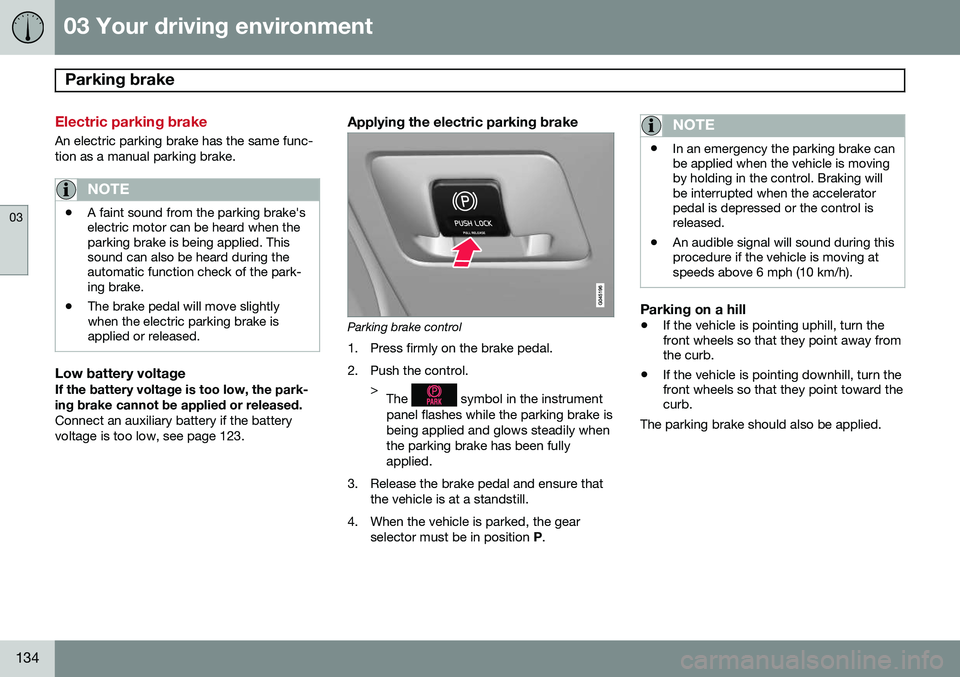
Parking brake control
1. Press firmly on the brake pedal.
2. Push the control. >The
symbol in the instrument
panel flashes while the parking brake is being applied and glows steadily whenthe parking brake has been fullyapplied.
3. Release the brake pedal and ensure that the vehicle is at a standstill.
4. When the vehicle is parked, the gear selector must be in position P.
NOTE
• In an emergency the parking brake can be applied when the vehicle is movingby holding in the control. Braking willbe interrupted when the acceleratorpedal is depressed or the control isreleased.
• An audible signal will sound during thisprocedure if the vehicle is moving atspeeds above 6 mph (10 km/h).
Parking on a hill
•
If the vehicle is pointing uphill, turn the front wheels so that they point away fromthe curb.
• If the vehicle is pointing downhill, turn thefront wheels so that they point toward thecurb.
The parking brake should also be applied.
Page 151 of 394
04 Driver support
Adaptive Cruise Control (ACC)*
04
* Option/accessory, for more information, see Introduction.149
2-second interval will vary according the speed of the vehicles.
WARNING
•
Adaptive Cruise Control is not a colli- sion avoidance system. The driver isalways responsible for applying thebrakes if the system does not detectanother vehicle.
• Adaptive Cruise Control does not reactto people or animals, or small vehiclessuch as bicycles and motorcycles. Italso does not react to slow moving,parked or approaching vehicles, orstationary objects.
• Do not use Adaptive Cruise Control indemanding driving conditions such ascity driving or other heavy traffic situa-tions, in slippery conditions, whenthere is a great deal of water or slushon the road, during heavy rain orsnow, in poor visibility, on windingroads or on highway on- or off-ramps.
The distance to the vehicle ahead (in the same lane) is monitored by a radar sensor.Your vehicle's speed is regulated by acceler-ating and braking. The brakes may emit asound when they are being modulated by the adaptive cruise control system. This is nor-mal.
WARNING
The brake pedal moves when the adaptive cruise control system modulates thebrakes. Do not rest your foot under thebrake pedal.
The ACC system is designed to smoothly regulate speed. However, the driver mustapply the brakes in situations that requireimmediate braking. This applies when thereare great differences in speed between vehi-cles, or if the vehicle ahead brakes suddenly.
WARNING
Due to limitations in the radar sensor, braking may occur unexpectedly or not atall, see page 155.
Adaptive Cruise Control can be put in active mode at any permitted speed. However, if thevehicle's speed falls below 18 mph (30 km/h)or if engine speed (rpm) becomes too low,ACC disengages (goes into standby mode) and will no longer modulate the brakes
2
. The driver will then have to maintain a safe dis- tance to the vehicle ahead.
WARNING
When Adaptive Cruise Control is in standby mode or is switched off com-pletely, the brakes will not be modulatedautomatically. The driver must assume fullcontrol over the vehicle.
Warning light—driver braking requiredAdaptive Cruise Control can exert brake force that is equivalent to approximately 40% ofthe vehicle's total braking capacity. In situa-tions requiring more brake force than ACCcan provide and if the driver does not applythe brakes, an audible signal from the Colli-sion Warning system will sound and warninglight will illuminate (see page 169) in thewindshield to alert the driver to react.
NOTE
Strong sunlight, reflections, extreme light contrasts, the use of sunglasses, or if thedriver is not looking straight ahead maymake the visual warning signal in the wind-shield difficult to see.
2
Does not apply to vehicles with the optional Queue Assist.