VOLVO XC90 2003 Service Manual
Manufacturer: VOLVO, Model Year: 2003, Model line: XC90, Model: VOLVO XC90 2003Pages: 242, PDF Size: 6.5 MB
Page 41 of 242
2003 VOLVO XC90
functioning.
Oil pressure warning light
If the light comes on while driving, stop the vehicle and then stop the \
engine immediately and
check the engine oil level See
page 130. If the light stays on after restart, have the vehicle towed to the
nearest authorized Volvo retailer. After hard driving, the light may com\
e on occasionally when the
engine is idling. This is normal, provided it goes off when the engine s\
peed is increased.
CHECK ENGINE Malfunction indicator light
On-Board Diagnostics II (OBDII): As you drive, a computer called "OBDI\
I" monitors your vehicle's
engine, transmission, electrical and emission systems. The CHECK ENGINE \
light will light up if the
computer senses a condition that potentially may need correcting. When t\
his happens, please have your
vehicle checked by a Volvo retailer as soon as possible.
A CHECK ENGINE light may have many causes. Sometimes, you may not notice\
a change in your
vehicle's behavior. Even so, an uncorrected condition could hurt fuel ec\
onomy, emission cleanliness, and
driveability. Extended driving without correcting the cause could even d\
amage other components in
your vehicle.
Canadian models are equipped with this warning light.
pg. 28 Instruments and controls
Indicator and warning symbols (contd)
Messages in the text window
file:///K|/ownersdocs/2003/2003_XC90/03xc90_02a.htm (7 of 16)12/30/200\
6 4:18:52 PM
Page 42 of 242
2003 VOLVO XC90
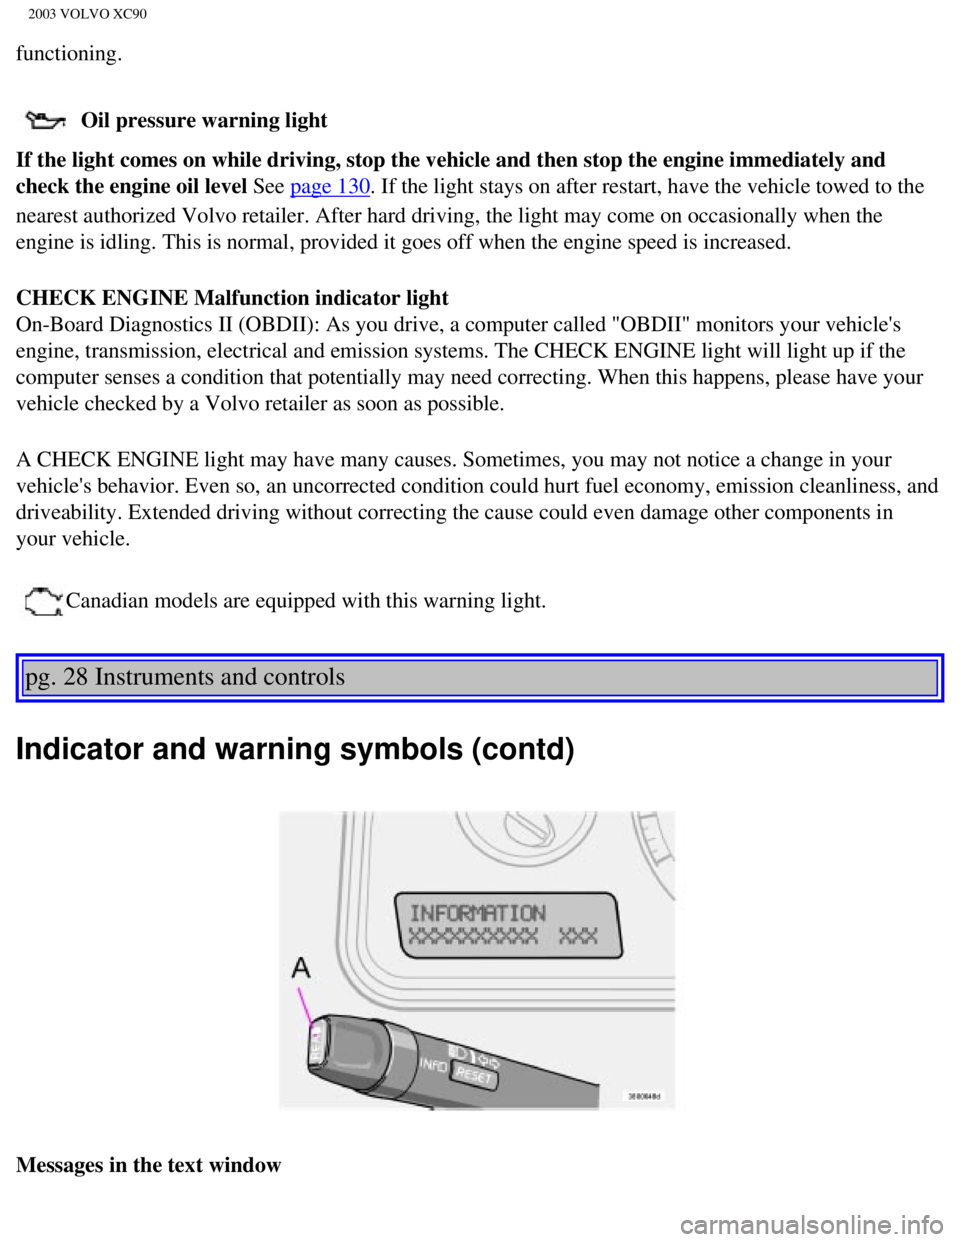
When a warning light in the instrument panel comes on, a message is also\
displayed in the text window.
After you have read the message, you can erase it by pressing button A (\
see illustration).
NOTE: Certain messages cannot be erased until the condition has been correcte\
d.
If a warning message is displayed when e.g. you are using the trip compu\
ter, this message must be
erased before you can access the function of your choice. Press button A\
to erase the warning message.
You can scroll through the stored messages by pressing button A (see il\
lustration). The text window can
be cleared (the message will be returned to memory) by pressing button\
A again. Message Meaning:
STOP SAFELY: Stop and switch off the engine - to help prevent serious risk of
damage.
STOP ENGINE: Stop and switch off the engine - to help prevent serious risk of
damage.
SERVICE URGENT: Take your vehicle to an authorized Volvo retailer for inspection as
soon as possible.
SEE MANUAL: Refer to your owner's manual. For additional information, please
contact your Volvo retailer.
SERVICE REQUIRED: Take your vehicle to an authorized Volvo retailer for inspection at
your convenience (but preferably before the next scheduled
maintenance).
FIX NEXT SERVICE: Have the system affected inspected at the next scheduled
maintenance.
TIME FOR REGULAR
SERVICE This light will come on at 7,500 mile (12,000 km) intervals, after
750 hours of driving or after 12 months, whichever occurs first, to
remind the driver that the maintenance interval has been exceeded.
The light will stay on for 2 minutes after start until reset by the
servicing retailer.
pg. 29 Instruments and controls
Switches in center console
file:///K|/ownersdocs/2003/2003_XC90/03xc90_02a.htm (8 of 16)12/30/200\
6 4:18:52 PM
Page 43 of 242
2003 VOLVO XC90
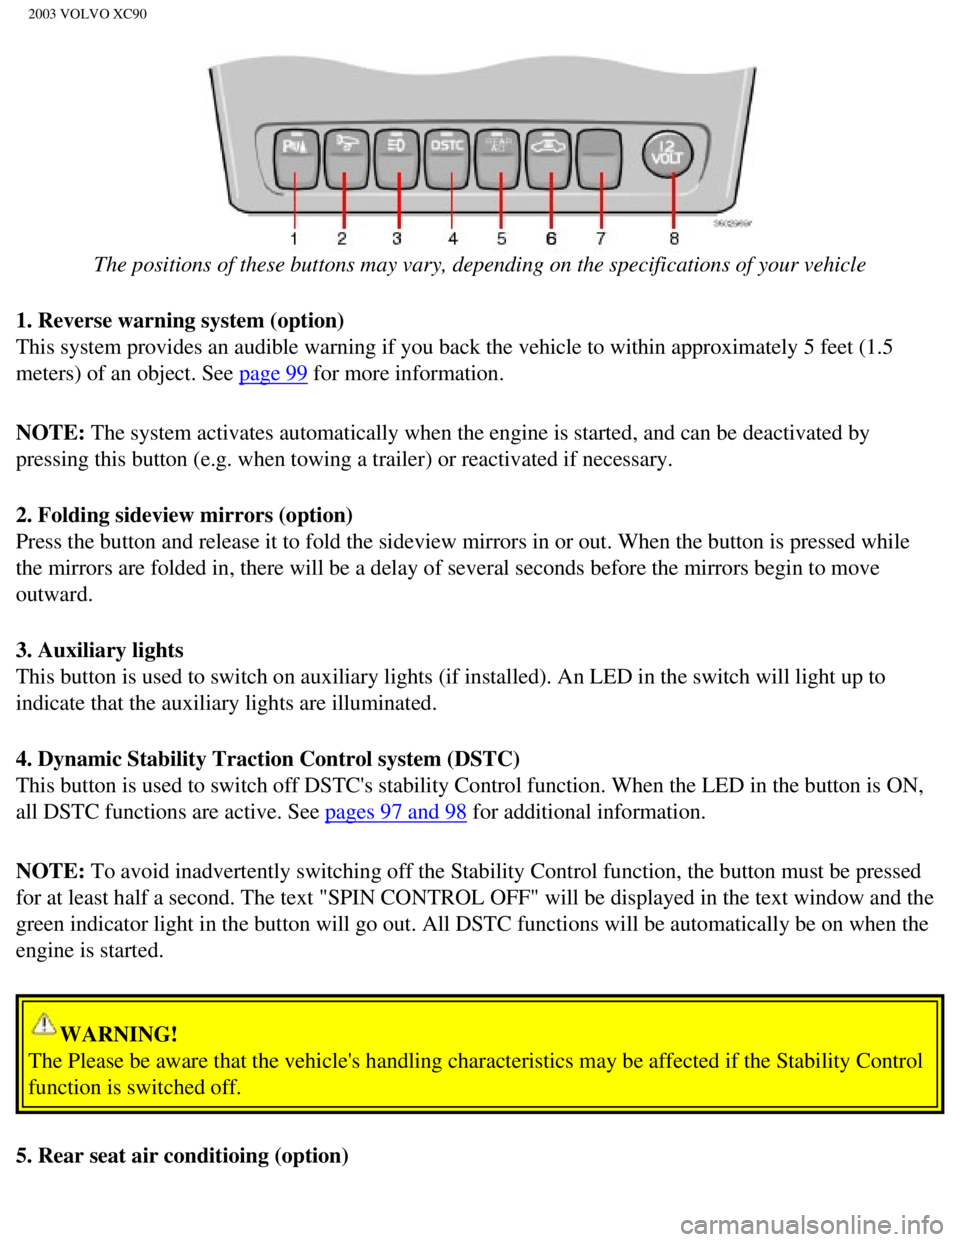
The positions of these buttons may vary, depending on the specifications\
of your vehicle
1. Reverse warning system (option)
This system provides an audible warning if you back the vehicle to withi\
n approximately 5 feet (1.5
meters) of an object. See
page 99 for more information.
NOTE: The system activates automatically when the engine is started, and can b\
e deactivated by
pressing this button (e.g. when towing a trailer) or reactivated if ne\
cessary.
2. Folding sideview mirrors (option)
Press the button and release it to fold the sideview mirrors in or out. \
When the button is pressed while
the mirrors are folded in, there will be a delay of several seconds befo\
re the mirrors begin to move
outward.
3. Auxiliary lights
This button is used to switch on auxiliary lights (if installed). An L\
ED in the switch will light up to
indicate that the auxiliary lights are illuminated.
4. Dynamic Stability Traction Control system (DSTC)
This button is used to switch off DSTC's stability Control function. Whe\
n the LED in the button is ON,
all DSTC functions are active. See
pages 97 and 98 for additional information.
NOTE: To avoid inadvertently switching off the Stability Control function, the\
button must be pressed
for at least half a second. The text "SPIN CONTROL OFF" will be displaye\
d in the text window and the
green indicator light in the button will go out. All DSTC functions will\
be automatically be on when the
engine is started.
WARNING!
The Please be aware that the vehicle's handling characteristics may be a\
ffected if the Stability Control
function is switched off.
5. Rear seat air conditioing (option)
file:///K|/ownersdocs/2003/2003_XC90/03xc90_02a.htm (9 of 16)12/30/200\
6 4:18:52 PM
Page 44 of 242
2003 VOLVO XC90
This button controls the optional rear seat air conditioning system on s\
even-seat models. See page 48 for
more information.
6. Temporarily disconnecting the alarm sensors (option)
See
page 81 for more details.
7. Not in use
8. 12 volt socket
This 12 volt socket can be used to plug in certain accessories such as c\
ellular telephones, etc. The
ignition key must be in position 1 (or higher) for the auxiliary socke\
t to function.
NOTE: The auxiliary sockets can also be used for cigarette lighters, which are\
available as accessories
at your Volvo retailer.
pg. 30 Instruments and controls
Steering wheel adjustment
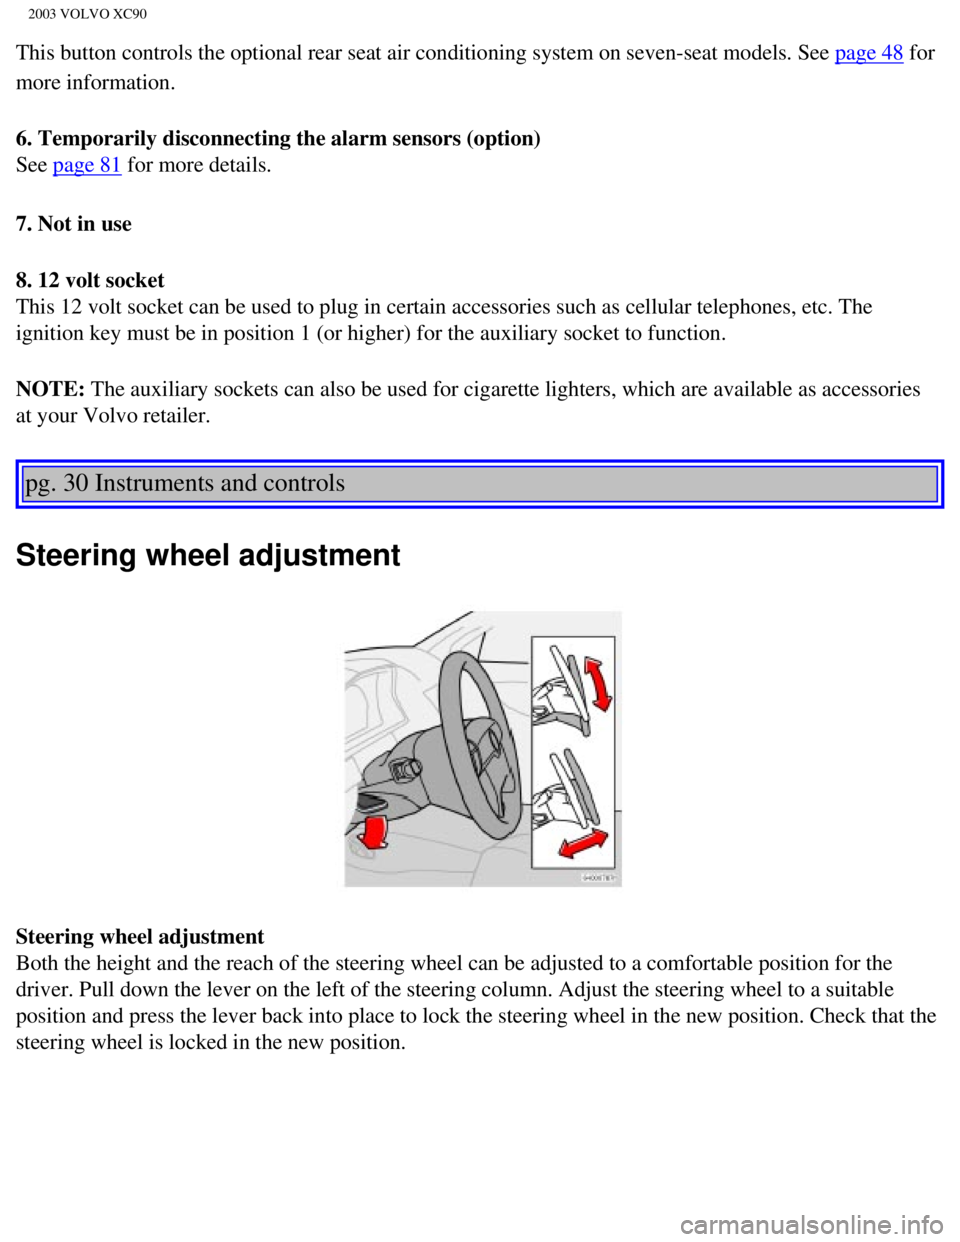
Steering wheel adjustment
Both the height and the reach of the steering wheel can be adjusted to a\
comfortable position for the
driver. Pull down the lever on the left of the steering column. Adjust t\
he steering wheel to a suitable
position and press the lever back into place to lock the steering wheel \
in the new position. Check that the
steering wheel is locked in the new position.
file:///K|/ownersdocs/2003/2003_XC90/03xc90_02a.htm (10 of 16)12/30/20\
06 4:18:52 PM
Page 45 of 242
2003 VOLVO XC90
WARNING!
The Never adjust the steering wheel while
driving.
pg. 31 Instruments and controls
Lighting panel
A - Headlights and parking lights
All lighting off.
Models with daytime running lights:
Low beam headlights will automatically come on if the ignition key is in\
position II. Front and rear
parking lights, tail lights, side marker lights, and license plate light\
s will also be on. Volvo recommends
the use of daytime running lights. If, however, you would prefer to have\
these lights turned off (USA
only), please consult your Volvo retailer. Please note that the use of \
daytime running lights is mandatory
in Canada.
Parking lights on. The parking lights should be switched off when you leave the vehicle to \
help avoid battery drain.
Headlights, parking lights, license plate lights and instrument panel il\
lumination are on if the
ignition key is in position II.
If the headlight switch is in this position, all lights will go out when\
the ignition is switched off.
The headlight switch must be in this position before the high beams will\
function.
Switch from high to low beams and vice versa by pulling the turn signal \
switch lever on the left side of
steering column toward you.
file:///K|/ownersdocs/2003/2003_XC90/03xc90_02a.htm (11 of 16)12/30/20\
06 4:18:52 PM
Page 46 of 242
2003 VOLVO XC90
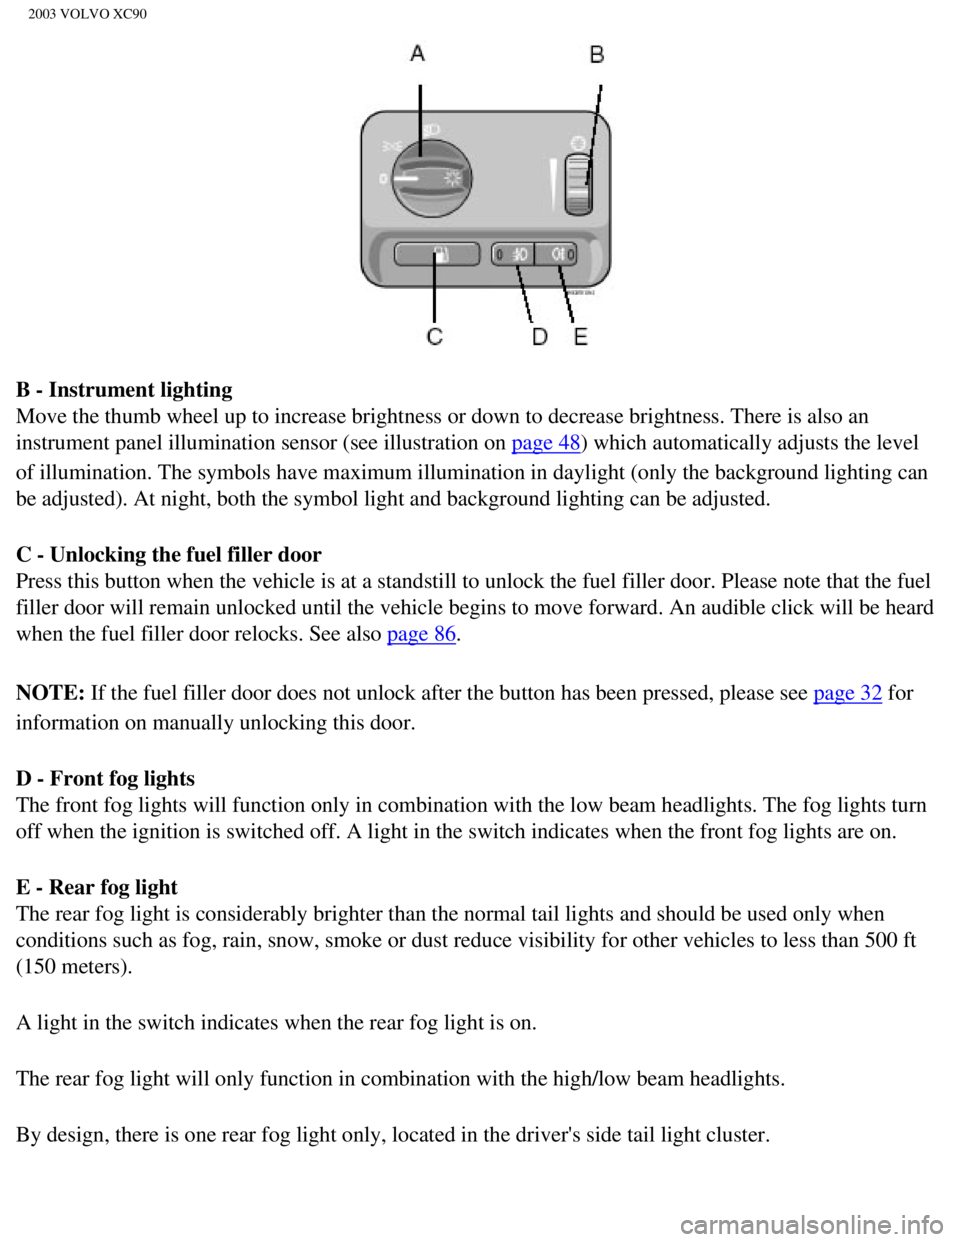
B - Instrument lighting
Move the thumb wheel up to increase brightness or down to decrease brigh\
tness. There is also an
instrument panel illumination sensor (see illustration on
page 48) which automatically adjusts the level
of illumination. The symbols have maximum illumination in daylight (onl\
y the background lighting can
be adjusted). At night, both the symbol light and background lighting c\
an be adjusted.
C - Unlocking the fuel filler door
Press this button when the vehicle is at a standstill to unlock the fuel\
filler door. Please note that the fuel
filler door will remain unlocked until the vehicle begins to move forwar\
d. An audible click will be heard
when the fuel filler door relocks. See also
page 86.
NOTE: If the fuel filler door does not unlock after the button has been press\
ed, please see
page 32 for
information on manually unlocking this door.
D - Front fog lights
The front fog lights will function only in combination with the low beam\
headlights. The fog lights turn
off when the ignition is switched off. A light in the switch indicates w\
hen the front fog lights are on.
E - Rear fog light
The rear fog light is considerably brighter than the normal tail lights \
and should be used only when
conditions such as fog, rain, snow, smoke or dust reduce visibility for \
other vehicles to less than 500 ft
(150 meters).
A light in the switch indicates when the rear fog light is on.
The rear fog light will only function in combination with the high/low b\
eam headlights.
By design, there is one rear fog light only, located in the driver's sid\
e tail light cluster.
file:///K|/ownersdocs/2003/2003_XC90/03xc90_02a.htm (12 of 16)12/30/20\
06 4:18:52 PM
Page 47 of 242

2003 VOLVO XC90
pg. 32 Instruments and controls
Manually unlocking the fuel filler door
Panel on passenger's side of cargo area
Manually unlocking the fuel filler door
NOTE: Cotton gloves are available in the tool kit located in the spare wheel \
well.
1. Open the upper and lower sections of the tailgate, and fold up the re\
ar section of the cargo area floor.
2. If the vehicle is equipped with the optional grocery bag holder, deta\
ch the holder's bands.
3. Remove the corner panel (1) from the floor of the cargo area.
4. Open the cover (2) in the side panel by pulling the tab (3) upwar\
d/outward.
file:///K|/ownersdocs/2003/2003_XC90/03xc90_02a.htm (13 of 16)12/30/20\
06 4:18:52 PM
Page 48 of 242
2003 VOLVO XC90
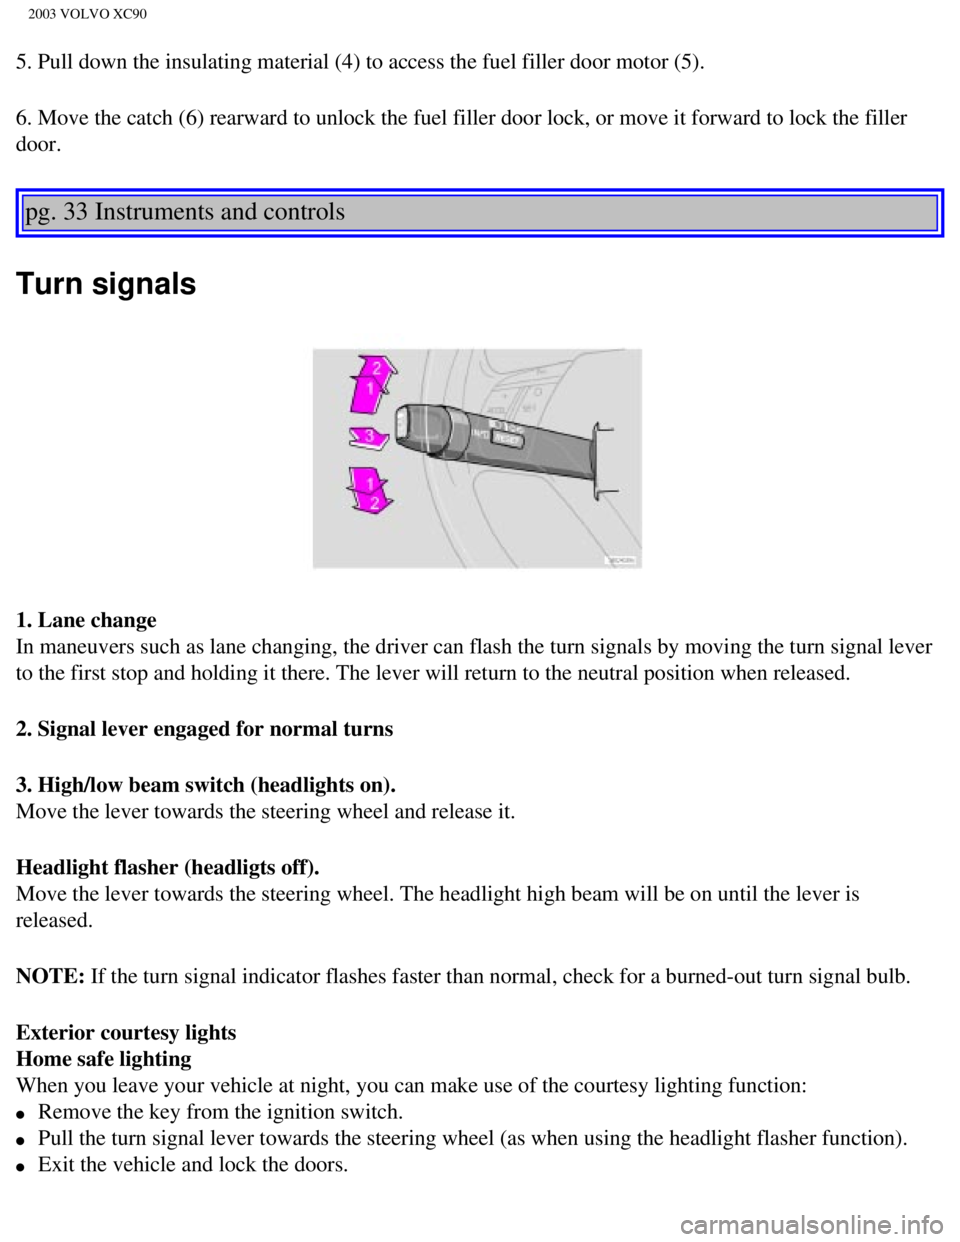
5. Pull down the insulating material (4) to access the fuel filler doo\
r motor (5).
6. Move the catch (6) rearward to unlock the fuel filler door lock, or\
move it forward to lock the filler
door.
pg. 33 Instruments and controls
Turn signals
1. Lane change
In maneuvers such as lane changing, the driver can flash the turn signal\
s by moving the turn signal lever
to the first stop and holding it there. The lever will return to the neu\
tral position when released.
2. Signal lever engaged for normal turns
3. High/low beam switch (headlights on).
Move the lever towards the steering wheel and release it.
Headlight flasher (headligts off).
Move the lever towards the steering wheel. The headlight high beam will \
be on until the lever is
released.
NOTE: If the turn signal indicator flashes faster than normal, check for a bur\
ned-out turn signal bulb.
Exterior courtesy lights
Home safe lighting
When you leave your vehicle at night, you can make use of the courtesy l\
ighting function:
l Remove the key from the ignition switch.
l Pull the turn signal lever towards the steering wheel (as when using th\
e headlight flasher function).
l Exit the vehicle and lock the doors.
file:///K|/ownersdocs/2003/2003_XC90/03xc90_02a.htm (14 of 16)12/30/20\
06 4:18:52 PM
Page 49 of 242
2003 VOLVO XC90
The headlights, parking lights, license plate lights and the lights in t\
he sideview mirrors will now come
on and remain on for 30, 60 or 90 seconds (the time interval is at your\
discretion and can be changed by
an authorized Volvo retailer).
Approach lighting
When approaching the vehicle at night, press the yellow button in the ce\
ntral locking remote control (see
illustration on
page 75). This lights up the interior courtesy lights, parking lights, license\
plate lights and
the lights in the sideview mirrors.
pg. 34 Instruments and controls
Windshield wipers
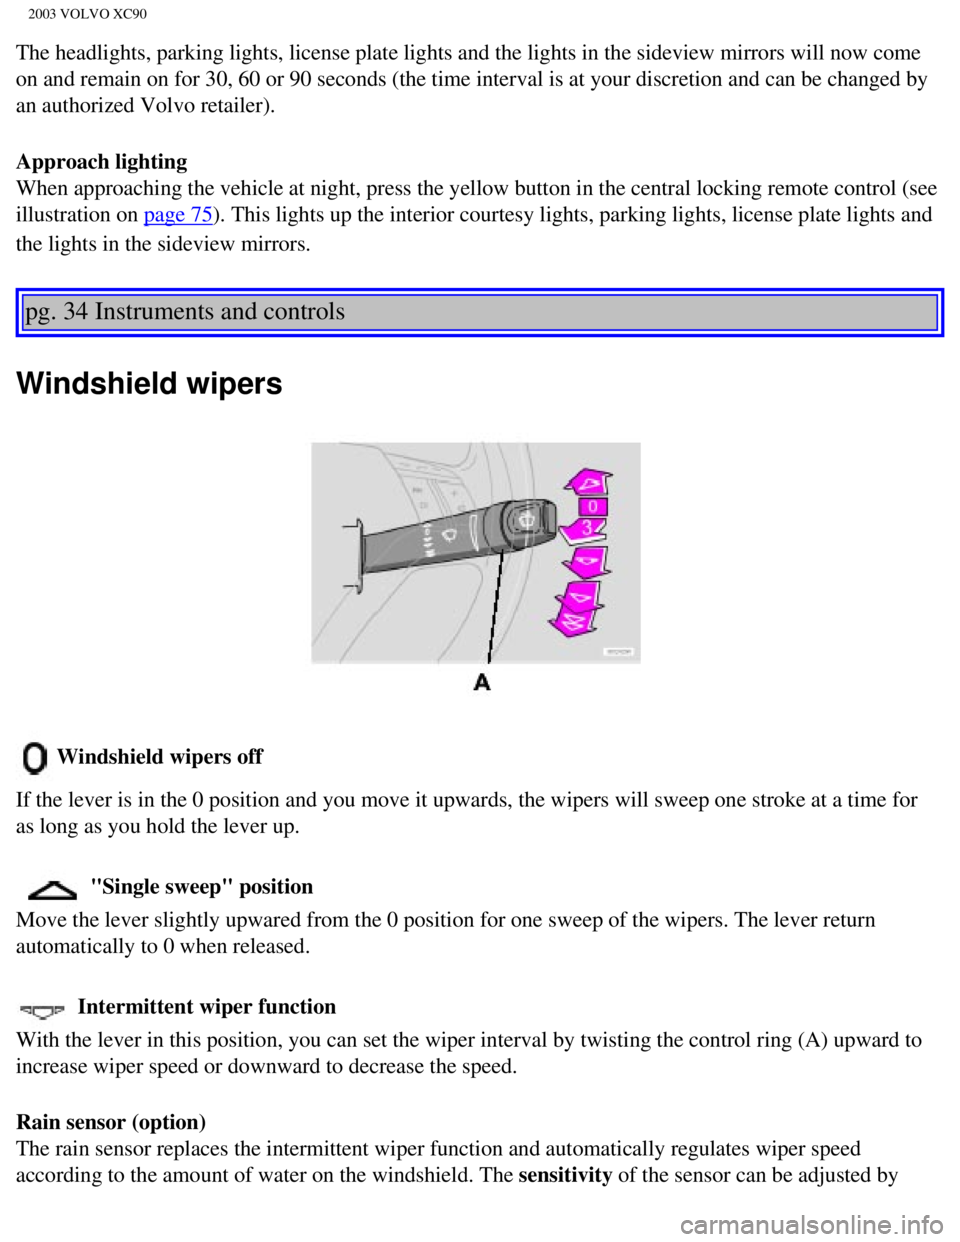
Windshield wipers off
If the lever is in the 0 position and you move it upwards, the wipers wi\
ll sweep one stroke at a time for
as long as you hold the lever up.
"Single sweep" position
Move the lever slightly upwared from the 0 position for one sweep of the\
wipers. The lever return
automatically to 0 when released.
Intermittent wiper function
With the lever in this position, you can set the wiper interval by twist\
ing the control ring (A) upward to
increase wiper speed or downward to decrease the speed.
Rain sensor (option)
The rain sensor replaces the intermittent wiper function and automatical\
ly regulates wiper speed
according to the amount of water on the windshield. The sensitivity of the sensor can be adjusted by
file:///K|/ownersdocs/2003/2003_XC90/03xc90_02a.htm (15 of 16)12/30/20\
06 4:18:52 PM
Page 50 of 242
2003 VOLVO XC90
twisting collar A upward or downward.
Activating the rain sensor function:
1. Switch on the ignition.
2. Move the windshield wiper lever to the intermittent position.
The rain sensor is deactivated when the ignition is switched completely \
off.
To reactivate the rain sensor function:
1. Switch on the ignition.
2. Move the windshield wiper lever to position 0 and then back to the in\
termittent position. CAUTION
When washing the vehicle in an automatic car wash, move the windshield w\
iper lever to
position 0 to deactivate the rain sensor. If the rain sensor is left on, the wipers will activate in the
car wash and could be damaged.
Wipers operate at "normal" speed
Wipers operate at "high" speed
3 - Windshield washer/headlight washer (certain models)
Pull the lever toward you and release it. High pressure jets mounted in \
the bumper will spray the
headlights.
Contents | Top of Page
file:///K|/ownersdocs/2003/2003_XC90/03xc90_02a.htm (16 of 16)12/30/20\
06 4:18:52 PM