display VOLVO XC90 2004 Owner's Manual
[x] Cancel search | Manufacturer: VOLVO, Model Year: 2004, Model line: XC90, Model: VOLVO XC90 2004Pages: 245, PDF Size: 6.36 MB
Page 137 of 245
2004 VOLVO XC90
state of charge more frequently and spray an antirust oil on the battery\
posts.
l Volvo recommends the use of snow tires on all four wheels for winter driving - see section "Wheels
and tires."
l To prevent the washer fluid reservoir from freezing, add washer solvents containing antifreeze (see
page 126 for the location of the washer fluid reservoir).
This is important since dirt is often splashed on the windshield during \
winter driving, requiring the
frequent use of the washers and wipers. Volvo Washer Solvent should be d\
iluted as follows:
Down to 14° F (-10° C): 1 part washer solvent and 4 parts water \
Down to 5° F (-15° C): 1 part washer solvent and 3 parts water
Down to 0° F (-18° C): 1 part washer solvent and 2 parts water
Down to -18° F (-28° C): 1 part washer solvent and 1 part water \
l Use Volvo Teflon Lock Spray in the locks.
NOTE: Avoid the use of de-icing sprays as they can cause damage to the locks.
W Winter/Wet driving mode-enhanced vehicle traction
l Mode W will only function if the gear selector is in the (D)rive position.
l Press the button at the base of the gear selector to engage/disengage th\
is driving mode.
l An LED in the button will light up to indicate that W is engaged and thi\
s will also be displayed in the
instrument panel (see
page 24).
l This mode may be selected for starting/moving off on slippery roads.
* Synthetic oil is not used when the oil is changed at the normal mainte\
nance intervals except at owner
request and at additional charge. Please consult your Volvo retailer.
pg. 106 Starting and driving
Before a long distance trip
It is always worthwhile to have your vehicle checked at a Volvo retailer\
before driving long distances.
Your retailer will also be able to supply you with bulbs, fuses, spark p\
lugs and wiper blades for your use
in the event that problems occur.
As a minimum, the following items should be checked before any long trip\
:
l Check that engine runs smoothly and that fuel consumption is normal.
l Check for fuel, oil, and fluid leakage
l Check transmission oil level*.
l Check condition of drive belts.
l Check state of the battery's charge.
l Examine tires carefully (the spare tire as well), and replace those th\
at are worn. Check tire pressures.
l The brakes, front wheel alignment, and steering gear should be checked b\
y your Volvo retailer only.
file:///K|/ownersdocs/2004/2004_XC90/04xc90_06b.htm (16 of 17)12/30/20\
06 4:35:23 PM
Page 206 of 245
2004 VOLVO XC90
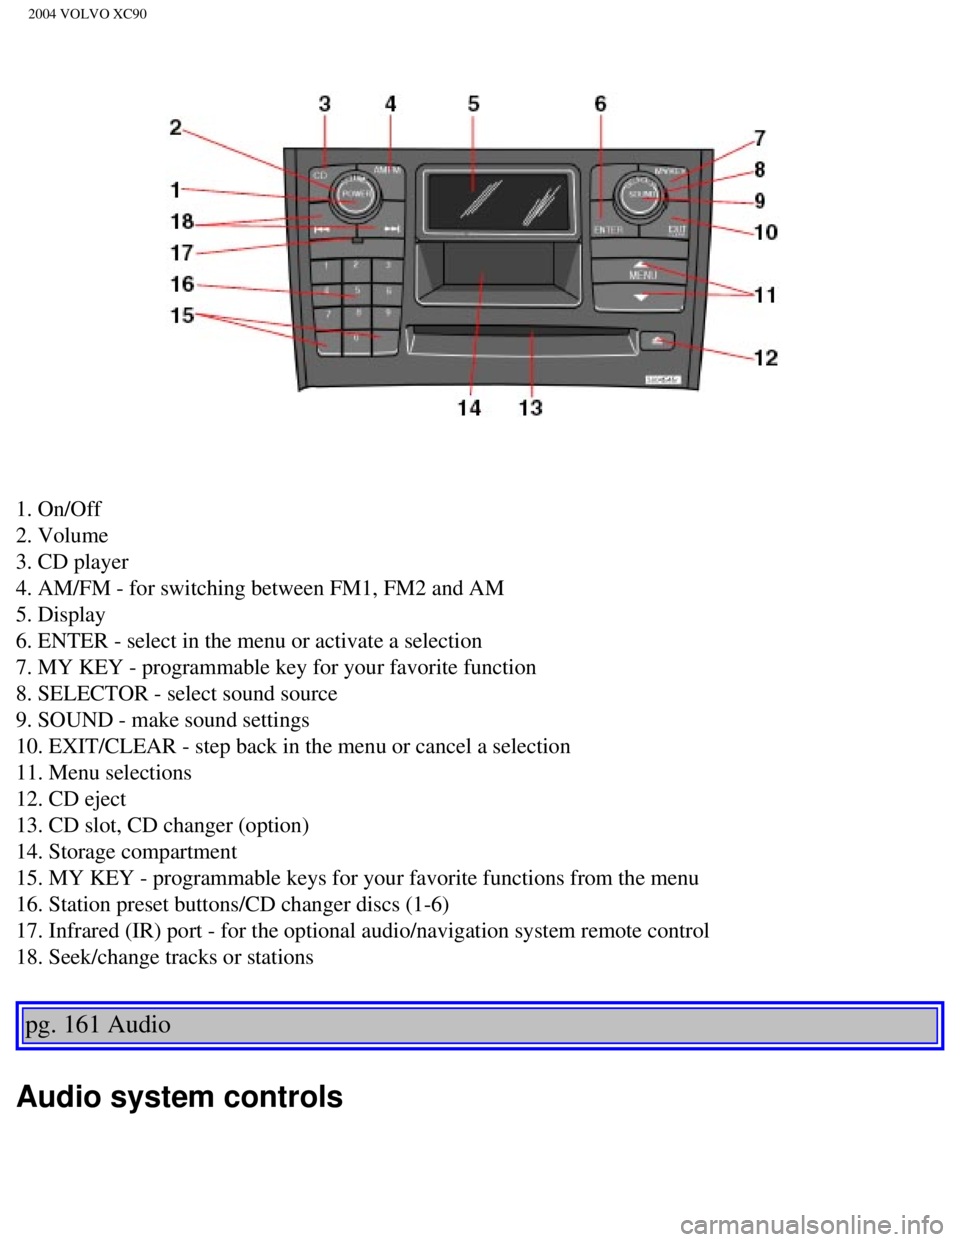
1. On/Off
2. Volume
3. CD player
4. AM/FM - for switching between FM1, FM2 and AM
5. Display
6. ENTER - select in the menu or activate a selection
7. MY KEY - programmable key for your favorite function
8. SELECTOR - select sound source
9. SOUND - make sound settings
10. EXIT/CLEAR - step back in the menu or cancel a selection
11. Menu selections
12. CD eject
13. CD slot, CD changer (option)
14. Storage compartment
15. MY KEY - programmable keys for your favorite functions from the menu\
16. Station preset buttons/CD changer discs (1-6)
17. Infrared (IR) port - for the optional audio/navigation system remo\
te control
18. Seek/change tracks or stations
pg. 161 Audio
Audio system controls
file:///K|/ownersdocs/2004/2004_XC90/04xc90_11a.htm (2 of 17)12/30/200\
6 4:35:31 PM
Page 207 of 245
2004 VOLVO XC90
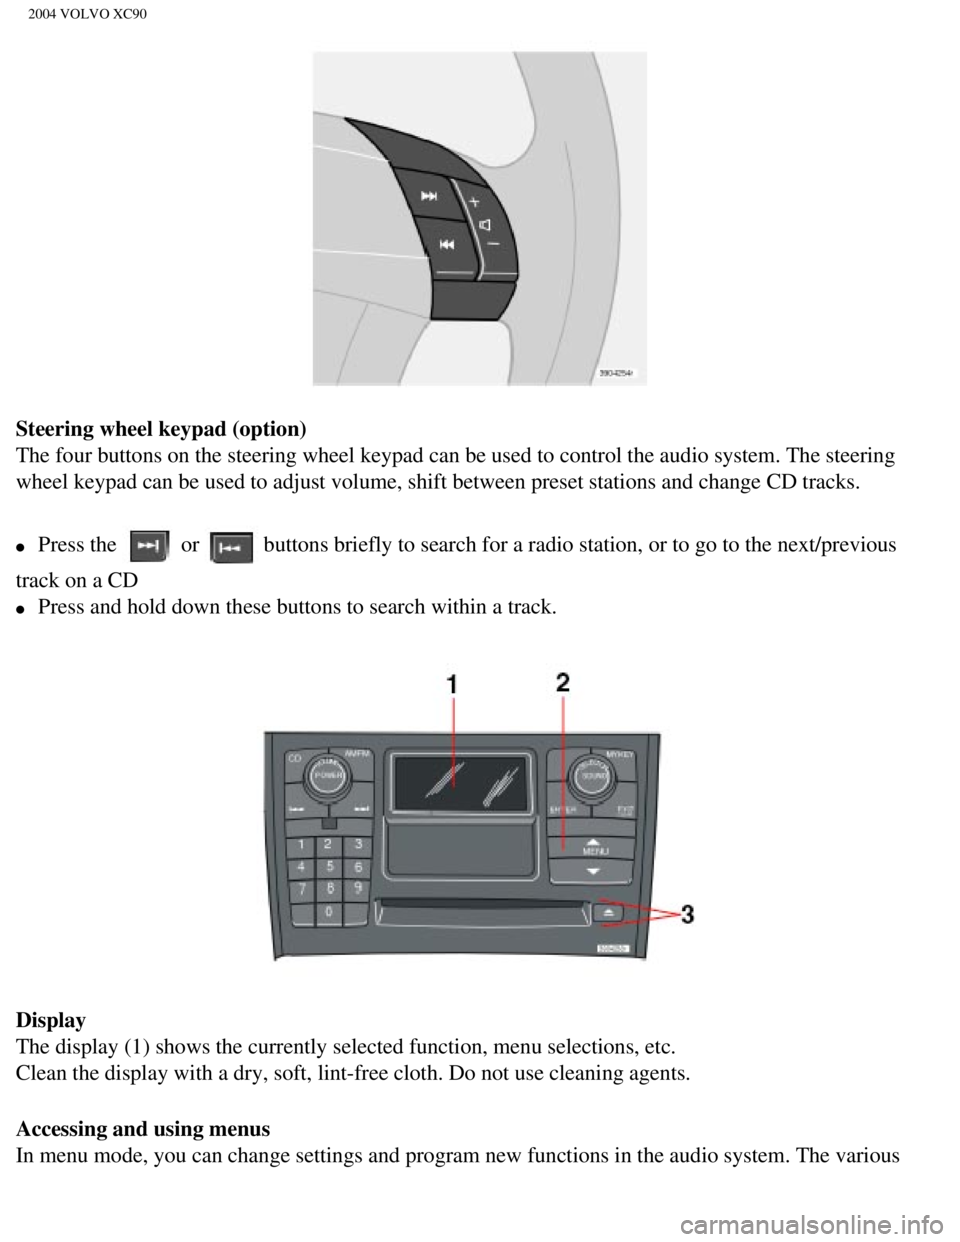
Steering wheel keypad (option)
The four buttons on the steering wheel keypad can be used to control the\
audio system. The steering
wheel keypad can be used to adjust volume, shift between preset stations\
and change CD tracks.
l Press the or buttons briefly to search for a radio station, or to go to the next/pre\
vious
track on a CD
l Press and hold down these buttons to search within a track.
Display
The display (1) shows the currently selected function, menu selections\
, etc.
Clean the display with a dry, soft, lint-free cloth. Do not use cleaning\
agents.
Accessing and using menus
In menu mode, you can change settings and program new functions in the a\
udio system. The various
file:///K|/ownersdocs/2004/2004_XC90/04xc90_11a.htm (3 of 17)12/30/200\
6 4:35:31 PM
Page 208 of 245
2004 VOLVO XC90
menu alternatives are shown in the display.
Press the menu button (2) to enter menu mode. Use the menus as follows\
:
l Use the menu keys (3) to navigate up or down in the menus. Dots in the\
display indicated that there
are more menu selections from which to choose.
l One long press on EXIT/CLEAR exits menu mode.
l A short press on the EXIT/CLEAR enables you to cancel, undo, or answer n\
o to a menu selection, or
to go back in the menu structure.
l Pressing ENTER confirms a menu selection, or takes you to the next subme\
nu.
pg. 162 Audio
Audio system controls (contd)
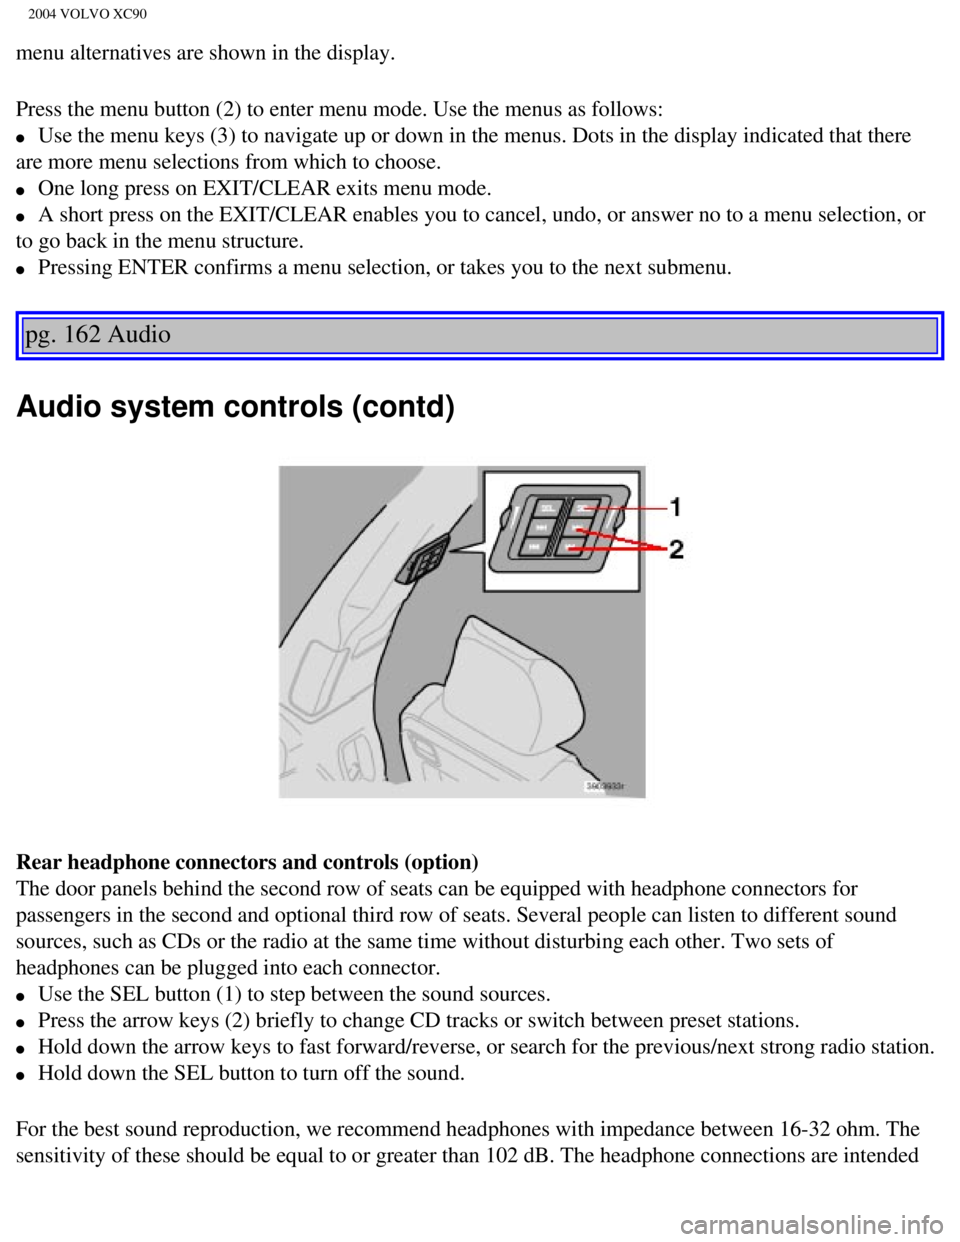
Rear headphone connectors and controls (option)
The door panels behind the second row of seats can be equipped with head\
phone connectors for
passengers in the second and optional third row of seats. Several people\
can listen to different sound
sources, such as CDs or the radio at the same time without disturbing ea\
ch other. Two sets of
headphones can be plugged into each connector.
l Use the SEL button (1) to step between the sound sources.
l Press the arrow keys (2) briefly to change CD tracks or switch between\
preset stations.
l Hold down the arrow keys to fast forward/reverse, or search for the prev\
ious/next strong radio station.
l Hold down the SEL button to turn off the sound.
For the best sound reproduction, we recommend headphones with impedance \
between 16-32 ohm. The
sensitivity of these should be equal to or greater than 102 dB. The head\
phone connections are intended
file:///K|/ownersdocs/2004/2004_XC90/04xc90_11a.htm (4 of 17)12/30/200\
6 4:35:31 PM
Page 209 of 245
2004 VOLVO XC90
for 3.5 mm contacts and are located under the lower edge of the socket.
All headphones are automatically turned off when the ignition is switche\
d off. They must be manually
restarted when the ignition is switched on again.
Headphones - limitations
l The headphones will only work when the ignition key is in position I or \
higher.
l If a set of headphones is connected to the same source that is being sen\
t through the speakers, the
headphone controls cannot be used to change track or station. This is to\
prevent the driver from being
distracted by an unexpected change in music.
l If the driver selects the same sound source as someone listening to this\
source through headphones,
the driver takes control of the sound source.
l Only one disc in the optional CD changer, and one track on the CD can be\
played at a time.
l Headphone users can choose from among the preset radio stations (AM, FM\
1, FM2) previously set by
the driver.
l If FM is played in the speakers, AM is not available and vice versa.
pg. 163 Audio
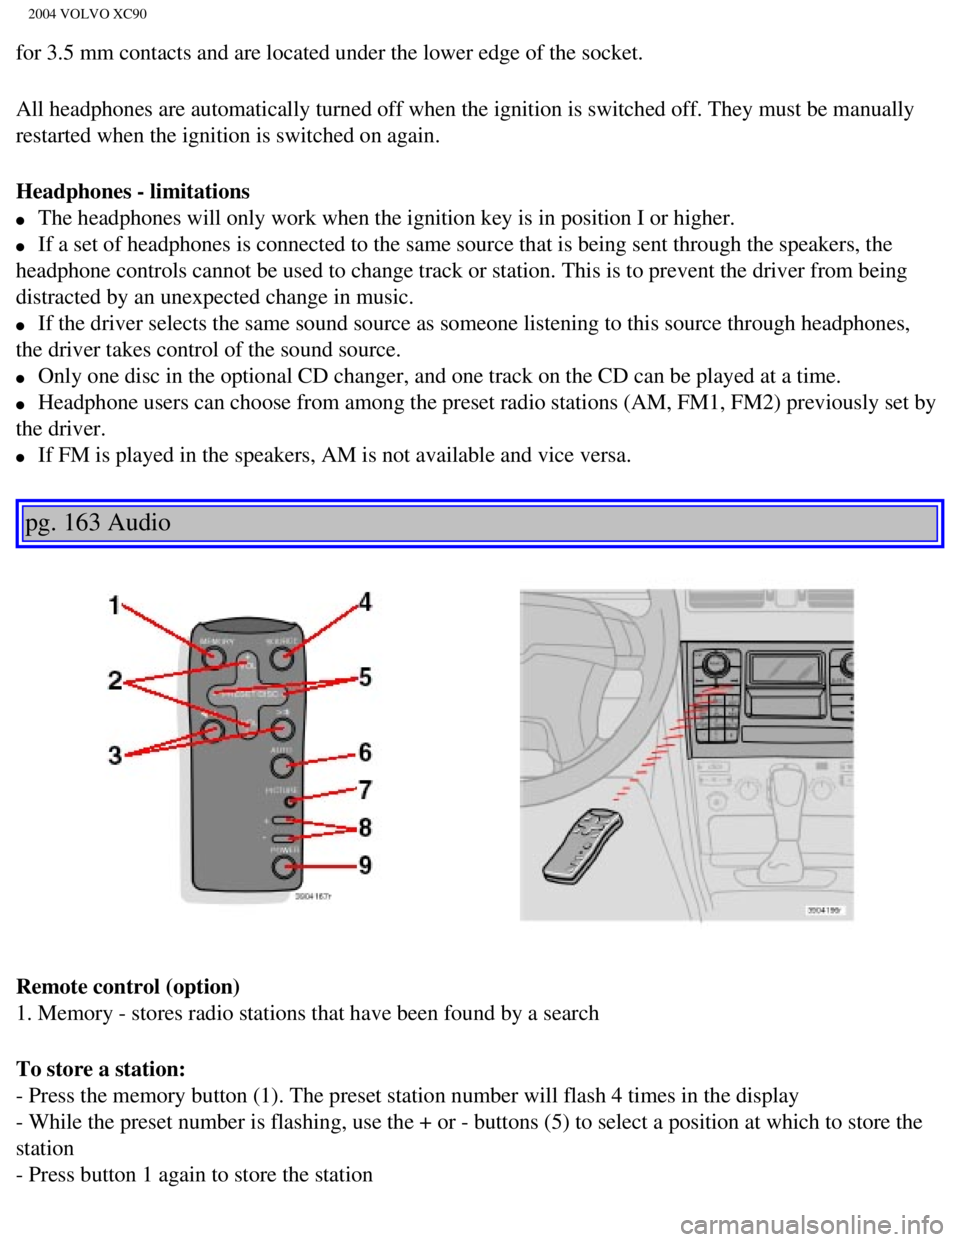
Remote control (option)
1. Memory - stores radio stations that have been found by a search
To store a station:
- Press the memory button (1). The preset station number will flash 4 \
times in the display
- While the preset number is flashing, use the + or - buttons (5) to s\
elect a position at which to store the
station
- Press button 1 again to store the station
file:///K|/ownersdocs/2004/2004_XC90/04xc90_11a.htm (5 of 17)12/30/200\
6 4:35:31 PM
Page 211 of 245
2004 VOLVO XC90
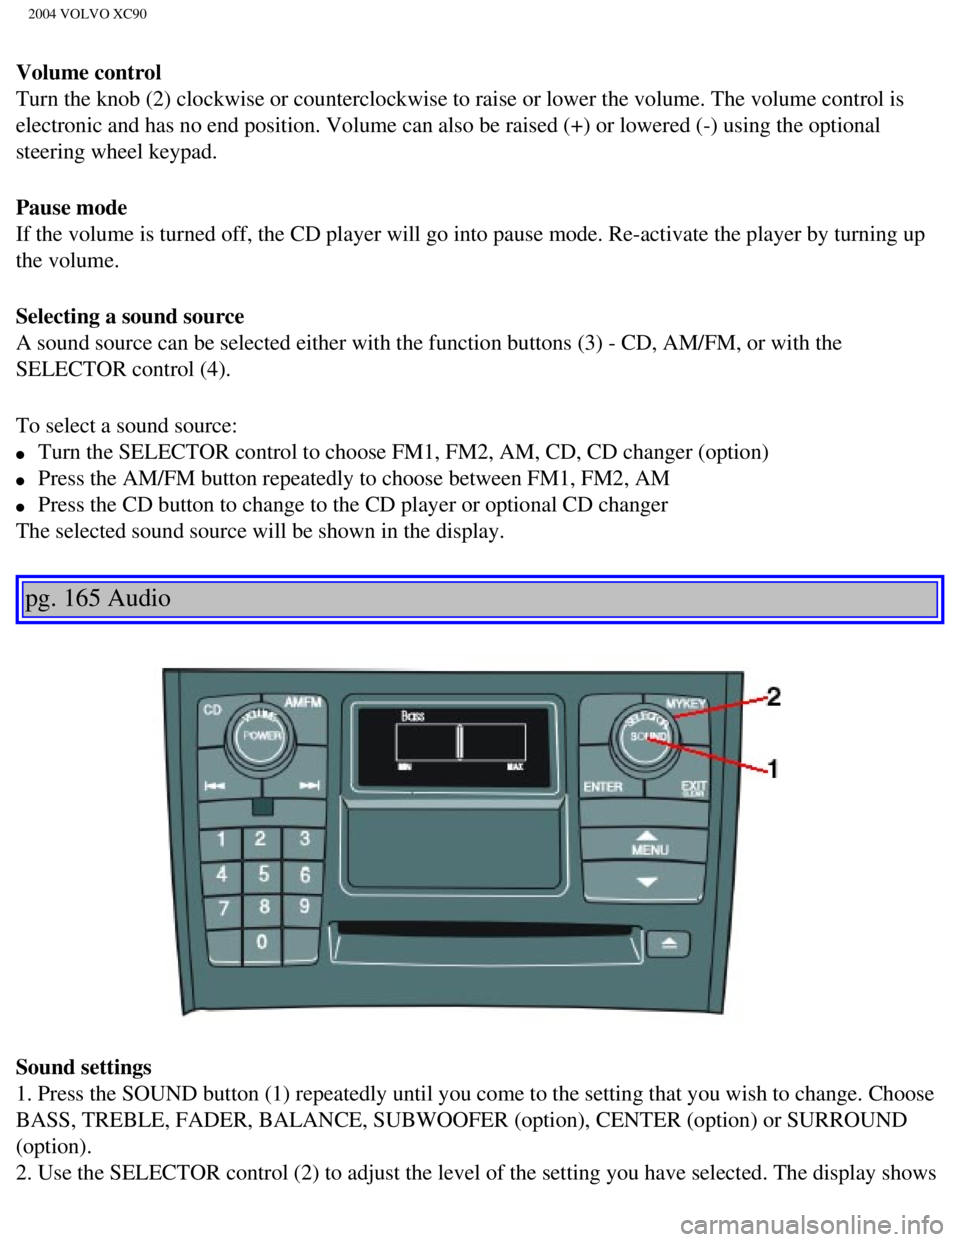
Volume control
Turn the knob (2) clockwise or counterclockwise to raise or lower the \
volume. The volume control is
electronic and has no end position. Volume can also be raised (+) or l\
owered (-) using the optional
steering wheel keypad.
Pause mode
If the volume is turned off, the CD player will go into pause mode. Re-a\
ctivate the player by turning up
the volume.
Selecting a sound source
A sound source can be selected either with the function buttons (3) - \
CD, AM/FM, or with the
SELECTOR control (4).
To select a sound source:
l Turn the SELECTOR control to choose FM1, FM2, AM, CD, CD changer (optio\
n)
l Press the AM/FM button repeatedly to choose between FM1, FM2, AM
l Press the CD button to change to the CD player or optional CD changer
The selected sound source will be shown in the display.
pg. 165 Audio
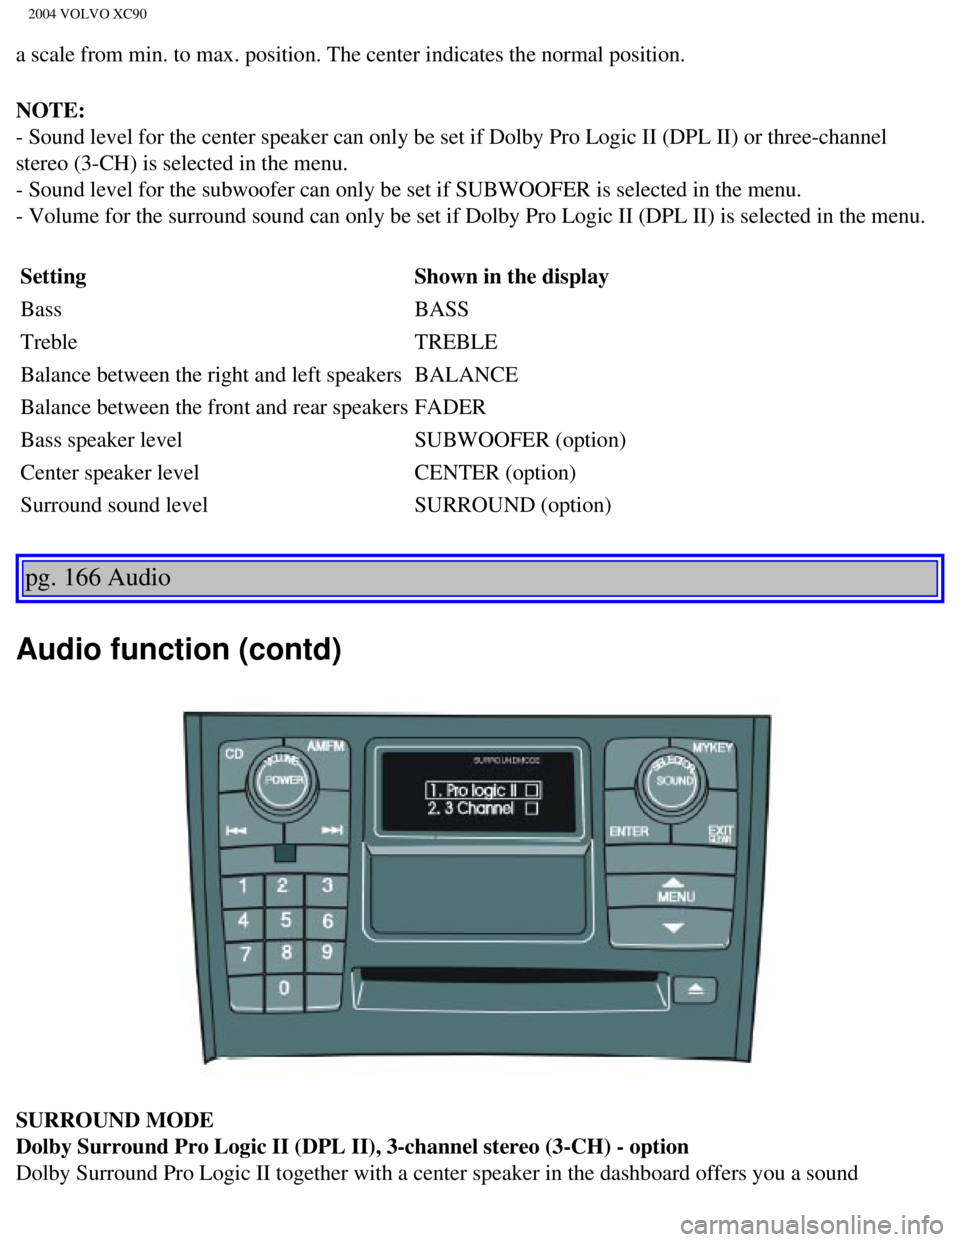
Sound settings
1. Press the SOUND button (1) repeatedly until you come to the setting\
that you wish to change. Choose
BASS, TREBLE, FADER, BALANCE, SUBWOOFER (option), CENTER (option) or\
SURROUND
(option).
2. Use the SELECTOR control (2) to adjust the level of the setting you\
have selected. The display shows
file:///K|/ownersdocs/2004/2004_XC90/04xc90_11a.htm (7 of 17)12/30/200\
6 4:35:31 PM
Page 212 of 245
2004 VOLVO XC90
a scale from min. to max. position. The center indicates the normal posi\
tion.
NOTE:
- Sound level for the center speaker can only be set if Dolby Pro Logic \
II (DPL II) or three-channel
stereo (3-CH) is selected in the menu.
- Sound level for the subwoofer can only be set if SUBWOOFER is selected\
in the menu.
- Volume for the surround sound can only be set if Dolby Pro Logic II (\
DPL II) is selected in the menu. Setting Shown in the display
Bass BASS
Treble TREBLE
Balance between the right and left speakers BALANCE
Balance between the front and rear speakers FADER
Bass speaker level SUBWOOFER (option)
Center speaker level CENTER (option)
Surround sound level SURROUND (option)
pg. 166 Audio
Audio function (contd)
SURROUND MODE
Dolby Surround Pro Logic II (DPL II), 3-channel stereo (3-CH) - opti\
on
Dolby Surround Pro Logic II together with a center speaker in the dashbo\
ard offers you a sound
file:///K|/ownersdocs/2004/2004_XC90/04xc90_11a.htm (8 of 17)12/30/200\
6 4:35:31 PM
Page 213 of 245
2004 VOLVO XC90
experience very close to a live performance. The normal left-right stere\
o channels are divided to left-
center-right. In addition, surround sound is produced by the rear speake\
rs. This surround sound mirrors
the resonance of a concert hall. Dolby Surround Pro Logic II functions i\
n CD mode. 3-channel stereo is
recommended for FM and AM radio broadcasts.
Dolby Surround Pro Logic II is only available on the highest level audio\
system - Premium Sound.
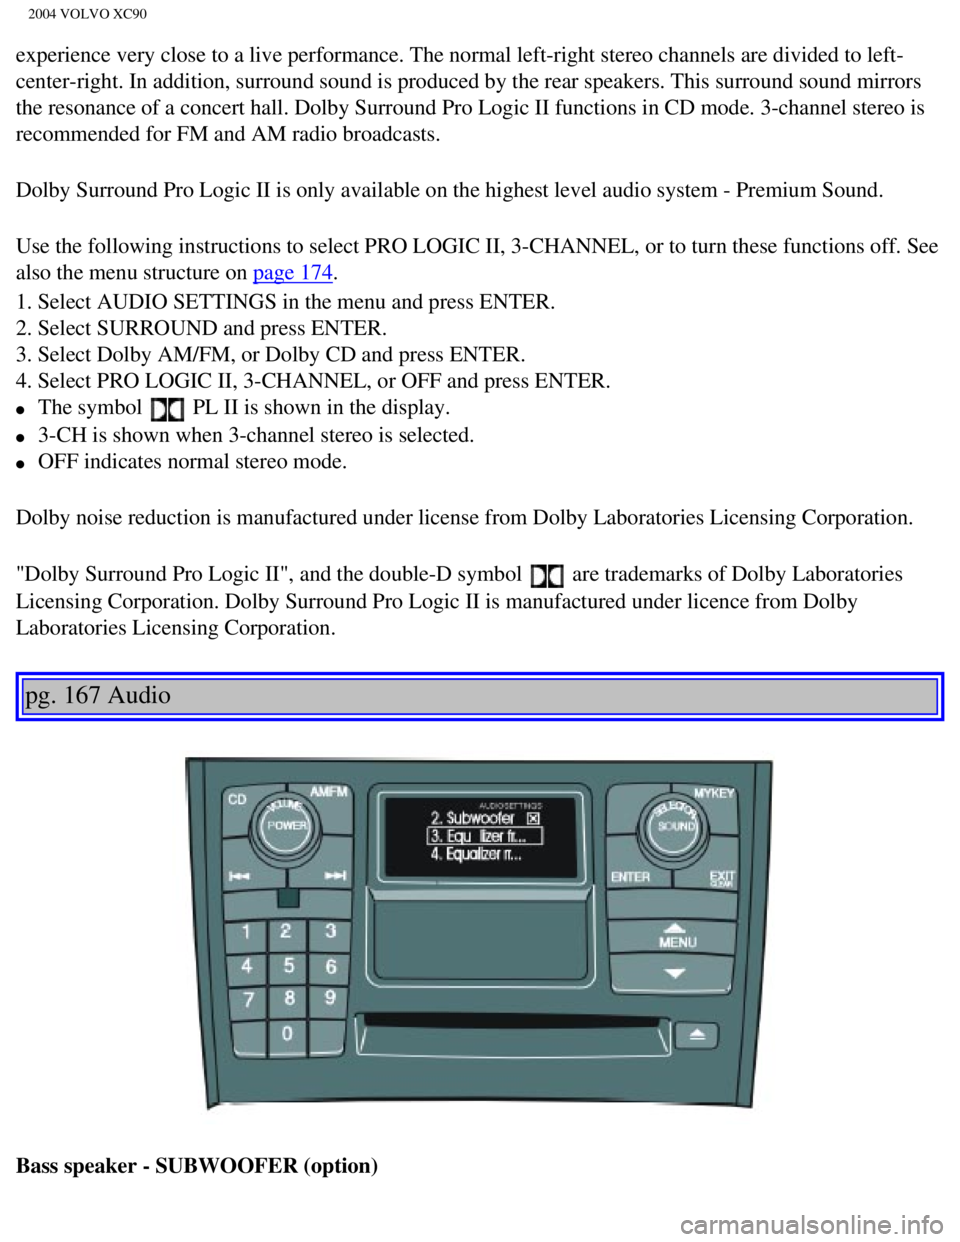
Use the following instructions to select PRO LOGIC II, 3-CHANNEL, or to \
turn these functions off. See
also the menu structure on
page 174.
1. Select AUDIO SETTINGS in the menu and press ENTER.
2. Select SURROUND and press ENTER.
3. Select Dolby AM/FM, or Dolby CD and press ENTER.
4. Select PRO LOGIC II, 3-CHANNEL, or OFF and press ENTER.
l The symbol PL II is shown in the display.
l 3-CH is shown when 3-channel stereo is selected.
l OFF indicates normal stereo mode.
Dolby noise reduction is manufactured under license from Dolby Laborator\
ies Licensing Corporation.
"Dolby Surround Pro Logic II", and the double-D symbol
are trademarks of Dolby Laboratories
Licensing Corporation. Dolby Surround Pro Logic II is manufactured under\
licence from Dolby
Laboratories Licensing Corporation.
pg. 167 Audio
Bass speaker - SUBWOOFER (option)
file:///K|/ownersdocs/2004/2004_XC90/04xc90_11a.htm (9 of 17)12/30/200\
6 4:35:31 PM
Page 215 of 245
2004 VOLVO XC90
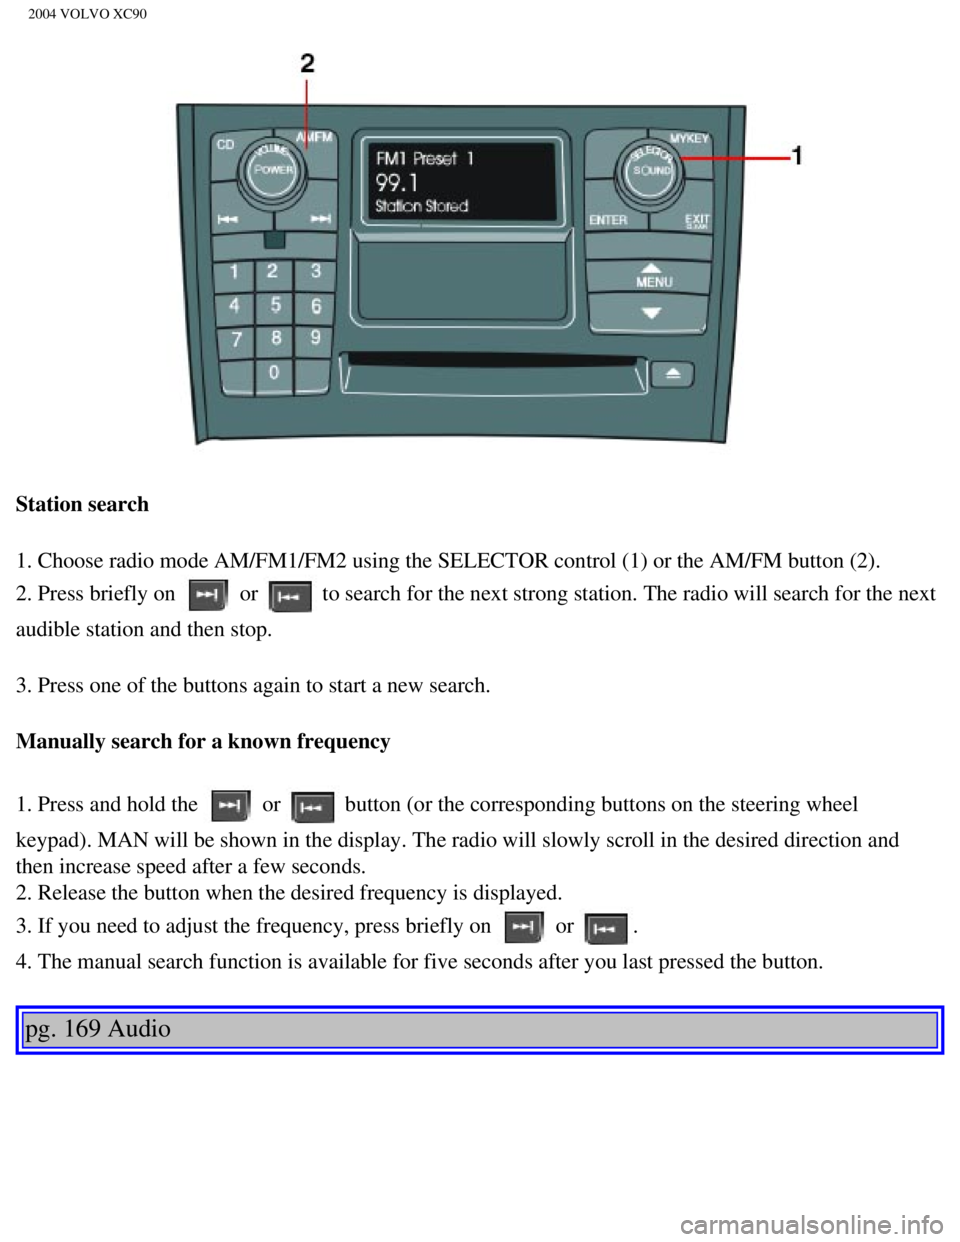
Station search
1. Choose radio mode AM/FM1/FM2 using the SELECTOR control (1) or the \
AM/FM button (2).
2. Press briefly on
or to search for the next strong station. The radio will search for the ne\
xt
audible station and then stop.
3. Press one of the buttons again to start a new search.
Manually search for a known frequency
1. Press and hold the
or button (or the corresponding buttons on the steering wheel
keypad). MAN will be shown in the display. The radio will slowly scroll\
in the desired direction and
then increase speed after a few seconds.
2. Release the button when the desired frequency is displayed.
3. If you need to adjust the frequency, press briefly on
or .
4. The manual search function is available for five seconds after you la\
st pressed the button.
pg. 169 Audio
file:///K|/ownersdocs/2004/2004_XC90/04xc90_11a.htm (11 of 17)12/30/20\
06 4:35:31 PM
Page 216 of 245
2004 VOLVO XC90
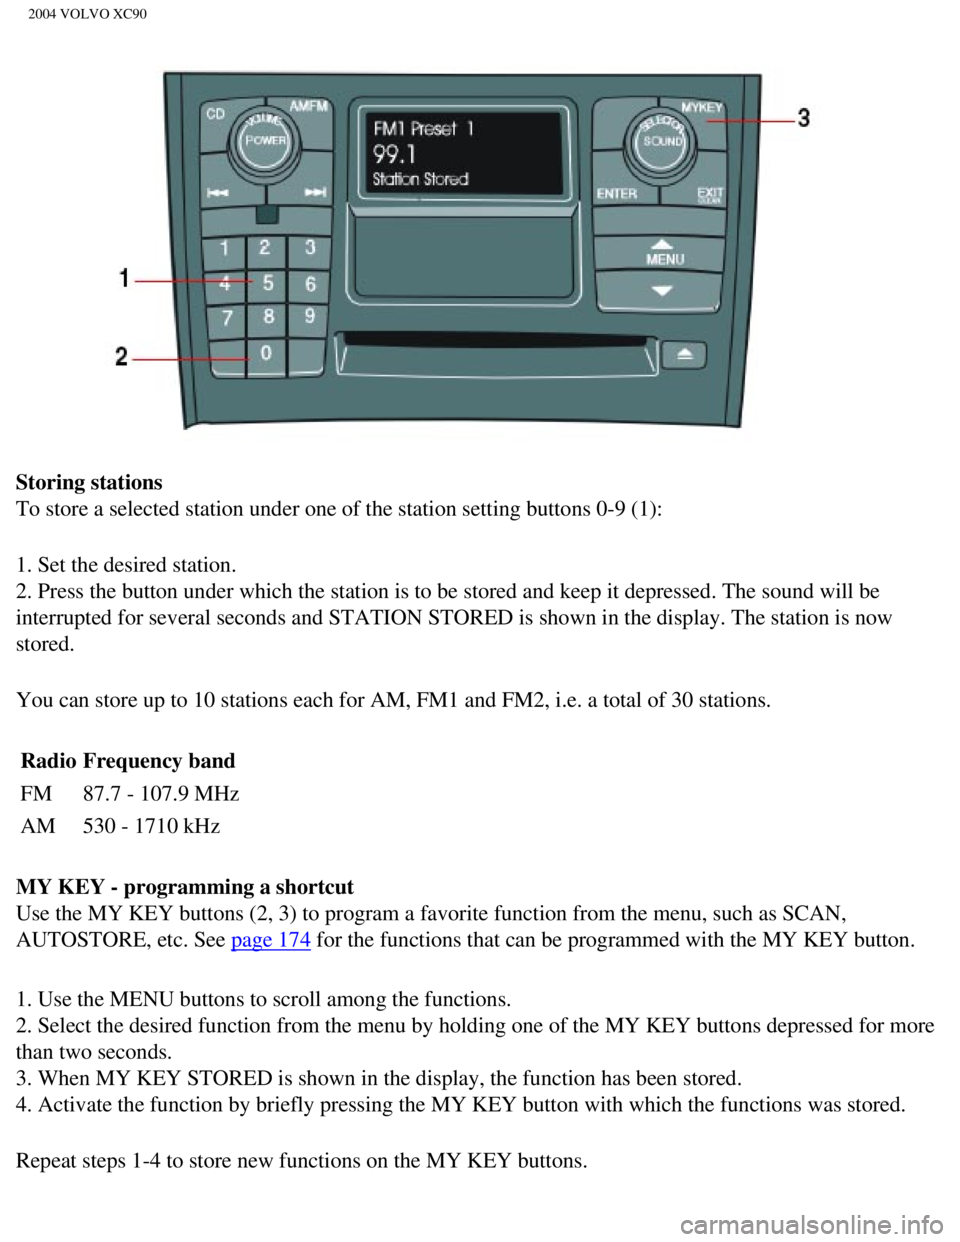
Storing stations
To store a selected station under one of the station setting buttons 0-9\
(1):
1. Set the desired station.
2. Press the button under which the station is to be stored and keep it \
depressed. The sound will be
interrupted for several seconds and STATION STORED is shown in the displ\
ay. The station is now
stored.
You can store up to 10 stations each for AM, FM1 and FM2, i.e. a total o\
f 30 stations. Radio Frequency band
FM 87.7 - 107.9 MHz
AM 530 - 1710 kHz
MY KEY - programming a shortcut
Use the MY KEY buttons (2, 3) to program a favorite function from the \
menu, such as SCAN,
AUTOSTORE, etc. See
page 174 for the functions that can be programmed with the MY KEY button.
1. Use the MENU buttons to scroll among the functions.
2. Select the desired function from the menu by holding one of the MY KE\
Y buttons depressed for more
than two seconds.
3. When MY KEY STORED is shown in the display, the function has been sto\
red.
4. Activate the function by briefly pressing the MY KEY button with whic\
h the functions was stored.
Repeat steps 1-4 to store new functions on the MY KEY buttons.
file:///K|/ownersdocs/2004/2004_XC90/04xc90_11a.htm (12 of 17)12/30/20\
06 4:35:31 PM