ESP VOLVO XC90 2006 Repair Manual
[x] Cancel search | Manufacturer: VOLVO, Model Year: 2006, Model line: XC90, Model: VOLVO XC90 2006Pages: 254, PDF Size: 8.43 MB
Page 175 of 254
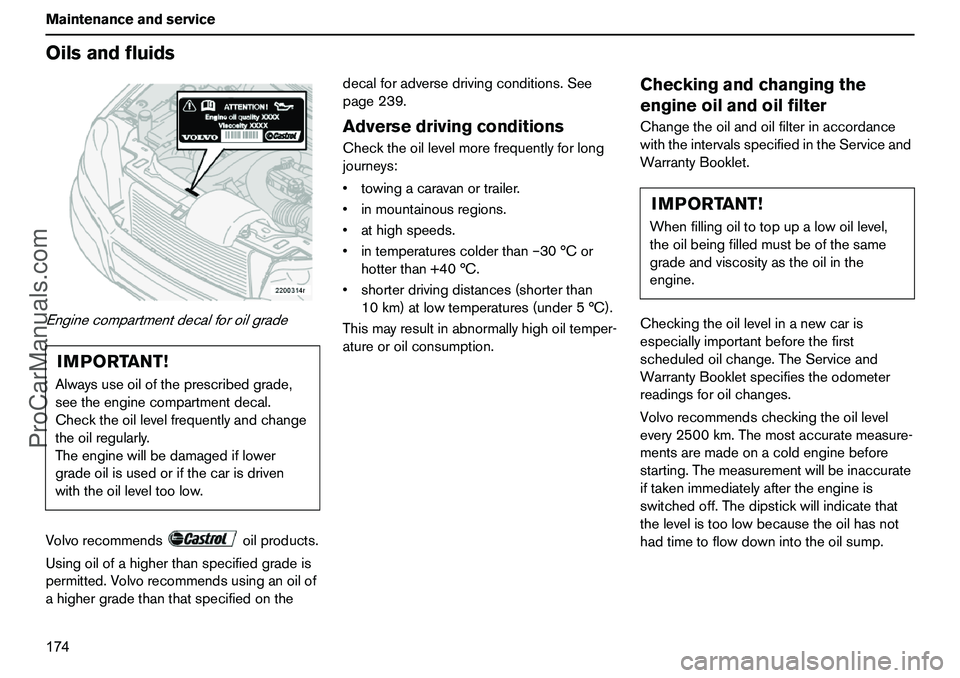
174 MaintenanceandserviceOilsandfluidsEnginecompartmentdecalforoilgradeVolvorecommendsoilproducts.
Usingoilofahigherthanspecifiedgradeis
permitted.Volvorecommendsusinganoilof
ahighergradethanthatspecifiedonthedecalforadversedrivingconditions.See
page239.
AdversedrivingconditionsChecktheoillevelmorefrequentlyforlong
journeys:
towingacaravanortrailer.
inmountainousregions.
athighspeeds.
intemperaturescolderthan–30°Cor
hotterthan+40°C.
shorterdrivingdistances(shorterthan
10km)atlowtemperatures(under5°C).
Thismayresultinabnormallyhighoiltemper-
atureoroilconsumption.
Checkingandchangingthe
engineoilandoilfilterChangetheoilandoilfilterinaccordance
withtheintervalsspecifiedintheServiceand
WarrantyBooklet.
Checkingtheoillevelinanewcaris
especiallyimportantbeforethefirst
scheduledoilchange.TheServiceand
WarrantyBookletspecifiestheodometer
readingsforoilchanges.
Volvorecommendscheckingtheoillevel
every2500km.Themostaccuratemeasure-
mentsaremadeonacoldenginebefore
starting.Themeasurementwillbeinaccurate
iftakenimmediatelyaftertheengineis
switchedoff.Thedipstickwillindicatethat
thelevelistoolowbecausetheoilhasnot
hadtimetoflowdownintotheoilsump.
IMPORTANT!Alwaysuseoiloftheprescribedgrade,
seetheenginecompartmentdecal.
Checktheoillevelfrequentlyandchange
theoilregularly.
Theenginewillbedamagediflower
gradeoilisusedorifthecarisdriven
withtheoilleveltoolow.
IMPORTANT!Whenfillingoiltotopupalowoillevel,
theoilbeingfilledmustbeofthesame
gradeandviscosityastheoilinthe
engine.
ProCarManuals.com
Page 179 of 254
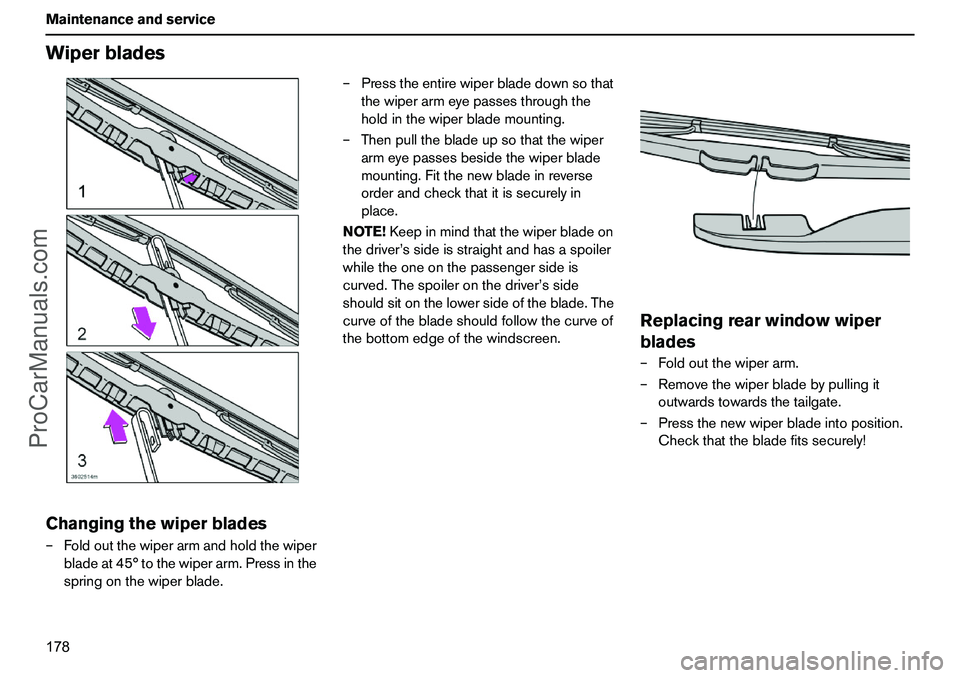
178 MaintenanceandserviceWiperbladesChangingthewiperblades–Foldoutthewiperarmandholdthewiper
bladeat45°tothewiperarm.Pressinthe
springonthewiperblade.–Presstheentirewiperbladedownsothat
thewiperarmeyepassesthroughthe
holdinthewiperblademounting.
–Thenpullthebladeupsothatthewiper
armeyepassesbesidethewiperblade
mounting.Fitthenewbladeinreverse
orderandcheckthatitissecurelyin
place.
NOTE!Keepinmindthatthewiperbladeon
thedriver’ssideisstraightandhasaspoiler
whiletheoneonthepassengersideis
curved.Thespoileronthedriver’sside
shouldsitonthelowersideoftheblade.The
curveofthebladeshouldfollowthecurveof
thebottomedgeofthewindscreen.
Replacingrearwindowwiper
blades–Foldoutthewiperarm.
–Removethewiperbladebypullingit
outwardstowardsthetailgate.
–Pressthenewwiperbladeintoposition.
Checkthatthebladefitssecurely!
ProCarManuals.com
Page 183 of 254
182 MaintenanceandserviceReplacingbulbsGeneralAllbulbspecificationsaregivenon
page247.
Thefollowinglistcontainsbulbsandpoint-
sourcelampsthatarespecialisedor
unsuitableforchangingexceptata
workshop:
Generalinteriorlightingintheroof
Rooflighting
Readinglamp
Gloveboxlighting
Lamps,Bi-Xenonheadlamps.IMPORTANT!Nevertouchthebulbs’glasswithyour
fingers.Greaseandoilsfromyourfingers
arevaporisedbytheheat,coatingand
damagingthereflector.
WARNING!
OncarswithBi-Xenonheadlamps,all
workonthelightsshouldbecarriedoutat
anauthorisedVolvoworkshop.
Bi-Xenonheadlampsmustbehandled
withextremecareduetothehigh-voltage
unit.
ProCarManuals.com
Page 184 of 254
183 Maintenanceandservice
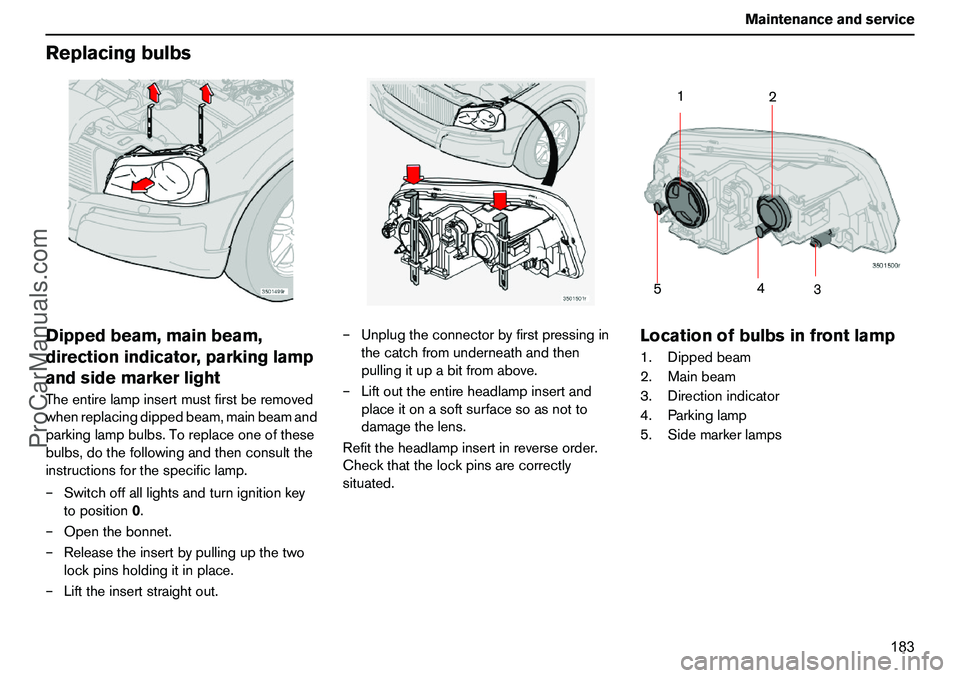
ReplacingbulbsDippedbeam,mainbeam,
directionindicator,parkinglamp
andsidemarkerlightTheentirelampinsertmustfirstberemoved
whenreplacingdippedbeam,mainbeamand
parkinglampbulbs.Toreplaceoneofthese
bulbs,dothefollowingandthenconsultthe
instructionsforthespecificlamp.
–Switchoffalllightsandturnignitionkey
toposition0.
–Openthebonnet.
–Releasetheinsertbypullingupthetwo
lockpinsholdingitinplace.
–Lifttheinsertstraightout.–Unplugtheconnectorbyfirstpressingin
thecatchfromunderneathandthen
pullingitupabitfromabove.
–Liftouttheentireheadlampinsertand
placeitonasoftsurfacesoasnotto
damagethelens.
Refittheheadlampinsertinreverseorder.
Checkthatthelockpinsarecorrectly
situated.
Locationofbulbsinfrontlamp1.Dippedbeam
2.Mainbeam
3.Directionindicator
4.Parkinglamp
5.Sidemarkerlamps
1
2
3
4
5
ProCarManuals.com
Page 185 of 254
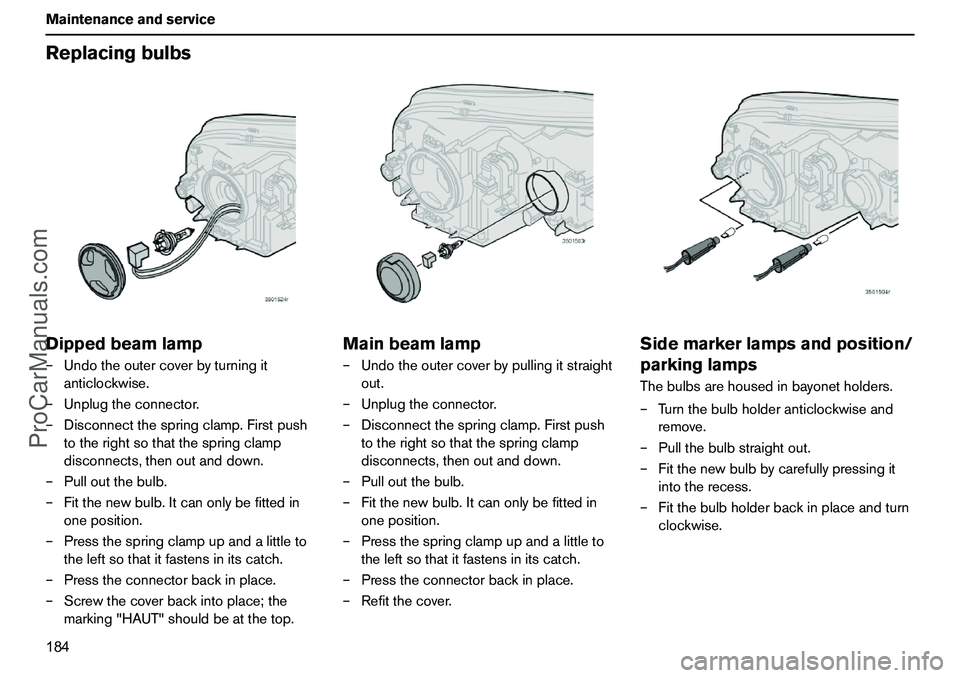
184 MaintenanceandserviceReplacingbulbsDippedbeamlamp–Undotheoutercoverbyturningit
anticlockwise.
–Unplugtheconnector.
–Disconnectthespringclamp.Firstpush
totherightsothatthespringclamp
disconnects,thenoutanddown.
–Pulloutthebulb.
–Fitthenewbulb.Itcanonlybefittedin
oneposition.
–Pressthespringclampupandalittleto
theleftsothatitfastensinitscatch.
–Presstheconnectorbackinplace.
–Screwthecoverbackintoplace;the
marking"HAUT"shouldbeatthetop.
Mainbeamlamp–Undotheoutercoverbypullingitstraight
out.
–Unplugtheconnector.
–Disconnectthespringclamp.Firstpush
totherightsothatthespringclamp
disconnects,thenoutanddown.
–Pulloutthebulb.
–Fitthenewbulb.Itcanonlybefittedin
oneposition.
–Pressthespringclampupandalittleto
theleftsothatitfastensinitscatch.
–Presstheconnectorbackinplace.
–Refitthecover.
Sidemarkerlampsandposition/
parkinglampsThebulbsarehousedinbayonetholders.
–Turnthebulbholderanticlockwiseand
remove.
–Pullthebulbstraightout.
–Fitthenewbulbbycarefullypressingit
intotherecess.
–Fitthebulbholderbackinplaceandturn
clockwise.
ProCarManuals.com
Page 188 of 254
187 Maintenanceandservice
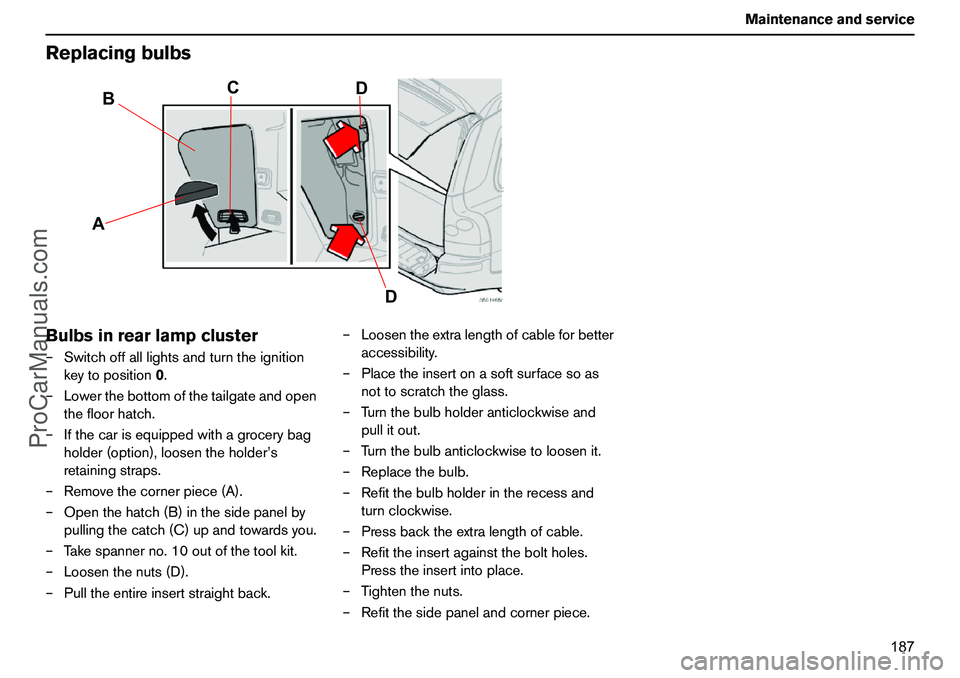
ReplacingbulbsBulbsinrearlampcluster–Switchoffalllightsandturntheignition
keytoposition0.
–Lowerthebottomofthetailgateandopen
thefloorhatch.
–Ifthecarisequippedwithagrocerybag
holder(option),loosentheholder’s
retainingstraps.
–Removethecornerpiece(A).
–Openthehatch(B)inthesidepanelby
pullingthecatch(C)upandtowardsyou.
–Takespannerno.10outofthetoolkit.
–Loosenthenuts(D).
–Pulltheentireinsertstraightback.–Loosentheextralengthofcableforbetter
accessibility.
–Placetheinsertonasoftsurfacesoas
nottoscratchtheglass.
–Turnthebulbholderanticlockwiseand
pullitout.
–Turnthebulbanticlockwisetoloosenit.
–Replacethebulb.
–Refitthebulbholderintherecessand
turnclockwise.
–Pressbacktheextralengthofcable.
–Refittheinsertagainsttheboltholes.
Presstheinsertintoplace.
–Tightenthenuts.
–Refitthesidepanelandcornerpiece.
AB
C
D
D
ProCarManuals.com
Page 192 of 254

191 Maintenanceandservice
FusesPressintheplasticcatchesontheshortsidesoftheboxandpullthecoverupward.Relay/Fuseboxintheenginecompartment1.ABS................................................................................................30A
2.ABS................................................................................................30A
3.High-pressurewasher,headlamps..........................................35A
4.Parkingheater(option)................................................................25A
5.Auxiliarylamps(option)...............................................................20A
6.Startermotorrelay........................................................................35A
7.Windscreenwipers......................................................................25A
8.Transmissioncontrolmodule(TCM),(V8,diesel).................15A
9.Fuelpump.....................................................................................15A
10.Ignitioncoils(petrol),enginecontrolmodule(ECM),
injectionvalves,(diesel)..............................................................20A
11.Acceleratorpedalsensor(APM),ACcompressor,fan
electronicsbox..............................................................................10A12.Enginecontrolmodule(ECM)(petrol),
injectionvalves,(petrol),massairflowsensor(petrol).......15A
Massairflowsensor(diesel).......................................................5A
13.Electronicthrottlemodule(ETM)(diesel),
solenoidvalve,SWIRL(airmixingvalve),
fuelpressureregulator(diesel)..................................................10A
14.Lambda-sond(petrol)..................................................................20A
Lambda-sond(diesel)..................................................................10A
15.Solenoidvalves,glowplugs(diesel)........................................10A
crankcaseventilationheater,solenoidvalves
massairflowsensor(V8),petrol...............................................15A
16.Dippedbeam(left)........................................................................20A
17.Dippedbeam(right).....................................................................20A
18.-................................................................................................................-
19.Enginecontrolmodule(ECM)supply,enginerelay................5A
20.Positionlamps...............................................................................15A
21.-................................................................................................................-
ProCarManuals.com
Page 201 of 254
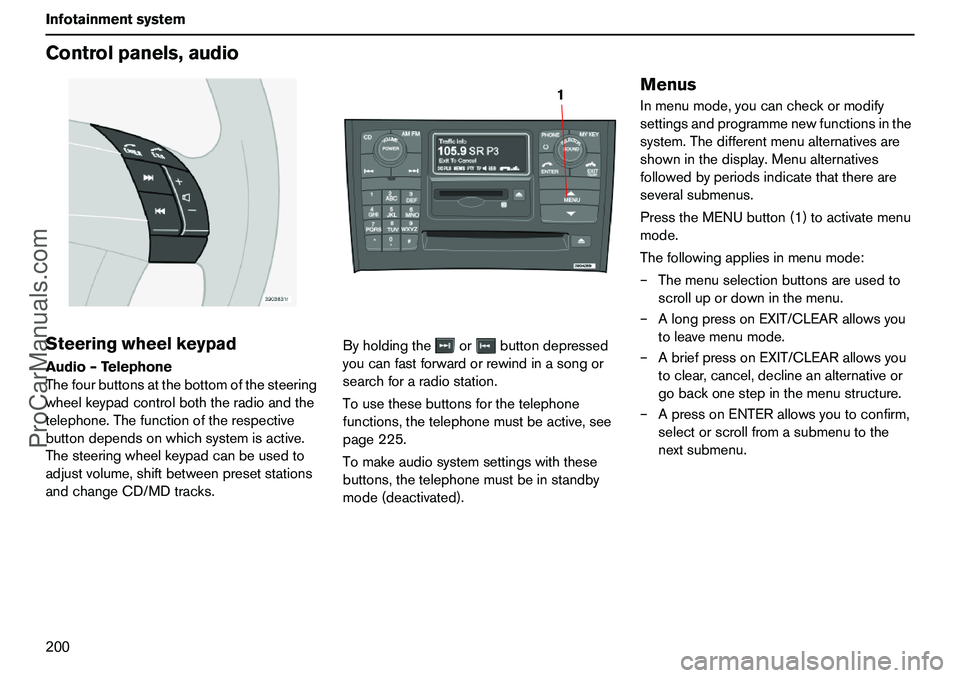
200 InfotainmentsystemControlpanels,audioSteeringwheelkeypadAudio–Telephone
Thefourbuttonsatthebottomofthesteering
wheelkeypadcontrolboththeradioandthe
telephone.Thefunctionoftherespective
buttondependsonwhichsystemisactive.
Thesteeringwheelkeypadcanbeusedto
adjustvolume,shiftbetweenpresetstations
andchangeCD/MDtracks.Byholdingtheorbuttondepressed
youcanfastforwardorrewindinasongor
searchforaradiostation.
Tousethesebuttonsforthetelephone
functions,thetelephonemustbeactive,see
page225.
Tomakeaudiosystemsettingswiththese
buttons,thetelephonemustbeinstandby
mode(deactivated).
MenusInmenumode,youcancheckormodify
settingsandprogrammenewfunctionsinthe
system.Thedifferentmenualternativesare
showninthedisplay.Menualternatives
followedbyperiodsindicatethatthereare
severalsubmenus.
PresstheMENUbutton(1)toactivatemenu
mode.
Thefollowingappliesinmenumode:
–Themenuselectionbuttonsareusedto
scrollupordowninthemenu.
–AlongpressonEXIT/CLEARallowsyou
toleavemenumode.
–AbriefpressonEXIT/CLEARallowsyou
toclear,cancel,declineanalternativeor
gobackonestepinthemenustructure.
–ApressonENTERallowsyoutoconfirm,
selectorscrollfromasubmenutothe
nextsubmenu.
1
ProCarManuals.com
Page 202 of 254
201 Infotainmentsystem
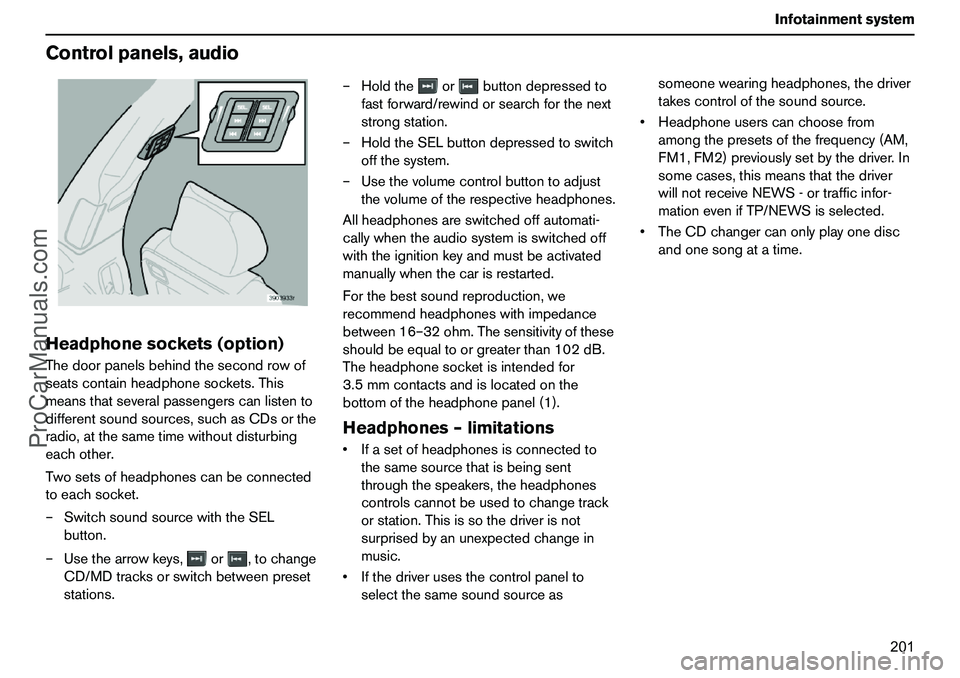
Controlpanels,audioHeadphonesockets(option)Thedoorpanelsbehindthesecondrowof
seatscontainheadphonesockets.This
meansthatseveralpassengerscanlistento
differentsoundsources,suchasCDsorthe
radio,atthesametimewithoutdisturbing
eachother.
Twosetsofheadphonescanbeconnected
toeachsocket.
–SwitchsoundsourcewiththeSEL
button.
–Usethearrowkeys,or,tochange
CD/MDtracksorswitchbetweenpreset
stations.–Holdtheorbuttondepressedto
fastforward/rewindorsearchforthenext
strongstation.
–HoldtheSELbuttondepressedtoswitch
offthesystem.
–Usethevolumecontrolbuttontoadjust
thevolumeoftherespectiveheadphones.
Allheadphonesareswitchedoffautomati-
callywhentheaudiosystemisswitchedoff
withtheignitionkeyandmustbeactivated
manuallywhenthecarisrestarted.
Forthebestsoundreproduction,we
recommendheadphoneswithimpedance
between16–32ohm.Thesensitivityofthese
shouldbeequaltoorgreaterthan102dB.
Theheadphonesocketisintendedfor
3.5mmcontactsandislocatedonthe
bottomoftheheadphonepanel(1).
Headphones–limitationsIfasetofheadphonesisconnectedto
thesamesourcethatisbeingsent
throughthespeakers,theheadphones
controlscannotbeusedtochangetrack
orstation.Thisissothedriverisnot
surprisedbyanunexpectedchangein
music.
Ifthedriverusesthecontrolpanelto
selectthesamesoundsourceassomeonewearingheadphones,thedriver
takescontrolofthesoundsource.
Headphoneuserscanchoosefrom
amongthepresetsofthefrequency(AM,
FM1,FM2)previouslysetbythedriver.In
somecases,thismeansthatthedriver
willnotreceiveNEWS-ortrafficinfor-
mationevenifTP/NEWSisselected.
TheCDchangercanonlyplayonedisc
andonesongatatime.
ProCarManuals.com
Page 205 of 254
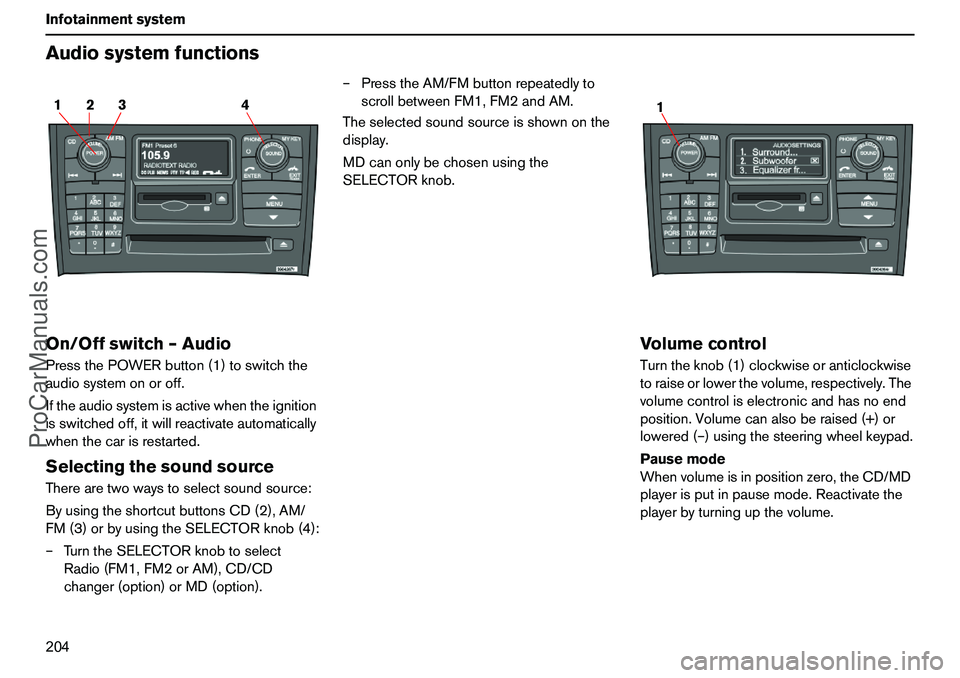
204 InfotainmentsystemAudiosystemfunctionsOn/Offswitch–AudioPressthePOWERbutton(1)toswitchthe
audiosystemonoroff.
Iftheaudiosystemisactivewhentheignition
isswitchedoff,itwillreactivateautomatically
whenthecarisrestarted.SelectingthesoundsourceTherearetwowaystoselectsoundsource:
ByusingtheshortcutbuttonsCD(2),AM/
FM(3)orbyusingtheSELECTORknob(4):
–TurntheSELECTORknobtoselect
Radio(FM1,FM2orAM),CD/CD
changer(option)orMD(option).–PresstheAM/FMbuttonrepeatedlyto
scrollbetweenFM1,FM2andAM.
Theselectedsoundsourceisshownonthe
display.
MDcanonlybechosenusingthe
SELECTORknob.
VolumecontrolTurntheknob(1)clockwiseoranticlockwise
toraiseorlowerthevolume,respectively.The
volumecontroliselectronicandhasnoend
position.Volumecanalsoberaised(+)or
lowered(–)usingthesteeringwheelkeypad.
Pausemode
Whenvolumeisinpositionzero,theCD/MD
playerisputinpausemode.Reactivatethe
playerbyturningupthevolume.
2 14 3
1
ProCarManuals.com