lift VOLVO XC90 2006 Owners Manual
[x] Cancel search | Manufacturer: VOLVO, Model Year: 2006, Model line: XC90, Model: VOLVO XC90 2006Pages: 256, PDF Size: 6.87 MB
Page 22 of 256

2006 VOLVO XC90
WARNING!
l Never try to open, remove, or repair any components in the OWS system. T\
his could result in
system malfunction. Maintenance or repairs should only be carried out by\
an authorized Volvo
service technician.
l The front passenger's seat should not be modified in any way. This could\
reduce pressure on the
seat cushion, which might interfere with the OWS system's function.
pg. 11 Safety
Occupant Weight Sensor (OWS) (contd)
WARNING!
Keep the following points in mind with respect to the OWS system. Failur\
e to follow these
instructions could adversely affect the system's function and result in \
serious injury to the occupant of
the front passenger's seat:
l The full weight of the front seat passenger should always be on the seat\
cushion. The passenger
should never lift him/herself off the seat cushion using the armrest in \
the door or the center console,
by pressing the feet on the floor, by sitting on the edge of the seat cu\
shion, or by pressing against the
backrest in a way that reduces pressure on the seat cushion. This could \
cause OWS to disable the
front passenger's side airbag.
l Do not place any type of object on the front passenger's seat in such a \
way that jamming, pressing,
or squeezing occurs between the object and the front seat, other than as\
a direct result of the correct
use of the ALR/ ELR seat belt (see
page 19).
l No objects should be placed under the front passenger's seat. This could\
interfere with the OWS
system's function.
pg. 12 Safety
Side impact (SIPS) airbag
file:///K|/ownersdocs/2006/2006_XC90/06xc90_01a.htm (15 of 17)12/30/20\
06 5:32:36 PM
Page 62 of 256

2006 VOLVO XC90
NOTE: There is also an audible signal that will sound if the car is driven wi\
th the parking brake
engaged.
l Release the parking brake pulling out the lower edge of the release hand\
le (A).
l If you inadvertently pull the plastic cover (B), it can be pressed bac\
k into place.
Opening the hood
WARNING!
Always use the parking brake when parking. On hills, also turn the front\
wheels toward the curb.The
indicator light in the instrument panel will light up even if the parkin\
g brake is applied only slightly.
Be sure to press down on the pedal sufficiently.
Opening/closing the hood
1. Pull the lever (1) located under the left side of the dashboard to \
release the hood lock.
2. Lift the hood slightly.
3. Press up the release control (2) located under the front edge of th\
e hood and lift.
To close the hood, place your hand on it and press down until the hood l\
ocks in the closed position.
WARNING!
l Do not grasp the ribs in the grille when closing the hood. If your finge\
rs protrude through the
grille, they could be injured on components in the engine compartment as\
the grille closes. We
recommend pressing down on the hood to close it.
l Check that the hood locks properly when closed!
pg. 42 Instruments and controls
file:///K|/ownersdocs/2006/2006_XC90/06xc90_02b.htm (9 of 17)12/30/200\
6 5:32:40 PM
Page 81 of 256
:")
2006 VOLVO XC90
Manually adjusted front seats
1. Front-rear adjustment: lift the bar and move the seat to the position\
of your choice.
2. Raise/lower the front edge of the seat cushion (option): use the co\
ntrol to pump the front edge of the
cushion up or down.
3. Raise/lower seat height: pump the seat up or down.
4. Lumbar support: turn the control for firmer or softer lumbar support.\
5. Backrest tilt: turn the control to adjust the angle of the backrest. \
6. Control panel for optional power seat (see
page 60 for more information).
WARNING!
- Do not adjust the seat while driving. The seat should be adjusted so t\
hat the brake pedal can be
depressed fully. In addition, position the seat as far rearward as comfo\
rt and control allow.
- Check that the seat is securely locked into position after adjusting. \
pg. 59 Interior
file:///K|/ownersdocs/2006/2006_XC90/06xc90_04a.htm (2 of 11)12/30/200\
6 5:32:41 PM
Page 82 of 256

2006 VOLVO XC90
Folding the backrests in the front seat
The front passenger seat backrest can be folded to a horizontal position\
to make room for a long load.
Fold the backrest as follows:
l Move the seat as far back as possible.
l Adjust the backrest to the upright position.
l Lift the catches on the rear of the backrest.
l Without releasing the catches, push the backrest forward.
l Move the seat as far forward as possible so that the head restraint slid\
es under the glove compartment.
WARNING!
Cover sharp edges on the load to help prevent injury to occupants. Secur\
e the load to help prevent
shifting during sudden stops.
pg. 60 Interior
Front seats (contd)
Power seat
Operation
Driver's seat: The seat can be adjusted if the ignition key is in position I, II or if\
the engine is running.
It can also be adjusted as follows with the ignition off:
l Within approximately 4 minutes after the driver's door has been unlocked\
from the outside and has
been opened and remains open.
l Within 40 seconds, if the driver's door has just been closed.
file:///K|/ownersdocs/2006/2006_XC90/06xc90_04a.htm (3 of 11)12/30/200\
6 5:32:41 PM
Page 85 of 256

2006 VOLVO XC90
As a safety precaution, the seat will stop automatically if the button i\
s released before the seat has
reached the preset position.
pg. 62 Interior
Rear seats
Entering the optional third row of seats
Tilting the outboard backrests in the second row of the seats:
Pull up the handle (1), hold it up, and tilt the backrest forward to m\
ove the seat.
Return the backrest to the upright position to slide the seat back to it\
s original position.
Forward/rearward seat adjustment
Lift the adjustment bar (2) to move the seat forward or rearward.
Removing the center console (seven-seat models only)
In order to make it possible to move the center seat in the second row o\
f seats as far forward as possible
(seven-seat models only), the rear section of the center console can b\
e removed.
file:///K|/ownersdocs/2006/2006_XC90/06xc90_04a.htm (6 of 11)12/30/200\
6 5:32:41 PM
Page 86 of 256
 and lift out the console.
l To return the console to its original position, slide it back into posit\
ion until it clicks into plac")
2006 VOLVO XC90
l Pull the handle (see illustration above) and lift out the console.
l To return the console to its original position, slide it back into posit\
ion until it clicks into place.
Sliding center seat - second row (seven-seat models only)
The center seat in the second row can be moved farther forward than the \
outboard seats. This makes it
possible for a child seated in this position to sit closer to the people\
in the front seats.
pg. 63 Interior
Head restraint - second row, center position
The head restraint in the center position can be adjusted to 4 different\
heights.
To raise - pull the restraint up until it clicks into one of the four heights po\
sitions.
To lower - press the button at the base of the support (see illustration above)\
and press the head restraint
down.
file:///K|/ownersdocs/2006/2006_XC90/06xc90_04a.htm (7 of 11)12/30/200\
6 5:32:41 PM
Page 92 of 256
. This lid can
be folded ba")
2006 VOLVO XC90
Storage compartment in the center console
To open the lid on the storage compartment, press the lower edge of the \
opening latch (see illustration above). This lid can
be folded back to form a small table area for rear seat passengers.
Lift the tray under the lid to expose the deep storage bin with slots fo\
r CD storage.
Cup holders for the front seats
Two cup holders are provided for the front seat occupants. Press lightly\
on the rear edge of the cover to open it.
Ashtray (accessory)
An ashtray insert is available from your Volvo retailer. This insert sli\
des into either of the cup holders.
Pen holder
There is a pen holder in the center console, in front of the gear select\
or.
pg. 69 Interior
file:///K|/ownersdocs/2006/2006_XC90/06xc90_04b.htm (2 of 9)12/30/2006\
5:32:42 PM
Page 94 of 256
2006 VOLVO XC90
pg. 70 Interior
Storage compartments (contd)
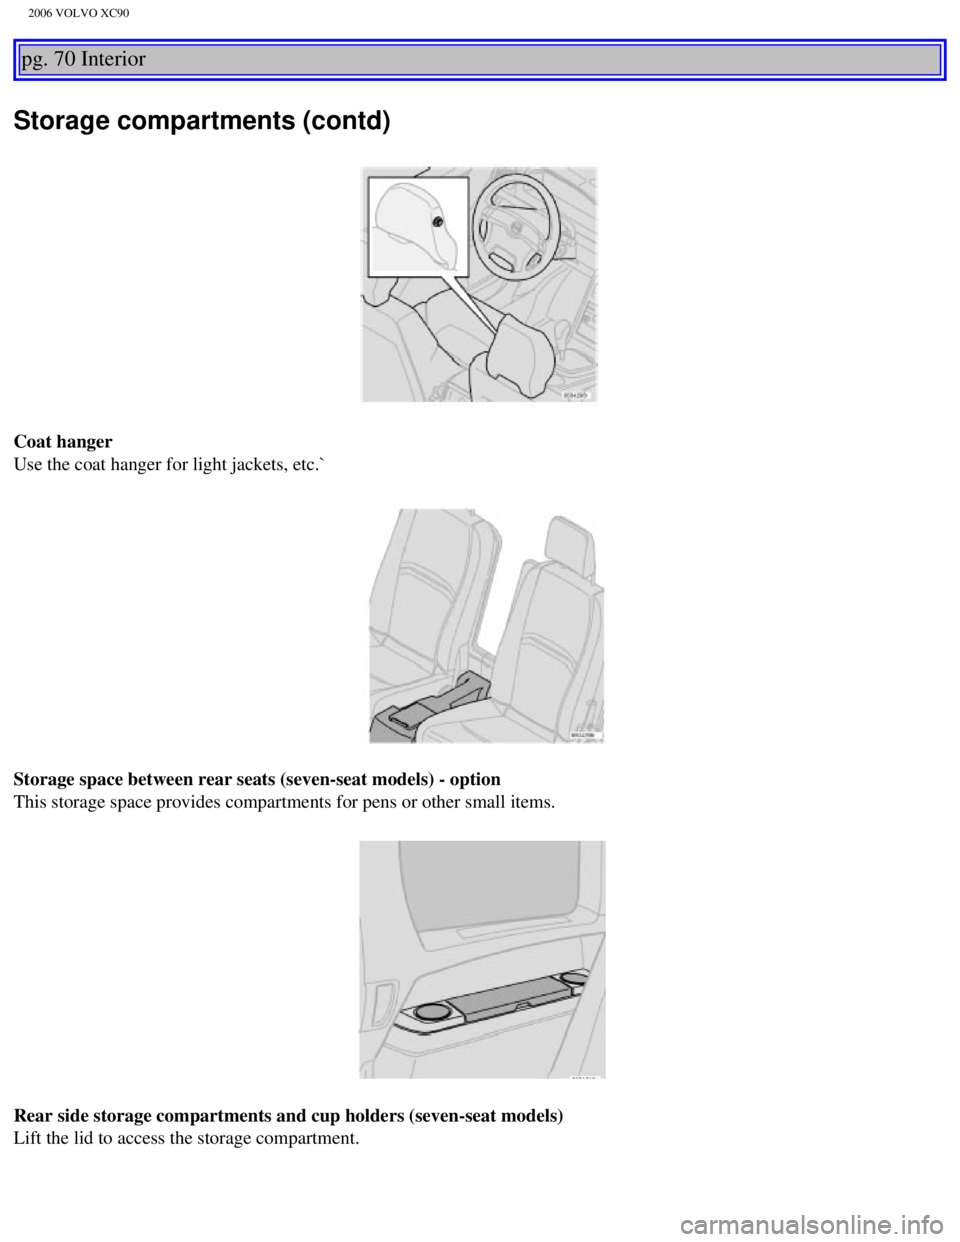
Coat hanger
Use the coat hanger for light jackets, etc.`
Storage space between rear seats (seven-seat models) - option
This storage space provides compartments for pens or other small items. \
Rear side storage compartments and cup holders (seven-seat models)
Lift the lid to access the storage compartment.
file:///K|/ownersdocs/2006/2006_XC90/06xc90_04b.htm (4 of 9)12/30/2006\
5:32:42 PM
Page 96 of 256

The Volvo XC90 can be equipped with a cargo net made of strong nylon fab\
ric.
This net can be installed in two places:
l Behind the rear seat backrests")
2006 VOLVO XC90
Nylon cargo net (option)
The Volvo XC90 can be equipped with a cargo net made of strong nylon fab\
ric.
This net can be installed in two places:
l Behind the rear seat backrests (the second row of seats in seven-seat m\
odels)
l Behind the front seat backrests if the rear seat backrests (the second \
row of seats in seven-seat models) have been folded
down.
If the vehicle is equipped with the cargo area cover, lift the cover out\
of the vehicle before installing the cargo net.
1. The upper and lower rods of the cargo net are hinged. Position the ro\
ds so that they are straight and lock in position.
2. Insert the end of the upper rod in one of the attachment brackets (s\
ee illustration above).
3. Insert the other end of the rod in the attachment bracket on the oppo\
site side of the vehicle.
4. Attach the lower straps to the eyelets on the floor if the net has be\
en installed in the rear attachment brackets.
Use the eyelets in the front seat rails if the net has been installed in\
the forward attachment brackets.
NOTE: On seven-seat models: When using the net in the rear attachment brackets\
, be sure it is installed in front of the side
armrests.
5. Adjust the straps to pull the net taut.
file:///K|/ownersdocs/2006/2006_XC90/06xc90_04b.htm (6 of 9)12/30/2006\
5:32:42 PM
Page 97 of 256
 \
and fold the net.
The cargo net can be stored under the floor of the cargo")
2006 VOLVO XC90
Folding and storing the cargo net
Press the release buttons on the hinges (1 in the illustration above) \
and fold the net.
The cargo net can be stored under the floor of the cargo area on five-se\
at models.
WARNING!
Be sure the cargo net is properly inserted in the attachment brackets an\
d the straps are correctly attached to the eyelets
and pulled taut.
Do not use the net if it is damaged in any way.
When it is not in use, store the net so that it cannot be thrown forward\
in the event of sudden braking, etc.
pg. 73 Interior
Steel grid (accessory)
To install the grid:
Upper attachments
1. Lift in the grid through the tailgate or through one of the rear pass\
enger doors (in this case, fold down the rear seat
backrests/backrests in second row of seats in seven-seat models).
2. Insert one of the grid's upper attachments into an attachment bracket\
above one of the rear passenger doors (see
illustration above).
3. Push the grid's attachment into the forward position in the attachmen\
t bracket (see inset illustration above) to lock the
attachment in place.
4. Insert the grid's other upper attachment in the attachment bracket ab\
ove the opposite rear passenger door, and press the
attachment into the forward position in the attachment bracket to lock i\
t in place.
file:///K|/ownersdocs/2006/2006_XC90/06xc90_04b.htm (7 of 9)12/30/2006\
5:32:42 PM