buttons VOLVO XC90 2007 Owners Manual
[x] Cancel search | Manufacturer: VOLVO, Model Year: 2007, Model line: XC90, Model: VOLVO XC90 2007Pages: 268, PDF Size: 8.57 MB
Page 49 of 268
2007 Volvo XC90
3. Panel vents78
4. Text window
46
5. Temperature gauge
46
6. Odometer/Trip odometer/Cruise control indicator
46, 63
7. Speedometer
46
8. Turn signal indicator lights
46
9. Tachometer
46
10. Ambient temperature gauge, clock, gear indicator
46
11. Fuel gauge
46
12. Indicator and warning symbols
47
13. Panel vents
78
14. Glove compartment
94
15. Hazard warning flashers
61
16. Audio system
219
17. Switches in the center console
52
18. Climate system controls
79
19. Windshield wiper/washer lever
59
20. Audio control buttons in steering wheel
224
21. Instrument panel
46
22. Horn
44
23. Cruise control buttons in steering wheel
63
24. Turn signals, High/low beams
58
25. Front fog lights, Rear fog light
55
26. Parking brake pedal
66
27. Parking brake release handle
66
28. Button for unlocking fuel filler door
55
29. Hood open lever
67
30. Reading lights
91
31. Courtesy light
91
32. Moonroof control (option)
73
33. Seat belt reminder
11
34. Rearview mirror
70
file:///K|/ownersdocs/2007/2007_XC90/07xc90_02.htm (3 of 40)12/30/2006\
5:53:37 PM
Page 76 of 268
2007 Volvo XC90
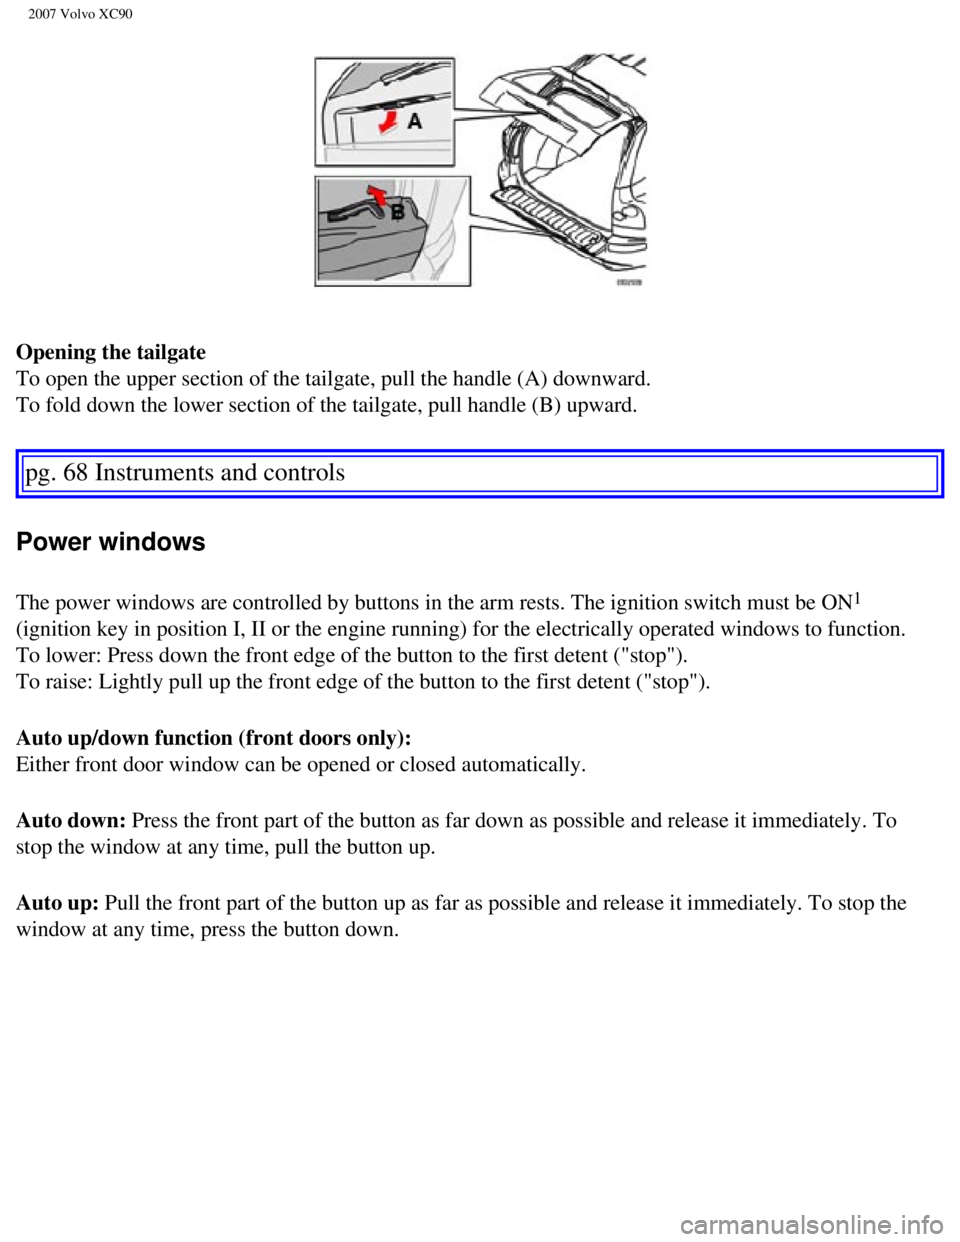
Opening the tailgate
To open the upper section of the tailgate, pull the handle (A) downwar\
d.
To fold down the lower section of the tailgate, pull handle (B) upward\
.
pg. 68 Instruments and controls
Power windows
The power windows are controlled by buttons in the arm rests. The igniti\
on switch must be ON1
(ignition key in position I, II or the engine running) for the electri\
cally operated windows to function.
To lower: Press down the front edge of the button to the first detent (\
"stop").
To raise: Lightly pull up the front edge of the button to the first dete\
nt ("stop").
Auto up/down function (front doors only):
Either front door window can be opened or closed automatically.
Auto down: Press the front part of the button as far down as possible and release \
it immediately. To
stop the window at any time, pull the button up.
Auto up: Pull the front part of the button up as far as possible and release it \
immediately. To stop the
window at any time, press the button down.
file:///K|/ownersdocs/2007/2007_XC90/07xc90_02.htm (30 of 40)12/30/200\
6 5:53:37 PM
Page 78 of 268
2007 Volvo XC90
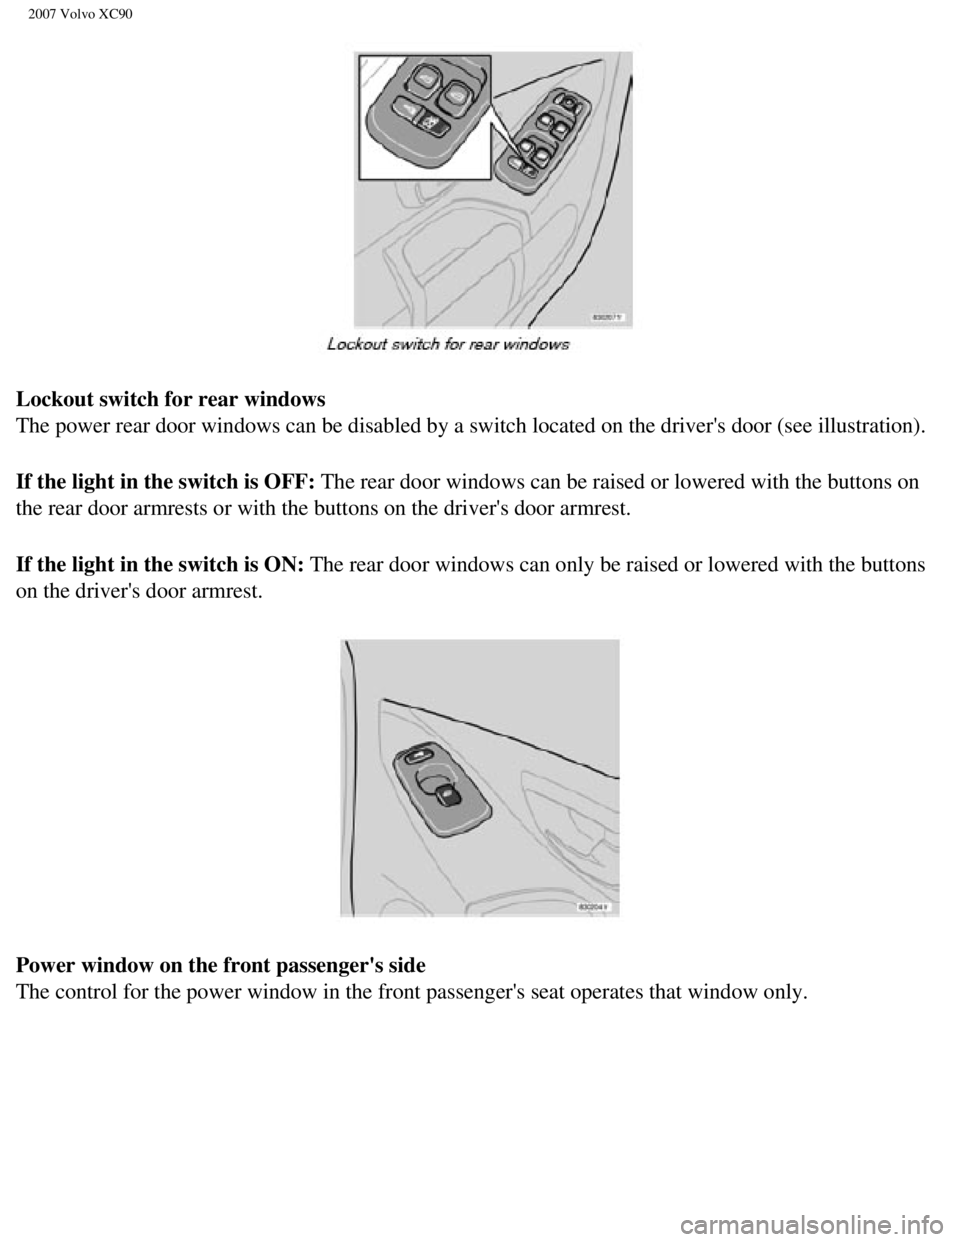
Lockout switch for rear windows
The power rear door windows can be disabled by a switch located on the d\
river's door (see illustration).
If the light in the switch is OFF: The rear door windows can be raised or lowered with the buttons on
the rear door armrests or with the buttons on the driver's door armrest.\
If the light in the switch is ON: The rear door windows can only be raised or lowered with the buttons
on the driver's door armrest.
Power window on the front passenger's side
The control for the power window in the front passenger's seat operates \
that window only.
file:///K|/ownersdocs/2007/2007_XC90/07xc90_02.htm (32 of 40)12/30/200\
6 5:53:37 PM
Page 98 of 268
2007 Volvo XC90
this occurs, switch off the ignition (key in position 0) and wait for \
a short period before operating the
seat again.
Emergency stop
If the seat accidentally begins to move, press any of the buttons to sto\
p the seat.
NOTE: Please refer to the following page for information on programming the m\
emory function in the
driver's seat.
Remote keyless entry system and the driver's seat
The remote control transmitter also controls the position of the electri\
cally operated driver's seat in the
following way:
- Adjust the seat to your preferences.
- When you leave your vehicle, lock it using the remote control.
The position of the seat is now stored in the remote control.
Automatic seat adjustment
To move the seat to the position in which you left it:
- Unlock the driver's door with the same remote control (the one used t\
o lock the doors)
- Open the driver's door within 2 minutes.
The driver's seat will automatically move to the position in which you l\
eft it.
NOTE:
l The seat will move to this position even if someone else has moved it to\
a different seating position
and locked the vehicle with a different remote control.
pg. 87 Interior
Front seats
l This feature will work in the same way with all of the remote control tr\
ansmitters (up to 3) that you
use with your vehicle.
l This feature will not function if you lock your vehicle with the key.
file:///K|/ownersdocs/2007/2007_XC90/07xc90_04.htm (4 of 23)12/30/2006\
5:53:40 PM
Page 99 of 268
2007 Volvo XC90
WARNING!
l Because the driver's seat can be adjusted with the ignition off, childre\
n should never be left
unattended in the vehicle.
l Movement of the seat can be STOPPED at any time by pressing any button o\
n the power seat
control panel.
l Do not adjust the seat while driving.
l The seat should be adjusted so that the brake pedal can be depressed ful\
ly. In addition, position the
seat as far rearward as comfort and control allow.
l The seat rails on the floor must not be obstructed in any way when the s\
eat is in motion.
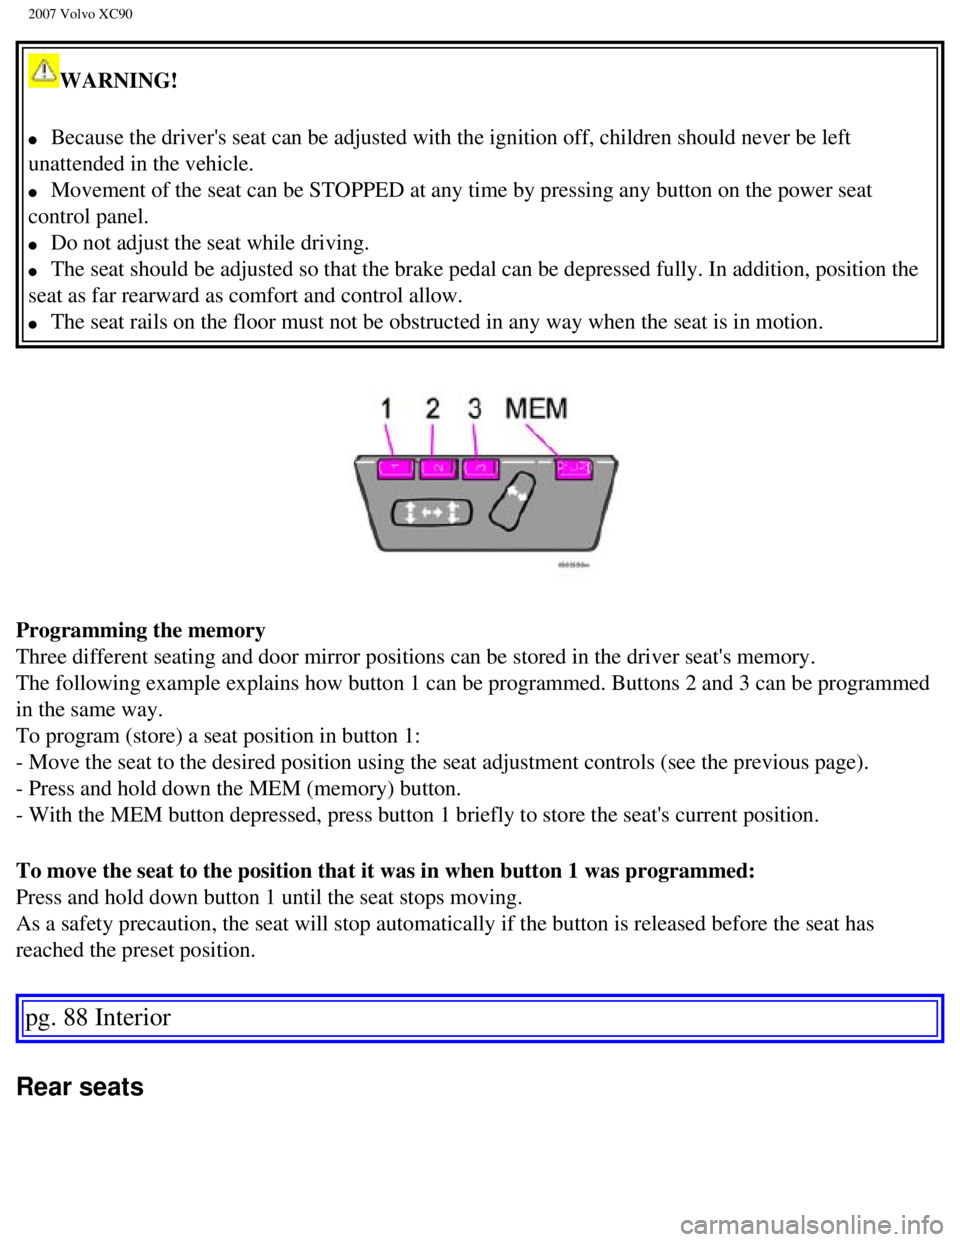
Programming the memory
Three different seating and door mirror positions can be stored in the d\
river seat's memory.
The following example explains how button 1 can be programmed. Buttons 2\
and 3 can be programmed
in the same way.
To program (store) a seat position in button 1:
- Move the seat to the desired position using the seat adjustment contro\
ls (see the previous page).
- Press and hold down the MEM (memory) button.
- With the MEM button depressed, press button 1 briefly to store the sea\
t's current position.
To move the seat to the position that it was in when button 1 was progra\
mmed:
Press and hold down button 1 until the seat stops moving.
As a safety precaution, the seat will stop automatically if the button i\
s released before the seat has
reached the preset position.
pg. 88 Interior
Rear seats
file:///K|/ownersdocs/2007/2007_XC90/07xc90_04.htm (5 of 23)12/30/2006\
5:53:40 PM
Page 104 of 268
2007 Volvo XC90
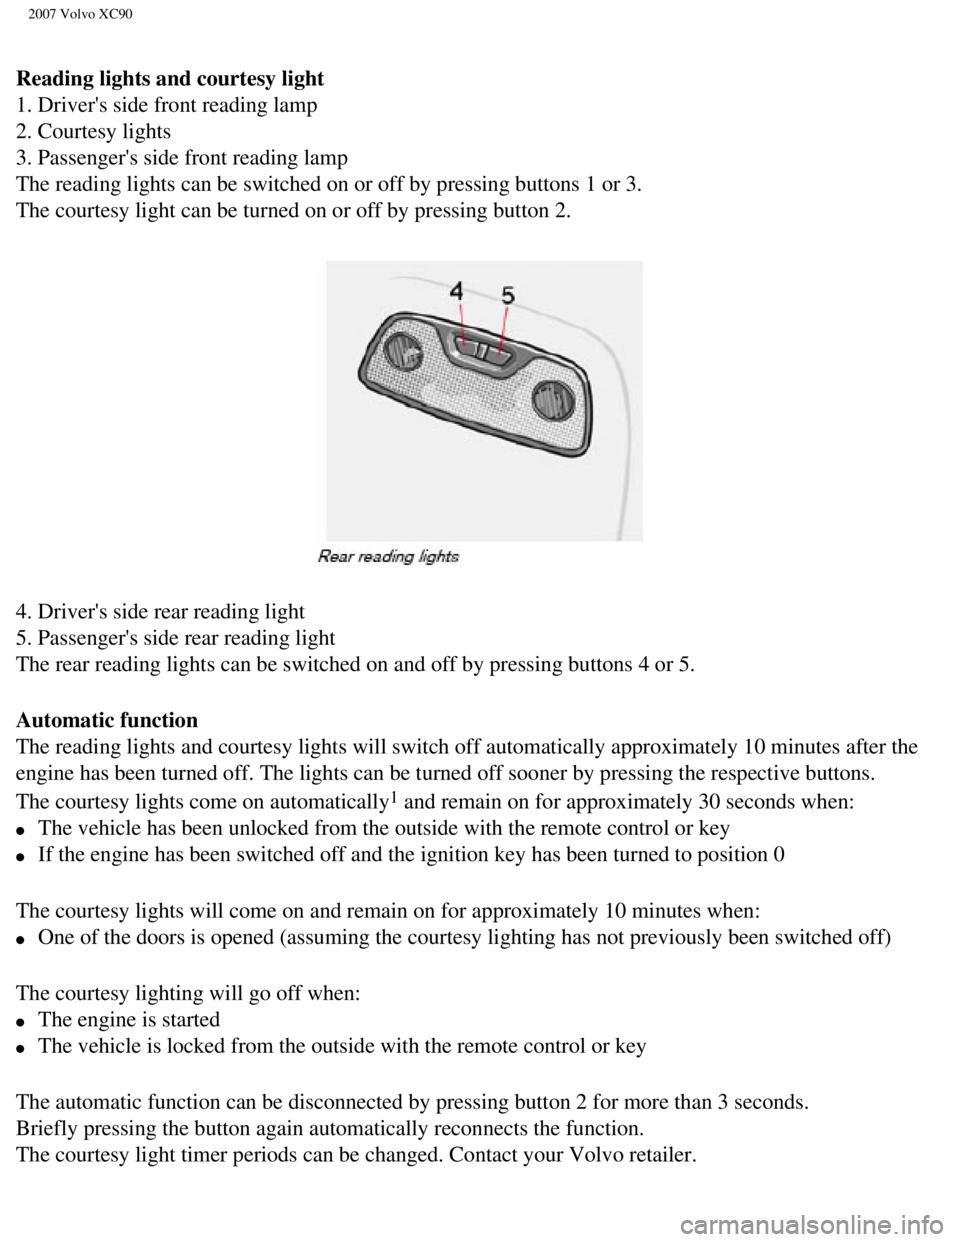
Reading lights and courtesy light
1. Driver's side front reading lamp
2. Courtesy lights
3. Passenger's side front reading lamp
The reading lights can be switched on or off by pressing buttons 1 or 3.\
The courtesy light can be turned on or off by pressing button 2.
4. Driver's side rear reading light
5. Passenger's side rear reading light
The rear reading lights can be switched on and off by pressing buttons 4\
or 5.
Automatic function
The reading lights and courtesy lights will switch off automatically app\
roximately 10 minutes after the
engine has been turned off. The lights can be turned off sooner by press\
ing the respective buttons.
The courtesy lights come on automatically
1 and remain on for approximately 30 seconds when:
l The vehicle has been unlocked from the outside with the remote control o\
r key
l If the engine has been switched off and the ignition key has been turned\
to position 0
The courtesy lights will come on and remain on for approximately 10 minu\
tes when:
l One of the doors is opened (assuming the courtesy lighting has not prev\
iously been switched off)
The courtesy lighting will go off when:
l The engine is started
l The vehicle is locked from the outside with the remote control or key
The automatic function can be disconnected by pressing button 2 for more\
than 3 seconds.
Briefly pressing the button again automatically reconnects the function.\
The courtesy light timer periods can be changed. Contact your Volvo reta\
iler.
file:///K|/ownersdocs/2007/2007_XC90/07xc90_04.htm (10 of 23)12/30/200\
6 5:53:40 PM
Page 114 of 268
2007 Volvo XC90
Folding and storing the cargo net
Press the release buttons on the hinges (1 in the illustration above) \
and fold the net. The cargo net can be
stored under the floor of the cargo area on five-seat models.
WARNING!
l Be sure the cargo net is properly inserted in the attachment brackets an\
d the straps are correctly
attached to the eyelets and pulled taut.
l Do not use the net if it is damaged in any way.
l When it is not in use, store the net so that it cannot be thrown forward\
in the event of sudden
braking, etc.
pg. 100 Interior
Securing cargo
Steel grid (accessory)
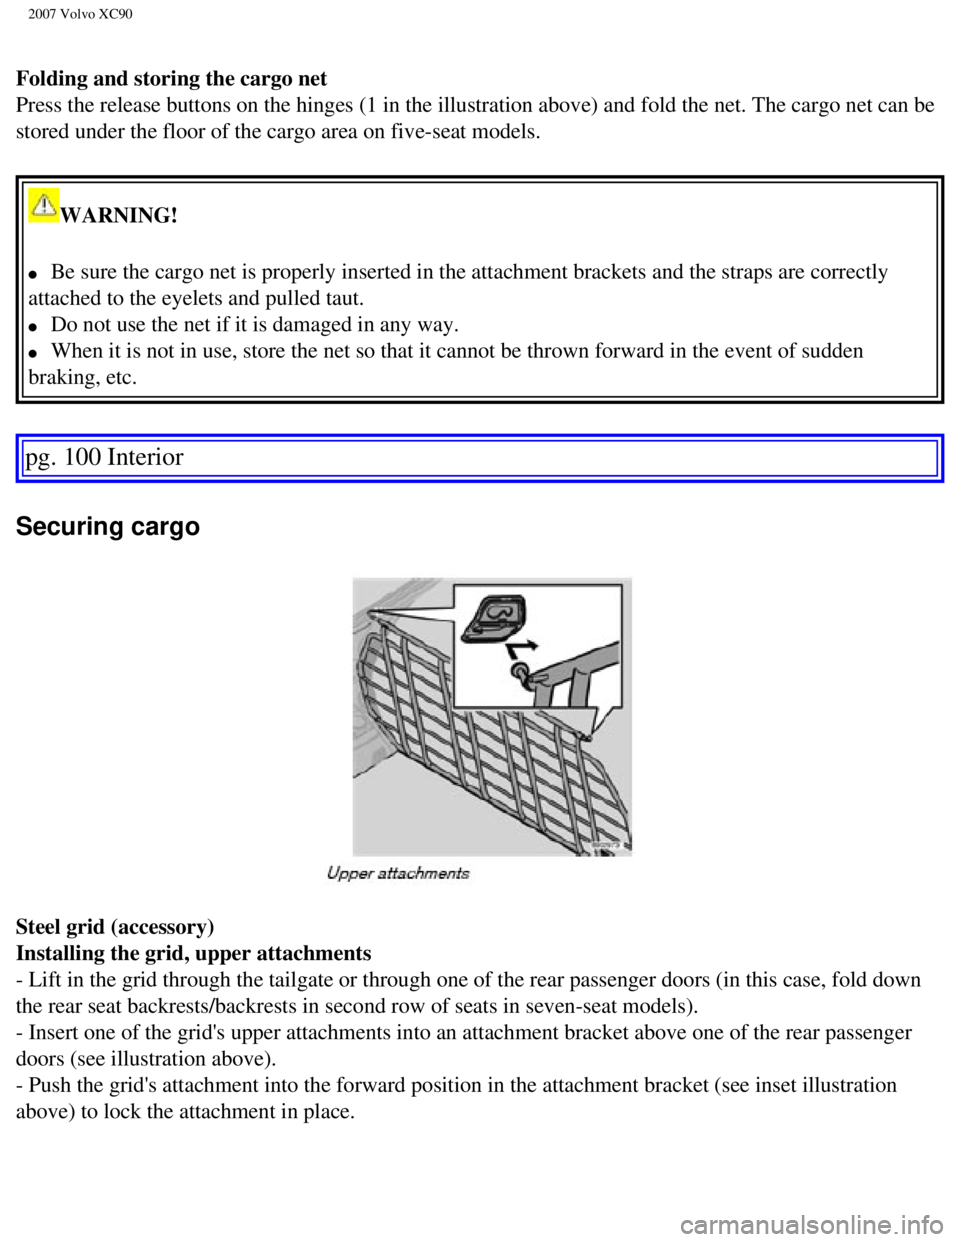
Installing the grid, upper attachments
- Lift in the grid through the tailgate or through one of the rear passe\
nger doors (in this case, fold down
the rear seat backrests/backrests in second row of seats in seven-seat m\
odels).
- Insert one of the grid's upper attachments into an attachment bracket \
above one of the rear passenger
doors (see illustration above).
- Push the grid's attachment into the forward position in the attachment\
bracket (see inset illustration
above) to lock the attachment in place.
file:///K|/ownersdocs/2007/2007_XC90/07xc90_04.htm (20 of 23)12/30/200\
6 5:53:40 PM
Page 123 of 268
2007 Volvo XC90
WARNING!
Never use the transmitter to lock the doors from inside the vehicle.
Doing so would ACTIVATE:
l the break-in alarm, which would sound if one of the doors were opened
l the optional interior motion and inclination alarm sensors.
Doing so would DEACTIVATE:
l the moonroof and interior courtesy light controls.
l the central locking buttons on the front door armrests, although the int\
erior door handles would still
function to allow occupants to leave the vehicle.
Disabled features would remain disabled until the remote is used again t\
o unlock the vehicle.
In addition, locking an occupied vehicle would hinder rapid access to th\
e occupants in an accident or
emergency.
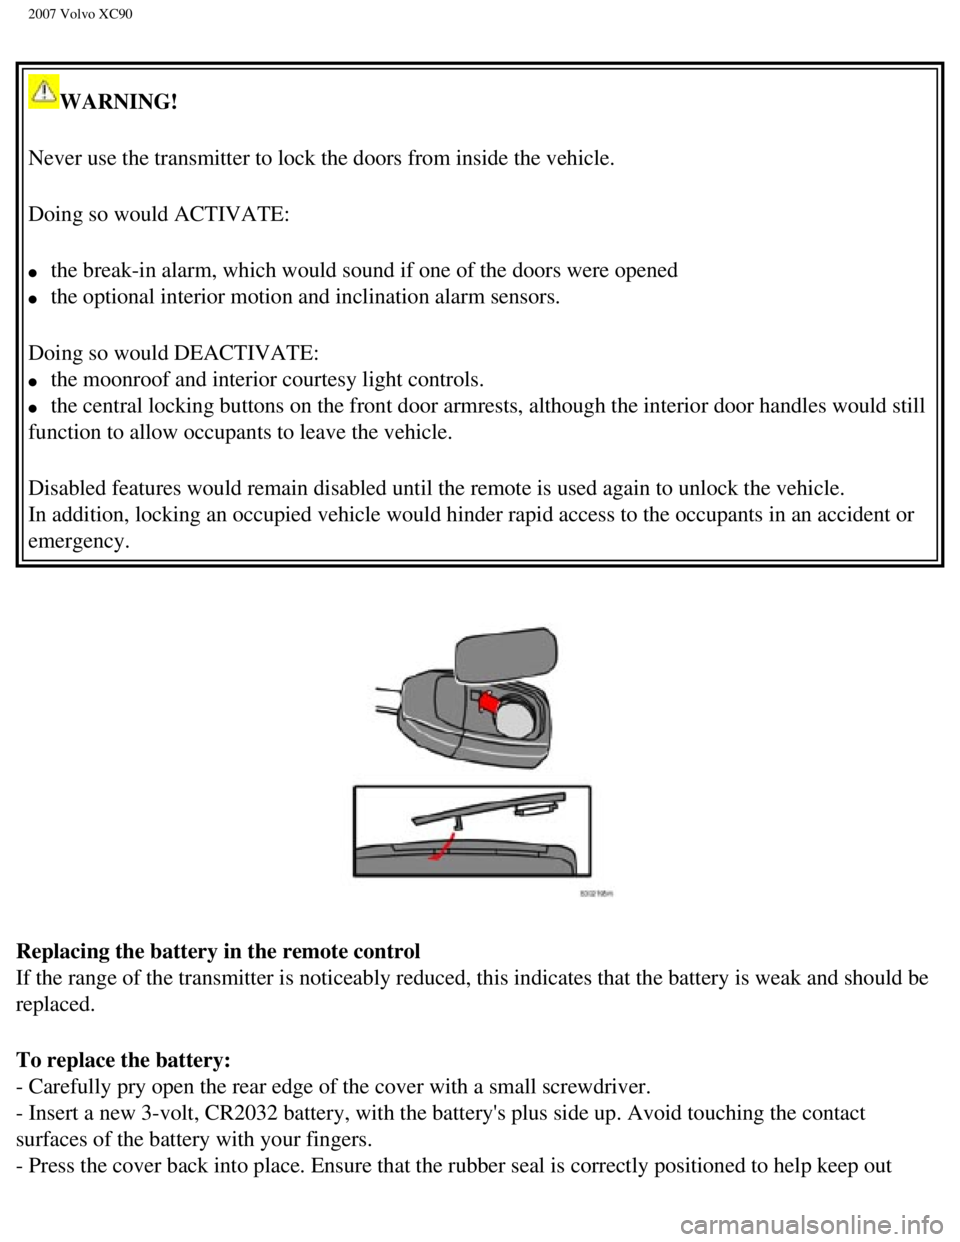
Replacing the battery in the remote control
If the range of the transmitter is noticeably reduced, this indicates th\
at the battery is weak and should be
replaced.
To replace the battery:
- Carefully pry open the rear edge of the cover with a small screwdriver\
.
- Insert a new 3-volt, CR2032 battery, with the battery's plus side up. \
Avoid touching the contact
surfaces of the battery with your fingers.
- Press the cover back into place. Ensure that the rubber seal is correc\
tly positioned to help keep out
file:///K|/ownersdocs/2007/2007_XC90/07xc90_05.htm (6 of 7)12/30/2006 \
5:53:41 PM
Page 235 of 268
2007 Volvo XC90
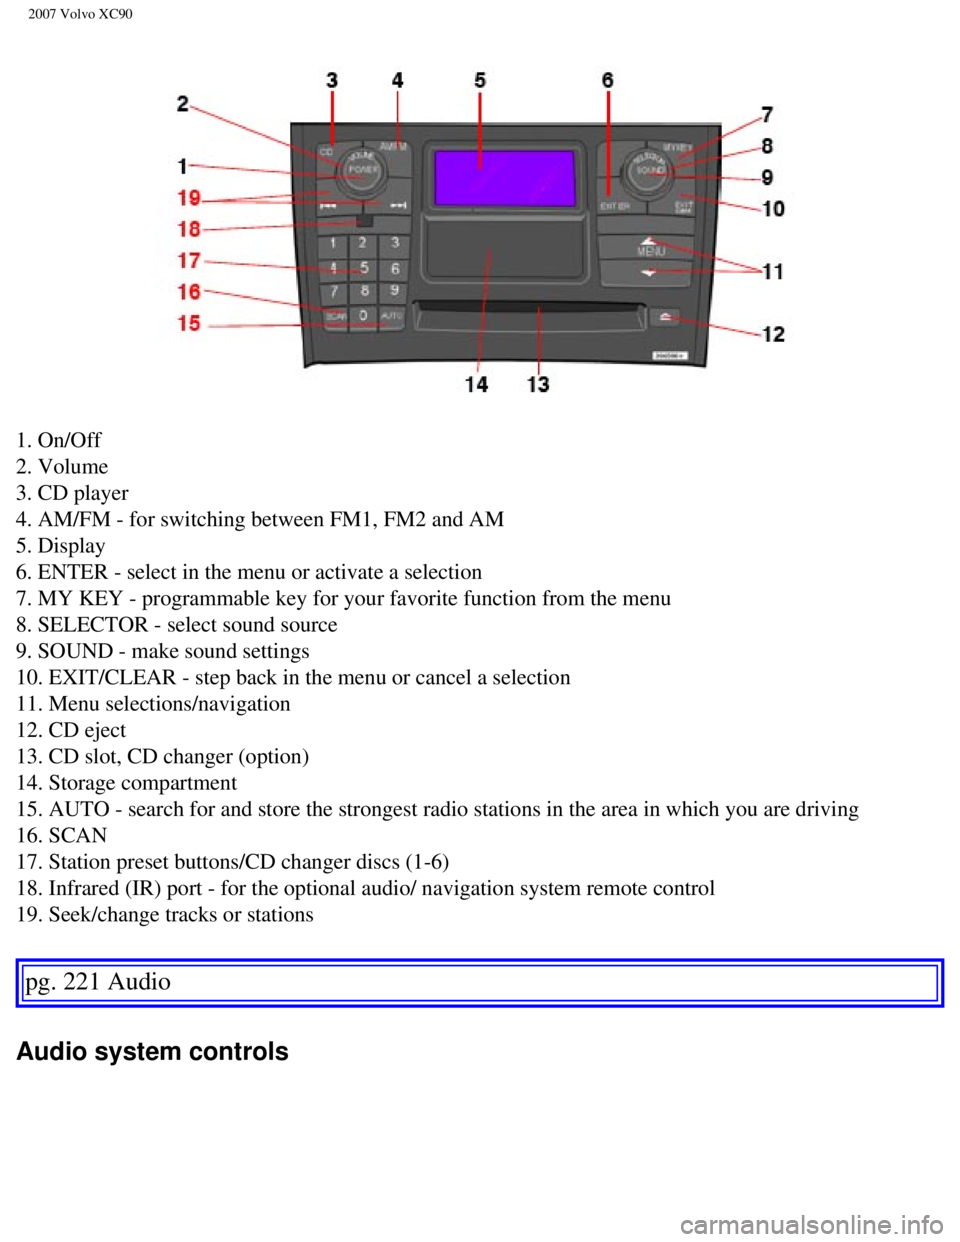
1. On/Off
2. Volume
3. CD player
4. AM/FM - for switching between FM1, FM2 and AM
5. Display
6. ENTER - select in the menu or activate a selection
7. MY KEY - programmable key for your favorite function from the menu
8. SELECTOR - select sound source
9. SOUND - make sound settings
10. EXIT/CLEAR - step back in the menu or cancel a selection
11. Menu selections/navigation
12. CD eject
13. CD slot, CD changer (option)
14. Storage compartment
15. AUTO - search for and store the strongest radio stations in the area\
in which you are driving
16. SCAN
17. Station preset buttons/CD changer discs (1-6)
18. Infrared (IR) port - for the optional audio/ navigation system rem\
ote control
19. Seek/change tracks or stations
pg. 221 Audio
Audio system controls
file:///K|/ownersdocs/2007/2007_XC90/07xc90_11.htm (2 of 26)12/30/2006\
5:53:54 PM
Page 236 of 268
2007 Volvo XC90
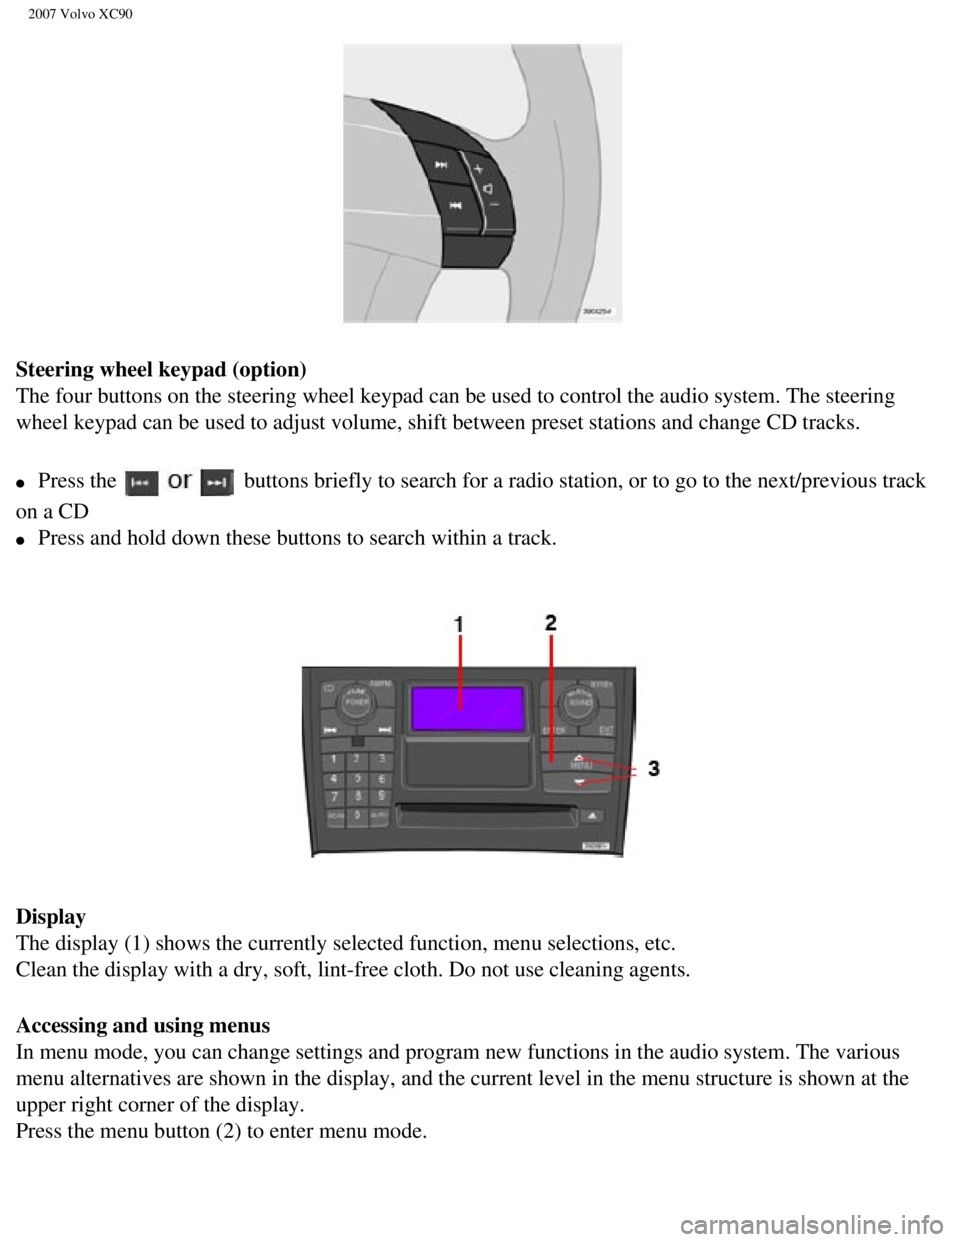
Steering wheel keypad (option)
The four buttons on the steering wheel keypad can be used to control the\
audio system. The steering
wheel keypad can be used to adjust volume, shift between preset stations\
and change CD tracks.
l Press the buttons briefly to search for a radio station, or to go to the next/pre\
vious track
on a CD
l Press and hold down these buttons to search within a track.
Display
The display (1) shows the currently selected function, menu selections\
, etc.
Clean the display with a dry, soft, lint-free cloth. Do not use cleaning\
agents.
Accessing and using menus
In menu mode, you can change settings and program new functions in the a\
udio system. The various
menu alternatives are shown in the display, and the current level in the\
menu structure is shown at the
upper right corner of the display.
Press the menu button (2) to enter menu mode.
file:///K|/ownersdocs/2007/2007_XC90/07xc90_11.htm (3 of 26)12/30/2006\
5:53:54 PM