buttons VOLVO XC90 2007 User Guide
[x] Cancel search | Manufacturer: VOLVO, Model Year: 2007, Model line: XC90, Model: VOLVO XC90 2007Pages: 268, PDF Size: 8.57 MB
Page 237 of 268
2007 Volvo XC90
Use the menus as follows:
l Use the menu arrow keys (3) to navigate up or down in the menus. Dots \
in the display indicate that
there are more menu selections from which to choose.
l Press ENTER to confirm or cancel a menu selection.
l One long press on EXIT/CLEAR exits menu mode.
l A short press on the EXIT/CLEAR enables you to cancel, undo, or answer n\
o to a menu selection, or
to go back in the menu structure.
Shortcut
The menu alternatives are numbered and can be accessed directly by press\
ing the respective keys on the
numbered keypad on the left side of the audio panel.
MY KEY - programming a shortcut
Use the MY KEY button to program a favorite function from the menu, such\
as RANDOM, etc.
- Use the MENU buttons to scroll among the functions.
- Select the desired function from the menu by pressing the MY KEY butto\
n for more than two seconds.
- When MY KEY STORED is shown in the display, the function has been stor\
ed.
pg. 222 Audio
Audio system controls
- Activate the function by briefly pressing the MY KEY button.
Repeat steps 1-4 to store new functions on the MY KEY buttons.
NOTE: The MY KEY buttons can only be programmed for one shortcut function at \
a time.
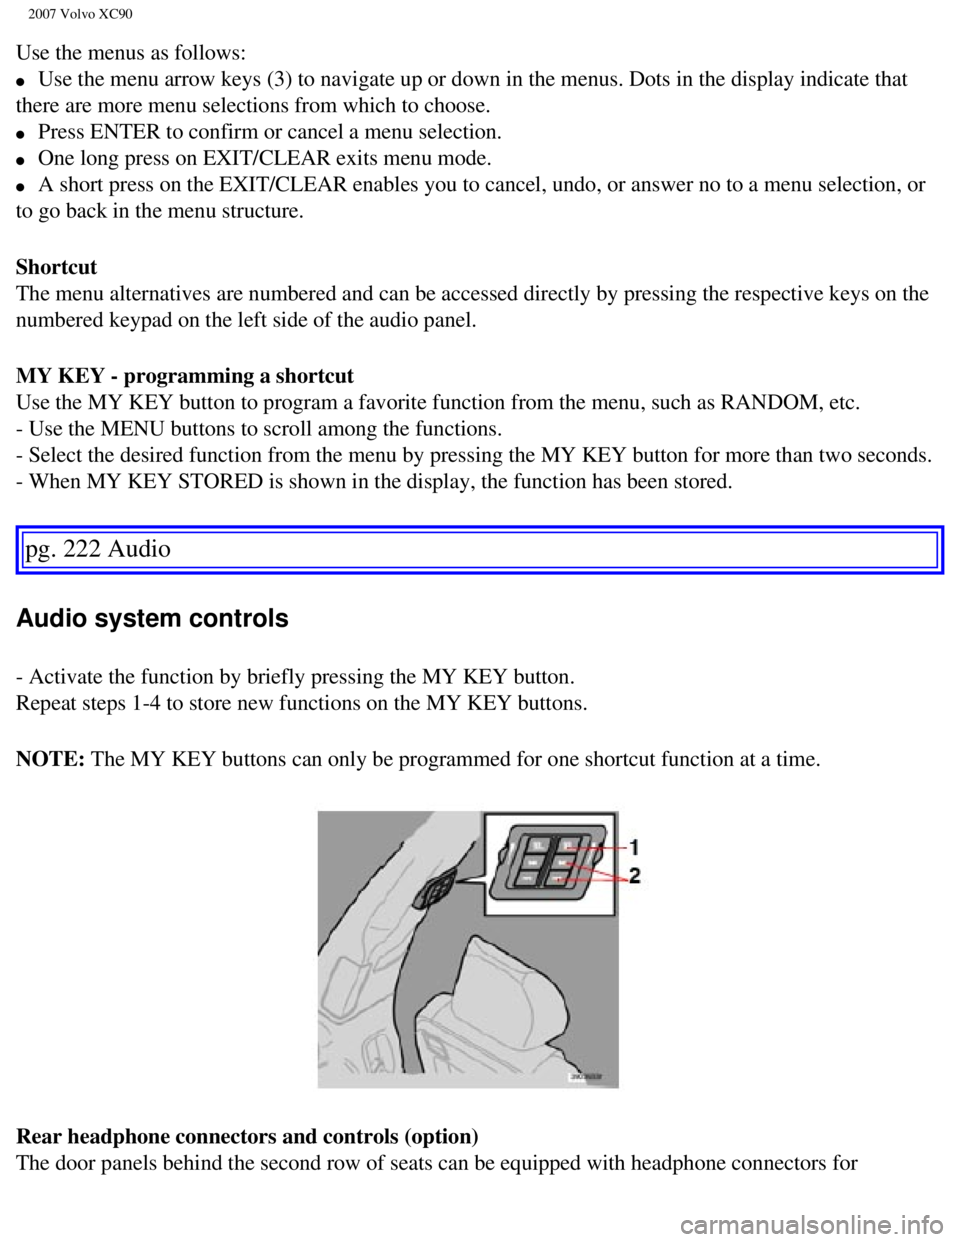
Rear headphone connectors and controls (option)
The door panels behind the second row of seats can be equipped with head\
phone connectors for
file:///K|/ownersdocs/2007/2007_XC90/07xc90_11.htm (4 of 26)12/30/2006\
5:53:54 PM
Page 239 of 268
2007 Volvo XC90
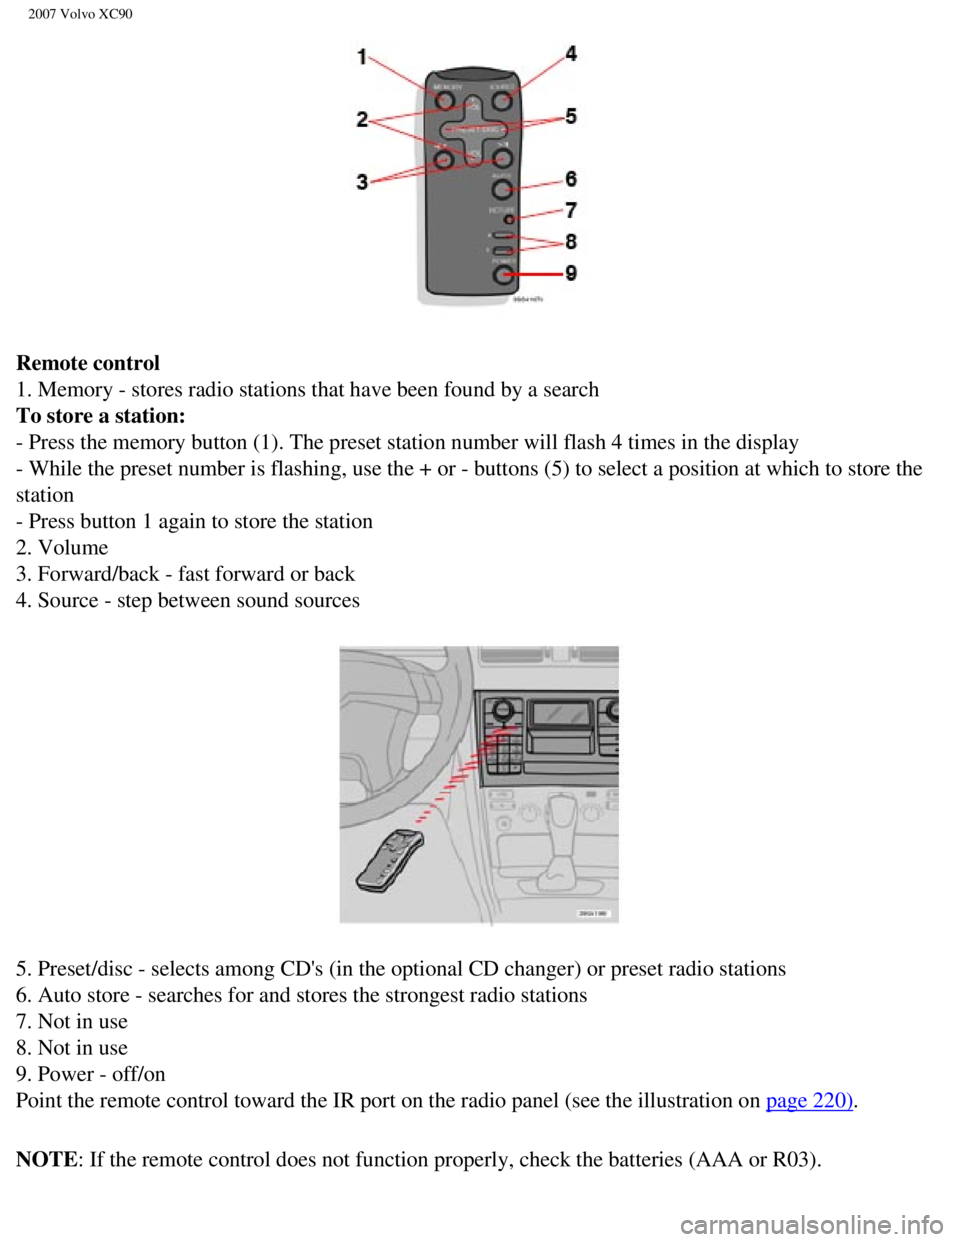
Remote control
1. Memory - stores radio stations that have been found by a search
To store a station:
- Press the memory button (1). The preset station number will flash 4 \
times in the display
- While the preset number is flashing, use the + or - buttons (5) to s\
elect a position at which to store the
station
- Press button 1 again to store the station
2. Volume
3. Forward/back - fast forward or back
4. Source - step between sound sources
5. Preset/disc - selects among CD's (in the optional CD changer) or pr\
eset radio stations
6. Auto store - searches for and stores the strongest radio stations
7. Not in use
8. Not in use
9. Power - off/on
Point the remote control toward the IR port on the radio panel (see the\
illustration on
page 220).
NOTE: If the remote control does not function properly, check the batteries \
(AAA or R03).
file:///K|/ownersdocs/2007/2007_XC90/07xc90_11.htm (6 of 26)12/30/2006\
5:53:54 PM
Page 243 of 268
2007 Volvo XC90
- Select AUDIO SETTINGS in the menu and press ENTER.
- Select Equalizer FR and press ENTER.
- Use the menu selection buttons to set the level or use the SELECTOR co\
ntrol.
- Press ENTER to select the next frequency. You can select five frequenc\
ies.
- Press ENTER until you come to the menu mode to save the changes you ha\
ve made.
Equalizer RR
EQ - REAR (certain audio systems)
This function is used to fine-tune the sound from the rear speakers.
- Select AUDIO SETTINGS in the menu and press ENTER.
- Select EQ- REAR and press ENTER.
Use the menu selection buttons to set the level or use the SELECTOR cont\
rol.
- Press ENTER to select the next frequency. You can select five frequenc\
ies
Press ENTER until you come to the menu mode to save the changes you have\
made.
pg. 227 Audio
Radio functions
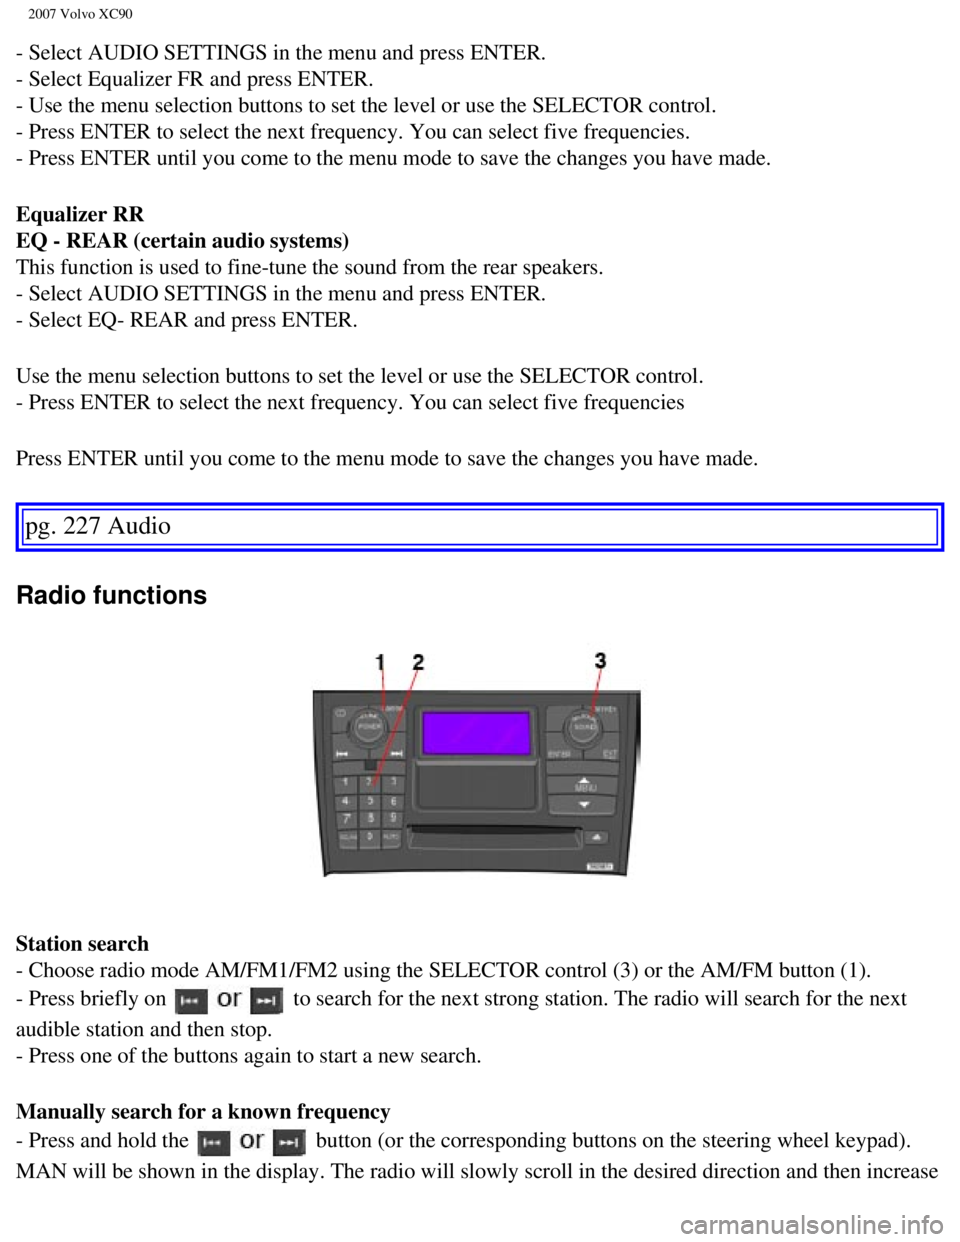
Station search
- Choose radio mode AM/FM1/FM2 using the SELECTOR control (3) or the A\
M/FM button (1).
- Press briefly on
to search for the next strong station. The radio will search for the ne\
xt
audible station and then stop.
- Press one of the buttons again to start a new search.
Manually search for a known frequency
- Press and hold the
button (or the corresponding buttons on the steering wheel keypad).
MAN will be shown in the display. The radio will slowly scroll in the de\
sired direction and then increase
file:///K|/ownersdocs/2007/2007_XC90/07xc90_11.htm (10 of 26)12/30/200\
6 5:53:54 PM
Page 244 of 268
2007 Volvo XC90
speed after a few seconds.
- Release the button when the desired frequency is displayed.
- If you need to adjust the frequency, press briefly on
.
The manual search function is available for five seconds after you last \
pressed the button.
Storing stations
To store a selected station under one of the station setting buttons 0-9\
(2):
- Set the desired station.
- Press the button under which the station is to be stored and keep it d\
epressed. The sound will be
interrupted for several seconds and STATION STORED is shown in the displ\
ay. The station is now
stored.
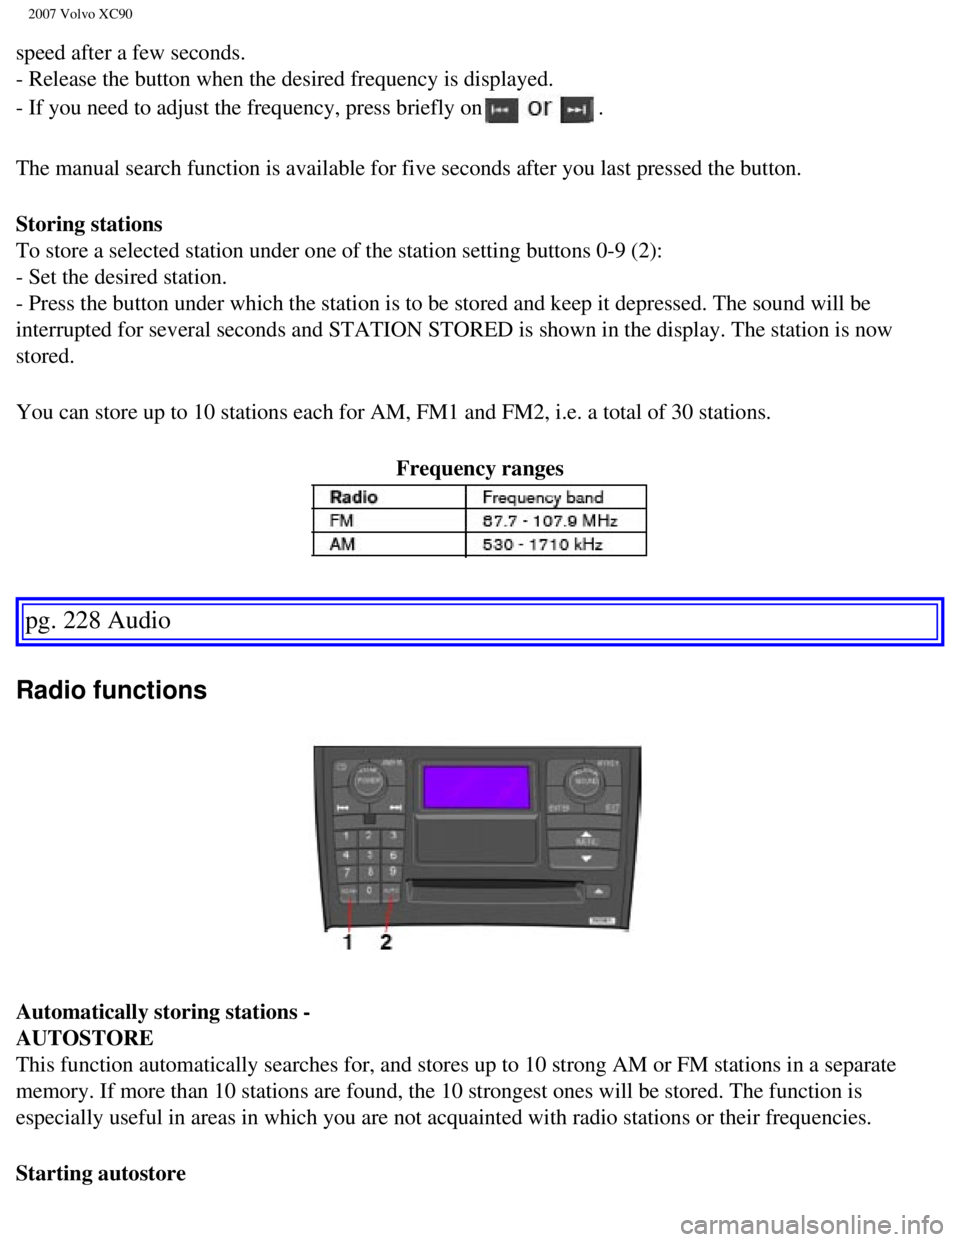
You can store up to 10 stations each for AM, FM1 and FM2, i.e. a total o\
f 30 stations. Frequency ranges
pg. 228 Audio
Radio functions
Automatically storing stations -
AUTOSTORE
This function automatically searches for, and stores up to 10 strong AM \
or FM stations in a separate
memory. If more than 10 stations are found, the 10 strongest ones will b\
e stored. The function is
especially useful in areas in which you are not acquainted with radio st\
ations or their frequencies.
Starting autostore
file:///K|/ownersdocs/2007/2007_XC90/07xc90_11.htm (11 of 26)12/30/200\
6 5:53:54 PM
Page 245 of 268

2007 Volvo XC90
- Choose a frequency band with the AM/ FM button.
- Press and hold down the AUTO button (2) until AUTOSTORING is shown i\
n the display.
When AUTOSTORING is no longer displayed, the autostore process is comple\
te. If there are no stations
with sufficient signal strength, NO AST FOUND is displayed.
Stopping autostore
- Press EXIT.
Selecting an autostored station
- Press AUTO (2) briefly. AUTO will be displayed.
- Press one of the preset buttons.
The radio will remain in Autostore mode until AUTO, EXIT, or AM/FM is pr\
essed.
SCAN
This function automatically searches the currently selected waveband (A\
M, FM1, or FM2) for strong
stations. When the radio finds a station, it will pause for approximatel\
y 8 seconds, after which it will
continue scanning.
Activating/deactivating Scan
- Choose a waveband by pressing the AM/ FM button.
- Press SCAN (1). SCAN will be shown in the display.
- Press EXIT to stop scanning.
Storing a station found by SCAN
Stations can be stored on the preset buttons while the SCAN function is \
activated.
- Press a preset button and hold it down until Station stored is display\
ed.
- This deactivates SCAN and the stored station can be selected by pressi\
ng the preset button.
Radio text
Certain stations broadcast program information, which can be shown in th\
e display.
- Press the MENU button.
- Select RADIOTEXT in the menu and press ENTER.
Select RADIOTEXT again to deactivate.
pg. 229 Audio
Sirius satellite radio (option or retailer-installed accessory)
Listening to satellite radio
file:///K|/ownersdocs/2007/2007_XC90/07xc90_11.htm (12 of 26)12/30/200\
6 5:53:54 PM
Page 246 of 268
2007 Volvo XC90
The Sirius satellite system consists of a number of high elevation satel\
lites in geosynchronous orbit.
NOTE: The digital signals from the Sirius satellites are line-of-sight, which\
means that physical
obstructions such as bridges, tunnels, etc, may temporarily interfere wi\
th signal reception.
Selecting Sirius radio mode
- Press Power to switch on the audio system (see
page 220 for information on the standard radio
functions).
- Turn the SELECTOR dial until Sirius 1 or 2 is displayed.
Activating Sirius radio
- Tune to a satellite channel that has no audio, which means that the ch\
annel is unsubscribed and the text
"Call 888-539- SIRIUS TO SUBSCRIBE" is displayed (see also "Selecting a\
channel" below).
- Call Sirius at 1-888-539-SIRIUS (7474). - When asked for the Sirius \
ID number press AUTO to
display this number. It is also possible to retrieve the Sirius ID from \
the MENU.
- "UPDATING SUBSCRIPTION" will be displayed while the subscription is be\
ing updated, after which
the display will return to the normal view.
SIRIUS ID
The SIRIUS ID is required when contacting the Sirius Call Center. It is \
used to activate your account
and when making any account transactions. The SIRIUS ID is sometimes ref\
erred to as the Electronic
Serial Number (ESN).
This function displays the 12-digit SIRIUS ID.
Selecting a channel category
- Select Sirius radio mode as described above.
- Press ENTER.
- Use the up/down arrow keys to scroll through the list of categories.
- Press ENTER to select a category.
- Use the
buttons to select a channel in the currently chosen category.
NOTE:
l The category "All" is default, which enables you to scroll through the e\
ntire list of available satellite
channels.
l The channel categories are automatically updated several times a year. T\
his takes approximately two
minutes and will interrupt normal broadcasting. A message will be displa\
yed while updating is in
progress. Information on channel or feature updates is available at www.\
sirius.com.
Selecting a channel
There are two ways of tuning in a channel:
file:///K|/ownersdocs/2007/2007_XC90/07xc90_11.htm (13 of 26)12/30/200\
6 5:53:54 PM
Page 247 of 268
2007 Volvo XC90
l By pressing and holding the buttons to start the scroll function. The scrolling function
begins slowly and increases speed after approximately 5 seconds. Release\
the button to listen to the
currently displayed channel.
l Through direct channel entry
Direct channel entry
The Sirius satellite channels are numbered consecutively throughout all \
of the categories. To access a
channel directly:
- Press MENU and scroll to "Direct channel entry."
- Use the numerical keypad to enter the channel's number. Press EXIT if \
necessary to erase a digit.
- Press ENTER. The radio will tune to this channel, even if it belongs t\
o a category other than the
currently selected one.
NOTE:
l The numbers of skipped or locked channels will not be displayed.
l If a channel is locked, the access code must be entered before the chann\
el can
pg. 230 Audio
Sirius satellite radio (option or retailer-installed accessory)
be selected. See "Unlocking a channel" on page 231.
Scanning
SCAN automatically searches through the list of satellite channels. Storing a channel
A total of 20 satellite channels can be stored; 10 channels each for Sir\
ius 1 and 2.
l A long press on one of the number keys stores the currently tuned channel on t\
hat key.
l A short press on a number key while the radio is in Sirius 1or 2 mode will tune\
to the preset satellite
channel stored on that button, regardless of the currently selected chan\
nel category.
Song Seek and Song Memory
The Song Seek and Song Memory functions provide both audio and visual no\
tification when Sirius is
broadcasting your favorite songs. Song Seek enables you to store the nam\
e of the song for future
advance notification when that song is being played. The Song Memory fea\
ture makes it possible to
view all of the current songs that are stored in memory.
Song memory
Up to ten songs can be saved in the system's memory.
- Press MENU.
- Scroll to "Add song to song mem." and follow the instructions shown in\
the display.
If a new song is selected when the memory is full, you will be prompted \
to press ENTER to delete the
file:///K|/ownersdocs/2007/2007_XC90/07xc90_11.htm (14 of 26)12/30/200\
6 5:53:54 PM
Page 252 of 268

2007 Volvo XC90
CD player
If a CD is in the slot and the audio system is in CD mode when it is swi\
tched on, the CD will be played
automatically. Otherwise, to play a CD:
- Insert a CD into the slot (2).
- Select the CD mode using the SELECTOR control (4) or the CD button (\
1).
CD changer (option)
The CD changer can hold up to six discs.
If a CD position in the changer containing a disc is selected, and the a\
udio system is in CD mode when it
is switched on, the CD will play automatically. Otherwise, to play a CD:\
- Select an empty position using the station setting buttons 1-6. INSERT\
DISC will be displayed. Be
sure this text is displayed before inserting a disc. The numbers of posi\
tions already containing discs are
shown in the display.
- Insert a CD into the slot (2).
- Select the CD mode using the SELECTOR control (4) or the CD button (\
1).
Ejecting CDs
CD player
- Press the EJECT button (3) to eject the CD.
NOTE: For reasons of traffic safety, the ejected CD must be removed within 12\
seconds or it will be
automatically drawn back into the slot and the CD player will enter paus\
e mode. Press the CD button to
restart the disc.
CD changer
Ejecting one disc
A short press on the EJECT button (3) will eject the CD that is currently playing.
NOTE: For reasons of traffic safety, you have 12 seconds in which to remove t\
he ejected disc. After
that, the disc automatically reinserts into the player.
Ejecting all discs
A long press on the EJECT button (3) starts the EJECT ALL function.
The text EJECTING ALL will be displayed and the entire magazine will be \
emptied disc by disc.
NOTE:
l The EJECT ALL function can only be used while the vehicle is at a stands\
till and will be cancelled if
the vehicle begins to move.
l For reasons of traffic safety, you have 12 seconds in which to remove th\
e ejected disc. After that, the
disc automatically reinserts into the player.
Pause
file:///K|/ownersdocs/2007/2007_XC90/07xc90_11.htm (19 of 26)12/30/200\
6 5:53:54 PM
Page 253 of 268
2007 Volvo XC90
To pause CD playback, turn the volume all the way down. "CD paused" will\
be displayed. This will not
occur if someone in the rear seat is listening to the CD through the opt\
ional headphones. Play will
resume when the volume is turned up again.
Audio files
In addition to playing normal music CDs, the CD player/changer can also \
play discs containing files in
mp3 or wma format.
pg. 234 Audio
CD functions
NOTE: Certain discs that are copy protected cannot be read by the player. Whe\
n a disc with audio files
is inserted in the player, the player scans the disc's folders before it\
begins playing the files. The length
of time that this takes depends on the quality of the disc.
Navigating the disc and playing tracks
If a disc with audio files is in the CD player, press ENTER to display a\
list of folders on the disc.
Use the up and down arrows to move among the folders on the disc. Audio \
files have the
symbol and
folders containing these files have the
symbol.
Press ENTER to play a selected folder or a file.
When the music file has been played, the player will continue to play th\
e rest of the files in the current
folder. When all of the files in the folder have been played, the player\
will automatically go to the next
folder and play the files in it.
NOTE: Press
if the entire name of the current track does not fit in the display.
Changing tracks
CD player/CD changer
l Briefly press to go to the next/ previous track or file. The optional steering wheel \
keypad can be used in the same way.
l Press and hold down to search within a track/file. The search continues as long as the
buttons are depressed. The optional steering wheel keypad can be used in\
the same way.
SCAN
This function plays the first ten seconds of each track or file
1.
- Press SCAN to begin scanning the tracks or files on the currently sele\
cted CD.
- Press EXIT/CLEAR or SCAN to interrupt the scan function and listen to \
an entire track or file.
Random play
file:///K|/ownersdocs/2007/2007_XC90/07xc90_11.htm (20 of 26)12/30/200\
6 5:53:54 PM
Page 256 of 268
2007 Volvo XC90
See Audio Settings in the FM Menu.
AUX Menu (option)
1. AUX input vol
2. Audio Settings
1
See Audio Settings in the FM Menu
1. Certain audio systems
pg. 237 Audio
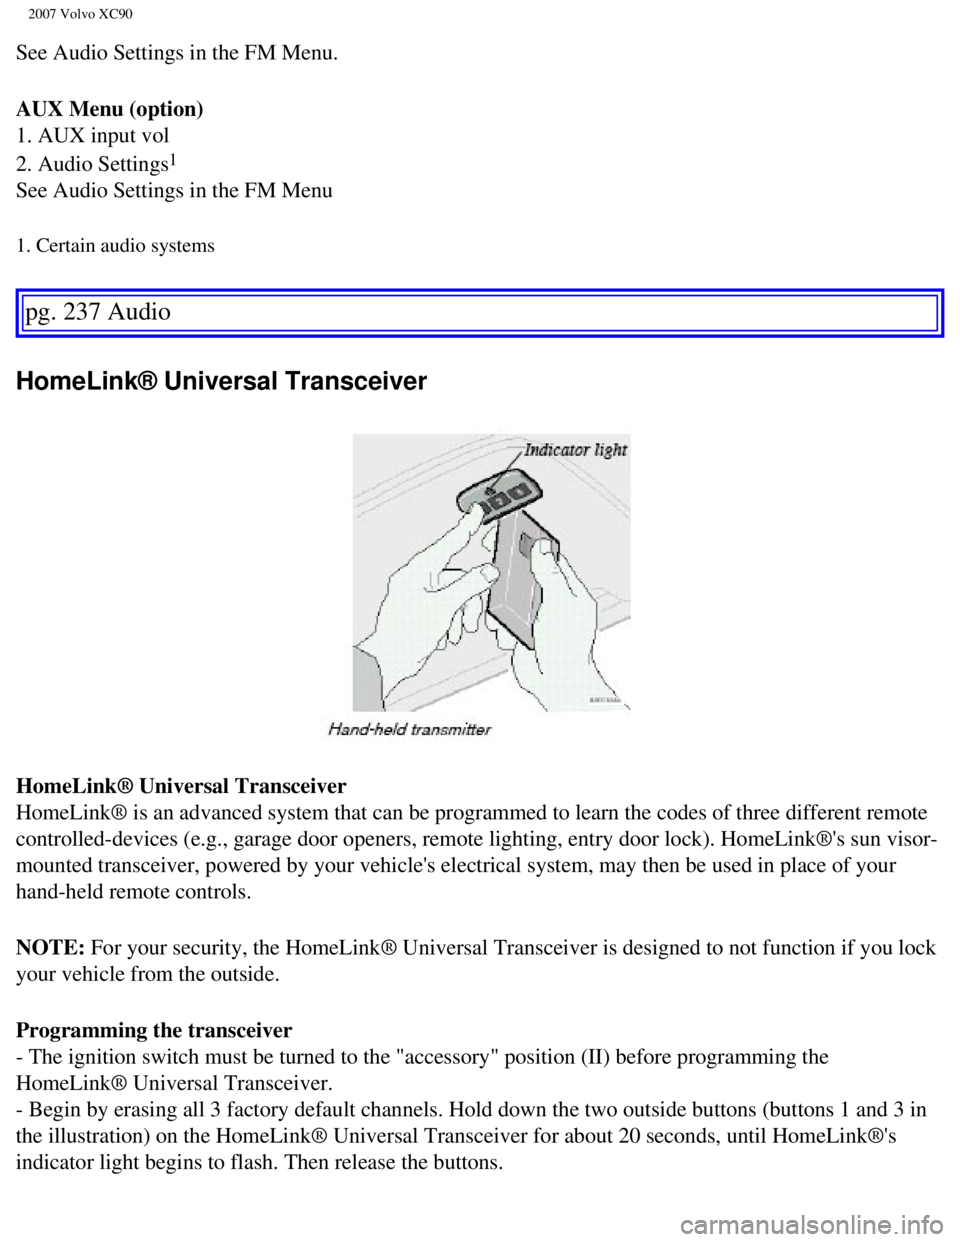
HomeLink® Universal Transceiver
HomeLink® Universal Transceiver
HomeLink® is an advanced system that can be programmed to learn the c\
odes of three different remote
controlled-devices (e.g., garage door openers, remote lighting, entry d\
oor lock). HomeLink®'s sun visor-
mounted transceiver, powered by your vehicle's electrical system, may th\
en be used in place of your
hand-held remote controls.
NOTE: For your security, the HomeLink® Universal Transceiver is designed t\
o not function if you lock
your vehicle from the outside.
Programming the transceiver
- The ignition switch must be turned to the "accessory" position (II) \
before programming the
HomeLink® Universal Transceiver.
- Begin by erasing all 3 factory default channels. Hold down the two out\
side buttons (buttons 1 and 3 in
the illustration) on the HomeLink® Universal Transceiver for about 2\
0 seconds, until HomeLink®'s
indicator light begins to flash. Then release the buttons.
file:///K|/ownersdocs/2007/2007_XC90/07xc90_11.htm (23 of 26)12/30/200\
6 5:53:54 PM