stop start VOLVO XC90 2018 Owner´s Manual
[x] Cancel search | Manufacturer: VOLVO, Model Year: 2018, Model line: XC90, Model: VOLVO XC90 2018Pages: 666, PDF Size: 11.32 MB
Page 277 of 666
DRIVER SUPPORT
275
Electronic Stability Control symbolsand messages
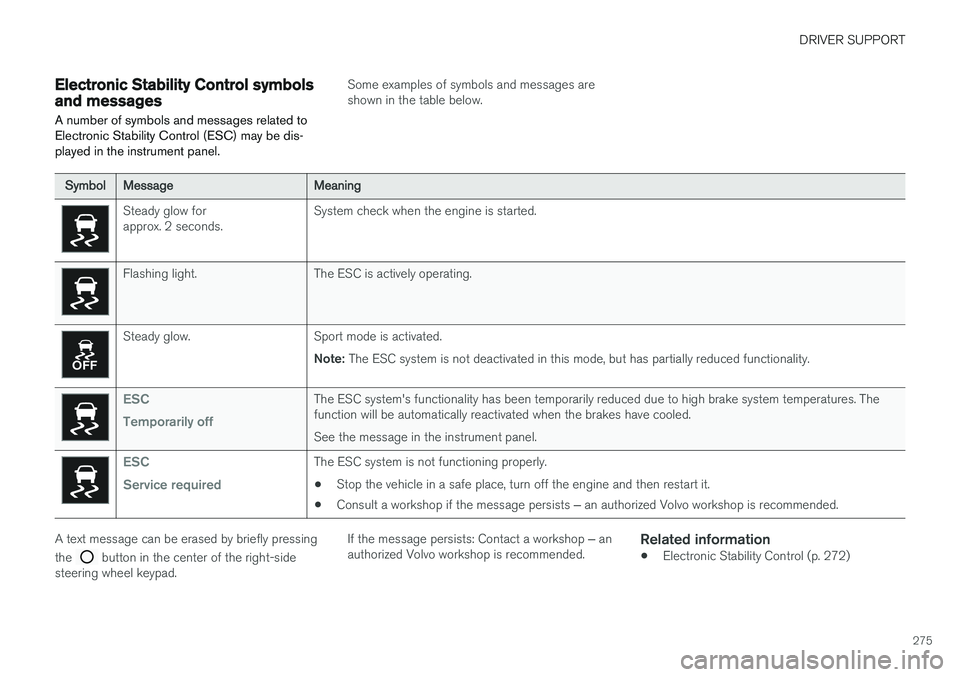
A number of symbols and messages related to Electronic Stability Control (ESC) may be dis-played in the instrument panel.
Some examples of symbols and messages are shown in the table below.
SymbolMessageMeaning
Steady glow for approx. 2 seconds. System check when the engine is started.
Flashing light. The ESC is actively operating.
Steady glow. Sport mode is activated.
Note: The ESC system is not deactivated in this mode, but has partially reduced functionality.
ESC Temporarily offThe ESC system's functionality has been temporarily reduced due to high brake system temperatures. The function will be automatically reactivated when the brakes have cooled. See the message in the instrument panel.
ESC Service requiredThe ESC system is not functioning properly.
• Stop the vehicle in a safe place, turn off the engine and then restart it.
• Consult a workshop if the message persists
‒ an authorized Volvo workshop is recommended.
A text message can be erased by briefly pressing the
button in the center of the right-side
steering wheel keypad. If the message persists: Contact a workshop
‒ an
authorized Volvo workshop is recommended.
Related information
• Electronic Stability Control (p. 272)
Page 396 of 666
||
DRIVER SUPPORT
* Option/accessory.
394
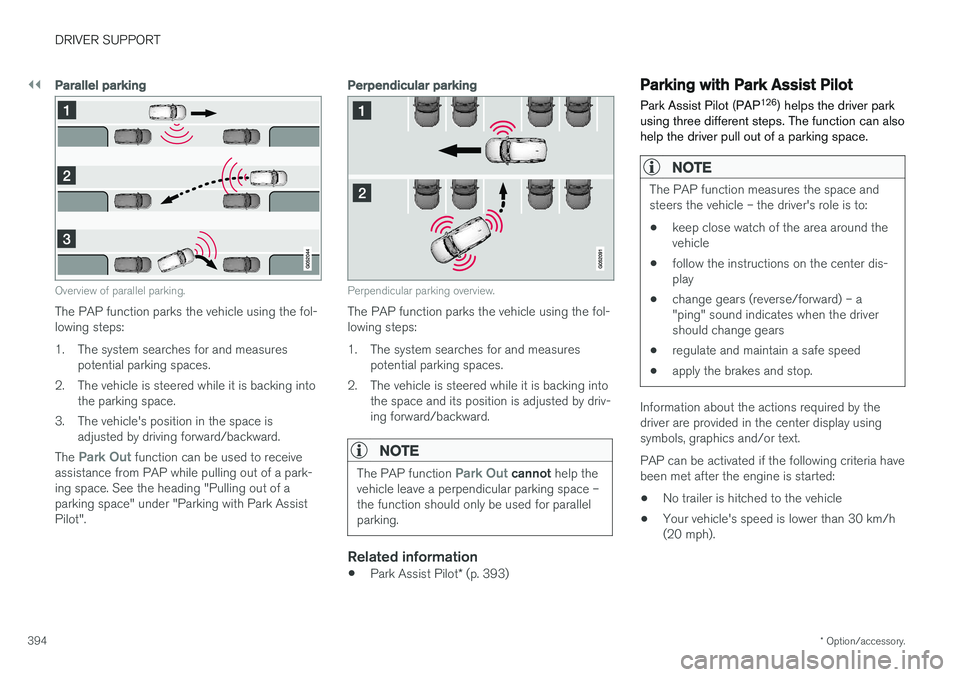
Parallel parking
Overview of parallel parking.
The PAP function parks the vehicle using the fol- lowing steps:
1. The system searches for and measures
potential parking spaces.
2. The vehicle is steered while it is backing into the parking space.
3. The vehicle's position in the space is adjusted by driving forward/backward.
The
Park Out function can be used to receive
assistance from PAP while pulling out of a park- ing space. See the heading "Pulling out of aparking space" under "Parking with Park AssistPilot".
Perpendicular parking
Perpendicular parking overview.
The PAP function parks the vehicle using the fol- lowing steps:
1. The system searches for and measures potential parking spaces.
2. The vehicle is steered while it is backing into the space and its position is adjusted by driv-ing forward/backward.
NOTE
The PAP function Park Out cannot help the
vehicle leave a perpendicular parking space – the function should only be used for parallelparking.
Related information
• Park Assist Pilot
* (p. 393)
Parking with Park Assist Pilot Park Assist Pilot (PAP 126
) helps the driver park
using three different steps. The function can also help the driver pull out of a parking space.
NOTE
The PAP function measures the space and steers the vehicle – the driver's role is to:
• keep close watch of the area around thevehicle
• follow the instructions on the center dis-play
• change gears (reverse/forward) – a"ping" sound indicates when the drivershould change gears
• regulate and maintain a safe speed
• apply the brakes and stop.
Information about the actions required by the driver are provided in the center display usingsymbols, graphics and/or text. PAP can be activated if the following criteria have been met after the engine is started: •
No trailer is hitched to the vehicle
• Your vehicle's speed is lower than 30 km/h (20 mph).
Page 413 of 666
STARTING AND DRIVING
}}
411
Braking on salted roads When driving on salted roads, a layer of salt may form on the brake discs and brake pads.
This could increase stopping distance. Maintain an extra large safety distance to the vehicleahead. Make sure to also:
• Apply the brakes from time to time to helpremove salt. Make sure braking does notpose a risk to any other road users.
• Gently apply the brakes when you have fin-ished driving and before driving again.
Related information
• Brakes (p. 409)
• Braking on wet roads (p. 410)
Maintenance of the brake system
Regularly check the brake system components for wear.
To keep the vehicle as safe and reliable as possi- ble, follow the Volvo service schedule specified inthe Warranty and Maintenance Records Informa-tion booklet. New and replaced brake pads andbrake discs do not provide optimal braking effectuntil they are "broken in" by driving a few hun-dred kilometers (miles). Compensate for thereduced braking effect by applying greater pres-sure to the brake pedal. Volvo recommends onlyusing brake pads approved for your Volvo.
CAUTION
The brake system's components should be regularly checked for wear. Contact a workshop for advice on how to do this or let a workshop perform the inspection- an authorized Volvo workshop is recom-mended.
Related information
• Brakes (p. 409)
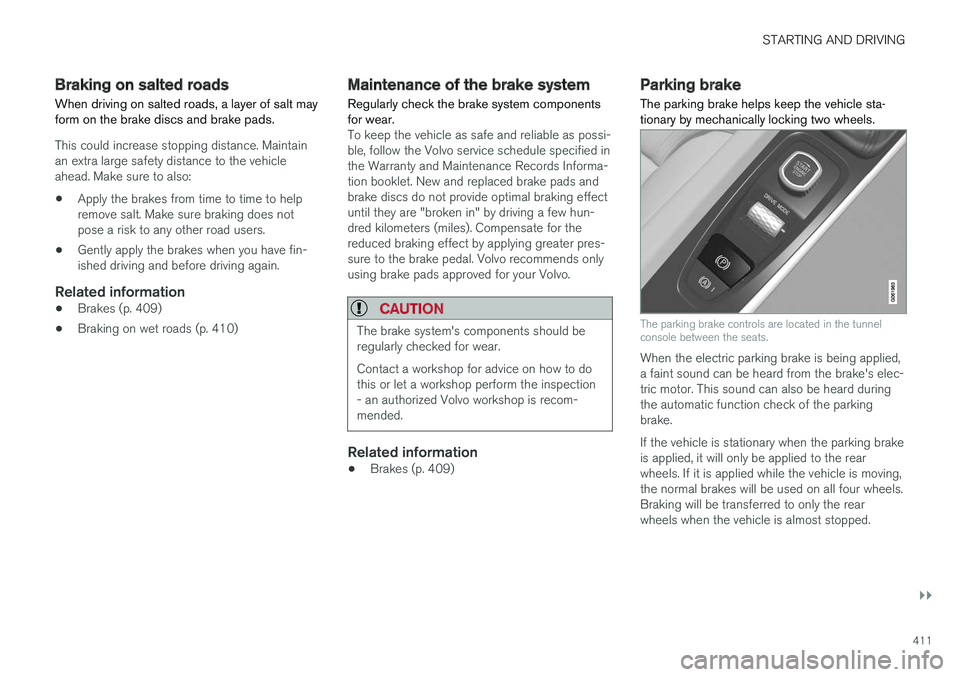
Parking brake The parking brake helps keep the vehicle sta- tionary by mechanically locking two wheels.
The parking brake controls are located in the tunnel console between the seats.
When the electric parking brake is being applied, a faint sound can be heard from the brake's elec-tric motor. This sound can also be heard duringthe automatic function check of the parkingbrake. If the vehicle is stationary when the parking brake is applied, it will only be applied to the rearwheels. If it is applied while the vehicle is moving,the normal brakes will be used on all four wheels.Braking will be transferred to only the rearwheels when the vehicle is almost stopped.
Page 417 of 666
STARTING AND DRIVING
415
Related information
•Activating and deactivating the parking brake (p. 412)
• Start battery (p. 598)
• Volvo's service program (p. 576)
Auto-hold brakes
With the Auto-hold brake function, the driver can release the brake pedal and the brakes willremain applied, for example, when the vehiclehas stopped at a traffic light or intersection.
When the vehicle stops, the brakes are activated automatically. The function can use either thenormal brakes or the parking brakes to keep thevehicle stationary and works on flat surfaces orhills. When driving off, the brakes will be automat-ically released if the driver's seat belt is buckled.
NOTE
When braking to a stop on an uphill or down- hill gradient, depress the brake pedal withslightly more force than usual before releas-ing to ensure that the vehicle cannot move atall.
The parking brake is activated if: • the vehicle is switched off
• the driver's door is opened
• the driver's seat belt is removed
• the vehicle has been stationary for a pro- longed period of time (5-10 minutes)
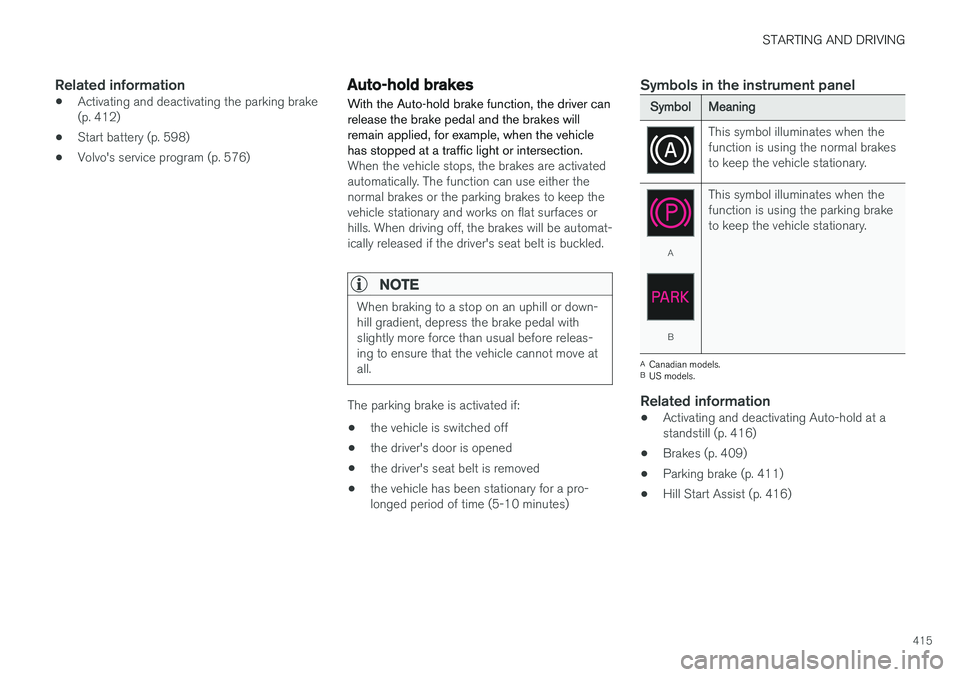
Symbols in the instrument panel
SymbolMeaning
This symbol illuminates when the function is using the normal brakesto keep the vehicle stationary.
A
B This symbol illuminates when the function is using the parking braketo keep the vehicle stationary.
A
Canadian models.
B US models.
Related information
• Activating and deactivating Auto-hold at a standstill (p. 416)
• Brakes (p. 409)
• Parking brake (p. 411)
• Hill Start Assist (p. 416)
Page 419 of 666
STARTING AND DRIVING
}}
* Option/accessory.417
Braking assist after a collision In a collision in which the activation level is reached for the pyrotechnic seat belt tensionersor airbags, or if a collision with a large animal isdetected, the vehicle's brakes will be automati-cally activated. This function is intended to helpprevent or reduce the effects of any subsequentcollision.
After a serious collision, it may no longer be pos- sible to control and steer the vehicle. In order toavoid or mitigate a possible further collision witha vehicle or an object in the vehicle's path, thebrake assist system is activated automatically tohelp stop the vehicle safely. The brake lights and hazard warning flashers are activated during braking. When the vehicle has stopped, the hazard warning flashers will con-tinue to flash and the parking brake will beapplied. If braking is not appropriate, e.g. if there is a risk of being hit by passing traffic, the driver can over-ride the system by depressing the acceleratorpedal. This function assumes that the brake system is intact after a collision. Brake assist is part of the Rear Collision Warning and Blind Spot Information safety systems.
Related information
•Rear Collision Warning (p. 345)
• BLIS
* (p. 346)
• Brake functions (p. 408)
Transmission The transmission is part of the vehicle's driveline (power transmission) between the engine andthe drive wheels. The function of the transmis-sion is to change gears depending on speedand power needs.
The vehicle has an 8-speed automatic transmis- sion. The number of gears allows the engine'storque and power band to be effectively utilized.Two of the gears are overdrive gears that savefuel when driving at a constant engine speed.Manual shifting is also possible. The instrumentpanel shows the gear currently in use.
CAUTION
Check the operating temperature of the transmission to help avoid damage to any ofthe drive system components. If there is a riskof overheating, a warning symbol will appearin the instrument panel and a text messagewill be displayed. Follow the recommenda-tions given.
Symbols in the instrument panelIf a problem should occur with the transmission, a symbol and a message will appear in the instru-ment panel.
Page 422 of 666
||
STARTING AND DRIVING
* Option/accessory.
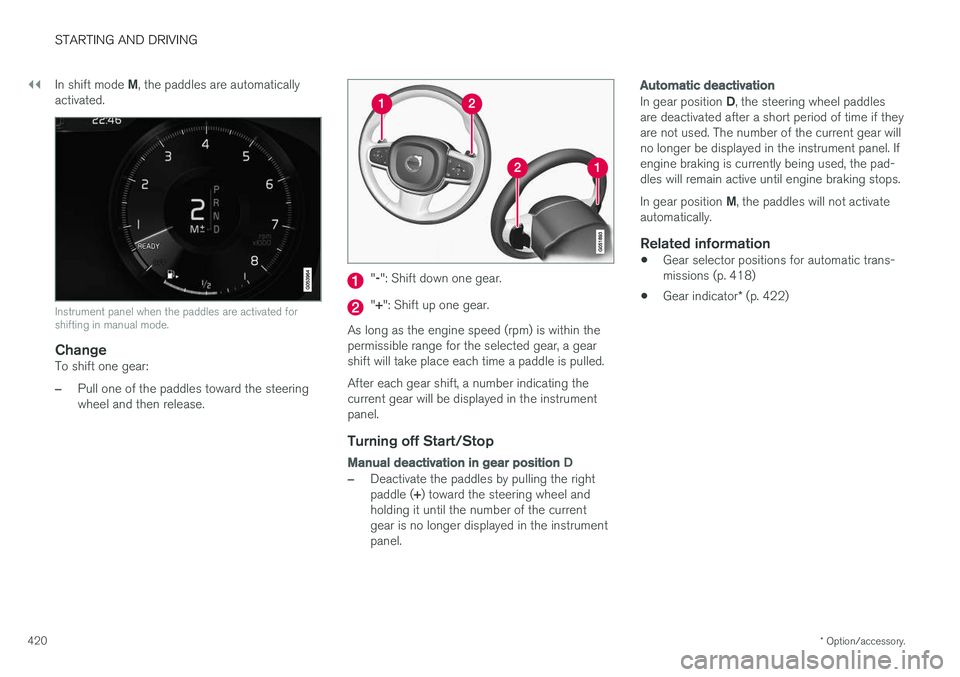
420 In shift mode
M, the paddles are automatically
activated.
Instrument panel when the paddles are activated for shifting in manual mode.
ChangeTo shift one gear:
–Pull one of the paddles toward the steering wheel and then release.
" -": Shift down one gear.
" + ": Shift up one gear.
As long as the engine speed (rpm) is within the permissible range for the selected gear, a gear shift will take place each time a paddle is pulled. After each gear shift, a number indicating the current gear will be displayed in the instrumentpanel.
Turning off Start/Stop
Manual deactivation in gear position D
–Deactivate the paddles by pulling the right paddle (+) toward the steering wheel and
holding it until the number of the current gear is no longer displayed in the instrumentpanel.
Automatic deactivation
In gear position D, the steering wheel paddles
are deactivated after a short period of time if they are not used. The number of the current gear willno longer be displayed in the instrument panel. Ifengine braking is currently being used, the pad-dles will remain active until engine braking stops. In gear position M, the paddles will not activate
automatically.
Related information
• Gear selector positions for automatic trans- missions (p. 418)
• Gear indicator
* (p. 422)
Page 425 of 666
STARTING AND DRIVING
}}
* Option/accessory.423
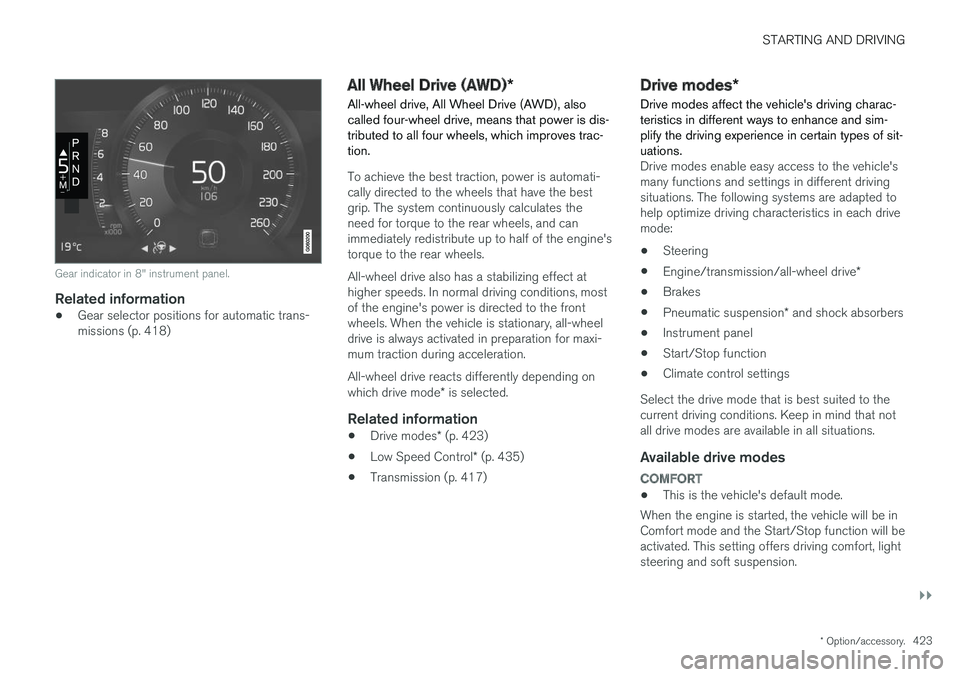
Gear indicator in 8" instrument panel.
Related information
•Gear selector positions for automatic trans- missions (p. 418)
All Wheel Drive (AWD)
*
All-wheel drive, All Wheel Drive (AWD), also called four-wheel drive, means that power is dis-tributed to all four wheels, which improves trac-tion.
To achieve the best traction, power is automati- cally directed to the wheels that have the bestgrip. The system continuously calculates theneed for torque to the rear wheels, and canimmediately redistribute up to half of the engine'storque to the rear wheels. All-wheel drive also has a stabilizing effect at higher speeds. In normal driving conditions, mostof the engine's power is directed to the frontwheels. When the vehicle is stationary, all-wheeldrive is always activated in preparation for maxi-mum traction during acceleration. All-wheel drive reacts differently depending on which drive mode * is selected.
Related information
• Drive modes
* (p. 423)
• Low Speed Control
* (p. 435)
• Transmission (p. 417)
Drive modes
*
Drive modes affect the vehicle's driving charac- teristics in different ways to enhance and sim-plify the driving experience in certain types of sit-uations.
Drive modes enable easy access to the vehicle's many functions and settings in different drivingsituations. The following systems are adapted tohelp optimize driving characteristics in each drivemode: • Steering
• Engine/transmission/all-wheel drive
*
• Brakes
• Pneumatic suspension
* and shock absorbers
• Instrument panel
• Start/Stop function
• Climate control settings
Select the drive mode that is best suited to the current driving conditions. Keep in mind that notall drive modes are available in all situations.
Available drive modes
COMFORT
• This is the vehicle's default mode.
When the engine is started, the vehicle will be in Comfort mode and the Start/Stop function will beactivated. This setting offers driving comfort, lightsteering and soft suspension.
Page 426 of 666
||
STARTING AND DRIVING
424
ECO
•Adapt the vehicle for more fuel-efficient and eco-friendly driving with Eco mode.
In this mode, the Start/Stop function is activated,the ground clearance is lower to reduce air resis-tance and certain climate settings are reduced. The instrument panel has an ECO gauge to facili- tate fuel-efficient driving.
OFF ROAD
• Maximizes the vehicle's ability to traverse dif- ficult terrain or poor roads.
In this mode, ground clearance is high, steering islight, and all-wheel drive and Hill Descent Controlare activated. The Start/Stop function is deacti-vated. This mode can only be activated at low speeds. The permitted speed range will be shown in thespeedometer. If this speed is exceeded, Off roadmode will be deactivated and another drive modeactivated. In Off road mode, a compass will be displayed between the speedometer and the tachometer inthe instrument panel.
NOTE
This drive mode is not designed to be used for normal street driving.
NOTE
Due to the increased ground clearance, if the OFF ROAD mode was selected when theengine was switched off, the suspension willlower when the engine is restarted.
CAUTION
Do not use the OFF ROAD drive mode when towing a trailer without an electrical connec-tion. This could result in damage to the pneu-matic suspension system's bellows.
DYNAMIC
• Dynamic mode is designed to provide sport- ier driving characteristics and a faster accel-eration response.
Gear shifting will be faster and more distinct andthe transmission will prioritize gears with a highertraction force. Steering response is faster, suspension is stiffer and ground clearance is lower to help reducebody roll when cornering. The Start/Stop function is deactivated.
INDIVIDUAL
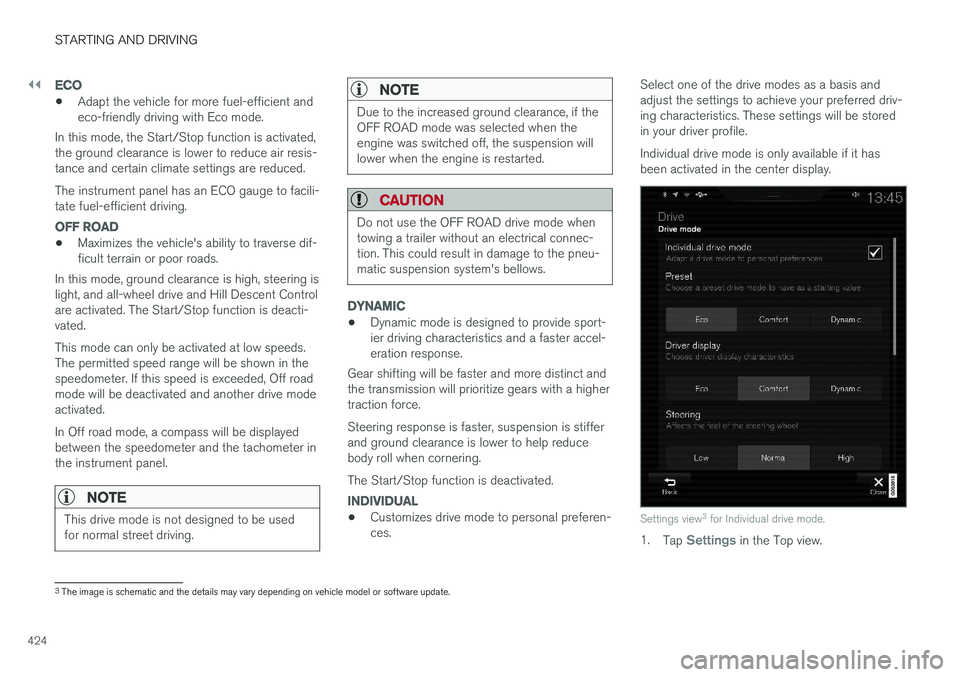
• Customizes drive mode to personal preferen- ces. Select one of the drive modes as a basis andadjust the settings to achieve your preferred driv-ing characteristics. These settings will be storedin your driver profile. Individual drive mode is only available if it has been activated in the center display.Settings view
3
for Individual drive mode.
1. Tap Settings in the Top view.
3
The image is schematic and the details may vary depending on vehicle model or software update.
Page 427 of 666
STARTING AND DRIVING
* Option/accessory.425
2. Tap
My CarIndividual Drive Mode and
select Individual Drive Mode.
3. Under
Presets, select one of the following
drive modes as a basis: Eco, Comfort orDynamic.
The following settings can be modified: •
Driver Display
•Steering force
•Powertrain Characteristics
•Brake Characteristics
•Suspension Control
•ECO Climate
•Start/Stop.
Related information
• Changing drive mode
* (p. 425)
• ECO drive mode (p. 426)
• Economical driving (p. 438)
• Start/Stop function (p. 428)
• Low Speed Control
* (p. 435)
• Hill Descent Control
* (p. 437)
• All Wheel Drive (AWD)
* (p. 423)
Changing drive mode *
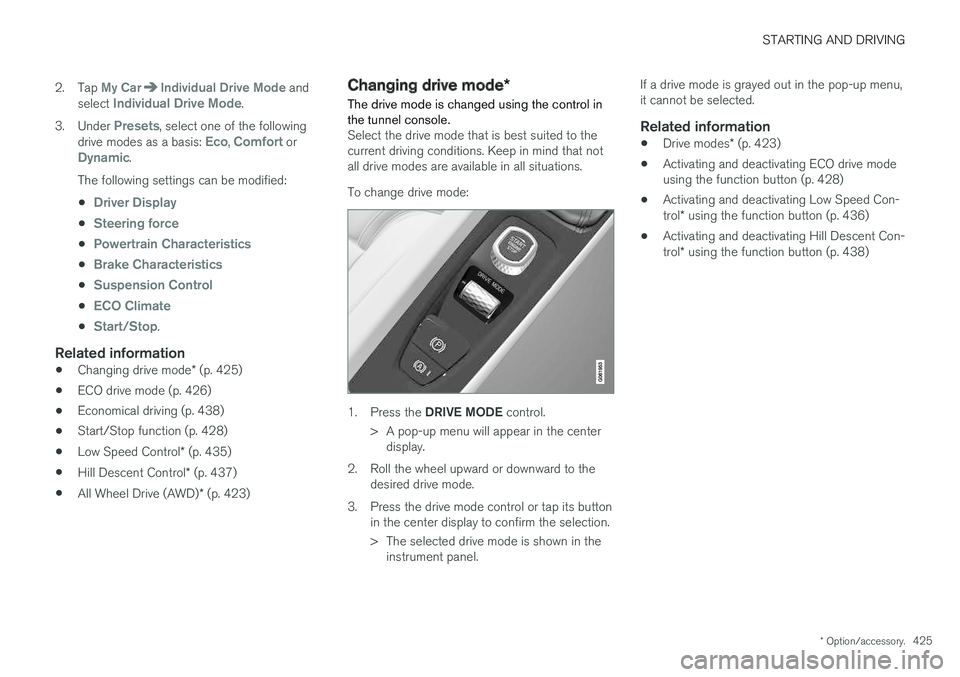
The drive mode is changed using the control in the tunnel console.
Select the drive mode that is best suited to the current driving conditions. Keep in mind that notall drive modes are available in all situations. To change drive mode:
1. Press the DRIVE MODE control.
> A pop-up menu will appear in the center display.
2. Roll the wheel upward or downward to the desired drive mode.
3. Press the drive mode control or tap its button in the center display to confirm the selection.
> The selected drive mode is shown in theinstrument panel. If a drive mode is grayed out in the pop-up menu, it cannot be selected.
Related information
•
Drive modes
* (p. 423)
• Activating and deactivating ECO drive modeusing the function button (p. 428)
• Activating and deactivating Low Speed Con- trol
* using the function button (p. 436)
• Activating and deactivating Hill Descent Con-trol
* using the function button (p. 438)
Page 429 of 666
STARTING AND DRIVING
* Option/accessory.427
•
On a level road, the vehicle's actual speed may differ from the set speed when cruisecontrol is active and the vehicle is coasting.
• On a steep uphill gradient, the vehicle'sspeed is reduced until the transmissiondownshifts. Reduced acceleration is then ini-tiated in order to reach the set speed.
• On a downhill gradient in which the vehicle iscoasting, the vehicle's actual speed may beslightly above or below the set speed. Thefunction uses engine braking to keep the setspeed. If necessary, the normal brakes arealso applied.
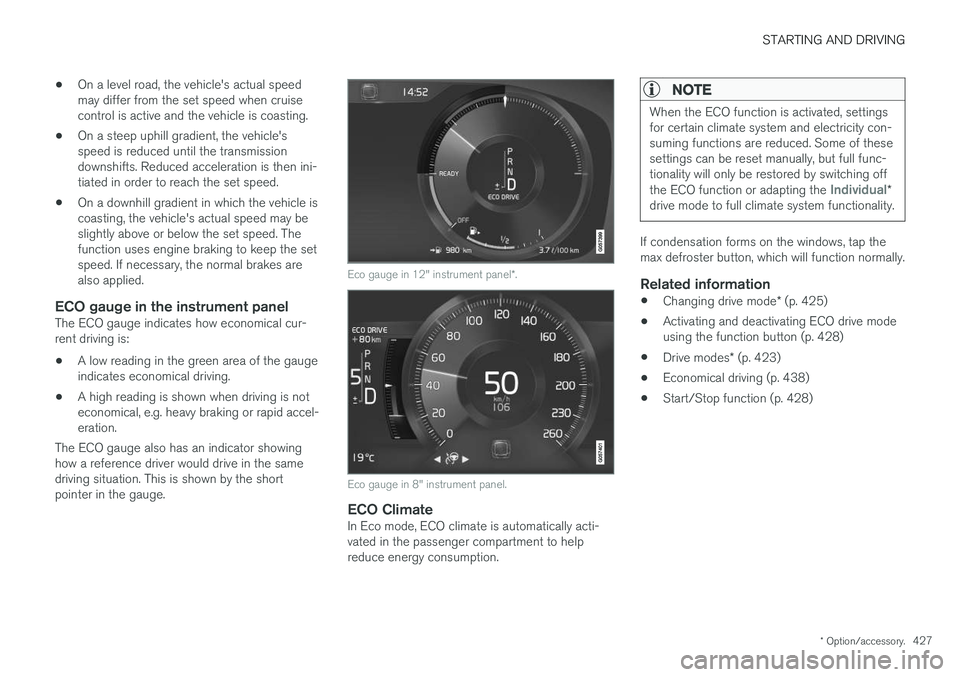
ECO gauge in the instrument panelThe ECO gauge indicates how economical cur-rent driving is:
• A low reading in the green area of the gaugeindicates economical driving.
• A high reading is shown when driving is noteconomical, e.g. heavy braking or rapid accel-eration.
The ECO gauge also has an indicator showinghow a reference driver would drive in the samedriving situation. This is shown by the shortpointer in the gauge.
Eco gauge in 12" instrument panel *.
Eco gauge in 8" instrument panel.
ECO ClimateIn Eco mode, ECO climate is automatically acti- vated in the passenger compartment to helpreduce energy consumption.
NOTE
When the ECO function is activated, settings for certain climate system and electricity con-suming functions are reduced. Some of thesesettings can be reset manually, but full func-tionality will only be restored by switching off the ECO function or adapting the
Individual*
drive mode to full climate system functionality.
If condensation forms on the windows, tap the max defroster button, which will function normally.
Related information
• Changing drive mode
* (p. 425)
• Activating and deactivating ECO drive modeusing the function button (p. 428)
• Drive modes
* (p. 423)
• Economical driving (p. 438)
• Start/Stop function (p. 428)