Engine specifications VOLVO XC90 2018 Owner´s Manual
[x] Cancel search | Manufacturer: VOLVO, Model Year: 2018, Model line: XC90, Model: VOLVO XC90 2018Pages: 666, PDF Size: 11.32 MB
Page 15 of 666
13
LOADING, STORAGE AND
PASSENGER COMPARTMENT
Passenger compartment interior558
Tunnel console 559
Electrical outlets 560
Using the electrical outlets 562
Using the glove compartment 563
Sun visors 564
Cargo compartment 564
Loading recommendations 564
Roof loads and load carriers 566
Grocery bag holders 566
Load anchoring eyelets 567
Installing and removing the cargo compartment cover * 567
Operating the cargo compartment cover *
568
Installing and removing the steelcargo grid * 570
Installing and removing the cargo net *
571
MAINTENANCE AND SERVICE
Volvo's service program
576
Data transfer between vehicle and workshop over Wi-Fi 578
Download Center 579
Handling system updates via Down-load Center 579
Vehicle status 580
Scheduling service and repairs 580
Sending vehicle information to theworkshop 582
Hoisting the vehicle 583
Opening and closing the hood 585
Climate control system service 586
Replacing a windshield with head-up display * 586
Engine compartment overview 587
Engine oil 587
Checking and filling engine oil 588
Refilling coolant 590
Replacing bulbs 591
Removing the plastic cover to replace bulbs 593
Removing the rectangular headlightcover 593
Location of exterior lights 594
Replacing the low beam headlight bulbs 595
Replacing the high beam headlight bulbs595
Replacing daytime running lights/ front parking light bulbs 596
Replacing front turn signal bulbs 597
Bulb specifications 597
Start battery 598
Support battery 601
Battery symbols 602
Fuses and fuseboxes 603
Replacing fuses 604
Fuses in the engine compartment 605
Fuses under the glove compartment 608
Fuses in the cargo compartment 611
Cleaning the interior 615
Cleaning the center display 615
Cleaning the head-up display *
616
Cleaning fabric upholstery and ceil-ing liner 617
Cleaning the seat belt 617
Cleaning floor mats and inlay mats 617
Cleaning leather upholstery 618
Cleaning the leather steering wheel 619
Cleaning interior plastic, metal andwood surfaces 620
Cleaning the exterior 620
Page 16 of 666
14
Polishing and waxing621
Hand washing 621
Automatic car washes 623
High-pressure washing 624
Cleaning the wiper blades 624
Cleaning exterior plastic, rubber and trim components 625
Cleaning rims 626
Corrosion protection 626
Paintwork 627
Touching up minor paint damage 627
Color codes 628
Changing rear window wipers 629
Replacing windshield wiper blades 630
Windshield wipers in the service position 631
Filling washer fluid 632
SPECIFICATIONS
Type designations636
Dimensions 639
Weights 641
Towing capacity and tongue weight 642
Engine specifications 643
Engine oil specifications 644
Coolant specifications 645
Transmission fluid specifications 645
Brake fluid specifications 645
Fuel tank volume 646
Air conditioning specifications 646
Approved tire pressure 647
INDEX
Index 649
Page 494 of 666

AUDIO, MEDIA AND INTERNET
* Option/accessory.
492
Playing media via the USB port External audio sources, such as an iPod ® or
MP3 player, can be connected to the audio sys- tem via the vehicle's USB port.
Devices with rechargeable batteries can be charged when they are connected via the USB port and the ignition is in mode I, II or the engine
is running. The content on the external source can be read faster if it only contains data of a compatible for-mat. Video files can also be played via the USBport. Some MP3 players have their own file system that the vehicle has support for.
Related information
• Connecting a device via the USB port(p. 492)
• Playing media (p. 486)
• Video (p. 490)
• Ignition modes (p. 407)
• Technical specifications for USB devices(p. 515)
• Apple ®
CarPlay ®
* (p. 493)
• Android Auto
* (p. 496)
Connecting a device via the USBport
External audio sources, such as an iPod ®
or
MP3 player, can be connected to the audio sys- tem via any of the vehicle's USB ports.
If the vehicle has two USB ports, the phone must be connected to the port with the white frame to use Apple CarPlay * or Android Auto *.
USB ports (type A) in the tunnel console. Route the cable forward to help avoid pinching when the cover isclosed.
Related information
• Playing media (p. 486)
• Playing media via the USB port (p. 492)
• Media player (p. 485)
• Technical specifications for USB devices (p. 515) •
Technical specifications for USB devices(p. 515)
• Apple ®
CarPlay ®
* (p. 493)
• Android Auto
* (p. 496)
Page 578 of 666

MAINTENANCE AND SERVICE
576
Volvo's service program
To keep the vehicle as safe and reliable as pos- sible, follow the Volvo service schedule speci-fied in the Warranty and Maintenance RecordsInformation booklet.
Volvo recommends having an authorized Volvo workshop perform service and maintenance.Volvo workshops have the staff, service literatureand special tools to guarantee the highest qualityof service.
CAUTION
To ensure the Volvo warranty is not invalida- ted, check and follow the Service and War-ranty Booklet.
IntroductionThe maintenance services contain several checks that require special instruments and tools andtherefore must be performed by a qualified tech-nician. To keep your Volvo in top condition, spec-ify time-tested and proven Genuine Volvo Partsand Accessories.
The Federal Clean Air Act - U.S.
The Federal Clean Air Act requires vehicle manu- facturers to furnish written instructions to the ulti-mate purchaser to assure the proper servicingand function of the components that controlemissions. These services, which are listed in the"Warranty and Service Records Information" booklet, are not covered by the warranty. You willbe required to pay for labor and material used.
Maintenance
Your Volvo passed several major inspections before it was delivered to you, in accordance withVolvo specifications. The maintenance proce-dures outlined in the Warranty and ServiceRecords Information booklet, many of which willpositively affect your vehicle's emissions, shouldbe performed as indicated. It is recommendedthat receipts for vehicle emission maintenance beretained in case questions arise concerningmaintenance. Inspection and maintenance shouldalso be performed anytime a malfunction isobserved or suspected.
Applicable warranties - U.S./Canada
In accordance with applicable U.S. and Canadian regulations, the following list of warranties is pro-vided.
• New Vehicle Limited Warranty
• Parts and Accessories Limited Warranty
• Corrosion Protection Limited Warranty
• Seat Belt and Supplemental Restraint Sys-tems Limited Warranty
• Emission Design and Defect Warranty
• Emission Performance Warranty
These are federal warranties. Other warrantiesare provided as required by state/provincial law.Refer to your separate Warranty and Service Records Information booklet for detailed informa-tion concerning each of the warranties.
Periodic maintenance helps minimize
emissions
NOTE
•
Refer to your Service and Warranty Book- let for a comprehensive service and main-tenance schedule up to 240,000 km(150,000 miles). This program containsinspections and services necessary forthe proper function of your vehicle andincludes components that affect vehicleemissions.
• The Warranty and Service Records Infor-mation booklet also contains detailedinformation concerning the warrantiesthat apply to your vehicle.
On-board Diagnostic SystemOBD II is part of your vehicle's computerized engine management system. It stores diagnosticinformation about your vehicle's emission con-trols. It can light the Check Engine light (MIL) if itdetects an emission control "fault." A "fault" is acomponent or system that is not performingwithin an expected range. A fault may be perma-nent or temporary. OBD II will store a messageabout any fault.
Page 590 of 666
||
MAINTENANCE AND SERVICE
588If the engine oil is not checked regularly and the level becomes low, this could cause seriousengine damage.
CAUTION
To satisfy the requirements for the engine's service intervals, all engines are factory-filledwith a specially adapted synthetic engine oil.Great care has been put into the choice of oil,with consideration given to service life, starta-bility, fuel consumption and environmentalimpact. For the recommended service intervals to apply, an approved engine oil must be used.Only use the prescribed oil grade to top off orchange the oil. Otherwise, there is a risk ofthe vehicle's service life, startability, fuel con-sumption and environmental impact beingaffected. Failure to use engine oil of the prescribed grade and viscosity could cause damage toengine-related components. Volvo Car Corpo-ration disclaims warranty liability for such typeof damage. Volvo recommends entrusting oil changes to an authorized Volvo workshop.
Volvo uses different systems to warn if the oil level is too low/high or the oil pressure is low. Onengine variants with an oil pressure sensor, a
warning symbol is displayed in the instrument panel when oil pressure is low
. On engine
variants with an oil level sensor, the
warn-
ing symbol in the instrument panel and display messages are used to alert the driver. Someengine variants have both systems. Contact aVolvo retailer for more information. Change the engine oil and oil filter according to the schedule specified in the Warranty and Main-tenance Records Information booklet. Oils of ahigher grade than that specified may be used. Ifthe vehicle is driven in adverse conditions, Volvorecommends using an oil with a higher gradethan that specified.
Related information
• Checking and filling engine oil (p. 588)
• Engine oil specifications (p. 644)
Checking and filling engine oil
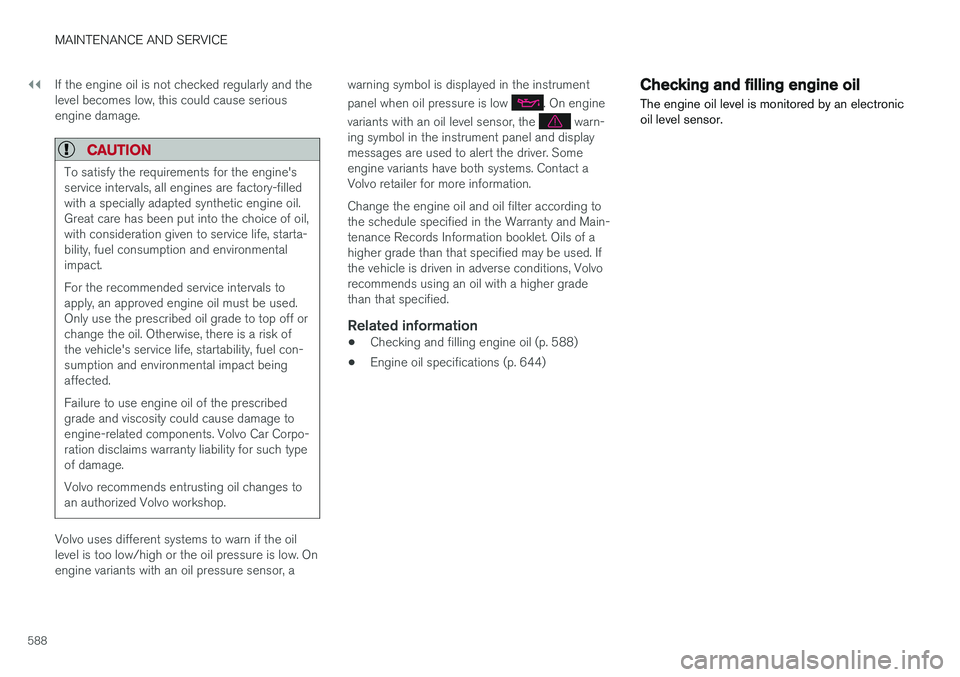
The engine oil level is monitored by an electronic oil level sensor.
Page 592 of 666
||
MAINTENANCE AND SERVICE
590
NOTE
If the conditions for measuring oil level are not properly fulfilled (time after engine shut-down, vehicle inclination, ambient tempera- ture, etc.) the message
No value availablewill be shown in the center display. This does not mean that anything is wrong in the vehi-
cle systems.
Related information
• Engine oil (p. 587)
• Engine oil specifications (p. 644)
• Ignition modes (p. 407)
• Vehicle status (p. 580)
Refilling coolant
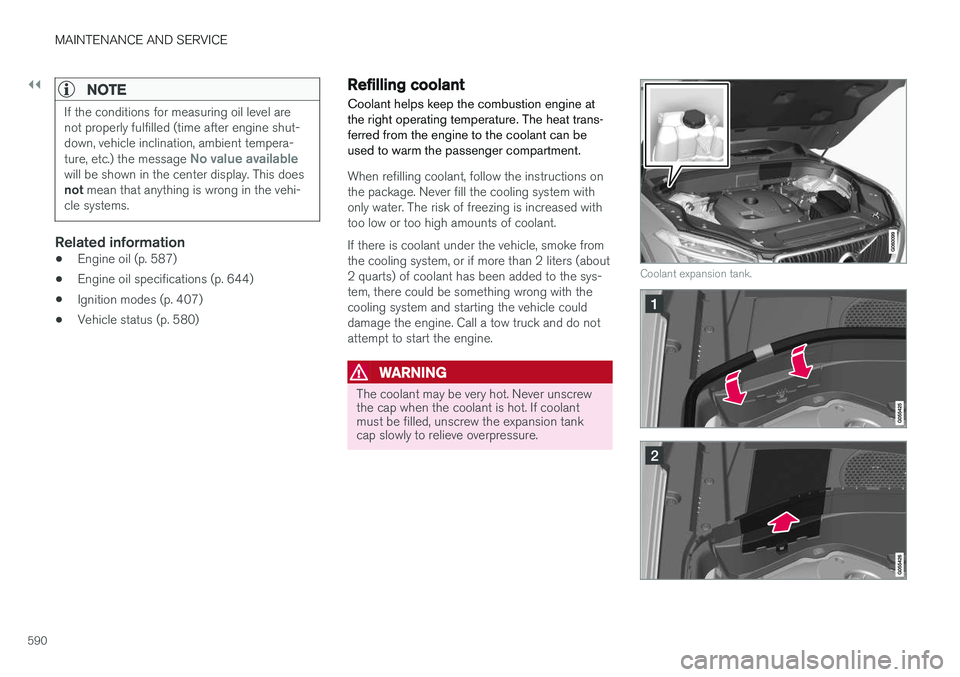
Coolant helps keep the combustion engine at the right operating temperature. The heat trans-ferred from the engine to the coolant can beused to warm the passenger compartment.
When refilling coolant, follow the instructions on the package. Never fill the cooling system withonly water. The risk of freezing is increased withtoo low or too high amounts of coolant. If there is coolant under the vehicle, smoke from the cooling system, or if more than 2 liters (about2 quarts) of coolant has been added to the sys-tem, there could be something wrong with thecooling system and starting the vehicle coulddamage the engine. Call a tow truck and do notattempt to start the engine.
WARNING
The coolant may be very hot. Never unscrew the cap when the coolant is hot. If coolantmust be filled, unscrew the expansion tankcap slowly to relieve overpressure.
Coolant expansion tank.
Page 593 of 666
MAINTENANCE AND SERVICE
}}
591
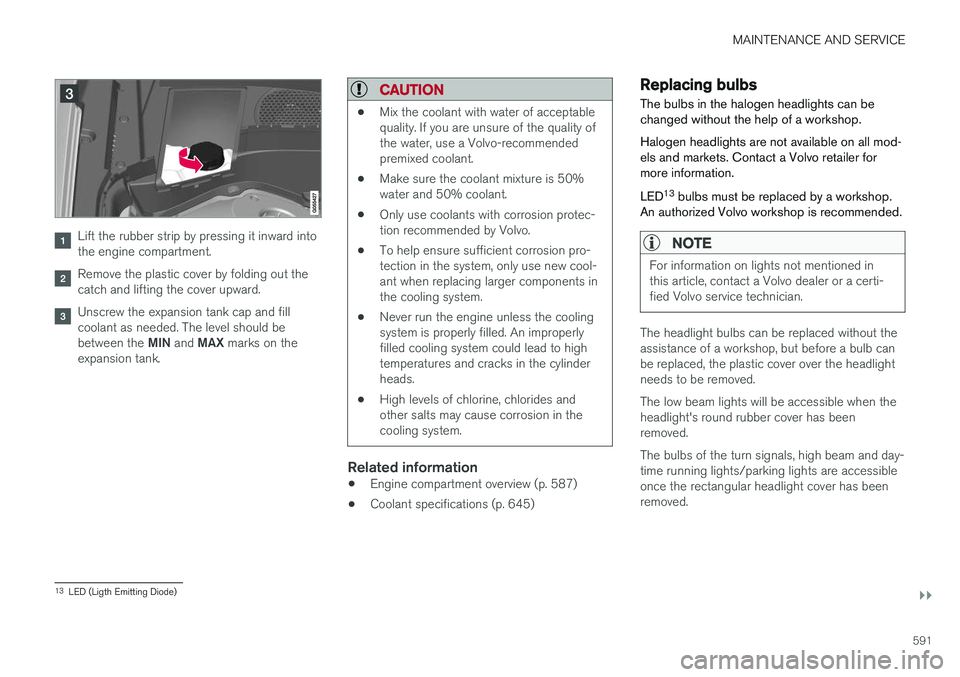
Lift the rubber strip by pressing it inward into the engine compartment.
Remove the plastic cover by folding out the catch and lifting the cover upward.
Unscrew the expansion tank cap and fill coolant as needed. The level should be between the MIN and MAX marks on the
expansion tank.
CAUTION
• Mix the coolant with water of acceptable quality. If you are unsure of the quality ofthe water, use a Volvo-recommendedpremixed coolant.
• Make sure the coolant mixture is 50%water and 50% coolant.
• Only use coolants with corrosion protec-tion recommended by Volvo.
• To help ensure sufficient corrosion pro-tection in the system, only use new cool-ant when replacing larger components inthe cooling system.
• Never run the engine unless the coolingsystem is properly filled. An improperlyfilled cooling system could lead to hightemperatures and cracks in the cylinderheads.
• High levels of chlorine, chlorides andother salts may cause corrosion in thecooling system.
Related information
•
Engine compartment overview (p. 587)
• Coolant specifications (p. 645)
Replacing bulbs
The bulbs in the halogen headlights can be changed without the help of a workshop. Halogen headlights are not available on all mod- els and markets. Contact a Volvo retailer formore information. LED 13
bulbs must be replaced by a workshop.
An authorized Volvo workshop is recommended.
NOTE
For information on lights not mentioned in this article, contact a Volvo dealer or a certi-fied Volvo service technician.
The headlight bulbs can be replaced without the assistance of a workshop, but before a bulb canbe replaced, the plastic cover over the headlightneeds to be removed. The low beam lights will be accessible when the headlight's round rubber cover has beenremoved. The bulbs of the turn signals, high beam and day- time running lights/parking lights are accessibleonce the rectangular headlight cover has beenremoved.
13 LED (Ligth Emitting Diode)
Page 595 of 666
MAINTENANCE AND SERVICE
}}
593
Removing the plastic cover toreplace bulbsThe headlight bulbs can be replaced without the assistance of a workshop, but before a bulb canbe replaced, the plastic cover over the headlightneeds to be removed.
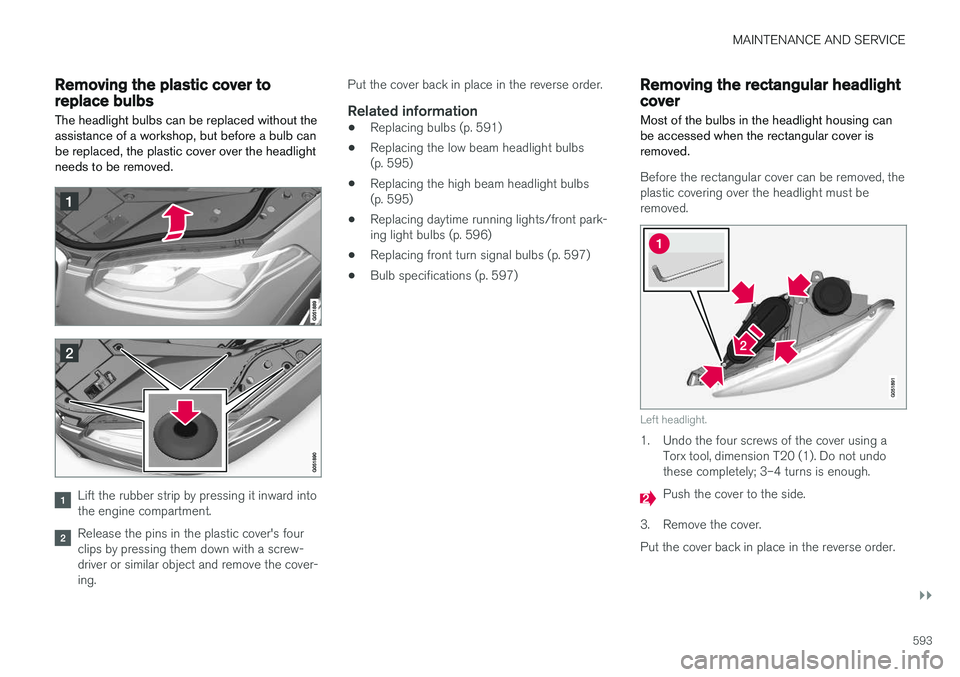
Lift the rubber strip by pressing it inward into the engine compartment.
Release the pins in the plastic cover's four clips by pressing them down with a screw-driver or similar object and remove the cover-ing. Put the cover back in place in the reverse order.
Related information
•
Replacing bulbs (p. 591)
• Replacing the low beam headlight bulbs(p. 595)
• Replacing the high beam headlight bulbs(p. 595)
• Replacing daytime running lights/front park-ing light bulbs (p. 596)
• Replacing front turn signal bulbs (p. 597)
• Bulb specifications (p. 597)
Removing the rectangular headlightcover
Most of the bulbs in the headlight housing can be accessed when the rectangular cover isremoved.
Before the rectangular cover can be removed, the plastic covering over the headlight must beremoved.
Left headlight.
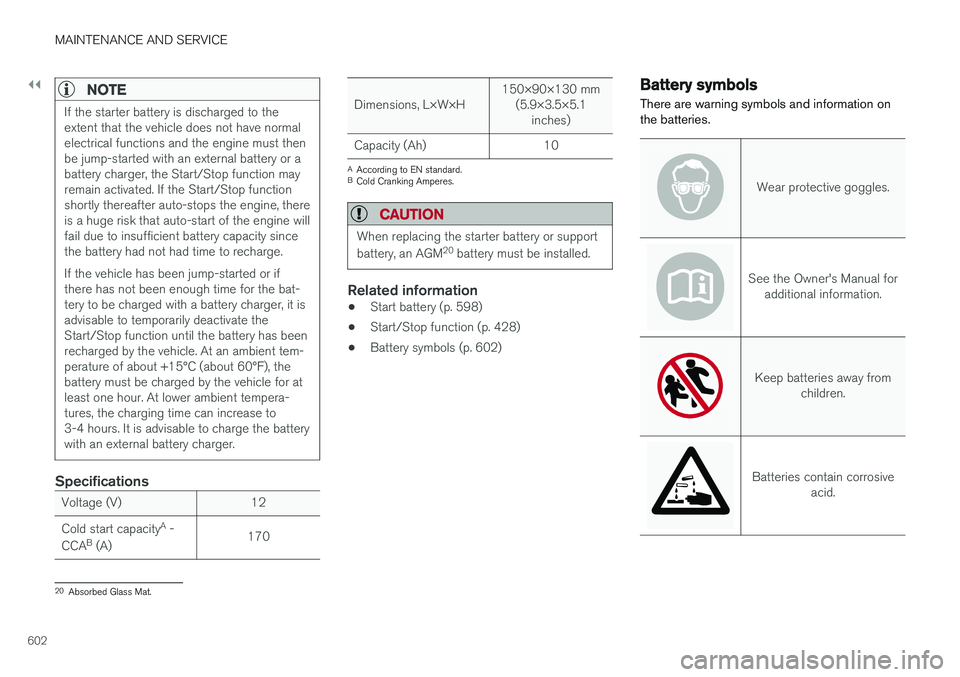
1. Undo the four screws of the cover using a Torx tool, dimension T20 (1). Do not undo these completely; 3–4 turns is enough.
Push the cover to the side.
3. Remove the cover. Put the cover back in place in the reverse order.
Page 604 of 666
||
MAINTENANCE AND SERVICE
602
NOTE
If the starter battery is discharged to the extent that the vehicle does not have normalelectrical functions and the engine must thenbe jump-started with an external battery or abattery charger, the Start/Stop function mayremain activated. If the Start/Stop functionshortly thereafter auto-stops the engine, thereis a huge risk that auto-start of the engine willfail due to insufficient battery capacity sincethe battery had not had time to recharge. If the vehicle has been jump-started or if there has not been enough time for the bat-tery to be charged with a battery charger, it isadvisable to temporarily deactivate theStart/Stop function until the battery has beenrecharged by the vehicle. At an ambient tem-perature of about +15°C (about 60°F), thebattery must be charged by the vehicle for atleast one hour. At lower ambient tempera-tures, the charging time can increase to3-4 hours. It is advisable to charge the batterywith an external battery charger.
Specifications
Voltage (V) 12 Cold start capacityA
-
CCA B
(A) 170
Dimensions, L×W×H150×90×130 mm
(5.9×3.5×5.1 inches)
Capacity (Ah) 10
A According to EN standard.
B Cold Cranking Amperes.
CAUTION
When replacing the starter battery or support battery, an AGM 20
battery must be installed.
Related information
• Start battery (p. 598)
• Start/Stop function (p. 428)
• Battery symbols (p. 602)
Battery symbols
There are warning symbols and information on the batteries.
Wear protective goggles.
See the Owner's Manual for additional information.
Keep batteries away from children.
Batteries contain corrosive acid.
20Absorbed Glass Mat.
Page 640 of 666
||
SPECIFICATIONS
638
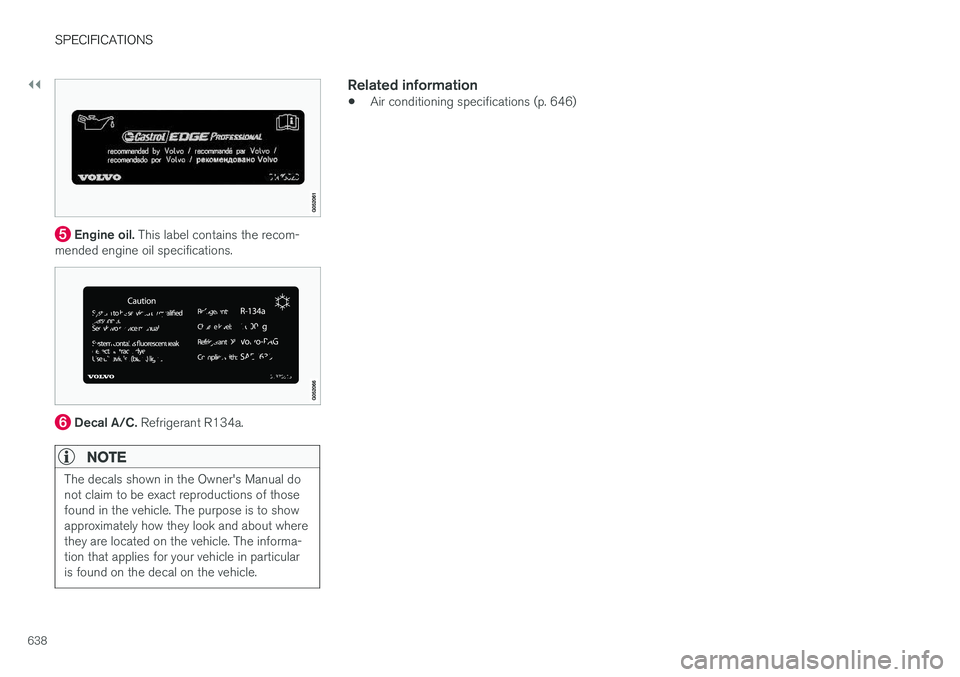
Engine oil. This label contains the recom-
mended engine oil specifications.
Decal A/C. Refrigerant R134a.
NOTE
The decals shown in the Owner's Manual do not claim to be exact reproductions of thosefound in the vehicle. The purpose is to showapproximately how they look and about wherethey are located on the vehicle. The informa-tion that applies for your vehicle in particularis found on the decal on the vehicle.
Related information
•Air conditioning specifications (p. 646)