mirror controls VOLVO XC90 T8 2016 Owner´s Manual
[x] Cancel search | Manufacturer: VOLVO, Model Year: 2016, Model line: XC90 T8, Model: VOLVO XC90 T8 2016Pages: 546, PDF Size: 10.26 MB
Page 142 of 546

||
INSTRUMENTS AND CONTROLS
* Option/accessory, for more information, see Introduction.
140
15
14
13
12
11
9
8
7
6
5
4
3
2
1
10
Magnetic zones
4. Press the button on the underside of mirrorrepeatedly until the desired magnetic zone (
1–15) is displayed (see the map of mag-
netic zones).
5. Wait until
C is again displayed in the mirror
or hold the button on the underside of mirror for approx. 6 seconds until
C is displayed in
the mirror.
6. Drive slowly in a circle at a speed of no more than 6 mph (10 km/h) until a direction is dis- played. This indicates that calibration is com-plete. Drive around in a circle an additionaltwo times to fine-tune the calibration.
7. Vehicles with an electrically heated wind- shield: * if
C is displayed when the heating
function is activated, perform step 6 with the heating function on. 8. Repeat the calibration procedure if neces-
sary.
Related information
• Defrosting windows and mirrors (p. 195)
• Compass (p. 139)
Lighting panel and controls
The lighting controls on the left-side steering wheel lever can be used to activate the vehicle'sexterior lighting. Instrument lighting brightnesscan be adjusted on the lighting panel.
Ring on the steering wheel lever
Page 151 of 546
 switch
Passenger's side reading light
Front reading lights
Turn the reading ligh")
INSTRUMENTS AND CONTROLS
}}
* Option/accessory, for more information, see Introduction.149
Courtesy lighting (AUTO) switch
Passenger's side reading light
Front reading lights
Turn the reading lights on or off by pressing the respective buttons briefly. Adjust the brightnessby pressing and holding the button.
Courtesy lighting
Turn the footwell and overhead courtesy lighting on or off by pressing the button briefly.
Courtesy lighting switch
Activate the automatic function by briefly press- ing the AUTO button in the ceiling console. The
indicator light in the button will illuminate. WithAUTO activated, the courtesy lighting will switch
on and off as follows: The courtesy lighting: • comes on when the vehicle is unlocked and when the ignition is switched off
• goes off when the engine is started andwhen the vehicle is locked
• comes on or goes off when one of the sidedoors is opened or closed
• remains on for 2 minutes if a side door isopen
The courtesy lighting switches off when:
Rear interior lighting
Rear reading lights
Rear reading lights: second row of seats
The rear interior lighting/reading lights are located in the ceiling. Turn them on or off by briefly pressing the button in the side console. Adjust the brightness bypressing and holding the button.
Rear courtesy lighting
Rear reading lights: third row of seats *
The rear courtesy lighting is turned on or off by briefly pressing the button in the ceiling console.Adjust the brightness by pressing and holdingthe button.
Glove compartment lightingThe glove compartment lighting comes on orgoes off when the glove compartment is openedor closed.
Vanity mirror lightingThe vanity mirror lighting comes on or goes offwhen the cover over the mirror is opened orclosed.
Cargo area lightingThe cargo area lighting comes on or goes offwhen the tailgate is opened or closed.
Page 163 of 546

INSTRUMENTS AND CONTROLS
}}
* Option/accessory, for more information, see Introduction.161
Adjusting the steering wheel
The steering wheel can be adjusted to various positions.
Adjusting the steering wheel
Lever for releasing/locking the steering wheel
Possible positions
The steering wheel's height and reach can be adjusted. To do so:
1. Push the lever down to release the steering wheel.
2. Adjust the steering wheel to a suitable posi- tion.
3. Pull back the lever to lock the steering wheel in place. If the lever is difficult to pull into place, press the steering wheel lightly at thesame time as you pull the lever.
WARNING
Never adjust the steering wheel while driving.
If the vehicle is equipped with the optional speed-dependent power steering, the level ofsteering force can be adjusted. The force level isadjusted according to the vehicle's speed.
Related information
• Steering wheel (p. 160)
• Adjustable steering force
* (p. 323)
Seats
The vehicle is equipped with 7 seats. The front seats can be adjusted electroncially or manually.The second and third row seats are adjusted pri-marily manually.
The adjustment settings for the power front seats *, door mirrors and the head-up display can
be stored in memory buttons. Using the multi-function control *, comfort in the
front seats can be further enhance by e.g., adjust- ing the lumbar support or extending the length ofthe front seat cushion. The rear seats can be folded down and their head restraints can be adjusted. The second rowseats can be moved forward/rearward and theirbackrest tilt can also be changed.
Related information
• Adjusting power front seats
* (p. 163)
• Adjusting function settings in the multifunc- tional front seats
* (p. 166)
• Manually operated front seats (p. 162)
• Using the power seat memory function
*
(p. 164)
• Folding the second row backrests (p. 172)
• Getting into and out of the third row of seats (p. 174)
Page 166 of 546
INSTRUMENTS AND CONTROLS
* Option/accessory, for more information, see Introduction.
164
Adjusting the passenger's seat from the driver's seat *
Using the controls on the side of the driver's seat, the driver can adjust the position of thefront passenger's seat.
Activating the function in the center
display
From the center display, the function can be acti- vated in two ways. After activating the function, adjust the passeng- er's seat within 10 seconds . If no adjustments
are made in that time span, the function deacti- vates automatically.
Activating from Function view
1. Go to the center display's Function view. 2. Activate the function by tapping
Adjust
passenger seat.
Activating from Settings
–In the center display, select SettingsMy
Car
SeatsAdjust Passenger Seat
From Driver Position.
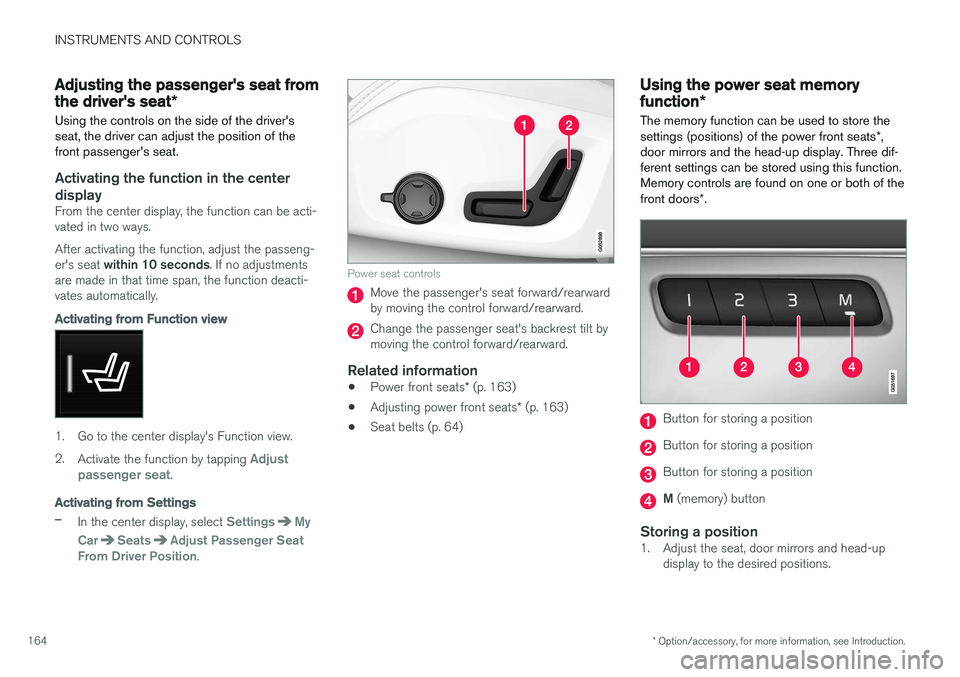
Power seat controls
Move the passenger's seat forward/rearward by moving the control forward/rearward.
Change the passenger seat's backrest tilt by moving the control forward/rearward.
Related information
• Power front seats
* (p. 163)
• Adjusting power front seats
* (p. 163)
• Seat belts (p. 64)
Using the power seat memory function
*
The memory function can be used to store the settings (positions) of the power front seats *,
door mirrors and the head-up display. Three dif- ferent settings can be stored using this function.Memory controls are found on one or both of the front doors *.
Button for storing a position
Button for storing a position
Button for storing a position
M (memory) button
Storing a position1. Adjust the seat, door mirrors and head-up
display to the desired positions.
Page 167 of 546

INSTRUMENTS AND CONTROLS
}}
* Option/accessory, for more information, see Introduction.165
2.
Press and release the M button. The indica-
tor light in the button will illuminate.
3. Press button 1, 2 or 3 within 3 seconds to
store the current position of the seat/ mirrors/head-up display in the selected but-ton.
> When the position has been stored in the selected button, an audible signal will sound and the indicator light in the M but-
ton will go out.
If none of the buttons (1, 2 or 3) is pressedwithin 3 seconds, the indicator light in the M but-
ton will go out and the position will not be stored.
The seat/mirrors/head-up display must be moved before a new position can be stored.
Using a stored positionA stored position can be used when one of thefront doors is opened or closed:
Front door open
–Press one of the bottons ( 1–3 ) briefly. The
seat, door mirrors and head-up display will move to the positions stored in that button.
Front door closed
–Press and hold one of the buttons ( 1–3 ) until
the seat, door mirrors and head-up display have moved to the positions stored in thatbutton. The seat, door mirrors and head-up display willstop automatically if the button is released beforethe they have reached the stored positions.
WARNING
•
Because the driver's seat can be adjusted with the ignition off, children should neverbe left unattended in the vehicle.
• Movement of the seat can be STOPPEDat any time by pressing any button on thepower seat control panel.
• Do not adjust the seat while driving. Theseat should be adjusted so that the brakepedal can be depressed fully. In addition,position the seat as far rearward as com-fort and control allow.
• The seat rails on the floor must not beobstructed in any way when the seat is inmotion.
Related information
•
Adjusting power front seats
* (p. 163)
• Power front seats
* (p. 163)
Multifunctional front seats *
In addition to the adjustment settings offered by the power seat controls, the multifunction controlprovides additional possibilities for convenienceand comfort.
Multifunction control on the side of the seat
The multifunction control can be used to adjust lumbar support *, the backrest's side bolsters *, the
length of the seat cushion and the massagefunction *. The adjustment settings made with the
control are shown in the center display * and cer-
tain settings can be made directly from the cen- ter display.
Center displayThe adjustment settings for the driver and pas-senger seats made using the multifunction con-trol are shown in the center display. If only oneseat is adjusted, the settings are shown in the
Page 190 of 546

Climate system controls
Climate system functions are controlled using buttons on the center console, the ce")
||
CLIMATE
188
Related information
•Climate system controls in the center display (p. 189)
Climate system controls
Climate system functions are controlled using buttons on the center console, the center dis-play and the climate system panel on the rearside of the tunnel console.
Overview of climate system controls
Climate system controls in the center display
Defroster buttons on the center console
Climate system panel on the rear side of the tunnel console
Related information
• Climate system controls in the center display (p. 189)
• Climate control system (p. 178)
• Rear climate system controls on the tunnelconsole (p. 190) •
Defrosting windows and mirrors (p. 195)
• Climate system voice commands (p. 123)
Page 191 of 546

CLIMATE
}}
* Option/accessory, for more information, see Introduction.189
Climate system controls in the center display
All climate system functions can be controlled from the center display's climate bar and Cli-mate view.
Climate barThe most common climate system functions can be controlled from the climate bar.
Temperature control for the driver and pas- senger sides.
Control for heated * and ventilated * driver/
passenger seats and heated steering wheel *.
Button for opening Climate view. The graphic in the button shows the activated climatesystem settings.
Climate viewTap the center button on the climate bar toaccess Climate view, which is divided into the fol- lowing tabs:
Main climate, Rear climate andParking climate Toggle between the tabs by
swiping the screen from left to right and by tap- ping the respective headings.
Main climate
In addition to the climate bar's functions, other primary climate system functions can also be controlled from the
Main climate tab.
Max, Electric, Rear: controls for defrosting
windows and door mirrors.
AC: air conditioning controls.
Recirc: recirculation controls.
Air distribution controls.
Blower control for the front seats.
AUTO: climate system Auto mode.
Page 192 of 546

||
CLIMATE
* Option/accessory, for more information, see Introduction.
190
Rear climate
All of the climate system functions for the rear seat can be controlled from the Rear climatetab.
Blower control for the second row of seats.
Blower control for the third row of seats.
Rear seat temperature control.
Rear seat heating control *.
Parking climate 1
All of the parking climate functions can be con- trolled from the Parking climate tab.
Related information
•
Climate system controls (p. 188)
• Defrosting windows and mirrors (p. 195)
• Air conditioning (p. 198)
• Adjusting air distribution (p. 202)
• Setting the temperature (p. 192)
• Setting the blower speed (p. 191)
• Automatic climate control (p. 187)
• Turning steering wheel heating
* on and off
(p. 197)
• Turning seat heating
* on and off (p. 199)
Rear climate system controls on the tunnel console
The rear seat climate system functions are con- trolled from the rear side of the tunnel console.
Rear seat heating *
Rear seat blower speed
Rear seat temperature control
Related information
•Climate system controls (p. 188)
• Turning seat heating
* on and off (p. 199)
• Setting the blower speed (p. 191)
• Setting the temperature (p. 192)
1
XC90 T8 Plug-in Hybrid only.
Page 197 of 546

CLIMATE
}}
* Option/accessory, for more information, see Introduction.195
Activating/deactivating the recirculation timer
With the timer activated, recirculation will switch off automatically after 20 minutes. 1.
Tap
Settings in the center display's Top
view.
2. Tap
Climate.
3. Activate/deactivate the timer by selecting/ deselecting the box for
Recirculation
Timer.
Related information
• Climate system controls in the center display (p. 189)
Defrosting windows and mirrors
The max. defroster, heated windshield * and
heated rear window/door mirror functions are used to remove ice or condensation.
Using the buttons in the center consoleThe buttons in the center console offer quick access to the defroster functions. On models with the optional heated windshield, the max. defroster function can only be activatedseparately from the Climate view in the centerdisplay.
Center console buttons
Button for the heated windshield * and max.
defroster.
Button for the heated rear window and door mirrors. Models
without a heated windshield.
–Press button (1).
> Max. defroster is activated (button indica-
tor light on)/deactivated (button indicator light off).
Models with a heated windshield *.
–Press button (1) repeatedly to access the function's three levels:
• Activate windshield heating
• Activate windshield heating and max. defroster
• Deactivated
> The windshield heating is activated (but- ton indicator light on)/deactivated (button indicator light off).
NOTE
Max. defroster starts after a slight delay to avoid a brief increase in blower speed if theheated windshield function has been deacti-vated by pressing the button twice in quicksuccession.
Heated rear window and door mirrors
–Press button (2).
> Heating for the rear window/door mirrorsis activated (button indicator light on)/ deactivated (button indicator light off).
Page 199 of 546

CLIMATE
* Option/accessory, for more information, see Introduction.197
2. Activate/deactivate the respective defroster
functions when the engine is started by selecting/deselecting the boxes for
Auto
Electric Front Defroster and Auto Electric
Rear Defroster.
The heating function will switch off automatically when the window/mirror is sufficiently warm andthe ice/condensation has disappeared.
Related information
• Climate system controls (p. 188)
• Climate system controls in the center display (p. 189)
• Defrosting windows and mirrors (p. 195)
• Air conditioning (p. 198)
• Turning recirculation on and off (p. 194)
• Adjusting air distribution (p. 202)
• Setting the blower speed (p. 191)
• Automatic climate control (p. 187)
• Turning front seat ventilation
* on and off
(p. 200)
• Turning steering wheel heating
* on and off
(p. 197)
Turning steering wheel heating * on
and off
The steering wheel can be heated electrically for added comfort in cold weather.
Activating/deactivating steering wheel
heating
Buttons for heated steering wheel and seats in the cli- mate bar
1. Tap the driver side steering wheel and seat button in the center display's climate bar to open the steering wheel and seat heatingcontrols. If the vehicle is not equipped with the optional heated or ventilated seats, the but-ton for steering wheel heating will be directlyaccessible in the climate bar. 2. Tap the steering wheel heating button
repeatedly to select one of four levels:
Off,High, Middle or Low.
> The level changes and is displayed in the button.
Automatic steering wheel heatingThe automatic function starts heating the steer- ing wheel automatically when the engine isstarted if the temperature is sufficiently cold. Thisfeature can be activated/deactivated. 1. Tap
Settings in the center display's Top
view.
2. Tap
Climate.
3. Under
Auto Steering Wheel Heating
Level, select Off, Low, Middle or High to
activate/deactivate the automatic function.
Related information
• Climate system controls (p. 188)
• Climate system controls in the center display (p. 189)
• Steering wheel (p. 160)