warning light VOLVO XC90 T8 2016 Owner´s Manual
[x] Cancel search | Manufacturer: VOLVO, Model Year: 2016, Model line: XC90 T8, Model: VOLVO XC90 T8 2016Pages: 546, PDF Size: 10.26 MB
Page 86 of 546
||
SAFETY
* Option/accessory, for more information, see Introduction.
84
WARNING
DEATH or SERIOUS INJURY can occur Follow all instructions on the booster cushion and in the vehicle's owner'smanual. MAKE SURE THE BOOSTER CUSHION IS SECURELY LOCKEDBEFORE THE CHILD IS SEATED. • Use this booster cushion only with chil- dren whose height and weight are withinthe permitted limits.
• In the event of a collision while the inte-grated booster cushion was occupied, theentire booster cushion and seat belt mustbe replaced. The booster cushion shouldalso be replaced if it is badly worn ordamaged in any way. This work should beperformed by a trained and qualifiedVolvo service technician only.
Related information
•
Integrated booster cushion
* (p. 81)
• Raising the integrated booster cushion
*
(p. 82)
Occupant weight sensor
The Occupant Weight Sensor (OWS) is designed to meet the regulatory requirements ofFederal Motor Vehicle Safety Standard (FMVSS)208 and is designed to disable (will not inflate)the passenger's side front airbag under certainconditions.
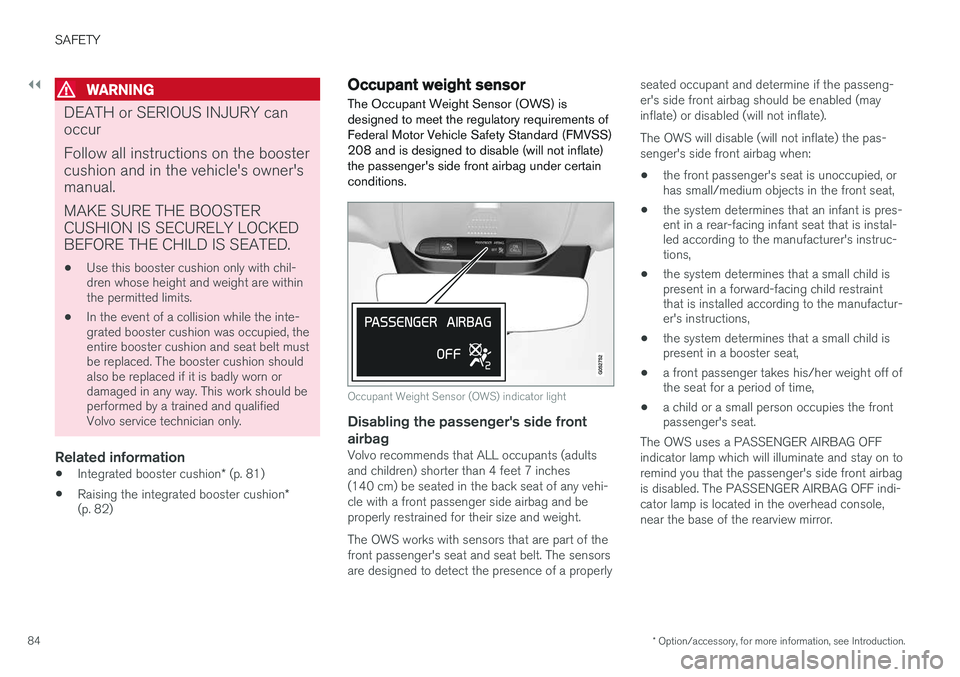
Occupant Weight Sensor (OWS) indicator light
Disabling the passenger's side front airbag
Volvo recommends that ALL occupants (adults and children) shorter than 4 feet 7 inches(140 cm) be seated in the back seat of any vehi-cle with a front passenger side airbag and beproperly restrained for their size and weight. The OWS works with sensors that are part of the front passenger's seat and seat belt. The sensorsare designed to detect the presence of a properly seated occupant and determine if the passeng-er's side front airbag should be enabled (mayinflate) or disabled (will not inflate). The OWS will disable (will not inflate) the pas- senger's side front airbag when:
• the front passenger's seat is unoccupied, or has small/medium objects in the front seat,
• the system determines that an infant is pres-ent in a rear-facing infant seat that is instal-led according to the manufacturer's instruc-tions,
• the system determines that a small child ispresent in a forward-facing child restraintthat is installed according to the manufactur-er's instructions,
• the system determines that a small child ispresent in a booster seat,
• a front passenger takes his/her weight off ofthe seat for a period of time,
• a child or a small person occupies the frontpassenger's seat.
The OWS uses a PASSENGER AIRBAG OFF indicator lamp which will illuminate and stay on toremind you that the passenger's side front airbagis disabled. The PASSENGER AIRBAG OFF indi-cator lamp is located in the overhead console,near the base of the rearview mirror.
Page 87 of 546
SAFETY
}}
85
NOTE
When the ignition is switched on, the OWS indicator light will illuminate for several sec-onds while the system performs a self-diag-nostic test.
However, if a fault is detected in the system:
• The OWS indicator light will stay on
• The SRS warning light will come on and stay on and a text message will be displayed.
WARNING
If a fault in the system is detected and indi- cated as described, be aware that the pas-senger's side front airbag will not deploy inthe event of a collision. In this case, the SRSsystem and Occupant Weight Sensor shouldbe inspected by a trained and qualified Volvoservice technician as soon as possible.
WARNING
•
Never try to open, remove, or repair any components in the OWS system. Thiscould result in system malfunction. Main-tenance or repairs should only be carriedout by an a trained and qualified Volvoservice technician.
• The front passenger's seat should not bemodified in any way. This could reducepressure on the seat cushion, whichmight interfere with the OWS system'sfunction.
Passenger's seat occu-pancy statusOWS indi- cator lightstatusPassenger's side front air-bag status
Seat unoccu- piedOWS indi- cator lightlights up.Passenger's side front air-bag disabled
Seat occu- pied by lowweight occu- pant/object AOWS indi- cator lightlights upPassenger's side front air-bag disabled
Seat occu- pied by heavyoccupant/objectOWS indi- cator light is not
litPassenger's side front air-bag enabled
A
Volvo recommends that children always be properly restrained in appropriate child restraints in the rear seats. Do not assume that the passenger's side front airbag is disabled unless thePASSENGER AIRBAG OFF indicator lamp is lit. Make sure thechild restraint is properly installed. If there is any doubt as to thestatus of the passenger's side front airbag, move the childrestraint to the rear seat.
The OWS is designed to enable (may inflate) the passenger's side front airbag in the event of acollision anytime the system senses that a per-son of adult size is sitting properly in the frontpassenger's seat. The PASSENGER AIRBAGOFF indicator lamp will be off and remain off. If a person of adult size is sitting in the front pas- senger's seat, but the PASSENGER AIRBAGOFF indicator lamp is on, it is possible that theperson isn't sitting properly in the seat. If thishappens:
• Turn the vehicle off and ask the person to place the seatback in an upright position.
• Have the person sit upright in the seat, cen-tered on the seat cushion, with the person'slegs comfortably extended.
• Restart the vehicle and have the personremain in this position for about two minutes.This will allow the system to detect that per-son and enable the passenger's frontal air-bag.
• If the PASSENGER AIRBAG OFF indicatorlamp remains on even after this, the personshould be advised to ride in the rear seat.
This condition reflects limitations of the OWS classification capability. It does not indicate OWSmalfunction.
Page 91 of 546
SAFETY
}}
89
Airbag system As an enhancement to the three-point seat belts, your vehicle is equipped with an airbag system.
WARNING
•If the airbag warning light stays on after the engine has started or if it illuminateswhile you are driving, have the vehicleinspected by a trained and qualified Volvoservice technician as soon as possible.
• Never try to repair any component or partof the airbag systems yourself. Any inter-ference in the system could cause mal-function and serious injury. All work onthese systems should be performed by atrained and qualified Volvo service techni-cian.
WARNING
If your vehicle has become flood-damaged in any way (e.g., soaked carpeting/standingwater on the floor of the vehicle), do notattempt to start the vehicle. This may causeairbag deployment which could result in seri-ous injury. Have the vehicle towed to a trainedand qualified Volvo service technician forrepairs. Before attempting to tow the vehicle:
1. Switch off the ignition for at least
10 minutes and disconnect the battery.
2. Follow the instructions for manually over- riding the shiftlock system.
Deployed airbags
WARNING
If any of the airbags have deployed:
• Do not attempt to drive the vehicle. Have it towed to a qualified repair facility.
• If necessary seek medical attentIon.
Driver/passenger side airbags
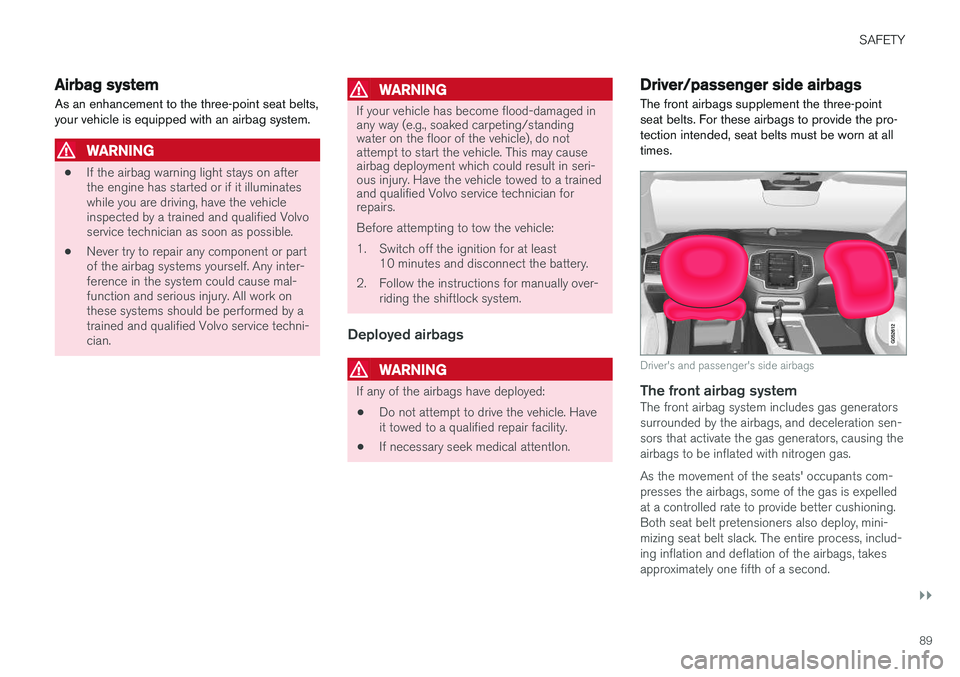
The front airbags supplement the three-point seat belts. For these airbags to provide the pro-tection intended, seat belts must be worn at alltimes.
Driver's and passenger's side airbags
The front airbag systemThe front airbag system includes gas generators surrounded by the airbags, and deceleration sen-sors that activate the gas generators, causing theairbags to be inflated with nitrogen gas. As the movement of the seats' occupants com- presses the airbags, some of the gas is expelledat a controlled rate to provide better cushioning.Both seat belt pretensioners also deploy, mini-mizing seat belt slack. The entire process, includ-ing inflation and deflation of the airbags, takesapproximately one fifth of a second.
Page 102 of 546
||
INSTRUMENTS AND CONTROLS
* Option/accessory, for more information, see Introduction.
100 systems, even home lighting. Additional informa- tion can be found on the Internet at,www.homelink.com/www.youtube.com/HomeLinkGentex or by phoning the hotline at 1–800–355–3515.
WARNING
•
If you use HomeLink ®
to open a garage
door or gate, be sure no one is near the gate or door while it is in motion.
• When programming a garage dooropener, it is advised to park outside of thegarage.
• Do not use HomeLink ®
with any garage
door opener that lacks safety stop andreverse features as required by U.S. fed-eral safety standards (this includes anygarage door opener model manufacturedbefore April 1, 1982). A garage door thatcannot detect an object - signaling thedoor to stop and reverse - does not meetcurrent U.S. federal safety standards. Formore information, contact HomeLink at:www.homelink.com.
Retain the original transmitter of the RF device you are programming for use in other vehicles aswell as for future HomeLink programming. It isalso suggested that upon the sale of the vehicle,the programmed HomeLink buttons be erasedfor security purposes. See the article "Program-ming HomeLink."
Related information
• Programming the HomeLink ®
Wireless Con-
trol System * (p. 100)Programming the HomeLink ®
Wireless Control System *
NOTE
Some vehicles may require the ignition to be switched on or be in the “accessories” posi-tion for programming and/or operation ofHomeLink. It is also recommended that a newbattery be placed in the hand-held transmitterof the device being programmed to Home-Link for quicker training and accurate trans-mission of the radio-frequency signal. TheHomeLink buttons must be reset first. Whenthis has been completed, Homelink is inlearning mode so that you can perform pro-gramming.
To program HomeLink®
1. Press the HomeLink ®
button to be pro-
grammed. The HomeLink ®
indicator will
begin flashing yellow once a second. You do not need to continue holding the button.
2. Point the hand-held transmitter toward the HomeLink ®
button to be programmed and
hold it approx. 6–12 inches (15–30 cm) away from the HomeLink ®
button. Do not
obstruct the HomeLink ®
indicator light.
Page 104 of 546
||
INSTRUMENTS AND CONTROLS
102
Gate Operator/Canadian Programming
Canadian radio-frequency laws require transmit- ter signals to “time-out” (or quit) after severalseconds of transmission – which may not be longenough for HomeLink to pick up the signal dur-ing programming. Similar to this Canadian law,some U.S. gate operators are designed to “time-out” in the same manner. If you live in Canada or you are having difficulties programming a gate operator or garage dooropener by using the “Programming” procedures, replace “Programming HomeLink” step 3 with the following:
• Continue to press and hold the HomeLink button while you
press and release - every
two seconds (“cycle”) your hand-held trans-
mitter until the HomeLink indicator light changes from a slow to a rapidly blinkinglight. Now you may release both the Home-Link and hand-held transmitter buttons.
Proceed with “Programming” step 4 to complete.
Using HomeLink ®When programming has been completed, HomeLink
®
can be used instead of the original
remote controls. To operate, press and hold the programmed HomeLink ®
button until the trained device begins
to operate 3
(this may take several seconds). The indicator light will glow steadily or flash when the button has been pressed. Activation will nowoccur for the trained device (i.e., garage dooropener, gate operator, security system, entry doorlock, home/office lighting, etc.).
NOTE
If the ignition is switched off, HomeLink will function for 30 minutes after the driver's doorhas been opened.
For convenience, the hand-held transmitter of the device may also be used at any time. In the event that there are still programming diffi- culties or questions, contact HomeLink at:www.HomeLink.com, www.youtube.com/HomeLinkGentex or by phoning the hotline at 1–800–355–3515.
Resetting HomeLink
®
buttonsUse the following procedure to reset (erase pro- gramming) from the three HomeLink ®
buttons
(individual buttons cannot be reset but can be “reprogrammed” as outlined in the following sec-tion): 1. Press and hold HomeLink ®
buttons 1 and 3
for approx. 10 seconds until the indicator light begins to flash green. 2. Release both buttons.
>HomeLink ®
is now in the training (or
learning) mode and can be programmedat any time beginning with “To program HomeLink ®
" above.
Reprogramming a single HomeLink ®
button
To reprogram an individual HomeLink ®
button:
1. Press and hold the desired HomeLink ®
but-
ton. DO NOT release the button.
2. The yellow indicator light will begin to flash after 20 seconds. Without releasing the HomeLink button, proceed with “To program HomeLink ®
" step 1 above.
For questions or comments, contact HomeLink at: www.HomeLink.com, www.youtube.com/HomeLinkGentex or by phoning the hotline at 1–800–355–3515.
FCC (USA) and IC (Canada)This device complies with FCC rules part 15 andIndustry Canada RSS-210. Operation is subjectto the following two conditions: (1) This devicemay not cause harmful interference, and (2) Thisdevice must accept any interference that may bereceived including interference that may causeundesired operation. WARNING: The transmitterhas been tested and complies with FCC and IC
3 Do not hold the button for more than 20 seconds as this will clear the programming of the button.
Page 106 of 546
||
INSTRUMENTS AND CONTROLS
* Option/accessory, for more information, see Introduction.
104
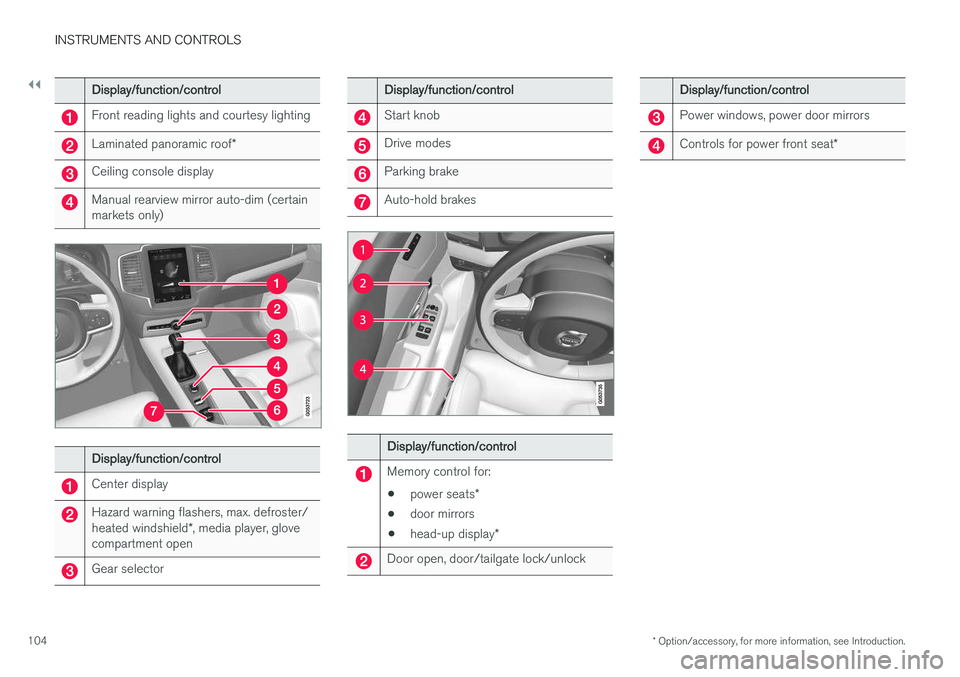
Display/function/control
Front reading lights and courtesy lighting
Laminated panoramic roof *
Ceiling console display
Manual rearview mirror auto-dim (certain markets only)
Display/function/control
Center display
Hazard warning flashers, max. defroster/ heated windshield*, media player, glove
compartment open
Gear selector
Display/function/control
Start knob
Drive modes
Parking brake
Auto-hold brakes
Display/function/control
Memory control for:
• power seats
*
• door mirrors
• head-up display
*
Door open, door/tailgate lock/unlock
Display/function/control
Power windows, power door mirrors
Controls for power front seat *
Page 107 of 546
INSTRUMENTS AND CONTROLS
}}
* Option/accessory, for more information, see Introduction.105
Adjusting the power door mirrors
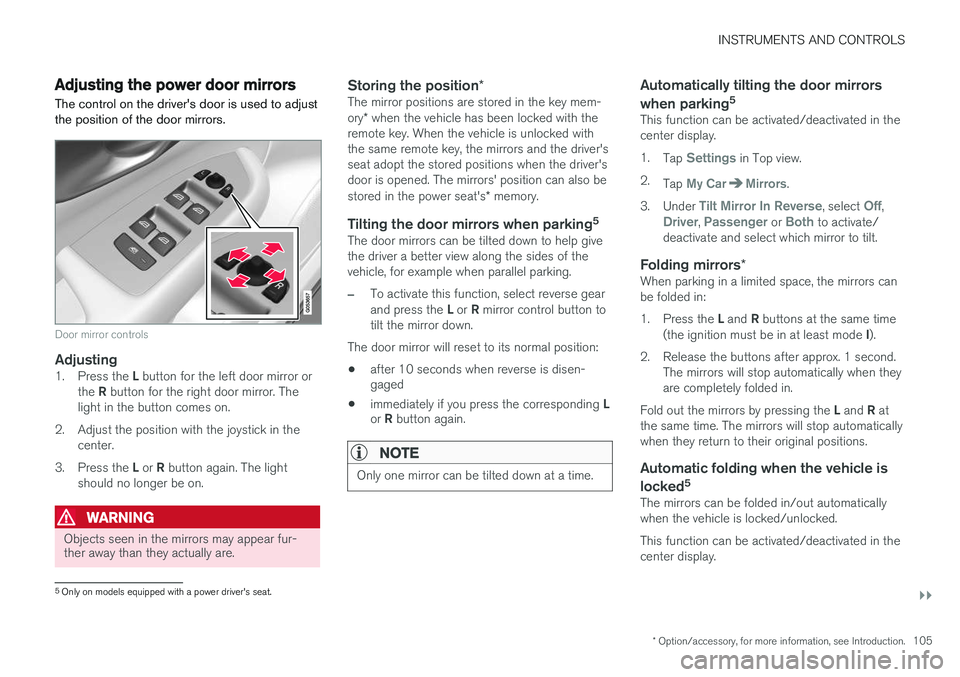
The control on the driver's door is used to adjust the position of the door mirrors.
Door mirror controls
Adjusting1. Press the L button for the left door mirror or
the R button for the right door mirror. The
light in the button comes on.
2. Adjust the position with the joystick in the center.
3. Press the L or R button again. The light
should no longer be on.
WARNING
Objects seen in the mirrors may appear fur- ther away than they actually are.
Storing the position *The mirror positions are stored in the key mem- ory* when the vehicle has been locked with the
remote key. When the vehicle is unlocked with the same remote key, the mirrors and the driver'sseat adopt the stored positions when the driver'sdoor is opened. The mirrors' position can also be stored in the power seat's * memory.
Tilting the door mirrors when parking 5The door mirrors can be tilted down to help give the driver a better view along the sides of thevehicle, for example when parallel parking.
–To activate this function, select reverse gear and press the
L or R mirror control button to
tilt the mirror down.
The door mirror will reset to its normal position:
• after 10 seconds when reverse is disen- gaged
• immediately if you press the corresponding
L
or R button again.
NOTE
Only one mirror can be tilted down at a time.
Automatically tilting the door mirrors when parking 5
This function can be activated/deactivated in the center display. 1.
Tap
Settings in Top view.
2. Tap
My CarMirrors.
3. Under
Tilt Mirror In Reverse, select Off,Driver, Passenger or Both to activate/
deactivate and select which mirror to tilt.
Folding mirrors *When parking in a limited space, the mirrors can be folded in: 1.
Press the L and R buttons at the same time
(the ignition must be in at least mode I).
2. Release the buttons after approx. 1 second. The mirrors will stop automatically when they are completely folded in.
Fold out the mirrors by pressing the L and R at
the same time. The mirrors will stop automaticallywhen they return to their original positions.
Automatic folding when the vehicle is
locked 5
The mirrors can be folded in/out automaticallywhen the vehicle is locked/unlocked. This function can be activated/deactivated in the center display.
5
Only on models equipped with a power driver's seat.
Page 118 of 546
INSTRUMENTS AND CONTROLS
116
Resetting user data when the vehicle changes ownersWhen the vehicle changes owners, all user set- tings should be reset to the factory defaults.
When the vehicle changes owners, it is essential to reset all user data and system settings to theirfactory defaults, including Volvo On Call.
Related information
• Resetting the settings view (p. 115)
• Volvo ID (p. 31)
Ambient temperature sensor
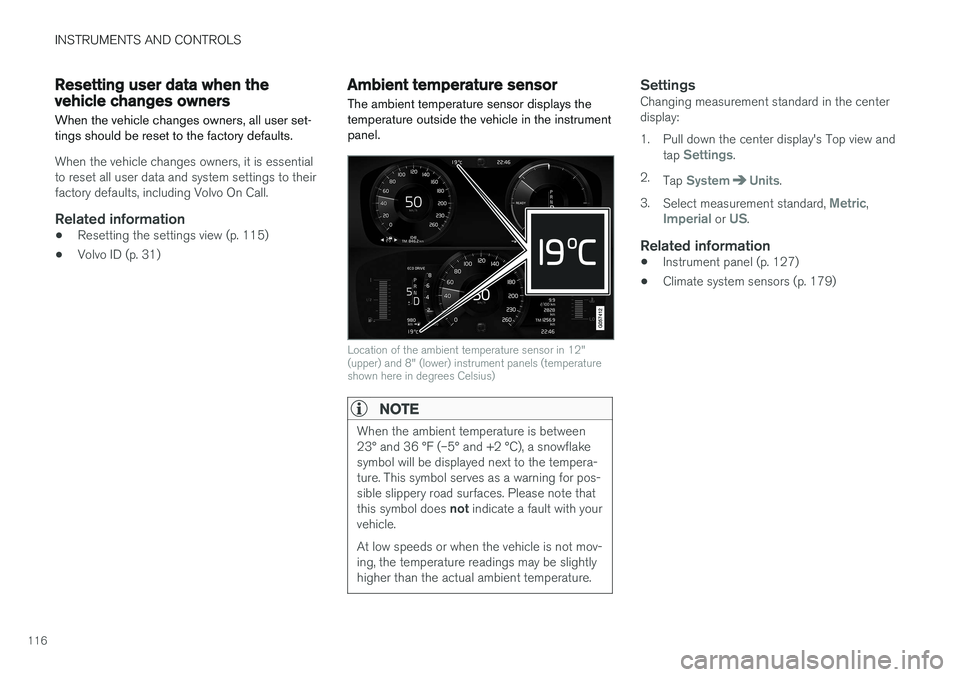
The ambient temperature sensor displays the temperature outside the vehicle in the instrumentpanel.
Location of the ambient temperature sensor in 12" (upper) and 8" (lower) instrument panels (temperatureshown here in degrees Celsius)
NOTE
When the ambient temperature is between 23° and 36 °F (–5° and +2 °C), a snowflakesymbol will be displayed next to the tempera-ture. This symbol serves as a warning for pos-sible slippery road surfaces. Please note that this symbol does not indicate a fault with your
vehicle. At low speeds or when the vehicle is not mov- ing, the temperature readings may be slightlyhigher than the actual ambient temperature.
SettingsChanging measurement standard in the center display:
1. Pull down the center display's Top view and
tap
Settings.
2. Tap
SystemUnits.
3. Select measurement standard,
Metric,Imperial or US.
Related information
• Instrument panel (p. 127)
• Climate system sensors (p. 179)
Page 120 of 546
||
INSTRUMENTS AND CONTROLS
118
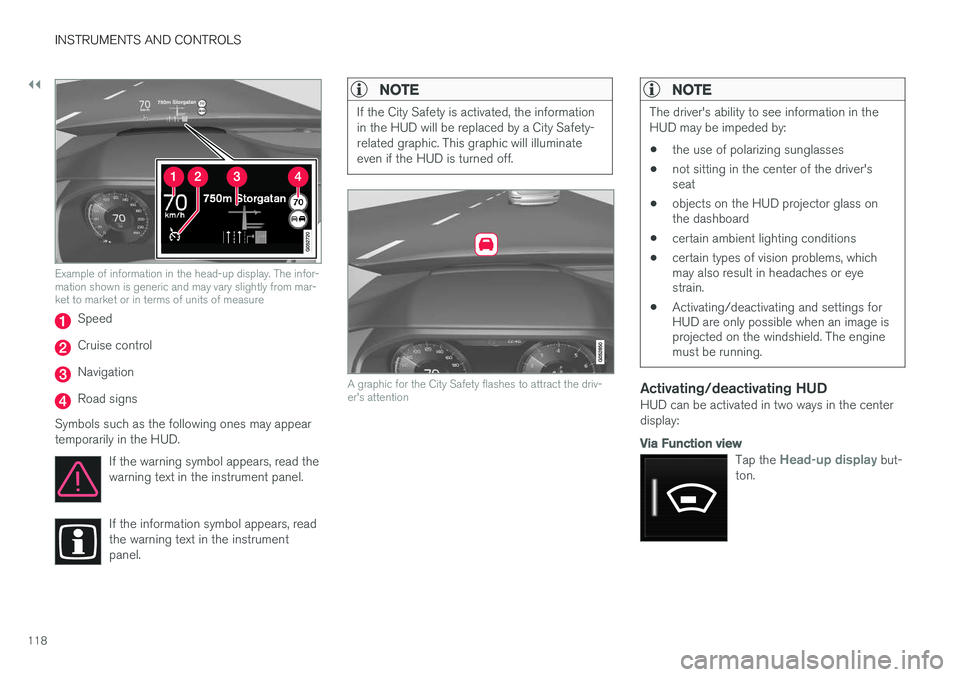
Example of information in the head-up display. The infor- mation shown is generic and may vary slightly from mar-ket to market or in terms of units of measure
Speed
Cruise control
Navigation
Road signs
Symbols such as the following ones may appear temporarily in the HUD. If the warning symbol appears, read thewarning text in the instrument panel.
If the information symbol appears, read the warning text in the instrumentpanel.
NOTE
If the City Safety is activated, the information in the HUD will be replaced by a City Safety-related graphic. This graphic will illuminateeven if the HUD is turned off.
A graphic for the City Safety flashes to attract the driv- er's attention
NOTE
The driver's ability to see information in the HUD may be impeded by: •the use of polarizing sunglasses
• not sitting in the center of the driver's seat
• objects on the HUD projector glass onthe dashboard
• certain ambient lighting conditions
• certain types of vision problems, whichmay also result in headaches or eyestrain.
• Activating/deactivating and settings forHUD are only possible when an image isprojected on the windshield. The enginemust be running.
Activating/deactivating HUDHUD can be activated in two ways in the center display:
Via Function view
Tap the Head-up display but-
ton.
Page 122 of 546
||
INSTRUMENTS AND CONTROLS
* Option/accessory, for more information, see Introduction.
120
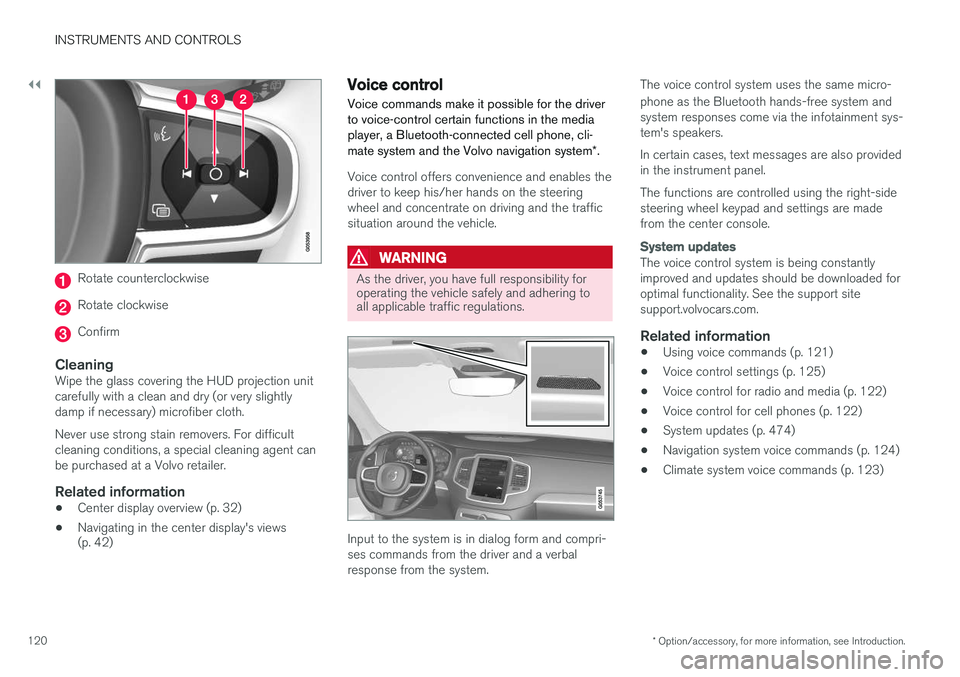
Rotate counterclockwise
Rotate clockwise
Confirm
CleaningWipe the glass covering the HUD projection unit carefully with a clean and dry (or very slightlydamp if necessary) microfiber cloth. Never use strong stain removers. For difficult cleaning conditions, a special cleaning agent canbe purchased at a Volvo retailer.
Related information
• Center display overview (p. 32)
• Navigating in the center display's views (p. 42)
Voice control
Voice commands make it possible for the driver to voice-control certain functions in the mediaplayer, a Bluetooth-connected cell phone, cli- mate system and the Volvo navigation system *.
Voice control offers convenience and enables the driver to keep his/her hands on the steeringwheel and concentrate on driving and the trafficsituation around the vehicle.
WARNING
As the driver, you have full responsibility for operating the vehicle safely and adhering toall applicable traffic regulations.
Input to the system is in dialog form and compri- ses commands from the driver and a verbalresponse from the system. The voice control system uses the same micro- phone as the Bluetooth hands-free system and system responses come via the infotainment sys-tem's speakers. In certain cases, text messages are also provided in the instrument panel. The functions are controlled using the right-side steering wheel keypad and settings are madefrom the center console.
System updates
The voice control system is being constantly improved and updates should be downloaded foroptimal functionality. See the support sitesupport.volvocars.com.
Related information
•
Using voice commands (p. 121)
• Voice control settings (p. 125)
• Voice control for radio and media (p. 122)
• Voice control for cell phones (p. 122)
• System updates (p. 474)
• Navigation system voice commands (p. 124)
• Climate system voice commands (p. 123)