lock VOLVO XC90 TWIN ENGINE 2019 Owners Manual
[x] Cancel search | Manufacturer: VOLVO, Model Year: 2019, Model line: XC90 TWIN ENGINE, Model: VOLVO XC90 TWIN ENGINE 2019Pages: 697, PDF Size: 10.33 MB
Page 273 of 697
KEY, LOCKS AND ALARM
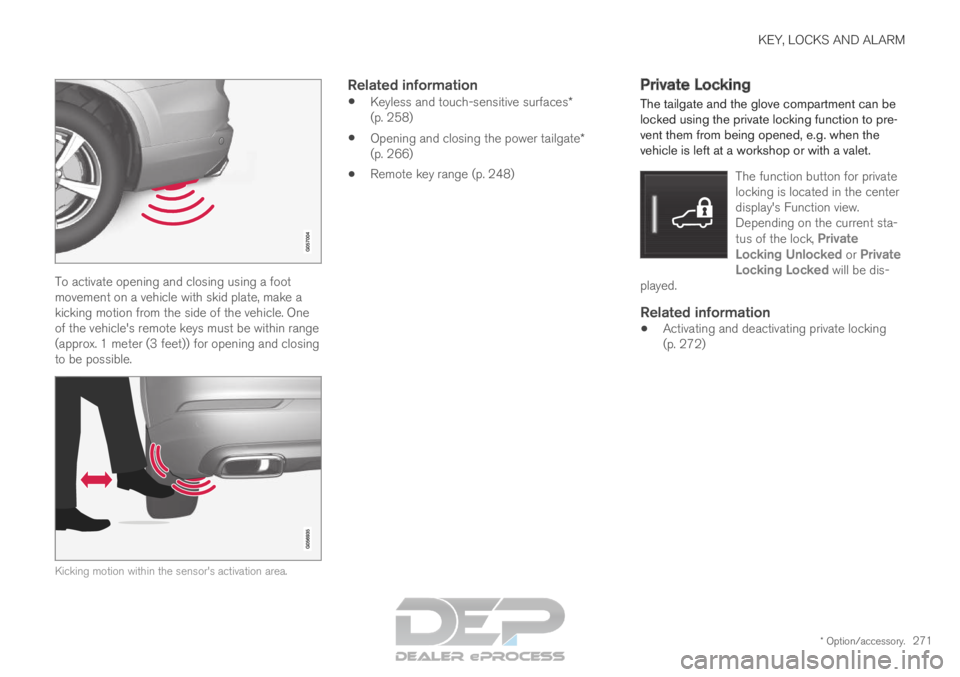
* Option/accessory.271To activate opening and closing using a foot
movement on a vehicle with skid plate, make a
kicking motion from the side of the vehicle. One
of the vehicle's remote keys must be within range
(approx. 1 meter (3 feet)) for opening and closing
to be possible.
Kicking motion within the sensor's activation area.
Related information
Keyless and touch-sensitive surfaces*
(p. 258)
Opening and closing the power tailgate*
(p. 266)
Remote key range (p. 248) Private Locking
The tailgate and the glove compartment can be
locked using the private locking function to pre-
vent them from being opened, e.g. when the
vehicle is left at a workshop or with a valet.
The function button for private
locking is located in the center
display's Function view.
Depending on the current sta-
tus of the lock, Private
Locking Unlocked or Private Locking Locked will be dis-
played.
Related information
Activating and deactivating private locking
(p. 272)
Page 274 of 697

KEY, LOCKS AND ALARM
* Option/accessory.
272 Activating and deactivating private
locking
Private locking is activated using the function
button in the center display and a PIN code.
NOTE For the valet lock function to be activated the
car must be in at least ignition mode I.
Entering security code before initial useThe first time the function is used, a security
code must be selected. This code can then be
used to deactivate private locking if the selected
PIN code has been lost or forgotten. The security
code functions as a PUK (security) code for all
PIN codes used for private locking.
Save the security code in a safe place.
To create a security code:
1. Tap the button for private locking in Function
view. > A pop-up window will appear. 2.
Enter your security code.
> The security code is saved. The private locking function is now ready for activa-
tion.
If the system has been reset, the above proce-
dure will need to be repeated.
Activating private locking1. Tap the button for private locking in Function view. > A pop-up window will appear.
2.
Enter the code you would like to use to
unlock the glove compartment and the tail-
gate and tap Confirm.
>
The glove compartment and tailgate will
lock. A green indicator light will illuminate
next to the button in Function view to con-
firm locked status.
Deactivating private locking1. Tap the button for private locking in Function view. > A pop-up window will appear.
2.
Enter the code used for locking and tap
Confirm.
>
The glove compartment and tailgate will
unlock. The green indicator light next to
the button in Function view will go out to
confirm unlocked status.
NOTE If you have forgotten or lost your PIN code or
if the PIN code has been entered incorrectly
more than three times, the security code can
be used to deactivate private locking.
NOTE
If private locking is activated and the vehicle
is unlocked using Volvo On Call* or the Volvo
On Call* app, private locking will be deacti-
vated automatically.
Page 275 of 697
 Alarm
The alarm emits sound and light signals if any-
one without a valid remote key attempts to break
into the vehicle or int")
KEY, LOCKS AND ALARM
}}
273
Related information
Private Locking (p. 271) Alarm
The alarm emits sound and light signals if any-
one without a valid remote key attempts to break
into the vehicle or interferes with the start battery
or alarm siren.
When armed, the alarm will be triggered if:
the hood, tailgate or any door is opened.
a battery cable is disconnected.
the alarm siren is disconnected.
Alarm signalsThe following occurs if the alarm is triggered:
A siren will sound for 30 seconds or until the
alarm is turned off.
All turn signals will flash for 5 minutes or
until the alarm is turned off.
If the reason the alarm was triggered is not recti-
fied, the alarm cycle will repeat up to 10 times 20
.
Alarm indicator A red indicator light on the dashboard shows the
status of the alarm:
Indicator off - the alarm is disarmed.
Indicator flashes once every two seconds -
the alarm is armed.
The indicator flashes quickly after the alarm
has been disabled for up to 30 seconds or
until the ignition is put in I mode – the alarm
has been triggered. 20
Certain markets only.
Page 276 of 697

||KEY, LOCKS AND ALARM
* Option/accessory.
274
In the event of alarm system failureIf a problem is detected in the alarm
system, a symbol and the message
Alarm system failure Service
required will appear in the instrument
panel. Contact a workshop - an authorized Volvo
workshop is recommended.
NOTE Do not attempt to repair or alter any of the
components in the alarm system yourself. Any
such attempt could affect the terms and con-
ditions of your insurance policy.
Related information
Arming and disarming the alarm (p. 274) Arming and disarming the alarm
The alarm is armed when the vehicle is locked.
Arming the alarmLock and arm the vehicle by:
pressing the lock button on the remote key .
touch the marked surface on the outside of
the door handle or the rubberized pressure
plate on the tailgate 21
.
If the vehicle is equipped with both keyless lock-
ing/unlocking* and power tailgate*, the button on the lower edge of the tailgate can also
be used to lock and arm the vehicle. A red LED light on the dashboard will flash every other
second when the vehicle is locked and the alarm is
armed.
Disarming the alarmUnlock and disarm the vehicle alarm by:
pressing the unlock button on the remote
key .
grip a door handle or press the tailgate's rub-
berized pressure plate 21
. 21
Only vehicles with keyless locking and unlocking* (Passive Entry).
Page 277 of 697

KEY, LOCKS AND ALARM
275
Disarming the alarm without a functioning
remote key
The vehicle can be unlocked and disarmed even
if the remote key is not functioning, e.g. if the
battery is discharged.
1. Open the driver's door using the detachablekey blade.
> This will trigger the alarm. Location of the backup key reader in the cup holder.
2. Place the remote key on the key symbol in
the backup reader in the tunnel console's
cup holder.
3.
Turn the start knob clockwise and release.
> The alarm will be disarmed.
Turning off a triggered alarm
– Press the unlock button on the remote key
or put the ignition into mode I by turning the
start knob clockwise and then releasing it.
NOTE
Remember that the alarm is armed when
the vehicle is locked.
The alarm will be triggered if any of the
doors is opened from the inside.
Automatically arming and disarming the
alarm
Automatically arming the alarm helps prevent
inadvertently leaving the vehicle without alarm
protection.
If the vehicle is unlocked using the remote key
(and the alarm is disarmed) but none of the
doors or tailgate are opened within two minutes,
the alarm will be automatically rearmed. The vehi-
cle will also re-lock.
On some markets, the alarm will be automatically
armed following a slight delay after the driver's
door has been opened and closed without being
locked.
To change this setting:
1.
Tap Settings in the center display's Top
view.
2.
Tap My Car Locking
.
3. Select Passive Arming Deactivation to
temporarily deactivate the function.
Related information
Alarm (p. 273)
Page 282 of 697

||DRIVER SUPPORT
* Option/accessory.
280
WARNING
The Electronic Stability Control system
ESC is supplementary driver support
intended to facilitate driving and make it
safer – it cannot handle all situations in
all traffic, weather and road conditions.
ESC is not a substitute for the driver's
attention and judgment. The driver is
always responsible for ensuring the vehi-
cle is driven in a safe manner, at the
appropriate speed, with an appropriate
distance to other vehicles, and in accord-
ance with current traffic rules and regula-
tions.
Stability control 3This function helps control the driving and brak-
ing force of each individual wheel in an attempt
to stabilize the vehicle.
Spin control and active yaw controlThis function is active at low speeds and brakes
the wheels that are spinning to transfer additional
power from wheels that are not spinning.
This function also helps prevent the wheels from
spinning while the vehicle is accelerating.
Engine drag control
Engine drag control (EDC
4
) helps prevent inad-
vertent wheel lock, e.g. after downshifting or
using engine braking when driving at low speeds
on a slippery surface.
Inadvertent wheel lock while driving could impair
the driver's ability to steer the vehicle.
Trailer Stability Assist* 5
Trailer Stability Assist (TSA
6
) is designed to help
stabilize a vehicle that is towing a trailer if the
vehicle and trailer have begun to sway. For more
information, see "Trailer Stability Assist".
NOTE The TSA function is deactivated if
ESC Sport
Mode is activated.
Related information
Electronic Stability Control Sport mode
(p. 281)
Activating/deactivating Sport mode in Elec-
tronic Stability Control (p. 281)
Electronic Stability Control Sport mode limi-
tations (p. 281)
Electronic Stability Control symbols and mes-
sages (p. 282)
Trailer Stability Assist* (p. 485)
3
Also called traction control.4 Engine Drag Control5Trailer Stability Assist is included if the vehicle is equipped with a V\
olvo original towbar.6 Trailer Stability Assist
Page 310 of 697
.
> The symbol in the instrument panel
changes colo")
||DRIVER SUPPORT
308
To temporarily deactivate Adaptive Cruise Control
and put it in standby mode:
– Press the button on the steering wheel
(2).
> The symbol in the instrument panel
changes color from WHITE to GRAY and
the set speed in the center of the speed-
ometer will change from BEIGE to GRAY.
WARNING
If Adaptive Cruise Control is in standby
mode, the driver must intervene and regu-
late both speed and distance to the vehicle
ahead.
If the vehicle comes too close to a vehicle
ahead when Adaptive Cruise Control is in
standby mode, the driver is instead warned
of the short distance by the Distance Alert
function.
Standby mode due to action by the driver
Adaptive Cruise Control will be temporarily deac-
tivated and put in standby mode if:
the brakes are applied
the gear selector is moved to N
the vehicle is driven faster than the set
speed for more than 1 minute Temporarily increasing speed using the accelera-
tor pedal, e.g. when passing another vehicle, will
not affect the setting. The vehicle will return to
the set speed when the accelerator pedal is
released.
Automatic standby mode
Adaptive Cruise Control is dependent on other
systems, such as Electronic Stability Control
(ESC
47
). If any of these other systems stops
working, Adaptive Cruise Control will automati-
cally switch off.
WARNING With automatic standby mode, the driver is
warned by an acoustic signal and a message
on the instrument panel.
The driver must then regulate vehicle
speed, apply the brakes if necessary, and
maintain a safe distance to other vehicles.
Adaptive Cruise Control may go into standby
mode if: your vehicle's speed goes below 5 km/h
(3 mph) and ACC cannot determine if the
vehicle ahead is stationary or if it is another
object, e.g. a speed bump.
your vehicle's speed goes under 5 km/h
(3 mph) and the vehicle ahead turns so that
ACC no longer has a vehicle to follow.
the driver opens the door.
the driver unbuckles the seat belt.
the engine speed (rpm) is too low/high.
one or more of the wheels lose traction.
the brake temperature is high.
the parking brake is applied.
the camera/radar sensor is covered by snow
or heavy rain (the camera lens/radar waves
are blocked)
Reactivating Adaptive Cruise Control
from standby mode Note: This illustration is general and details may vary
depending on model.
47
Electronic Stability Control
Page 317 of 697

DRIVER SUPPORT
* Option/accessory.315Symbol
Message MeaningThe symbol is WHITE.
The vehicle is maintaining the set speed.Adaptive Cruise Contr.
Unavailable
The symbol is GRAY. Adaptive Cruise Control is in standby mode.Adaptive Cruise Contr.
Service required
The symbol is GRAY. The system is not functioning as intended. Contact a workshop ‒ an authorized Volvo workshop is
recommended. Windscreen sensor
Sensor blocked, see Owner's manual
Clean the windshield in front of the camera and radar sensors.A text message can be erased by briefly pressing
the
button in the center of the right-side
steering wheel keypad.
If the message persists: Contact a workshop ‒ an
authorized Volvo workshop is recommended.
Related information
Adaptive Cruise Control* (p. 300)
Page 327 of 697

DRIVER SUPPORT
}}
325
Standby mode due to action by the driver
Pilot Assist will be temporarily deactivated and
put in standby mode if: the brakes are applied.
the gear selector is moved to N
a turn signal is used for more than 1 minute.
the vehicle is driven faster than the set
speed for more than 1 minute
Temporarily increasing speed using the accelera-
tor pedal, e.g. when passing another vehicle, will
not affect the setting. The vehicle will return to
the set speed when the accelerator pedal is
released.
When the turn signals are used, Pilot Assist's
steering assistance will be temporarily deacti-
vated. When the turn signal is switched off, steer-
ing assistance will be automatically reactivated if
the traffic lane's side markings can still be
detected.
Automatic standby mode
Pilot Assist is dependent on other systems, such
as Electronic Stability Control (ESC 61
). If any of
these other systems stops working, Pilot Assist
will automatically switch off.
WARNING With automatic standby mode, the driver is
warned by an acoustic signal and a message
on the instrument panel.
The driver must then regulate vehicle
speed, apply the brakes if necessary, and
maintain a safe distance to other vehicles.
Adaptive Cruise Control may go into standby
mode if, e.g.:
the driver opens the door.
the brake temperature is high.
the driver's hands are not on the steering
wheel.
the parking brake is applied.
the engine speed (rpm) is too low/high.
the driver unbuckles the seat belt.
one or more of the wheels lose traction.
the camera/radar sensor is covered by snow
or heavy rain (the camera lens/radar waves
are blocked)
your vehicle's speed goes below 5 km/h
(3 mph) and Pilot Assist cannot determine if
the vehicle ahead is stationary or if it is
another object, e.g. a speed bump.
your vehicle's speed goes under 5 km/h
(3 mph) and the vehicle ahead turns so that
Pilot Assist no longer has a vehicle to follow.
Reactivating Pilot Assist from standby
mode Note: This illustration is general and details may vary
depending on model.
To reactivate Pilot Assist:
–
Press the button on the steering wheel
(1).
>
Speed will be set to the most recently
stored speed. 61
Electronic Stability Control
Page 331 of 697

DRIVER SUPPORT
}}
* Option/accessory. 329
Pilot Assist limitations
Pilot Assist functionality may be reduced in cer-
tain situations.
Pilot Assist is a driver support function designed
to simplify driving and assist the driver in many
situations. However, the driver is always responsi-
ble for maintaining a suitable distance to vehicles
or objects around it and ensuring that the vehicle
is correctly positioned in the traffic lane.
WARNING In some situations, Pilot Assist may have trou-
ble helping the driver properly or may be
deactivated automatically – we advise against
using Pilot Assist in such cases. Examples of
such situations include:
the lane markings are worn, missing or
cross each other.
lane division is unclear, for example, when
the lanes divide or merge or at exits or
when there are multiple sets of markings.
edges or other lines than lane markings
are present on or near the road, e.g.
curbs, joints or repairs to the road sur-
face, edges of barriers, roadside edges or
strong shadows.
the lane is narrow or winding.
the lane contains ridges or holes.
weather conditions are poor, e.g. rain,
snow or fog or slush or reduced visibility
with poor light conditions, backlighting,
wet road surface, etc.
The driver should also note that Pilot Assist
has the following limitations:
High curbs, roadside barriers, temporary
obstacles (traffic cones, safety barriers,
etc.) are not detected. Alternatively, they
may be detected incorrectly as lane mark-
ings, with a subsequent risk of contact
between the vehicle and such obstacles. The driver is responsible for ensuring that
the vehicle maintains a suitable distance
from such obstacles.
The camera and radar sensors do not
have the capacity to detect all oncoming
objects and obstacles in traffic environ-
ments, e.g. potholes, stationary obstacles
or objects that completely or partially
block the route.
Pilot Assist does not "see" pedestrians,
animals, etc.
The recommended steering input is lim-
ited in force, which means that it cannot
always help the driver to steer and keep
the vehicle within the lane.
In vehicles equipped with Sensus
Navigation*, the function is able to use
information from map data, which could
cause variations in performance.
Pilot Assist is switched off if the power
steering is working with reduced power -
e.g. during cooling due to overheating
(see section "Speed-dependent steering
force").
The driver can always correct or adjust steering
assistance provided by Pilot Assist by turning the
steering wheel to the desired position.