keyless VOLVO XC90 TWIN ENGINE 2019 Owner's Manual
[x] Cancel search | Manufacturer: VOLVO, Model Year: 2019, Model line: XC90 TWIN ENGINE, Model: VOLVO XC90 TWIN ENGINE 2019Pages: 697, PDF Size: 10.33 MB
Page 264 of 697

KEY, LOCKS AND ALARM
* Option/accessory.
262 Antenna locations for the start and
lock system
The vehicle is equipped with a keyless start and
lock system 13
that uses a number of integrated
antennas positioned throughout the vehicle. Location of the antennas.
Under the cup holder in the front section of
the tunnel console
In the upper front section of the left-side rear
door
14 In the upper front section of the right-side
rear door
14 In the center of the rear seat backrest
14
WARNING Individuals with an implanted pacemaker
should not allow the pacemaker to come
closer than 22 cm (9 in.) to the Keyless sys-
tem antennas. The aim of this is to prevent
disturbances between the pacemaker and the
Keyless system.
Related information
Keyless and touch-sensitive surfaces*
(p. 258)
Remote key range (p. 248) Locking and unlocking from inside
the vehicle
The doors and tailgate can be locked and
unlocked from inside the vehicle using the cen-
tral lock buttons in the front doors. The lock but-
tons in the rear doors* can be used to lock/
unlock that particular door.
Central locking Button with indicator light for locking and unlocking in
front door.
Unlocking using the front door buttons
–
Press the button to unlock all side doors
and the tailgate. 13
The keyless lock system only applies to vehicles equipped with keyless l\
ocking and unlocking (Passive Entry*).
14 Only in vehicles equipped with keyless locking and unlocking (Passive E\
ntry*).
Page 269 of 697

KEY, LOCKS AND ALARM
}}
* Option/accessory. 267
–
Move your foot in a kicking motion* under the
rear bumper.
Closing
To close 17
the power tailgate, do one of the fol-
lowing: –
Press the button on the lower edge of
the tailgate to close. > The tailgate will close automatically – the
tailgate will remain unlocked.
NOTE
The button remains active 24 hours after
the tailgate was opened. After this time,
the tailgate must be closed manually.
If the tailgate has been open for more than
30 minutes, it will automatically close
slowly. –
Press and hold the button on the
remote key.
>
The tailgate closes automatically and an
audible signal sounds – the tailgate will
remain unlocked.
– Press and hold the button on the dash-
board.
>
The tailgate closes automatically and an
audible signal sounds – the tailgate will
remain unlocked.
– Move your foot in a kicking motion* under
the rear bumper.
>
The tailgate closes automatically and an
audible signal sounds – the tailgate will
remain unlocked. 17
Vehicles equipped with keyless locking and unlocking (Passive Entry*) have a button for closing and a button for closing and locking.
Page 270 of 697

||KEY, LOCKS AND ALARM
* Option/accessory.
268
Closing and locking 17
–
Press the button on the lower edge of
the tailgate to close and simultaneously lock
both the tailgate and doors (all doors must
be closed in order to lock).
>
The tailgate closes automatically – the
tailgate and doors lock, and the alarm* is
armed.
NOTE
One of the vehicle's remote keys must be
within range for locking and unlocking to
be possible.
When the keyless locking or closing* func-
tions are used, three audible signals will
sound if the key is not detected close
enough to the tailgate.
CAUTION When operating the tailgate manually, open
and close it slowly. If you encounter resis-
tance, do not use force. This could lead to
damage and loss of function.
Interrupting opening or closingInterrupt opening or closing by doing one of the
following:
Press the button on the dashboard.
Press the button on the remote key.
Press the close button on the underside of
the tailgate.
Press the rubberized pressure plate on the
underside of the tailgate's outer handle.
Using a foot movement*.
Tailgate movement is interrupted and stops. The
tailgate can then be opened or closed manually.
If the tailgate stops near the closed position, it
will open the next time it is activated.
Pinch protectionIf anything obstructs the tailgate with enough
force to prevent it from opening or closing, pinch
protection will be activated.
When opening - the tailgate will stop moving
and an audible signal will sound.
When closing - the tailgate will stop, a long
audible signal will sound and the tailgate will
return to the programmed maximum opening
position.
WARNING Be aware of the risk of serious injury when
operating the tailgate. Before opening/clos-
ing, make sure that no one is in the path of
the tailgate who could be injured by its move-
ment.
Always operate the tailgate with caution.
Preloaded springs
Preloaded springs for the power tailgate.
WARNING
Do not attempt to open or access the preloa-
ded springs in the power tailgate struts. They
are preloaded with high pressure and can
cause injury if opened.
17
Vehicles equipped with keyless locking and unlocking (Passive Entry*) have a button for closing and a button for closing and locking.
Page 273 of 697
KEY, LOCKS AND ALARM
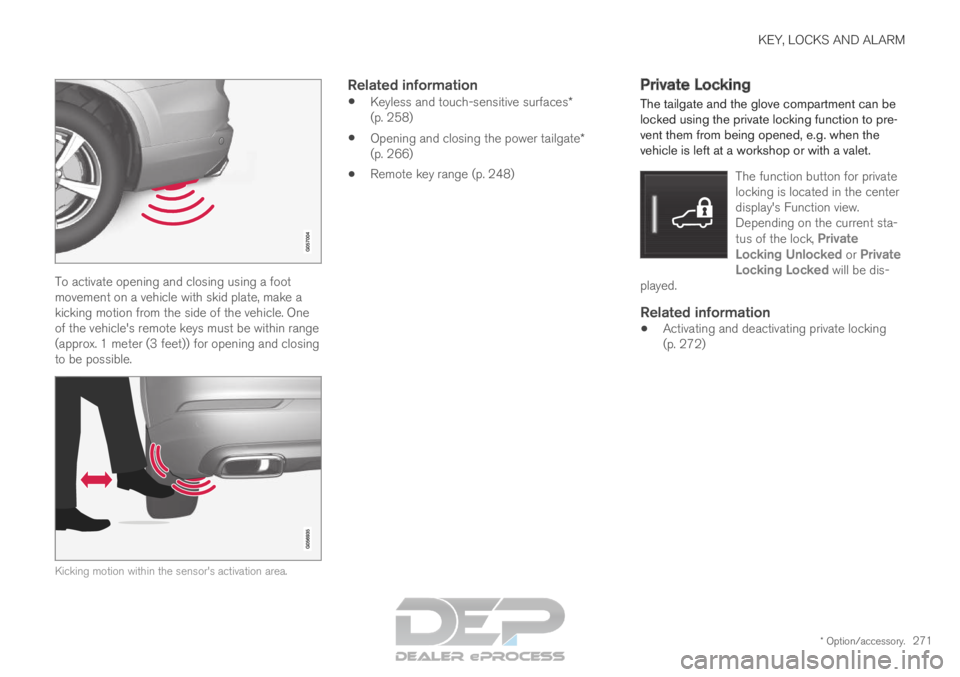
* Option/accessory.271To activate opening and closing using a foot
movement on a vehicle with skid plate, make a
kicking motion from the side of the vehicle. One
of the vehicle's remote keys must be within range
(approx. 1 meter (3 feet)) for opening and closing
to be possible.
Kicking motion within the sensor's activation area.
Related information
Keyless and touch-sensitive surfaces*
(p. 258)
Opening and closing the power tailgate*
(p. 266)
Remote key range (p. 248) Private Locking
The tailgate and the glove compartment can be
locked using the private locking function to pre-
vent them from being opened, e.g. when the
vehicle is left at a workshop or with a valet.
The function button for private
locking is located in the center
display's Function view.
Depending on the current sta-
tus of the lock, Private
Locking Unlocked or Private Locking Locked will be dis-
played.
Related information
Activating and deactivating private locking
(p. 272)
Page 276 of 697

||KEY, LOCKS AND ALARM
* Option/accessory.
274
In the event of alarm system failureIf a problem is detected in the alarm
system, a symbol and the message
Alarm system failure Service
required will appear in the instrument
panel. Contact a workshop - an authorized Volvo
workshop is recommended.
NOTE Do not attempt to repair or alter any of the
components in the alarm system yourself. Any
such attempt could affect the terms and con-
ditions of your insurance policy.
Related information
Arming and disarming the alarm (p. 274) Arming and disarming the alarm
The alarm is armed when the vehicle is locked.
Arming the alarmLock and arm the vehicle by:
pressing the lock button on the remote key .
touch the marked surface on the outside of
the door handle or the rubberized pressure
plate on the tailgate 21
.
If the vehicle is equipped with both keyless lock-
ing/unlocking* and power tailgate*, the button on the lower edge of the tailgate can also
be used to lock and arm the vehicle. A red LED light on the dashboard will flash every other
second when the vehicle is locked and the alarm is
armed.
Disarming the alarmUnlock and disarm the vehicle alarm by:
pressing the unlock button on the remote
key .
grip a door handle or press the tailgate's rub-
berized pressure plate 21
. 21
Only vehicles with keyless locking and unlocking* (Passive Entry).
Page 436 of 697

STARTING AND DRIVING
* Option/accessory.
434 Starting the vehicle
The vehicle can be started using the start knob
in the tunnel console when the remote key is in
the passenger compartment. Start knob in the tunnel console.
WARNING
Before starting:
Buckle your seat belt.
Adjust the seat, steering wheel and mir-
rors.
Make sure you can fully depress the
brake pedal. The remote key is not physically used to start the
ignition because the vehicle is equipped with the
keyless Passive Start system.
To start the vehicle:
1.
The remote key must be inside the vehicle.
For vehicles with Passive Start, the key must
be in the front section of the passenger
compartment. With the optional keyless lock-
ing/unlocking function*, the key can be any-
where in the vehicle.
2. Press and hold down the brake pedal 1
as far
as possible.
3. Turn the start knob clockwise and release. The control will automatically return to the
original position.
WARNING
Never use more than one inlay mat at a
time on the driver's floor. If any other type
of floor mat is used, remove the original
mat from the driver's seat floor before
driving. All types of mats must be securely
anchored in the attachment points in the
floor. Make sure the floor mat does not
impede the movement of the brake pedal
or accelerator pedal in any way, as this
could be a serious safety hazard.
Volvo's floor mats are specially manufac-
tured for your vehicle. They must be prop-
erly secured in the attachment points in
the floor to help ensure they cannot slide
and become trapped under the pedals.
The starter motor will crank until the engine
starts or until overheating protection is triggered.
During normal start conditions, the vehicle's elec-
tric motor will be prioritized and the gasoline
engine will remain off. This means that once the
start knob is turned clockwise, the electric motor
has been "started" and the vehicle is ready to be
driven. The warning and information symbols in
the instrument panel will go out and the selected
theme will be displayed to indicate that the elec-
tric motor is activated. 1
If the vehicle is moving, it is only necessary to turn the start knob cl\
ockwise to start the engine.
Page 685 of 697

INDEX
683
Inflatable Curtain 60
Inflating tires 587
Inflation pressure
adjusting 568
Checking 567
decal 569
recommended 569
Inflation pressure monitoring 569 action 573
Status 572
Inflation pressure table 675
Information display 84, 86
Infotainment (Audio and media) 496
Instrument cluster 84 settings 86
Instrument illumination 164
Instrument lighting 164
Instrument panel 84 App menu 103, 104
hybrid-related symbols and messages 430
messages 105
settings 86
Instruments and controls 82
Instruments overview left-hand drive vehicle 82 Integrated booster cushion
76
folding down
78
folding up 77
IntelliSafe driver support 28
Interior Air Quality System 208
Intermittent wiping 176
Internet, see Internet-connected vehicle 541
Internet-connected vehicle 541
book service and repair 615
No connection or poor connection 546
send car data 616
system updates 613
iPod® , connecting 524
ISOFIX/LATCH anchors 74
J Jack
575
Jump-start
481
K Key
243
Keyboard
126, 129
change language 129 Keyless
locking/unlocking
259
settings 261
touch-sensitive surfaces 258
Key tag 243
L Labels
location
664
Laminated glass 166
Lamps changing 626
Trailer 486
Lane Keeping Aid operation 375
Lane Keeping Aid (LKA) 372, 374, 375, 376, 377, 379
Language 132
Leather upholstery, cleaning instructions 648
Leveling control 461 settings 464
License agreement 98, 549
Lifting tools 575
Light control 152, 164